background image

35

10.4 Port Operation

10.3.7 Help

10.3.8 Exit

10.4.1 Panel Array Mode

10.4.2 Keyboard Hotkey Operation

10. Java Client 

(continued)

10.3 Java Client Control Panel 

(continued)

Clicking this button brings up the online help screen for the Java Client.

Clicking the Exit button terminates the Java Client session.

Java Client port operation is the same as for the Windows Client. See section 9.4, 

Port Operation, for details.

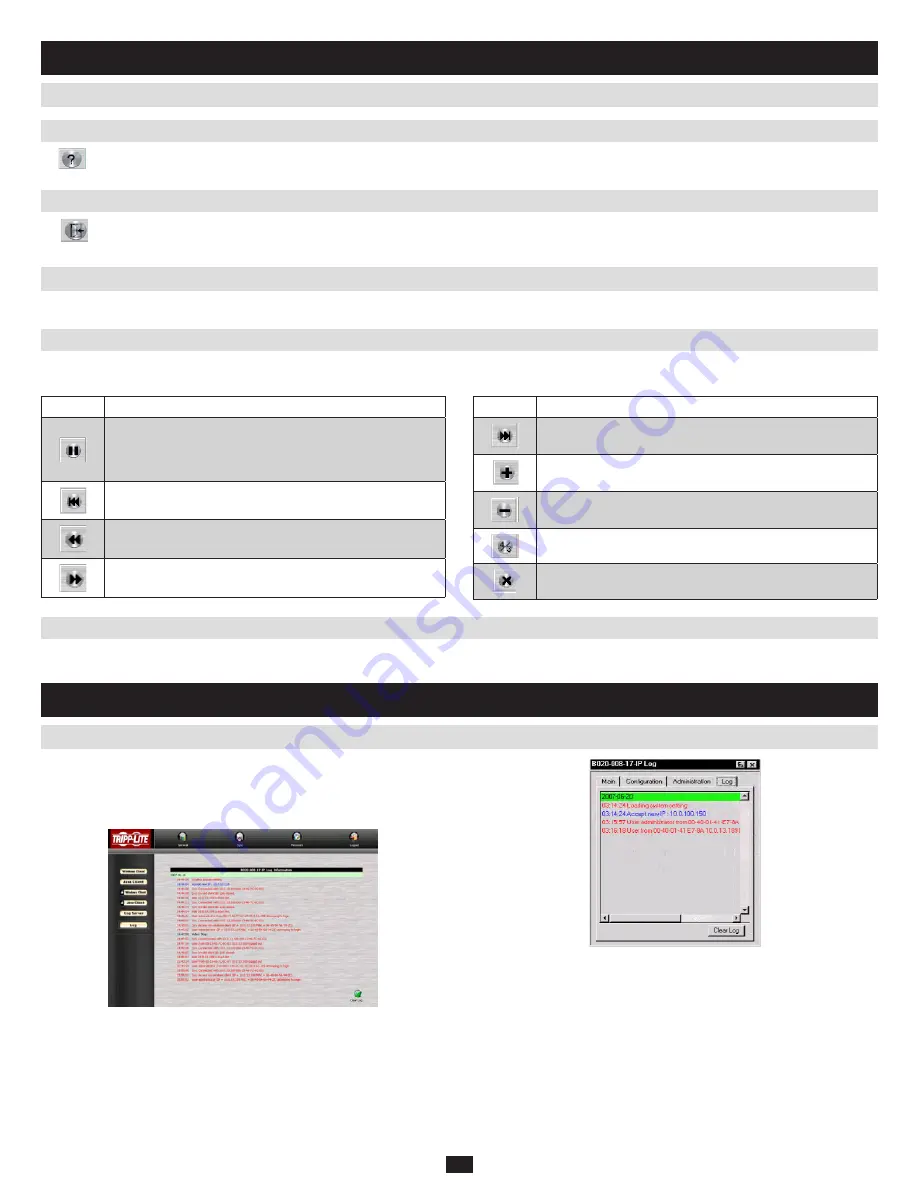
This is very similar to the Windows Client Panel Array Mode (see section 9.4.3 for details), except for some differences in the toolbar. The Java Client 
Panel Array Mode Toolbar is described in the table below:

Icon

Function

Pauses on the panel that has the focus at the time you click 
the pause button. After you click Pause, the button changes to 
an arrowhead and its caption changes to Resume. To resume 
scanning, click the Resume button.

Brings the current panels focus to the first available port that 
is four ports before the port you were just on.

Brings the current panels focus to the first available port 
before the port you were just on.

Brings the current panels focus to the first available port after 
the port you were just on.

Icon

Function

Brings the current panels focus to the first available port that 
is four ports after the port you were just on.

Increase the number of panels in the array. (Choose between 
16, 8, 4 and 1.)

Decrease the number of panels in the array. (Choose be-
tween 16, 8, 4 and 1.)

Toggle 4/3 aspect ratio.

Exit Panel Array mode.

Keyboard hotkey operation is the same as for the Windows Client. See section 9.4.5, 

Keyboard Hotkey Operation, for details.

11.1 Log File on Remote Main Page

11. Log File

The NetDirector Console KVM Switch with IP Access logs all the events 

that take place on it. To view the contents of the log file, click the Log icon 

at the left of the remote main page; or, click on the Log tab of the local 
console OSD. A screen similar to the one below appears: 

A maximum of 512 events are stored in the log file. To clear the log file, 
click on the Clear Log icon at the lower right of the screen.

Note:  The Log File is a temporary file that is erased when the KVM switch is turned off or loses 

power. It is recommended that you install the Log Server to back up the contents of the 
log file.

Содержание B020-008-17-IP

Страница 1: ... com support Copyright 2010 Tripp Lite All rights reserved All trademarks are the property of their respective owners The policy of Tripp Lite is one of continuous improvement Specifications are subject to change without notice W arranty Registration register online today for a chance to win a FREE Tripp Lite product www tripplite com warranty ...

Страница 2: ...lugging 12 6 6 Powering Off and Restarting 12 6 7 Port ID Numbering 12 7 Administration 12 7 1 Local Console 12 7 2 Main Page 13 7 2 1 Quick View Ports 13 7 2 2 List Function 13 7 2 3 Port Names 14 7 3 Port Operation 14 7 4 Configuration Page 15 7 6 Administration Page 16 7 6 1 User Management 16 7 6 2 Service Configuration 17 7 6 3 Network 18 7 6 4 RADIUS Settings 18 7 6 5 Security 19 7 6 6 Custo...

Страница 3: ...og Server Main Screen 38 12 4 1 Overview 38 12 4 2 List Panel 38 12 4 3 Event Panel 38 13 AP Operation 39 13 1 Overview 39 13 2 Windows Client 39 13 2 1 Installation 39 13 2 2 Starting Up 39 13 2 3 Connecting 40 13 2 4 Operation 41 13 3 Java Client 41 13 3 1 Installation 41 13 3 2 Starting Up 41 13 3 3 Operation 41 14 Appendix 42 14 1 Specifications 42 14 2 OSD Factory Default Settings 42 14 3Trou...

Страница 4: ...V interference caused by unauthorized modifications to this device It is the responsibility of the user to correct such interference The manufacturer is not responsible for any damage incurred in the operation of this system if the correct operational voltage setting was not selected prior to operation PLEASE VERIFY THAT THE VOLTAGE SETTING IS CORRECT BEFORE USE This package consists of 1 B020 008...

Страница 5: ...be set to Exclusive Occupy and Share Network Interfaces TCP IP HTTP HTTPS UDP RADIUS DHCP SSL ARP DNS 10Base T 100Base TX Auto Sense and Ping High video resolution up to 1280 x 1024 75Hz 17 LCD monitor 1600 x 1200 60Hz remote computer Browsers must support 128 bit SSL encryption A VGA SVGA or MultiSync monitor capable of displaying the highest resolution provided by any computer in the installatio...

Страница 6: ... 9 Console Release Tabs These tabs one on each side must be pressed inward to release the LCD and keyboard module allowing them to be pulled out of the rack 1 Port LEDs An On Line LED lights amber to indicate that the device attached to its corresponding port is up and running A Selected LED lights green to indicate that the computer attached to its corresponding port has the KVM focus 2 Keyboard ...

Страница 7: ...gs in here 2 Power Switch This is a standard rocker switch that powers the unit on and off 3 External Console Ports For flexibility and convenience the NetDirector Console KVM Switch with IP Access supports an external KVM console 4 LAN Port The cable that connects the KVM switch to a LAN WAN or Internet plugs in here 5 KVM Ports The custom wired KVM cable kits that connect to the computers plug i...

Страница 8: ...removing the power supply If the system has multiple sources of power disconnect power from the system by unplugging all power cables from the power supplies Never push objects of any kind into or through cabinet slots They may touch dangerous voltage points or short out parts resulting in a risk of fire or electrical shock Do not attempt to service the device yourself Refer all servicing to quali...

Страница 9: ...h To expand the number of computers that can be controlled in your KVM installation up to 16 additional KVM switches model B007 008 or B022 U16 can be cascaded to a NetDirector Console KVM Switch with IP Access As many as 256 computers can be controlled in a complete two stage installation In a two stage installation the NetDirector Console KVM Switch with IP Access is considered the first stage u...

Страница 10: ... it clicks into place 2 3 Rotate the top panel all the way back to expose the LCD screen 4 Reach underneath and pull the keyboard module all the way out until it clicks into place Refer to the diagrams in the Opening Separately section as you do the following Push the release catches in and pull the top and bottom panels out until the keyboard module clicks into place Once the console has been rel...

Страница 11: ...o be When you have entered the LCD OSD Menu function pressing this button exits the current menu and returns you to the previous menu Use it to leave an adjustment menu when you are satisfied with the adjustment you have made When you are at the Main Menu pressing this button exits the LCD OSD The Adjustment Settings An explanation of the LCD OSD adjustment settings is given in the table below Set...

Страница 12: ... port is assigned a two digit Port ID number You can access any device by specifying the Port ID of the port that it is connected to Port numbers from 1 9 start with a preceding zero so they become 01 09 For example a computer attached to Port 6 would have a Port ID of 06 6 4 Port Selection 7 1 Local Console 6 5 Hot Plugging 6 6 Powering Off and Restarting 6 7 Port ID Numbering 6 Basic Operation c...

Страница 13: ...red eye icon 7 2 Main Page 7 Administration continued The List Function lets you broaden or narrow the scope of which ports the OSD displays in the Main screen To invoke the List Function click the arrow at the upper right corner of the screen or press F3 The screen changes to allow you to choose the ports that will be listed The drop down list on the left offers four fixed choices as shown in the...

Страница 14: ... A double click will switch you to the device attached to the port After a second or two the bar changes to provide you with a text input box 2 Key in the new Port Name or modify delete the old one The maximum number of characters allowed for a Port Name is 15 You can use all letters numbers and symbols on the typewriter keys of keyboards with PC US English layout 3 When you have finished editing ...

Страница 15: ...nly those ports which have been set Accessible and have been selected as Quick View ports QUICK VIEW POWERED ON Only those ports which have been set Accessible and have been selected as Quick View ports and are Powered On The default is ALL Scan Duration Determines how long the focus dwells on each port as it cycles through the selected ports in Auto Scan Mode Key in a value from 0 255 seconds The...

Страница 16: ...ver If the switch is on a network that uses DHCP assigned IP addresses this item is a convenient way of ascertaining what its IP address is Heading Description Username A minimum of 6 and a maximum of 15 characters is allowed Password A minimum of 8 and a maximum of 15 characters is allowed Confirm Password To be sure there is no mistake in the password you are asked to enter it again The two entr...

Страница 17: ...e Log Server is discussed in Chapter 12 The Log File is discussed in Chapter 11 Field Explanation Program This is the port number that must be specified when connecting from the Windows Client software program Valid entries are from 1024 60 000 The default is 9000 Java This is the port number used for Java Client connections Valid entries are from 0 65535 HTTP The port number for a browser login T...

Страница 18: ...address manually button and fill in the IP address subnet mask and default gateway DNS Server For automatic DNS Server address assignment select the Obtain DNS Server address automatically button To specify the DNS Server address manually select the Use the following DNS Server button and fill in the addresses for the primary and alternate DNS servers Note Specifying the primary DNS Server address...

Страница 19: ...ault web page name entry field lets the Administrator specify a login string in addition to the IP address that the user must include when accessing the KVM switch with a browser For example 192 168 0 126 abcdefg The user must include the forward slash and the string along with the IP address For security purposes we recommend that you change this string from time to time Note If no string is spec...

Страница 20: ...set a port s Share mode double click it to bring up the I O attributes dialog box Miscellaneous The functions performed by the remaining elements at the bottom of the screen are described in the table on the next page The Customization dialog box is arranged in four major sections Login Failures Working Mode I O and untitled miscellaneous functions at the bottom The functions of each of the Custom...

Страница 21: ...g the firmware isn t on the OSD Administration page it is an adminis trative function so we will discuss it in this chapter To upgrade the firmware do the following Download the new firmware file to a computer that is not part of your 1 KVM switch installation From that computer open your browser and log in to the NetDirector 2 Console KVM Switch with IP Access see section 8 1 Logging In Click the...

Страница 22: ...After accepting installing the certificate a login page appears Provide a valid username and password set up by the system administrator then click Login to continue Note 1 If you supply an invalid login the authentication routine will return a message stating Invalid Username or Password Please try again If you exceed the number of login failures set by the administrator a message stating that Th...

Страница 23: ...anges the Reset on exit check box is automatically selected and the KVM switch will reset when you log out Clearing the check mark before logging out will cause the new settings to be discarded Last IP from DHCP Server Displays the current IP address of the NetDirector Console KVM Switch with IP Access Note This field only appears when the System Administrator has chosen to obtain an IP Address vi...

Страница 24: ...program and closes the application Graphics Configuration Dialog Box The dialog box is organized into two main parts Screen Option and Snapshot Screen Options Screen Options lets you set up the way the remote display appears on the local monitor If Full Screen Mode is enabled the box is checked the remote display fills the entire screen If Full Screen Mode is not enabled the box is not checked the...

Страница 25: ...ibe the icon s function The functions that the icons perform are described in the table below Icon Purpose Click on the hand icon and drag to move the control panel to another position on the screen Click to bring up the Hotkey Setup dialog box see section 9 3 1 Hotkey Setup for details Click to bring up the Video Options dialog box Right click to perform a quick Auto Sync see section 9 3 2 Video ...

Страница 26: ...e F12 Tab and Ctrl F12 Del F12 Substitute Ctrl key If your local computer captures Ctrl key combinations preventing them from being sent to the remote system you can implement their effects on the remote system by specifying a function key to substitute for the Ctrl key If you substitute the F11 key for example pressing F11 5 would appear to the remote system as Ctrl 5 F6 F7 Substitute Ctrl key If...

Страница 27: ...creen If the local and remote mouse pointers are out of sync in most cases performing this function will bring them back into sync Note This function works best with a bright screen If you are not satisfied with the results use the Screen Position arrows to position the remote display manually RGB Drag the slider bars to adjust the RGB Red Green Blue values When an RGB value is increased the RGB c...

Страница 28: ...nding your message If a user s name is selected and you want to post a message to all users select All Users before sending your message If a user has disabled Chat its icon displays before the user s name to indicate so If a user has occupied the KVM or the KM its icon displays before the user s name to indicate so The Button Bar The buttons on the Button Bar are described in the table below Butt...

Страница 29: ...them manually Click to skip from the current port to the next accessible one without having to invoke the OSD Click to skip from the current port to the last accessible port on the entire installation without having to invoke the OSD Click to bring up the OSD Click to close the toolbar Click to logout and exit the Windows Client application Click to invoke Panel Array Mode see section 9 4 3 9 4 3 ...

Страница 30: ... ports in order starting from the first port on the installation An S appears in front of the Port ID Display to indicate that the port is being accessed under Auto Scan Mode Pausing Auto Scan While you are in Auto Scan Mode you can pause the scanning and focus on a particular computer by pressing P During the time that Auto Scanning is paused the S in front of the Port ID blinks on and off Pausin...

Страница 31: ...ent may no longer be synchronized with the remote system s mouse pointer There are three quick methods that can be used to bring the two pointers back into sync Right clicking on the hammer icon in the Windows Client Control Panel Moving the mouse pointer into the Control Panel and back out again Performing an Auto Sync with the Video Adjustment function see section 9 3 2 Video Adjustment for deta...

Страница 32: ...tails Keypad Some keyboard combinations cannot be captured and sent to the KVM switch when using the Java Client In order to implement their effects on the remote system this function provides a one click implementation of some common window control combinations Mouse Synchronization At times the local mouse movement may lose sync with the remote mouse movement The Mouse Synchronization function g...

Страница 33: ...le position disable mouse acceleration click Advanced to get the dialog box for this Windows NT Windows 98 Set the mouse speed to the slowest position Sun Linux Open a terminal session and issue the following command Sun xset m 1 Linux xset m 0 Message Board The NetDirector Console KVM Switch with IP Access supports multiple user logins which can possibly give rise to access conflicts To alleviate...

Страница 34: ...message to the board The names of all the logged in users appear in the User List panel By default messages are posted to all users To post a message to an individual user select the user s name before sending your message If a user s name is selected and you want to post a message to all users select All Users before sending your message If a user has disabled Chat the icon displays before the us...

Страница 35: ... port before the port you were just on Brings the current panels focus to the first available port after the port you were just on Icon Function Brings the current panels focus to the first available port that is four ports after the port you were just on Increase the number of panels in the array Choose between 16 8 4 and 1 Decrease the number of panels in the array Choose be tween 16 8 4 and 1 T...

Страница 36: ...file save it on your computer and run it from there Click 5 Next Then follow the on screen instructions to complete the installation and have the Log Server program icon placed on your desktop Specify the MAC address of the Log Server computer on the Service Configuration page of the Administrator Utility see section 7 6 2 To bring up the Log Server either double click the program icon or key in t...

Страница 37: ...o help identify it Limit This specifies the number of days that an event should be kept in the Log Server s database before it expires and it is cleared out Item Explanation New search This is one of three radio buttons that define the scope of the search If it is selected the search is performed on all the events in the database for the selected KVM switch Search last results This is a secondary ...

Страница 38: ...e help file contains instructions about how to set up operate and troubleshoot the Log Server List Panel The List panel contains six fields Field Explanation Recording Determines whether the Log Server is recording log events for the corresponding KVM switch If the Recording check box is the field displays Recording and log events are recorded If the Recording check box is not checked the field di...

Страница 39: ...e Tools Menu contains two entries Keyboard and Config Server List Each time the WinClient exe file is run it searches the User s local LAN segment for KVM switches and lists them in this box If you want to connect to one of these units double click it Term Explanation Server This area is used when you want to connect to a KVM switch at a remote location You can drop down the IP list box and select...

Страница 40: ...rname and Password and then click 2 OK The program attempts to connect to the selected KVM switch While it does so you can check the Message List window for status messages regarding the operation s progress Once contact with the KVM switch has been established the 3 Switch to Remote View button becomes active Click it to connect to the KVM switch and take over console control of the unit that is ...

Страница 41: ...ole KVM Switch with IP Access go to the AP Java Client program and double click its icon to bring up the Address Input dialog box Note The Java Client requires Java version 1 4 2 or higher Key in the IP address for the unit you want to connect to including 1 a forward slash followed by the login string if one has been set up by your system administrator then click OK Note 2 For security purposes t...

Страница 42: ...P776 Series KVM Cable Kits P776 Series KVM Cable Kits Power Cord Port IEC 320 C13 IEC 320 C13 LAN Port RJ45 Female RJ45 Female Reset Button Yes Yes Power On Off Switch Yes Yes Port Selection Buttons Yes Yes LCD Monitor Power On Off Button Yes Yes LCD Settings Menu Yes Yes Online LEDs 8 Green 16 Green Selected LEDs 8 Orange 16 Green KVM Switch Power LED 1 Blue 1 Blue Specification B020 008 17 IP B0...

Страница 43: ...e computers screen resolutions higher than 1280 x 1024 even though the KVM switch supports 1600 x 1200 for remote comput ers If you wish to set the screen resolutions of the connected computers to something higher than 1280 x 1024 see section 14 4 Screen Resolutions Higher than 1280 x 1024 When I switch to one of the computers on my installation the LCD monitor screen goes blank All I see is a bla...

Страница 44: ...splay resolution should be set to 1024 x 768 60Hz Under Text Mode 1 Enter the ok prompt and issue the following firmware commands setenv output device screen r1024x768x60 reset all Under XWindow 1 Open a console and issue the following command m64config res 1024x768x60 2 Log out 3 Log in Video display problems with 13W3 interface systems e g Sun Ultra servers The display resolution should be set t...

Страница 45: ...its KVM and or Console ports We have specifically modified the shape of these connectors so that only KVM cables that we have designed to work with this product can be connected 15 Warranty 16 Warranty Registration 14 4 Screen Resolutions Higher than 1280 x 1024 The maximum screen resolution of the NetDirector Console KVM Switch with IP Access integrated LCD monitor is 1280 x 1024 In order to prot...

Отзывы: