background image


www.trikdis.com  


  5   


December, 2022 


Transceiver RF-LORA 

1.2


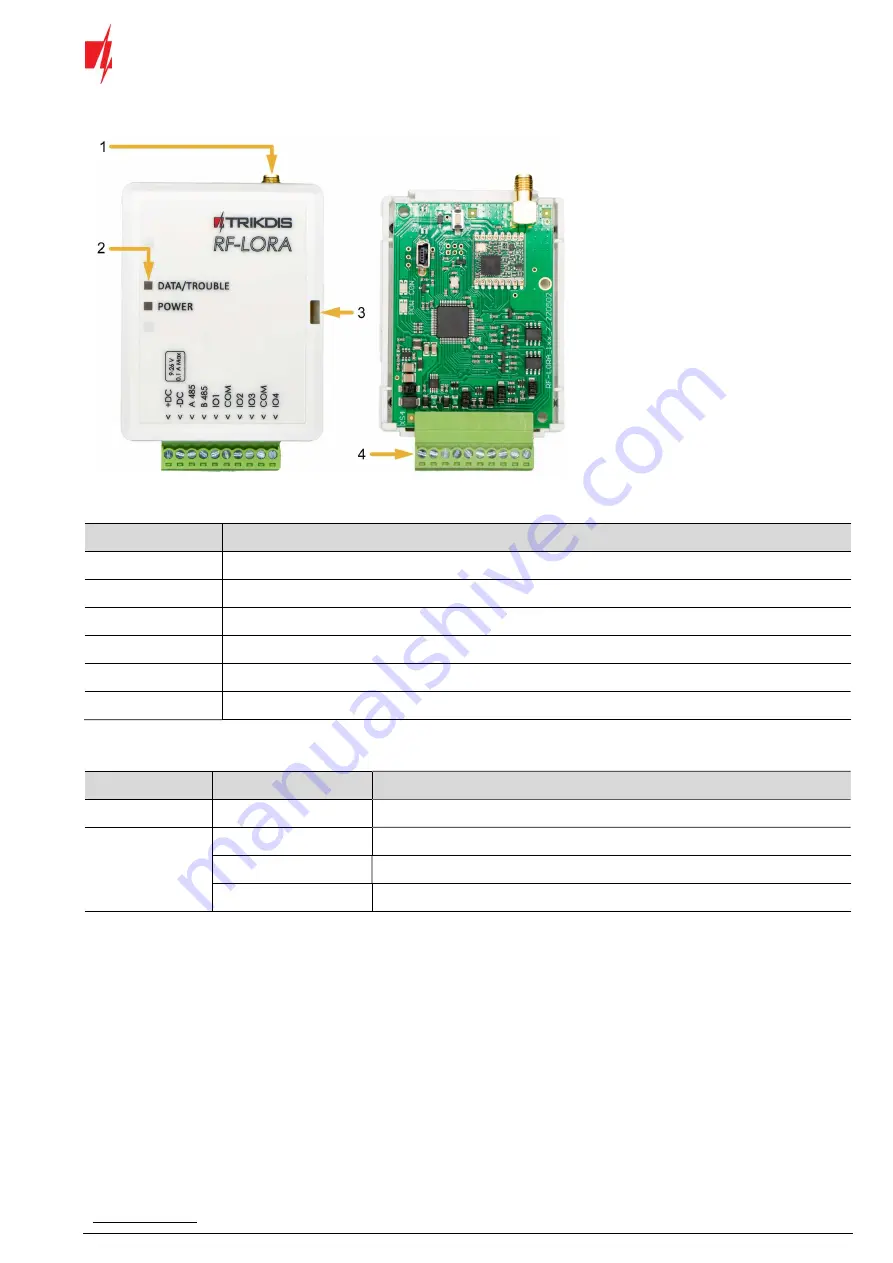
Expander elements  


1.


SMA connector for RF 
antenna.  

2.


Light indicators.  

3.


Frontal case opening slot.  

4.


Terminal for external 
connections.  

1.3


Purpose of terminals  

Terminal 

Description 

+DC 

Power terminal (9-26 V DC positive)  

-DC 

Power terminal (9-26 V DC negative)  

A 485 

RS485

 bus A contact  

B 485 

RS485

 bus B contact  

IO1-IO4 

Not used  

COM 

Not used  

1.4


LED indication of operation  

Indicator 

Light status 

Description 

DATA/TROUBLE 

Red blinking  

Communication with the module is broken  

POWER 

Off  

No supply voltage  

Green blinking  

Normal supply voltage level  

Yellow blinking  

Low supply voltage level (≤11.5 V)  


Содержание RF-LORA

Страница 1: ...www trikdis lt UAB Trikdis Draugyst s g 17 LT 51229 Kaunas Lietuva 370 37 408 040 info trikdis lt Transceiver RF LORA Installation manual December 2022...

Страница 2: ...1 2 Expander elements 5 1 3 Purpose of terminals 5 1 4 LED indication of operation 5 2 WIRING SCHEMATICS 6 2 1 Fastening 6 2 2 Schematic of RF LORA transceiver connection to FLEXi SP3 control panel 6...

Страница 3: ...n in order to avoid mistakes that can lead to malfunction or even damage to the equipment Always disconnect the power supply before making any electrical connections Any changes modifications or repai...

Страница 4: ...Line of sight wireless range up to 1000 m One RF LORA transceiver can be connected to the FLEXi SP3 control panel Connection The RF LORA transceiver is connected to the FLEXi SP3 control panel via the...

Страница 5: ...Description DC Power terminal 9 26 V DC positive DC Power terminal 9 26 V DC negative A 485 RS485 bus A contact B 485 RS485 bus B contact IO1 IO4 Not used COM Not used 1 4 LED indication of operation...

Страница 6: ...iring schematics 2 1 Fastening 1 Remove the top lid 2 Remove the PCB board 3 Fasten the base of the case in the desired place using screws 4 Reinsert the board 5 Close the top lid 2 2 Schematic of RF...

Страница 7: ...d or iO 8 LORA wireless expanders 4 Launch TrikdisConfig 5 Connect the FLEXi SP3 to a computer using a USB Mini B cable or connect to the FLEXi SP3 remotely 6 Click the button Read F4 for the program...

Страница 8: ...e PGM tab configure the expander s PGM output 11 Once configuration is complete click the Write F5 button 12 Wait for the updates to finish 13 Click the Disconnect button and disconnect the USB cable...

Отзывы: