background image

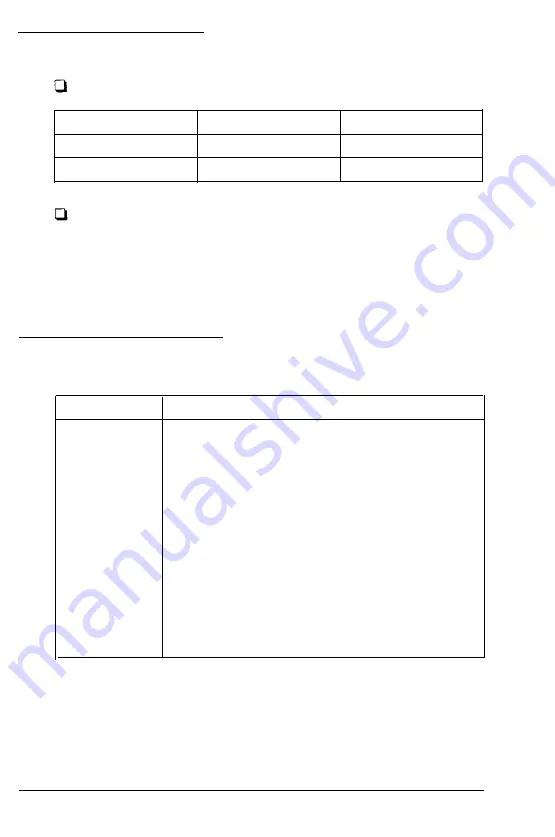
System Timing

  System Clock Speed:

Speed

CPU

High

33MHz (25MHz)

L O W

8MH.z (8MHz)

l/O

8MHz

8MHz

  Clock Cycle Time:

125ns (8MHz)

40ns (25MHz)

30ns 

(33MHz)

I/O Address Map

Hex range

Device

000-01F

DMA controller 1, 8237A-5

120-03F

Interrupt controller 1, 8259A, Master

040 - 05F

Timer, 8254-2

060 - 06F

8042 (Keyboard)

070 - 07F

Real-trme clock NMI mask

080 - 09F

DMA page register, 74LS612

0A0 - 0BF

Interrupt controller 2, 8237A-5

0C0 - 0DF

DMA controller 2, 8237A-5

OF0

Clear math coprocessor busy

OF1

Reset math coprocessor

OF8 - OFF

Math coprocessor

378 - 37F

Parallel port on board

3F0 - 3F7

FDD control on board

3F8 - 3FF

Serial port on board

Note: I/O address hex 000 to FFF are reserved for the system board 

110

Hex 100 to 3FF are available on the I/O channel.

A-4 Specifications

Содержание 386X

Страница 1: ...386X XE OPERATIONS GUIDE...

Страница 2: ...3 8 6 X X E OPERATIONS GUIDE...

Страница 3: ...erpr fung der Serie auf Einhaltung der Bestimmungen einger umt TriGem Inc 4 NaengChun Dong Seodaemun Ku Seoul Korea English translation We hereby certify that the TriGem 386X and 386XE complies with t...

Страница 4: ...the specifications of the product described within this manual at any time without notice and without obligation of TriGem Computer Inc to notify any person of such revision or changes COPYRIGHT NOTIC...

Страница 5: ...rk of ATI Technologies Inc HP LaserJet Series II is a product of HewlettPackard Inc MS DOS and GW Basic are trademark of Microsoft Corporation Windows is a trademark of Microsoft Corporation Seagate i...

Страница 6: ...e to radio or television reception which can be determined by turning the equipment off and on the user is encouraged to try to correct the interference by one or more of the following measures l Reor...

Страница 7: ...r short out parts that could result in a fire or electrical shock This computer should only be connected to the AC power source indicated on your computer system s information label If you are not sur...

Страница 8: ...e covered by the operating instructions Improper adjustment of other controls may result in damage and may require extensive repair work to restore the product to normal operation Unplug this product...

Страница 9: ...alimentation et puis enleve le couvercle Once removed the cover must be replaced and screwed in position before the power supply cord is plugged back in Apres le couvercle a enleve visse le couvercle...

Страница 10: ...und um berhitzung zu vermeiden m en diese ffnungen unbedingt freigehalten werden Betreiben Sie das Ger t nie auf Betten Sofas oder anderen wiechen Unterlagen Stecken keine Gegegenst nde Schraubenziehe...

Страница 11: ...en benutzen Wartung des Computers Wenn der Computer nicht ordnungsgem arbeitet d tfen Sie nur die Finstellungen vornehmen die im Handbuch genannt werden Andere Einstellungen oder Ver nderungen k nnen...

Страница 12: ...rschraubten Haube ist unbedingt folgendes zu beachten Das Netzkabel mu aus der Steckdose gezogen werden und zwar bevor Sie das Ger t ffnen Die Haube muss wieder monitert und verschraubt werden Erst da...

Страница 13: ...nnecting the Keyboard l 10 Adjusting the Keyboard Angle 1 11 7 Turning On the Computer l 12 The Command Prompt l 15 8 Copying System Diskettes l 16 9 Resetting Your Computer l 19 Chapter 2 Running the...

Страница 14: ...3 15 Using a Single Diskette Drive 3 16 Using the Hard Disk Drive 3 17 Chapter 4 Using MS DOS With Your Computer Inserting Diskettes 4 2 Disk Drive Letters 4 2 Starting MS DOS 4 4 System Prompt 4 6 Cu...

Страница 15: ...Hard Disk Drive 6 1 Care of Hard Disk Drives 6 2 Preparing Your Hard Disk 6 3 Changing Your SETUP 6 4 Partitioning Your Hard Disk 6 6 Formatting Your Hard Disk 6 9 Organizing Your Hard Disk 6 l1 Backi...

Страница 16: ...puter System A l System MotherBoard A l CPU Logic A 2 System Memory A 3 System I O A 3 SystemTiming A 4 I O Address Map A 4 Appendix B System MotherBoard Hardware Settings B 2 Removing the MotherBoard...

Страница 17: ...mory a total of eight internal option slots a System Motherboard on board FDC IDE HDC and built in serial and parallel interfaces Your computer comes with MS DOS the operating system by Microsoft In a...

Страница 18: ...tion Chapter 3 covers some general operating procedures including how to use and care for your disks and disk drives Chapter 4 provides basic instructions for using MS DOS with your computer Chapter 5...

Страница 19: ...in the computer and any time options are added or changed 1 Unpacking n As you unpack the different parts of your computer system be sure to inspect each piece If anything is missing or looks damaged...

Страница 20: ...your computer it is important to choose the right location Select a spot that provides the following A large sturdy desk or table that can easily support the weight of your system including all of it...

Страница 21: ...monitor and additional outlets for a printer and any other peripherals If it has the appropriate power cord you can plug the monitor into the auxiliary power outlet on the back panel of the computer...

Страница 22: ...o controller board This board generates the letters numbers and graphics symbols displayed on the monitor screen Connectors are provided for the display type that is supported by the board monochrome...

Страница 23: ...atched cables 3 Connect the monitor cable to the video connector on the back of the computer as shown below If the plug has retaining screws tighten them securely Figure 1 2 Connecting the Monitor 4 P...

Страница 24: ...ace Using the Parallel Interface The parallel interface on your computer is Centronics compatible and uses a 25 pin connector To connect a parallel printer to your computer you need an IBM compatible...

Страница 25: ...her end of the cable to the printer as shown below If the printer has retaining clips on each side of the printer port squeeze the clips together to secure the cable 4 Plug the printer s power cord in...

Страница 26: ...able If you are not sure which one you need or whether you have the right one check with the store where you bought the cable To connect a serial device follow the same steps outlined above for a para...

Страница 27: ...these steps to connect the power cord 1 Insert the power cord into the AC inlet on the computer s back panel as shown below To avoid an electric shock be sure to plug the cord into the computer befor...

Страница 28: ...05VV F should be used F r Ger te die in europ ischen L ndern eingesetzt werden sollte ein Netzkabel Typ HAR mit der Nummer H05VV F benutzt werden Your keyboard has only one cable to connect This simpl...

Страница 29: ...board by adjusting the legs on the bottom Turn the keyboard over and lift each leg upward until it locks into place as shown below You lock the legs into a low or high position or leave them flat Figu...

Страница 30: ...pidly can damage the computer s circuitry Do not leave a beverage on top of or next to your system or any of its components Spilled liquid can damage the circuitry of your equipment Do not attempt to...

Страница 31: ...ps to turn on your system 1 Turn on the monitor printer and any other peripheral devices connected to the computer 2 To turn on the computer press the power switch Figure l 8 Power Switch Setting Up Y...

Страница 32: ...89 American Megatrends Inc c 1989 TriGem Coporation XXXX KB OK press ESC to bypass MEMORY test c American Megatrends Inc XXXX XXXX XXXXXX KB The computer continually updates this display as it tests i...

Страница 33: ...a word processing program or a spreadsheet program The Command Prompt After the computer has loaded MS DOS from the hard disk you see the MS DOS command prompt on the screen The command prompt tells y...

Страница 34: ...ven 360KB doubledensity 5 inch diskettes N o t e If you do not have any 360KB diskettes you can use unformatted 1 2MB diskettes When copying from 360KB diskettes the DISKCOPY program formats the 1 2MB...

Страница 35: ...Disk 4 Press any key The DISKCOPY program copies the contents of the MS DOS diskette to the computer s memory and then you see the following Insert TARGET diskette in drive A Press any key to continu...

Страница 36: ...he copy of the MS DOS diskette which you just made and insert the another MS DOS diskette into drive A Then press any key Follow the prompts on the screen to make a copy off this diskette as you did f...

Страница 37: ...The POWER Switch Turn the main system POWER switch off wait ten seconds then turn it back on The computer will then run the complete self test diagonistic routine Caution Any time you RESET your comp...

Страница 38: ...ed due to a system configuration change You probably do not need to change all these settings just change the ones that apply to your computer For example if you have added no extra equipment and have...

Страница 39: ...te with its full potential If POST detects an error you are prompted Press Fl to RESUME The setup program performs the following operations Displays date time and the screen the list current values fo...

Страница 40: ...he screen Make a note of this number before you call Customer Support at AMI for assistance with the BIOS The Reference number in your BIOS will let you know the type of BIOS on your system The Refere...

Страница 41: ...he system and displays the size of the memory being tested Note Note that you can bypass the memory test by pressing the ESC key This option would be useful when the memory on the system is quite larg...

Страница 42: ...ect and use Enter to get into the option Errors Reported by BIOS You may also see the error prompts in the first screen if your system has detected errors while comparing the configuration settings on...

Страница 43: ...reen immediately after the memory test Press DEL if you want to run SETUP EXTD SET If you hit DEL key you will see a menu like as following EXIT FOR BOOT RUN CMOS SETUP RUN XCMOS SETUP This means that...

Страница 44: ...NU This lists the parameters you can change with the SETUP program A solid cursor bar highlights the parameter currently available to be changed You can use the following key conventions Enter moves t...

Страница 45: ...the date The time here is 24 hour time so don t be alarmed when hour 13 shows up on the screen Simply highlight either the hours minutes or the seconds and press the PgUp I PgDn keys to step through...

Страница 46: ...board Setup The keyboard Setup is the next option for the user You may either choose to enable or disable the Keyboard test during Power On Self Test by setting keyboard as Installed or Not Installed...

Страница 47: ...e satisfied with the option settings press the ESC key then press Y to write the new settings into the configuration RAM Your computer will run through the self test diagnostics again and try to read...

Страница 48: ...nu screen Extended CMOS Setup lets you select additional features of system for better performances RAM CACHE BUS CONTROLLER SETUP You may select the option RAM CACHE BUS CONTROLLER SETUP by pressing...

Страница 49: ...rently available to be changed You can use the following key conventions Moves the selection bar PgUp PgDn Scrolls available settings E s c Exit to Main Menu Start up Speed This parameter lets you sel...

Страница 50: ...r programs have difficulty running with the cache enabled System BIOS Shadow System BIOS Shadow Option copies BIOS from ROM to RAM By enabling this option BIOS service will be accessed from RAM which...

Страница 51: ...enu using Up and Down arrow key and press ENTER The screen will be replaced by the following This screen is the system communication setup This lists the parameters you can change with EXTENDED SETUP...

Страница 52: ...ou should also disable this option when you install the external card to use another serial port for COM2 Parallel Port If you use on board parallel port select LPTl for this parameter However if you...

Страница 53: ...TE CMOS REGISTERS AND EXIT exist on the Extended Setup Main menu and press Enter But in any case when you don t want to accept the changes select DO NOT WRITE CMOS REGISTER AND EXIT on the Main menu A...

Страница 54: ...iGem 386XE it can operate 33MHz or 8MHz At 25MHz or 33MHz the computer performs all tasks faster and almost all programs may be run at 25MHz or 33MHz However some option cards and application programs...

Страница 55: ...ocated on the MS DOS diskette supplied with the system You can find the detailed description of TGSS COM in your MS DOS User s Guide Special Keys on your Keyboard Certain keys on your keyboard serve s...

Страница 56: ...haracter codes or functions Moves the cursor back one space deleting the character to the left of the cursor Ends a line of keyboard input or executes a command may be called the Return key In some ap...

Страница 57: ...and spreadsheets Turns the insert function on and off in some application programs Deletes the character at the cursor position The Num Lock Scroll Lock and Caps Lock keys work as toggles press the ke...

Страница 58: ...lar operation however you may need to reset the computer as described in the following section Caution It is best not to run off the computer to stop a program or command If you have created new data...

Страница 59: ...and dirt A hard disk stores data the same way that a diskette does but it works faster and has much larger storage capacity All disks are divided into data storage compartments by sides tracks and se...

Страница 60: ...disk drive to store and retrieve data on a disk There is one head above the diskette and one below so the drive can write to both sides of the diskette To write to a disk the computer spins it in the...

Страница 61: ...se single sided 160KB or 180KB diskettes These diskettes contain 40 tracks per side 8 or 9 sectors per track and hold up to 360KB of information which is approximately 150 pages of text With 8 sectors...

Страница 62: ...vice versa There are also certain limitations on using diskettes that are the same size as the drive but have different capacities The following tables summarize the possiblities and limitations 5 in...

Страница 63: ...rives Follow these basic precautions to protect your diskette and avoid losing data Do not remove a diskette from the diskette drive or turn off the computer while the drive light is on This light ind...

Страница 64: ...e if it has been damaged Carefully label your diskettes Attach labels firmly but gently and only along the top of a diskette next to the manufacturer s label Do not stick several labels on top of one...

Страница 65: ...to protect it from dust Inserting and Removing Diskettes To insert a diskette into the drive hold it with the label facing up and the read write slot leading into the drive as shown below Figure 3 4...

Страница 66: ...ette turn the drive latch up until it is horizontal and the edge of the diskette pops out Carefully pull out the diskette place it in its protective envelope and store it in a proper location such as...

Страница 67: ...otect a diskette to prevent its data from being altered When a diskette is write protected you can read it and copy data from it but you cannot store new data on the diskette or delete any files it co...

Страница 68: ...e comer Write Protect Figure 3 7 3 Diskette Write Protect SW To remove the write protection slide the switch toward the center of the diskette so the hole is covered Making Backup Copies It is importa...

Страница 69: ...t normally require two diskette drives Usually MS DOS recognizes the first diskette drive the top drive as drive A and the second diskette drive as drive B If you have only one diskette drive MS DOS r...

Страница 70: ...te The hard disk however provides several advantages The 20MB hard disk can store more data than 16x1 2MB diskettes and the 40MB hard disk can store twice as much Your computer can perform all disk re...

Страница 71: ...f backing up hard disk files on the Chapter 6 Preparing the hard disk for moving Before you move the computer you need to secure the read write heads inside the hard disk drive Securing the read write...

Страница 72: ...w location The TGSHIP command should be run whenever you are going to move the main system unit This command moves the read write heads inside the hard disk drive to a safety zone where they won t acc...

Страница 73: ...ft Disk Operating System The disk operating system is a collection of programs that allow you to control all the elements of your computer When booting up the MS DOS command file is copied from the MS...

Страница 74: ...on procedure by placing the MS DOS Install diskette in the A drive and turning your computer on Disk Drive Letters The various disk drives on your computer are assigned letters As you work with MS DOS...

Страница 75: ...and the write protect notch to the left When the diskette is all the way in close the drive door by turning the door latch handle down Caution If any resistance is felt when closing the drive door sto...

Страница 76: ...emove the MS DOS Install diskette from its protective envelope and insert it into the A drive Close the disk door and turn your computer on Remove the Install disk and insert the Select disk Press ENT...

Страница 77: ...S DOS has been installed simply turn your system on Your computer will perform its self test diagnostics and display the DOS Shell menu screen Notice that the words Command Prompt are highlighted by a...

Страница 78: ...lowing the system prompt you will see a blinking underline _ character This is the cursor The cursor shows you where the next character you type will appear on the screen As you can see here any comma...

Страница 79: ...s require one or more of the MS DOS diskettes Hard disk system user s can run any DOS command without diskettes because the programs are stored on the hard disk drive Case Sensitivity MS DOS does not...

Страница 80: ...tire buffer to the command line F4 key The opposite of F2 deletes all characters from the buffer up to but not including the next character you type F5 key Moves the current line you are typing into t...

Страница 81: ...ur mind The BACKSPACE key on your keyboard works just like a backspace key on a regular typewriter it moves the cursor back one position In addition however it erases the last character typed Press th...

Страница 82: ...efault drive by looking at the system prompt For example indicates that the A drive is currently the default drive Unless you specify otherwise MS DOS will direct any disk activity to the A floppy dis...

Страница 83: ...en configured yet See Chapter 6 Using Your Hard Disk for instructions From the A prompt try the command The computer will respond Press ENTER after you insert the diskette into the drive then the syst...

Страница 84: ...need seven blank diskettes It is a good idea to prepare seven diskette labels at this time Write the following on those diskette labels using a felt tipped pen MS DOS MAIN SYSTEM DISKETTE BACKUP COPY...

Страница 85: ...menu The system prompt will appear Enter the following command The following message will be displayed The SOURCE diskette is the disk that you will be copying from Insert the MS DOS master diskette...

Страница 86: ...sed by the DISKCOPY routine Press the SPACEBAR key The drive will turn on indicating that the computer formatting the new diskette then writing the copied information onto it After a few moments the d...

Страница 87: ...system memory and will display When the computer is finished reading the drive will turn off and the following message will appear Remove the master MS DOS diskette from the floppy disk drive and put...

Страница 88: ...ter MS DOS diskette you may put your master diskette away in a safe place From now on only use the master MS DOS diskette to make copies For all other purposes use the backup copy of the MS DOS disket...

Страница 89: ...ne you will be copying to Put your master MS DOS diskette in the A drive and a new blank diskette in the B drive Warning If you have any doubts about which diskette goes in which drive check them care...

Страница 90: ...ompt will reappear To compare the backup diskette with the original you will use the DISKCOMP command Enter the command at the system prompt The computer will respond Since both diskettes are already...

Страница 91: ...is a good copy of the master MS DOS diskette you may put your master diskette away in a safe place and put the label on the backup diskette From now on only use the master MS DOS diskette to make copi...

Страница 92: ...o achieve a result MS DOS is a collection of program files as are the control programs found in application software Data files are files that contain the information data used by program files A file...

Страница 93: ...eedom in your selection of filenames Each filename can be up to eight characters long To this eight character name can be added an extension Extensions always begin with a period which is followed by...

Страница 94: ...n used The following are examples of illegal filenames along with an explanation 3RDQUARTER SALES This is too long MS DOS will accept this filename but it will be shortened to fit the size limits The...

Страница 95: ...ave them off entirely if you want Using filename extensions with data files allows you to have many different variations for a set of filenames For instance different chapters of a book might be named...

Страница 96: ...such as when the file was created or updated last The DIR Command MS DOS provides a simple command that allows you to look at the directory of any particular disk This is the DIR command Enter the com...

Страница 97: ...use the DIR command to search for specific files on a disk To do this enter the DIR command in the following format For instance if you want to find the directory entry for a file named MAYSALES RPT o...

Страница 98: ...onto drive A enter the command The computer will display the directory of the diskette inserted in the B drive A similar command will cause the computer to display the directory of your hard disk Not...

Страница 99: ...ry listing This is through the use of wildcard characters Wildcard characters are used to make a single command cover a number of similarly named files While MS DOS provides several wildcard character...

Страница 100: ...ome with detailed instructions for their set up and use These instructions will often ask you to use the information in this chapter to find specific files in the disk directories or back up the maste...

Страница 101: ...programs are distributed on floppy diskettes Before you buy an application software package for your computer you should make sure that it will run under MS DOS Products labeled for IBM PC for IBM PC...

Страница 102: ...c disk is safely protected by a thin cardboard jacket The diskette spins inside this jacket allowing the entire surface of the diskette to be scanned by the drive s circuitry Data is read from or writ...

Страница 103: ...S formats disks with a different pattern than Apple DOS or CP M This is why your computer system cannot read these foreign disks To see what happens when you attempt to use an unformatted disk insert...

Страница 104: ...e The following routines will show you how to use the FORMAT command These procedures assume that you are formatting double sided highdensity 1 2M byte diskettes AT compatible Information on formattin...

Страница 105: ...you don t want to have a label of your disk Then the screen will display the following message Don t be concerned if the message displayed is slightly different from this example Enter N to return to...

Страница 106: ...on switch The computer will proceed to format the diskette Upon completion you will see this message And the following screen will be appeared if you press ENTER If you want to have a volume label typ...

Страница 107: ...u will see this message Press ENTER not to have a label of your disk Then the screen will display XXXXXXX bytes total disk space XXXXXXX bytes available on disk XXX bytes in each allocation unit XXXXX...

Страница 108: ...s well as additional areas reserved for use by MS DOS One of these areas is the File Allocation Table or FAT This part of the diskette contains a list of all of the files on the disk and where they ar...

Страница 109: ...m area enter the following command at the system prompt The computer will load the FORMAT command file into system memory then respond Insert new diskette for drive A and press ENTER when ready Insert...

Страница 110: ...Serial Number is XXXX XXXX Format another Y N Enter N to return to the system prompt Then enter The directory listing should appear similar to the following Copying Files If you have a dual drive syst...

Страница 111: ...afe to copy enter the COPY command with the following format A COPY A filename B For example to copy the file MAYSALES RPT from drive A to drive B enter the command A COPY A MAYSALES RPT B When the co...

Страница 112: ...in this case A drive It is also possible to copy a file between two disks when neither one is the default drive For instance A COPY C MAYSALES RPT B will copy the MAYSALES RPT file from the hard disk...

Страница 113: ...and A COPY MAYSALES B will copy all files about MAYSALES to the B drive A final example A COPY C will copy all of the files on a diskette in the A drive to the hard disk drive This command is useful w...

Страница 114: ...o store data and program files between computing sessions It is more convenient however to store your files on a hard disk drive The main reason for this is the speed of the hard disk drive Files are...

Страница 115: ...precision makes for a delicate mechanism Even though your hard disk drive is built to withstand the rigors of shipping it should be moved as little and as gently as possible If you need to move your...

Страница 116: ...time enter this command A C If the computer responds with C enter C DIR If a directory listing is displayed even if there are no files shown it means that your hard disk system has already been parti...

Страница 117: ...and format your hard disk you have to let your computer know that you have one This is done with the SETUP program Once you have determined that your hard disk is clean that is to say neither partiti...

Страница 118: ...e disk type number matched with the hard disk you have If you select the type number 17 for 41MB hard disk it provides the following information under the right hand headings This should match the inf...

Страница 119: ...HDC and if you want to install the another type of HDD except IDE you must disable the on board IDE HDC using the Extended Setup Program See Chapter 2 for the detailed information of it Partitioning Y...

Страница 120: ...Enter choice l Press ESC to exit FDISK Note If you only have one hard disk drive option 5 will not be displayed Press ENTER to choose the default selection Create a DOS Partition The FDISK menu will...

Страница 121: ...sk Options To reserve the entire hard disk for MS DOS press the ENTER FDISK now displays the following message System will now restart Insert DOS diskette in drive A Press any key when ready It is com...

Страница 122: ...e same time Use the DIR command to check the contents of the drive If your hard disk is formatted there may be files stored on it that you will need Skip this section on formatting and proceed to the...

Страница 123: ...ch used with the FORMAT command A disk label can be useful when sorting directories so you may want to enter one now A volume label can use up to eleven characters See Chapter 4 Using MS DOS for a lis...

Страница 124: ...routines the computer will look at the A drive to find the MS DOS install diskette Since the drive is empty it will then look at the hard disk drive If the hard disk drive is installed and formatted...

Страница 125: ...ctories When the computer displays the C prompt again enter C DIR to see what you have done You should see a directory listing similar to the following COMMAND COM XXXXX X XX XX X XXX FORMAT EXE XXXXX...

Страница 126: ...directory The period entry represents the current directory while the double period entry represents the parent directory for the current subdirectory These shorthand entries allow you to move up and...

Страница 127: ...from the MS DOS install diskette into the DOS4 subdirectory on the hard disk First make sure you are currently logged into the DOS4 subdirectory by entering the command sequence C CD C CD DOS4 Insert...

Страница 128: ...it in the DOS4 subdirectory Later as your hard disk gets filled up with application software program and data files the disk space saved by deleting such duplicate files might become useful Repeat the...

Страница 129: ...on your MS DOS install diskette will help you back up your hard disk The first BACKUP will copy files from the hard disk onto diskettes The other RESTORE allows you to use the diskettes created by the...

Страница 130: ...the diskettes you will be using The following table shows the approximate number of diskettes needed to backup an entire hard disk HARD DISK NUMBER OF DISKETTES CAPACITY 180K 360K 1 2M 10M byte 63 32...

Страница 131: ...the root directory of the hard disk Enter C CD C Now make sure your diskettes are formatted and ready If you are running BACKUP from the MS DOS install diskette enter the command C A BACKUP C A S If...

Страница 132: ...e RESTORE Command MS DOS provides the RESTORE command program to allow you to copy files from the archive diskettes created by the BACKUP command back onto the hard disk You should only have use the R...

Страница 133: ...the hard disk drive has not yet been partitioned If the computer correctly executed the C command but failed to run a directory it probably means that the hard disk has been partitioned but not yet fo...

Страница 134: ...A drive to the hard disk root directory The S switch tells MS DOS that you want to restore the subdirectories as well as the root directory files You will be prompted to insert the backup archive disk...

Страница 135: ...le far this manual to provide detailed instructions for connecting these devices Please follow the instructions provided with your peripheral If you should have problems with the installation of a per...

Страница 136: ...ed inside your main system unit Since your system CPU must be in constant communication with both the keyboard and the display monitor specific circuits connect them together Since other peripheral de...

Страница 137: ...have been agreed upon by the microcomputer industry so that the different manufacturer s machines can communicate with each other Your computer system uses the RS 232C asynchronous serial communicati...

Страница 138: ...or the first parallel port Additional parallel ports can be added to your computer through the use of multi function boards These ports would be labeled LPT2 LPT3 etc Connecting Printers Most but not...

Страница 139: ...serial port Connectors are provided on the modem itself for attachment to the phone system Connecting External Disk Drives At some point you may decide to add an external disk drive This may become ne...

Страница 140: ...e yourself with some of the basic principles of expanding your computer Tools Required To install most expansion products in your main system unit you will usually need the following tools a small med...

Страница 141: ...nit cover is removed Separe le cordon d alimentation et puis enleve le couvercle Once removed the cover must be replaced and screwed in position before the power supply cord is plugged back in Apres l...

Страница 142: ...panel sockets Set the monitor safely aside Unplug the keyboard and set it aside Unscrew the screws on the rear panel of the unit and set them aside Carefully slide the main system unit s cover towards...

Страница 143: ...er the disk drive nosepieces When the cover is properly seated on the main system unit chassis replace and tighten down the screws on the rear panel Reconnect the keyboard to its connector on the rear...

Страница 144: ...uit boards First read all of the instructions provided with the expansion product Then carefully unpack the circuit board s to be installed Warning Most computer circuit boards have static sensitive c...

Страница 145: ...to allow easy access to the jumpers The system boards contains eight expansion slots comprised of two basic types as follows l Two 8 bit slot for PC XT boards l Six 16 bit slots for PC AT boards or 8...

Страница 146: ...ide Making sure the board is correctly aligned carefully insert the board s edge contacts into the slot connector on the main system unit s motherboard A gentle rocking motion is helpful in getting th...

Страница 147: ...each their connectors you may have to move the board you just installed to another slot If any external equipment is used with the expansion board connect it to the board s rear panel connector s foll...

Страница 148: ...e way in Replace the hold down clamps and their mounting screws Connect any internal power cables to the correct pins on the rear of the expansion unit Connect any required control cables to the devic...

Страница 149: ...of the plate into the bottom of the drive frame Replace the mounting plate onto the mounting frame by sliding the plate into the two openings provided in the mounting frame Replace the hold down scre...

Страница 150: ...y Keyboard 101 key keyboard 41 to 95 F 5 to 35 C 5 to 140 F 15 to 60 C 20 to 80 no condensation 10 to 90 no condensation IBM PC AT 238W 110 Range l00 125 VAC 7 0 A 50 6OHz 220 Range 200 240 VAC 4 5A 5...

Страница 151: ...ni speaker Real Time Clock 2ea 9 pin RS 232C asynchronous serial communication port lea 25pin Centronics compatible parallel printer port l ea 5 pin Keyboard port CPU Logic Main Central Processor IC T...

Страница 152: ...ROM CMOS RAM BANK 1 BANK 2 0 0 256K 0 256K 256K 256K 256K 256K 0 256K 256K 256K 256K 1M 0 1M 256K 1M 256K 1M 1M 1M 1M 1M 1M 64K byte 128 byte System I 0 DMA Channels 8 bit operations 4 channel 16 bit...

Страница 153: ...060 06F 8042 Keyboard 070 07F Real trme clock NMI mask 080 09F DMA page register 74LS612 0A0 0BF Interrupt controller 2 8237A 5 0C0 0DF DMA controller 2 8237A 5 OF0 Clear math coprocessor busy OF1 Res...

Страница 154: ...otherboard This appendix provides configuration and interface information for this board You may skip this appendix if you are not installing expansion products that require changing the motherboard s...

Страница 155: ...m power on the system CPU will compare these settings with the information stored in its configuration RAM as part of the diagnostic routines If any inconsistencies are found they will be shown on the...

Страница 156: ...ir slot connectors on the system motherboard noting the location of each board and any internal cable connections for re installation later Carefully unplug all of the cables connected to the system m...

Страница 157: ...ber of connectors for communication with other parts of the computer system These connectors are discussed below For pinout information on these connectors see Appendix D Connector Pinouts The connect...

Страница 158: ...Two 8 bit slots for PC XT boards Six 16 bit slots for PC AT boards Caution Do not overload the system board power connector by installing expansion boards that may draw excessive current Keyboard Port...

Страница 159: ...Program and disable the serial ports Refer to Chapter 2 for the detailed descriptions of Extended Setup Program Parallel Port J2 Connector J2 on the system board provides a standard Centronics 25pin...

Страница 160: ...onnector is a two pin header IDE Interface connector J24 You use this 40 pin connector with IDE type Hard disk drive Note Your system has an on board IDE type HDC and if you want to install the anothe...

Страница 161: ...displayed on the video screen is made up of a large number of individual dots This is true whether the displayed screen image is made up of text or graphics or is a mixture of both The higher the mon...

Страница 162: ...200 With the higher resolution CGA has gained acceptance in the office environment By using colored text screens and low level graphics a number of software packages have been made easier to use Enhan...

Страница 163: ...ome green or amber CGA dot resolution 640 x 200 maximum text display 80 columns x 25 lines colors 2 of 16 colors 640 x 200 4 of 16 colors 320 x 200 EGA dot resolution 640x350 maximum text display 80 c...

Страница 164: ...TTL Monochrome These monitors provide up to 1000x350 resolution with either a green or amber colored screen Primarily intended for text only applications these monitors can run Hercules compatible gr...

Страница 165: ...roller board instead Multi sync Multi sync monitors are so named because they are able to adjust themselves to any standard video format Providing resolutions up to 1400 x 1200 multi sync video monito...

Страница 166: ...Data Terminal Ready DTR Singal Ground GND Data Set Ready DSR Request to Send RTS Clear to Send CTS Ring lndicator RI Note All signals conform to EIA Standard RS 232C Centronics compatible parallel pri...

Страница 167: ...Note 1 All outputs are s ware generated All inputs are real time signals not latched 2 All signals are TTL compatible Keyboard Port 6 pin mini DIN connector D 2 Connector Pinouts...

Страница 168: ...IDE Port Connector Pinouts D 3...

Страница 169: ...in post header Pin Signal Name 1 Power Good Signal 2 5v Volts 3 12v Volts 4 12v Volts 5 Ground 6 Ground 7 Ground 8 Ground 9 5 Volts 10 5v Volts 11 5v Volts 12 5v Volts Figure D l Expansion Slot Connec...

Страница 170: ...tor Pinouts Pin l O Type A l Input A 2 l O A 3 I O A 4 I O A 5 l O A 6 I O A 7 I O A 8 I O A 9 I O A 10 Input A 11 output A 12 I O A 13 I O A 14 I O A 15 I O A 16 I O A 17 l O A 18 I O A 19 l O A 20 I...

Страница 171: ...B 9 Power I2 VDC B IO Ground GND B 11 output SMEMW B 12 output SMEMR B 13 I10 IOW B 14 I O IOR B 15 output DACK3 B 16 Input DRQ3 B 17 output DACKl B 18 Input DRQl B 19 I O REFRESH B 20 output CLK B 21...

Страница 172: ...Expansion Slot Connector Pinouts continued Connector Pinouts D 7...

Страница 173: ......

Отзывы: