background image

Digital Terrestrial  Receiver - 

T R IAX

3 5

   Receiver

3 5

Installation

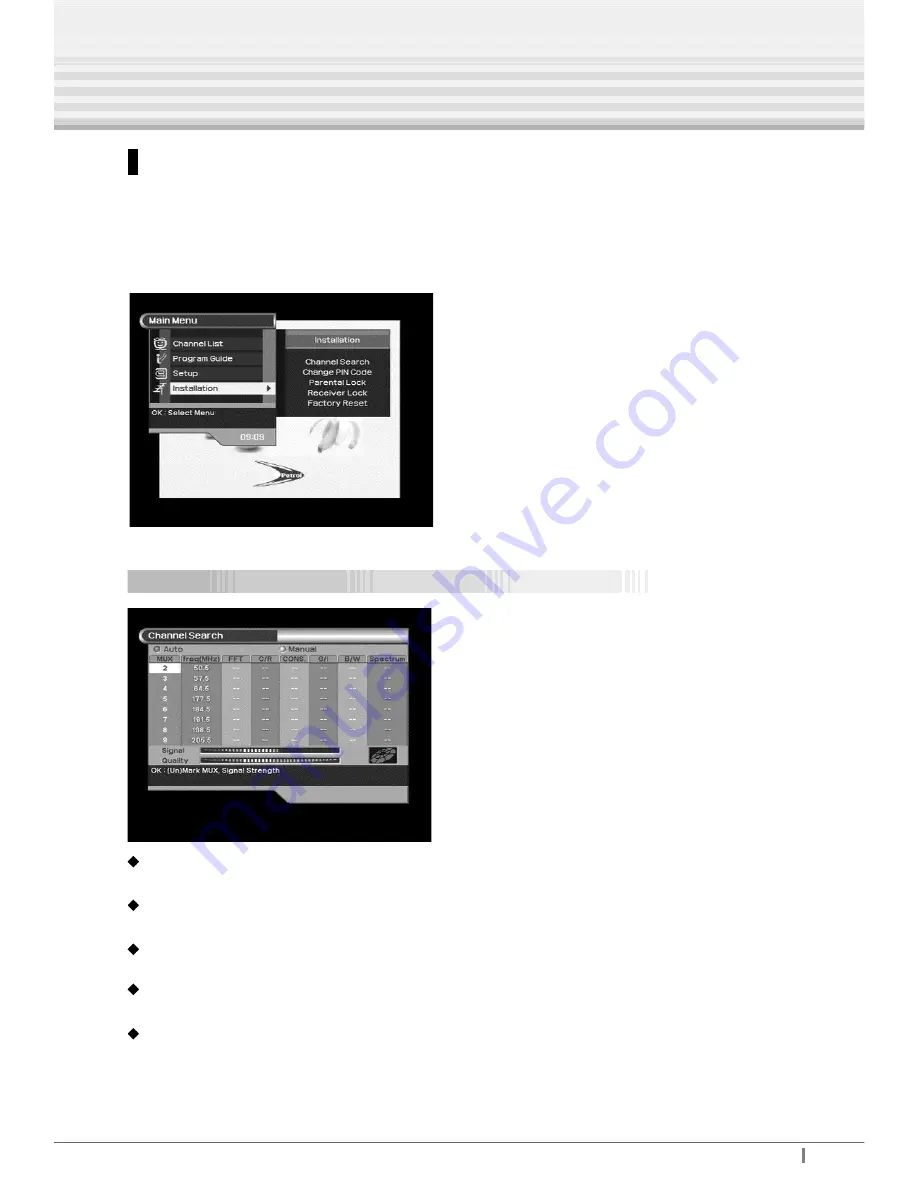
This Menu helps you to setup a variety of parameters necessary for receiving signal and
managing the channel information. To avoid loss of service, it is important to understand
the following table before you make changes.

Channel Search

Search Mode
Auto / Manual
MUX
Broadcast sent by television network

freq (MHz)

Center frequency (Center frequency of each MUX)

FFT (Fast Fourier Transform)

2K, 8K

C/R (Code rate)

1/2, 2/3, 3/4, 5/6, 7/8

Menu Operation

Содержание DVB 250 T

Страница 1: ...Owner s Instructions TRIAX DVB 250 T Digital Terrestrial Receiver ...

Страница 2: ...ON 1 Do not block ventilation slots of STB 2 Do not place the STB on soft furnishings or carpets 3 Ensure that a free airflow is maintained around the STB 4 Do not allow the STB to be exposed to direct sunlight or a heater 5 Do not stack other electronic equipment on top of the STB LIQUIDS Keep liquids away from the STB Apparatus shall not be exposed to dripping or splashing and no objects filled ...

Страница 3: ...r Manufacture s instructions for safeguarding other equipments connected to the STB TV set etc must be followed during the lightning 3 Ensure lightning protection devices for the terrestrial antenna mains and LNB are installed SERVICING 1 Service should be carried out by authorised service engineer ...

Страница 4: ...m 13 Menu Tree 13 Automatic Channel Search for Television Services 14 Manual Channel Search 14 Basic Function 15 17 Menu Operation 18 Main Menu 18 Channel List 19 Channel Information 20 Channel Sorting 20 22 Channel Editing 22 27 1 Delete Channels 23 2 Lock Channels 24 3 Edit Favorite Channels 25 4 Organize Channel Categories 25 5 Move the Position of Channels 26 6 Rename Channels 27 Contents ...

Страница 5: ... Setup 30 1 Menu Language 30 2 SCART Output 31 3 Screen Type 31 4 Banner Time 31 5 RF Output 32 6 Other Setting 32 34 Installation 35 Channel Search 35 38 Change PIN Code 38 Parental Lock 39 Receiver Lock 39 Factory Reset 39 TELETEXT Navigation 40 TroubleShooting 41 Technical specifications 42 43 ...

Страница 6: ...ding the Remote Control Unit Remote Control Unit TELETEXT TV STB 18 FAVORITE 19 MUTE 16 CHANNEL UP DOWN 15 MENU 14 PRE CHANNEL 13 SOUND 12 EXIT 11 NUMERIC Buttons 17 VOLUME UP DOWN STANDBY EPG INFORMATION SUBTITLE PAGE UP DOWN LEFT RIGHT OK TV RADIO 1 2 3 4 5 7 6 9 8 10 ...

Страница 7: ...ween TV and STB receive mode TV RADIO To switch between TV program and RADIO only receiving mode NUMERIC Buttons To select the channel and enter the channel information and PIN Code EXIT To return to the normal viewing mode from a menu SOUND Yellow To select the sound track list in the current channel PRE CHANNEL Blue To return to the previous channel MENU To display the Main Menu on the screen or...

Страница 8: ...between Operation and Standby mode CH To change channels up and down To move up or down highlight marked cursor VOL To increase or decrease the volume To move left or right highlighted cursor LIST OK To confirm your choice or display the channel list TV RADIO To switch between TV program and Radio only receiving mode 3 4 5 1 2 ...

Страница 9: ...STB RF Loop In RS 232 To connect to a personal computer for software upgrade AUDIO To connect audio R L to a TV or an Audio Amp or System VIDEO To connect video to a TV using RCA jack TV OUT To connect to TVvia a conaxial cable for analogue broadcast loop through ANT IN To connect analogue TV antenna via coaxial cable TV To connect this port to that of a TV via scart cable VCR To connect this port...

Страница 10: ...e other side shall connect to the television AV input i e the audio and video input b Connect STB via SCART connector not supplied Simply connect the SCART lead from TV on STB to the SCART connector usually found on the rear of your television 2 Antenna Loop through connection c ANT IN for Digital Connect outdoor antenna via RF cable to take digital broadcast d ANT IN for Analogue Connect outdoor ...

Страница 11: ...ours to the video audio outputs on the STB and the other end to the video audio inputs on the VCR Make sure your VCR is set to Video Input or AV input to view your STB Consult your VCR user manual for details b Connect VCR via SCART not supplied Simply connect one end of the SCART lead to the STB as shown and the other end of the SCART connector to the VCR usually found on the rear STB to a VCR Re...

Страница 12: ...a RCA connection lead supplied Use a standard RCA lead to connect Audio R Audio L outputs on the STB to the AUX input on the HI FI System The AUX input may sometimes be called also LINE IN TV IN or VCR IN b Connect VCR via OPTICAL S PDIF Use optical cable to connect STB with Hi Fi for digital audio sound STB to a HI FI System ...

Страница 13: ...Digital Terrestrial Receiver TRIAX 13 Menu Tree Receiver Setting up Your System ...

Страница 14: ...stallation Menu Enter the PIN Code Factory PIN code is 0000 Select channel search in the Installation Menu Enter the PIN code Factory PIN Code is 0000 Select the Television Service you want to search by pressing the UP DOWN buttons and OK button Press Green Manual button then STB will automatically search all channels and save them into the Channel List Manual Channel Search You can automatically ...

Страница 15: ...he Channel List 3 Press the CH CH buttons on the Remote Control Unit to select the channel you want 4 To change the TV RADIO channel press the TV RADIO button on the Remote Control Unit Information Screen After the television channels have been programmed you will see the information banner box each time you switch channels Logical Channel Number Channel Name Network Name Parental Rating Signal Qu...

Страница 16: ...o cancel mute press the MUTE button again or press the VOL VOL buttons Sound Track When you want to change the Audio Language of current channel press the SOUND button Use the UP DOWN buttons on the Remote Control Unit to select the audio language you want Press OK and use the LEFT RIGHT buttons on the Remote Control Unit to select the sound type Stereo Mono Left Right EXIT ro SOUND button Exit th...

Страница 17: ...r System Subtitle Language To select subtitle language press the SUBTITLE button Use the UP DOWN buttons on the Remote Control Unit to select the Subtitle language you want To stop the subtitle select the Off on the submenu EXIT or SUBTITLE button Exit this menu ...

Страница 18: ...n to return to the previous menu or press the EXIT button to quit the Menu system completely Note Press the OK button when there is no Menu Window on the screen and the simple channel list will appear on the screen Main Menu 1 Turn on TV and your STB after you have connected all peripheral devices to it 2 Press the MENU button on the Remote Control Unit You will see the Main Menu on the TV screen ...

Страница 19: ...marked in red This menu helps you to easily select the channel that you want to watch To watch a specific channel first select the specific channel that you wish to watch by pressing the UP DOWN LEFT RIGHT buttons and then press OK button on the Remote Control Unit Also press the PAGE UP DOW N buttons Main menu shows the following information Channel List Shows the whole channel list stored in STB...

Страница 20: ...ppear on the right display window It consists of the following items Favorite Channel Category Sound Subtitle TTX TELETEXT PID Video Audio and PCR and Scrambling symbol Subtitle Teletext Scrambling symbol These are automatically displayed when the broadcasting station provides appropriate information Channel Sorting This mode displays channels according to the respective classifications desired by...

Страница 21: ...hannel lists that are locked Category displays channel lists that are set according to 12 genres The 12 genres are composed of Etc Movie Drama News Affair Show Game Sports Children s Music Dance Art Culture Social Education Leisure and Special Furthermore it displays the 4 types of channel lists that are arbitrarily set by the user USER1 USER2 USER3 and USER4 Favorite displays channel lists that a...

Страница 22: ... channel construct Favorite Channel List select Category Move channel s position and change the name of channel Press the Blue button in the Channel List menu and Channel Editing Window will be displayed Use the LEFT RIGHT buttons to move the cursor press the OK button to check the position you want and then press the Menu button to exit and save the data D Delete L Lock 1234 Favorite F1 F4 Cat Ca...

Страница 23: ... Numeric buttons 0 9 to select the channel that you want to delete from the channel list Use the LEFT RIGHT buttons to move the D delete position and press the OK button Press the MENU button to display Please press OK on the center of the screen Press the OK button to save and press the EXIT button to exit this menu ...

Страница 24: ... Numeric buttons 0 9 to select the channel That you want to lock from the channel list Use the LEFT RIGHT buttons to move the L lock position and press the OK button Press the MENU button to display Please press OK on the center of the screen Press the OK button to save and press the EXIT button to exit this menu Note The Parental Lock on the Installation Menu must be switched ON so that the Chann...

Страница 25: ...ect the channel that you want to add into favorite channel list from the all channel list Use the LEFT RIGHT buttons to move the F1 F2 F3 or F4 position and press the OK button The Favorite Channel List can be sectioned into four categories F1 F4 And one channel can be multiple selected from F1 to F4 Press the MENU button to display Please press OK on the center of the screen Press the OK button t...

Страница 26: ...UP DOWN DOUBLE ARROWS or the Numeric buttons 0 9 to select the channels of which position you want to move from the channel list Use the LEFT RIGHT buttons to move to the M move position and press the OK button Move it to the position where you want to place it using the CH CH buttons Press the Blue button to confirm Press the MENU button to display Please press OK on the center of the screen Pres...

Страница 27: ...LE ARROWS or the Numeric buttons 0 9 to select the channel that you want to rename from the channel list Use the LEFT RIGHT buttons to move to the R Rename position and press the OK button Keyboard screen will be displayed as bellow Red button Save Exit Green button Exit Use the UP DOWN LEFT RIGHT to key in the new channel name ...

Страница 28: ...ogram Guide screen will be displayed 1 Now Next EPG The information may include current time name of the Now and Next Program the starting and ending time of the Now Next Program Program information will be available only when it is included in the transmission When you press Red button on the Remote Control Unit Now and Next Program Guide are toggled When you press TV RADIO button on the Remote C...

Страница 29: ...on about certain program move the highlight to the program you want on the weekly EPG menu by pressing the UP DOWN LEFT RIGHT buttons and then press the OK button Press the Green or Yellow button to select the date you want Note 1 If the OK button is not pressed hard on channels Programs the BLUE button doesn t operate To see detailed information about the event you want press the OK button on the...

Страница 30: ...ing Select Setup in the Main Menu The following submenu will show up on your TV 1 Menu Language Select the desired language of the Menu 13 languages are available To select the desired Menu Language 1 Select the Setup in the Main Menu 2 Select Menu Language using the right button and then press OK button 3 Use the UP DOWN buttons to select the language you want and then press OK button ...

Страница 31: ...BS or RGB 3 Screen Type You can choose either 4 3 or 16 9 or Auto according to your TV type Auto 4 3 16 9 auto conversion Note screen type adapted on your TV menu setup 4 Banner Time You can set the display duration of the information banner box displayed on the Screen The time ranges from 2 to 20 seconds ...

Страница 32: ...he factory preset value is Channel 40 6 Other Setting This mode helps you to setup Audio Language Subtitle Language Time Adjust OSD Color OSD Transparency and System Information Audio Language Select the default language for audio when changing channels It is available for 13 languages If any language is not selected then the default language of current channel will be automatically selected ...

Страница 33: ...when changing channels It is available for 13 languages NOTE this only works for DVB subtitling Time Adjust D Date M Month H Hour M Minute You can set your local time according to your location Adjust the current time if neccessary by using UP DOWN buttons OSD Color You can adjust the OSD Color Cyber Wood Marine and Evergreen ...

Страница 34: ... Receiver 34 Digital Terrestrial R Menu Operation OSD Transparency Select OSD Transparency type 0 20 40 60 or 80 System Information Displays the system information Model Name S W Version H W Version and B L Boot Loader Version ...

Страница 35: ...d managing the channel information To avoid loss of service it is important to understand the following table before you make changes Channel Search Search Mode Auto Manual MUX Broadcast sent by television network freq MHz Center frequency Center frequency of each MUX FFT Fast Fourier Transform 2K 8K C R Code rate 1 2 2 3 3 4 5 6 7 8 Menu Operation ...

Страница 36: ...ect setting value of each parameter listed in the above table 1 Automatic Channel Search Automatic Channel Search helps you to automatically load the channel information of all MUX contained 1 Press the UP DOWN buttons to select Channel Search in the installation menu and press the OK button Then channel search window will be displayed 2 Press Red Auto button to start the Automatic Channel Search ...

Страница 37: ...ore convenient to search a specific MUX Like the Automatic Channel Search Manual Channel Search also searches all channels broadcasted over a specific MUX using its predefined information Press the UP DOWN buttons to select the MUX No you want to find and then Press the OK button Select the MUX to search manually Each MUX has its own parameter value Press the Green Manual button to start the manua...

Страница 38: ...Manual button to start the User MUX Channel Search Press the MENU button to return to the previous menu Press the EXIT button to exit this menu and return to the viewing mode Change PIN Code You can change your PIN Personal Identification Number Code from factory default value 0000 as follows Select Change PIN Code in the Installation Menu Then you will be asked for a New PIN Code Enter the new PI...

Страница 39: ... Code Note When the Parental Lock is set OFF you can watch the Lock Channel without entering the PIN Code Receiver Lock To lock the receiver select Receiver Lock in the Installation Menu and select On using UP DOWN and OK buttons Now the receiver is locked Whenever you try to start STB the Dialogue Window which asks you to enter your PIN Code will appear on the screen Factory Reset All data you ar...

Страница 40: ...Yellow Blue buttons 6 1 Page Link The broadcaster usually sends Teletext in a way that each Teletext page is linked with other four pages Red button link 1 Yellow button link 3 Green button link 2 Blue button link 4 6 2 Display Functions To select the display functions of the Teletext decoder the user has to press the OK button on the RCU Red button Toggle Hold mode The stop mode holds the current...

Страница 41: ...ture above Check the signal level if this is low then try to adjust the alignment of your antenna See No Picture above Check the volume level of the TV and STB Check the Mute status of the TV and STB Point Remote Control Unit directly towards the STB Check and replace batteries Check the Signal Strength and the Signal Quality in the channel list or channel search menu Adjust the direction of your ...

Страница 42: ...g Transport Stream MPEG 2 ISO IEC 13818 Transport stream Specification Profile Level MPEG 2 MP ML Input Rate Max 90 Mbit s Aspect Ratio 4 3 16 9 Video Resolution 720 x 576 Audio Decoding MPEG MusiCam Layer I II Audio Mode Single channel Dual channel Joint stereo Sampling 32 44 1 and 48KHz Main Resources Main CPU ST 5518 Flash Memory 1Mbyte SDRAM for MPEG 2Mbyte SDRAM for SYSTEM 2Mbyte Power Supply...

Страница 43: ... 2Vrms RS232C Transfer rate 115 200 bps 9 Pin D sub Type S PDIF Digital Audio Optical output RF Modulator RF Connector 75Ohm 169 2 Female Loop Through 75Ohm 169 2 Male Frequency 470MHz to 860MHz Output Channel CH21 69 for the Remodulation TV Standard PAL B G D CK Selectable Physical Specification Size W x H x D 340 x 66 x 247 mm Weight Net 2 1 Kg Operating Temp 0 C to 50 C Storage Temp 10 C to 65 ...

Страница 44: ... REV 01 2004 01 04 300xxx ...

Отзывы: