TRENDnet TW100-BRV304 SHEETS Скачать руководство пользователя страница 80

TW100-BRV304 User's Guide 

Connecting 2 LANs via VPN 


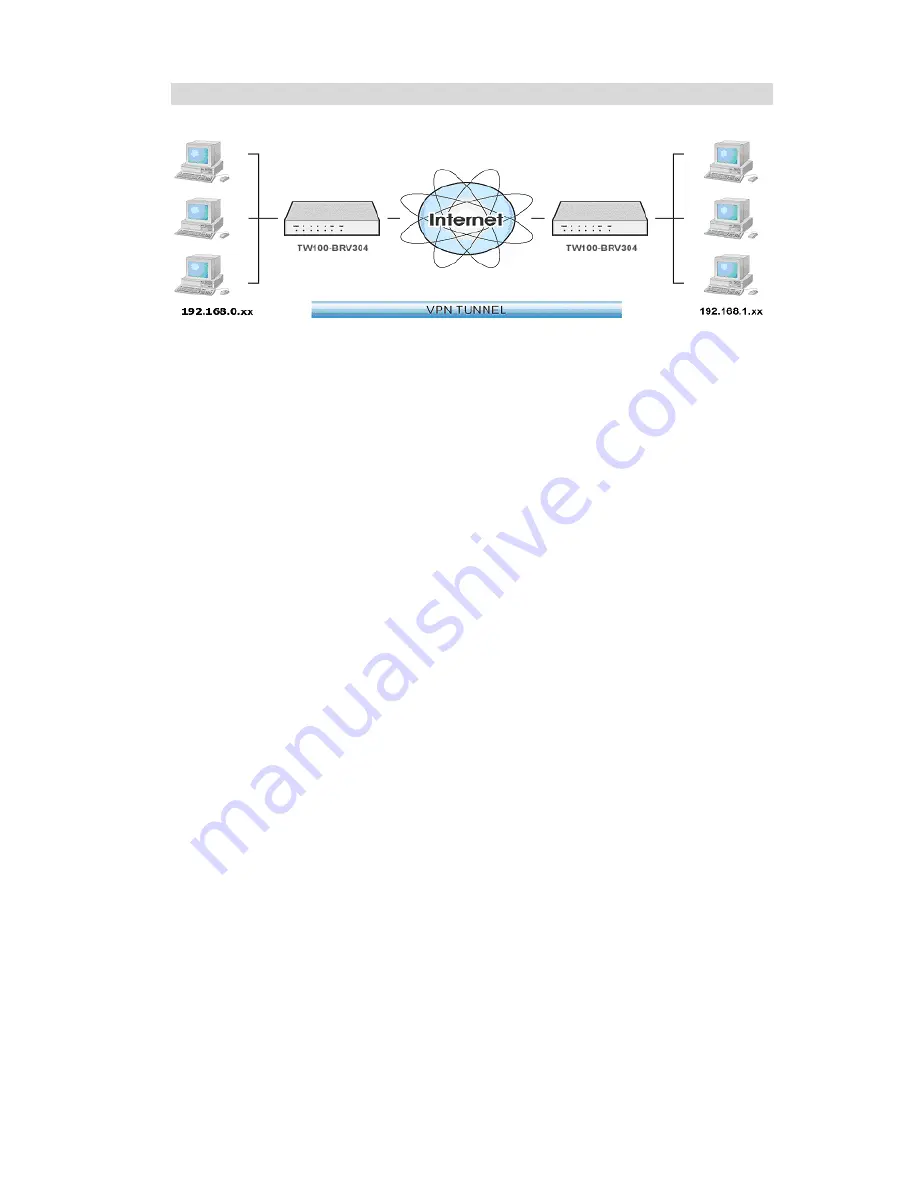
Figure 47: Connecting 2 VPN Gateways 

This allows two (2) LANs to be connected. PCs on each endpoint gain secure access to the 
remote LAN. 


The 2 LANs MUST use different IP address ranges.  


The VPN Policies at each end determine when a VPN tunnel will be established, and what 
systems on the remote LAN can be accessed once the VPN connection is established. 


It is possible to have simultaneous VPN connections to many remote sites. 


76 

Содержание TW100-BRV304 SHEETS

Страница 1: ......

Страница 2: ......

Страница 3: ...32 CHAPTER 5 OPERATION AND STATUS 33 Operation 33 Status Screen 33 Connection Status PPPoE 34 Connection Status PPTP 37 Connection Status Telstra Big Pond 38 Connection Details SingTel RAS 39 Connect...

Страница 4: ...ATURES SETTINGS 123 Overview 123 Config File 124 Network Diagnostics 125 PC Database 126 Remote Administration 130 Routing 132 Upgrade Firmware 137 UPnP 138 APPENDIX A TROUBLESHOOTING 139 Overview 139...

Страница 5: ...being easy to use Internet Access Features Shared Internet Access All users on the LAN or WLAN can access the Internet through the TW100 BRV304 using only a single external IP Address The local invali...

Страница 6: ...undesirable Web sites by LAN users Internet Access Log See which Internet connections have been made VPN Pass through Support PCs with VPN Virtual Private Networking software using PPTP L2TP and IPSec...

Страница 7: ...ates protection against DoS attacks Rule based Policy Firewall To provide additional protection against malicious pack ets you can define your own firewall rules This can also be used to control the I...

Страница 8: ...Corresponding LAN hub port is using 100BaseT Off Corresponding LAN hub port connection is using 10BaseT or no active connection DMZ Link Act On DMZ port is active Off No active connection to the DMZ p...

Страница 9: ...r you wish to make available to the public you can connect it here To use multiple servers use a standard LAN cable to connect the DMZ port to a normal port on another hub and connect your servers to...

Страница 10: ...ble from the Internet the Virtual Server Port Forwarding feature must be configured to send incoming traffic to the appropriate server Advantages of the DMZ Port If running any Servers on your LAN you...

Страница 11: ...am 1 Choose an Installation Site Select a suitable place on the network to install the TW100 BRV304 Ensure the TW100 BRV304 and the DSL Cable modem are powered OFF 2 Connect LAN Cables Use standard LA...

Страница 12: ...standard LAN ca ble 4 Power Up Power on the Broadband modem Connect the supplied power adapter to the TW100 BRV304 and power up Use only the power adapter provided Using a different one may cause hard...

Страница 13: ...V304 you wish to use Use the table below to locate detailed instructions for the required functions To Do this Refer to Configure PCs on your LAN Chapter 4 PC Configuration Check TW100 BRV304 operatio...

Страница 14: ...rogram The TW100 BRV304 contains an HTTP server This enables you to connect to it and confi gure it using your Web Browser Your Browser must support JavaScript The configuration program has been teste...

Страница 15: ...the Address box enter HTTP and the IP Address of the TW100 BRV304 as in this example which uses the TW100 BRV304 s default IP Address HTTP 192 168 0 1 If you can t connect If the TW100 BRV304 does not...

Страница 16: ...r admin for the User Name and leave the Password blank These are the default values Both the name and password can and should be changed using the Admin Login screen Once you have changed either the n...

Страница 17: ...dress button to copy the MAC address from your PC to the TW100 BRV304 Common Connection Types Cable Modems Type Details ISP Data required Dynamic IP Address Your IP Address is allocated automatically...

Страница 18: ...Address is allocated automatically when you connect to you ISP Usually none However some ISP s may require you to use a particular Hostname Domain name or MAC physical address Static Fixed IP Address...

Страница 19: ...tion Data Input Use the menu bar on the top of the screen and the Back button on your Browser for navigation Changing to another screen without clicking Save does NOT save any changes you may have mad...

Страница 20: ...e value as the PCs on that LAN segment DHCP Server If Enabled the TW100 BRV304 will allocate IP Addresses to PCs DHCP clients on your LAN when they start up The default and recommended value is Enable...

Страница 21: ...our LAN Using the TW100 BRV304 s DHCP Server This is the default setting The DHCP Server settings are on the LAN screen On this screen you can Enable or Disable the TW100 BRV304 s DHCP Server function...

Страница 22: ...each PC TCP IP Settings Overview If using the default TW100 BRV304 settings and the default Windows TCP IP settings no changes need to be made By default the TW100 BRV304 will act as a DHCP Server aut...

Страница 23: ...ng Figure 9 IP Address Win 95 Ensure your TCP IP settings are correct as follows Using DHCP To use DHCP select the radio button Obtain an IP Address automatically This is the default Windows setting U...

Страница 24: ...administrator can advise you of the IP Address they assigned to the TW100 BRV304 Figure 10 Gateway Tab Win 95 98 On the DNS Configuration tab ensure Enable DNS is selected If the DNS Server Search Or...

Страница 25: ...t Control Panel Network and on the Protocols tab select the TCP IP protocol as shown below Figure 12 Windows NT4 0 TCP IP 2 Click the Properties button to see a screen like the one below Figure 13 Win...

Страница 26: ...administrator before making the following changes 1 The Default Gateway must be set to the IP address of the TW100 BRV304 To set this Click the Advanced button on the screen above On the following scr...

Страница 27: ...PC Configuration Figure 15 Windows NT4 0 DNS 23...

Страница 28: ...Right click the Local Area Connection icon and select Properties You should see a screen like the following Figure 16 Network Configuration Win 2000 3 Select the TCP IP protocol for your network card...

Страница 29: ...Address from the TW100 BRV304 Using a fixed IP Address Use the following IP Address If your PC is already configured check with your network administrator before making the following changes Enter th...

Страница 30: ...Connection 2 Right click the Local Area Connection and choose Properties You should see a screen like the following Figure 18 Network Configuration Windows XP 3 Select the TCP IP protocol for your net...

Страница 31: ...ains an IP Address from the TW100 BRV304 Using a fixed IP Address Use the following IP Address If your PC is already configured check with your network administrator before making the following change...

Страница 32: ...displays 2 Under Tasks located on the left hand side of the window click Manage network connec tions 3 In Network Connections window displays right click on the correct Local Area Connec tion then cl...

Страница 33: ...5 Select Internet Protocol Version 4 TCP IPv4 then click Properties From the General tab verify that Obtain an IP address automatically and Obtain DNS server address auto matically are selected Click...

Страница 34: ...nge your Internet Connection 3 Select the Connection tab and click the Setup button 4 Cancel the pop up Location Information screen 5 Click Next on the New Connection Wizard screen 6 Select Connect to...

Страница 35: ...lick Edit Location Select TCP IP for the Network field Leave the Phone Number blank Click Save then OK Configuration is now complete Before clicking Sign On always ensure that you are using the TW100...

Страница 36: ...changes Fixed IP Address By default most Unix installations use a fixed IP Address If you wish to continue using a fixed IP Address make the following changes to your configuration Set your Default G...

Страница 37: ...plications which use non standard connections or port numbers may be blocked by the TW100 BRV304 s built in firewall You can define such applications as Special Applica tions to allow them to function...

Страница 38: ...and the IP addresses allocated to them use the PC Database option on the Other menu System Device Name This displays the current name of the TW100 BRV304 Firmware Version The current version of the fi...

Страница 39: ...ion is currently estab lished If the connection does not exist the Connect button can be used to establish a connection If the connection currently exists the Disconnect button can be used to break th...

Страница 40: ...dle for the time period specified in the Idle Time out field The connection will now be termi nated Disconnecting The current connection is being terminated due to either the Idle Time out above or Di...

Страница 41: ...ernet Service Provider PPTP Status This indicates whether or not the connection is currently established If the connection does not exist the Connect button can be used to establish a connection If th...

Страница 42: ...our ISP Internet Service Provider Connection Status This indicates whether or not the connection is currently estab lished If the connection does not exist the Connect button can be used to establish...

Страница 43: ...which is currently used Physical Address The hardware address of this device as seen by remote devices on the Internet This is different to the hardware address seen by devices on the local LAN IP Ad...

Страница 44: ...ection Dynamic IP address If you have a Fixed Static IP address this button has no effect If the ISP s DHCP Server has NOT allocated an IP Address for the TW100 BRV304 this button will say Renew Click...

Страница 45: ...ove DNS IP Address The IP Address of the Domain Name Server which is currently used DHCP Client This will show Enabled or Disabled depending on whether or not this device is functioning as a DHCP clie...

Страница 46: ...TW100 BRV304 User s Guide 42 the ISP s DHCP Server this button will say Release Clicking the Release button will break the connection and release the IP Address Refresh Update the data shown on screen...

Страница 47: ...and how to use the TW100 BRV304 s Internet Features Overview The following advanced features are provided WAN Port Configuration Advanced Internet Communication Applications Special Applications Mult...

Страница 48: ...ISPs require a particular value often that of the PC initially used for Internet access You can use the Copy from PC button to copy your PC s address into this field the Default button to insert the...

Страница 49: ...hod If your ISP does not use a login method username password for Internet access leave this at the default value None Direct connec tion Otherwise check the documentation from your ISP select the log...

Страница 50: ...e for this time period the connection will be terminated Advanced Internet Figure 27 Internet Screen This screen allows configuration of all advanced features relating to Internet access Communication...

Страница 51: ...he TW100 BRV304 s firewall In this case you can define the application as a Special Application Special Applications Screen This screen can be reached by clicking the Special Applications button on th...

Страница 52: ...Special Applications screen as required On your PC use the application normally Remember that only one 1 PC can use each Special application at any time Also when 1 PC is finished using a particular S...

Страница 53: ...s the URL Filter screen An example screen is shown below Figure 29 URL Filter Screen Data URL Filter Screen Filter Strings Current Entries This lists any existing entries If you have not entered any v...

Страница 54: ...at the DDNS server If the DDNS Service provides software to perform this IP address update you should disable the Update function or not use the software at all 5 From the Internet users will be able...

Страница 55: ...ord Key Enter your current password for the DDNS Service Domain Name Enter the domain name allocated to you by the DDNS Service If you have more than one name enter the name you wish to use DDNS Statu...

Страница 56: ...on both Internet users are connecting to the same IP Address but using different protocols To Internet users all virtual Servers on your LAN have the same IP Address This IP Address is allocated by yo...

Страница 57: ...ers This lists a number of pre defined Servers plus any Servers you have defined Details of the selected Server are shown in the Properties area Properties Enable Use this to Enable or Disable support...

Страница 58: ...ere is no need to use this screen or change any settings Figure 33 Options Screen Data Options Screen Backup DNS IP Address Enter the IP Address of the DNS Domain Name Servers here These DNS will be u...

Страница 59: ...gn a user name and password to the TW100 BRV304 Figure 34 Admin Login Screen Data Admin Login Screen Admin Login Login name Enter the login name here If a password is set and also the login name is re...

Страница 60: ...TW100 BRV304 User s Guide Figure 35 Password Dialog Enter the User Name and Password you set on the Admin Login screen above 56...

Страница 61: ...2 Set the desired restrictions on the other groups Group 1 Group 2 Group 3 and Group 4 as needed 3 Assign PC to the groups as required Restrictions are imposed by blocking Services or types of connec...

Страница 62: ...o apply the blocking only during scheduled times If access is not blocked no Scheduling is possible and this setting has no effect To define the schedule use the Schedule option on the menu Services T...

Страница 63: ...Security Configuration 59...

Страница 64: ...ult group Access Control Log To check the operation of the Access Control feature an Access Control Log is provided Click the View Log button on the Access Control screen to view this log This log sho...

Страница 65: ...ed administrators only Firewall Rules Screen Click the Firewall Rules option on the Security menu to see a screen like the following exam ple This example contains two 2 rules for outgoing traffic Sin...

Страница 66: ...ection for more details Edit To Edit or modify an existing rule select it and click the Edit button Move There are 2 ways to change the order of rules Use the up and down indicators on the right to mo...

Страница 67: ...ption Source IP These settings determine which traffic based on their source IP address is covered by this rule Select the desired option Any All traffic from the source port is covered by this rule S...

Страница 68: ...P address and Finish IP address fields You can ignore the Subnet Mask field Subnet address If this option is selected enter the required mask in the Subnet Mask field Services Select the desired Servi...

Страница 69: ...a Logs Screen Enable Logs Incoming Traffic Select the desired option All IP traffic this will log all incoming TCP IP connections of any type This will generate the largest logs and fill the internal...

Страница 70: ...normal Router operations Connections to the Web based interface of this Router This option will log each connection to the Router itself whenever the Web based management interface is used Other conn...

Страница 71: ...desired option for sending the log by E mail When log is full The time is not fixed The log will be sent when the log is full which will depend on the volume of traf fic Every day Every Monday The lo...

Страница 72: ...SMTP Server Enter the address or address or IP address of the SMTP Simple Mail Transport Protocol Server you use for outgoing E mail Port No Enter the port number used to connect to the SMTP Server T...

Страница 73: ...ively they become a DoS attack Threshold This setting affects the number of half open connections allowed A half open connection arises when a remote client contacts the Server with a connection reque...

Страница 74: ...ackets are discarded forcing re transmission of these packets In some situations this could prevent successful communication Normally this setting should be disabled Block TCP Flood A TCP flood is exc...

Страница 75: ...e time for a particular day is blank no action will be performed Define Schedule Screen This screen is accessed by the Scheduling link on the Security menu Figure 43 Define Schedule Screen Data Define...

Страница 76: ...e from the list Note that you can only delete Services you have added the pre defined services can not be deleted Add New Service Name Enter a suitable name for this Service Type Select the correct ty...

Страница 77: ...s endpoints Each IPsec VPN has two SAs one in each direction If IKE Internet Key Exchange is used to generate and exchange keys there are also SA s for the IKE connection as well as the IPsec connecti...

Страница 78: ...e site However you should only Enable one 1 policy at a time If multiple policies for the same remote site are enabled the policies are examined in the order in which they are listed and the first mat...

Страница 79: ...uires no VPN configuration since it is not acting as a VPN endpoint Client PC to VPN Gateway Figure 46 Client PC to VPN Server In this situation the PC must run appropriate VPN client software in orde...

Страница 80: ...endpoint gain secure access to the remote LAN The 2 LANs MUST use different IP address ranges The VPN Policies at each end determine when a VPN tunnel will be established and what systems on the remo...

Страница 81: ...particular site In that case the first matching policy for the traffic under consideration will be used Data VPN Policies Screen VPN List Policy Name The name of the policy When creating a policy you...

Страница 82: ...create a policy which is similar to an existing policy select the policy and click the Copy button Remember that the new policy must have a different name and there can only be one active enabled pol...

Страница 83: ...ecause it increases traffic volume Remote VPN Endpoint The Internet IP address of the remote VPN endpoint Gateway or client Dynamic Select this if the Internet IP address is unknown In this case only...

Страница 84: ...raffic So it would not be forwarded to the Gateway Local IP addresses Type Any no additional data is required Any IP address is accepta ble For outgoing connections this allows any PC on the LAN to us...

Страница 85: ...whether you previously selected Manual Key Exchange or IKE Manual Key Exchange Figure 52 VPN Wizard Manual Key Exchange Screen These settings must match the remote VPN Note that you cannot use both A...

Страница 86: ...characters 48 HEX chars If using AES encryption the key input size must match the Key Size selected above ESP Authentication Generally you should enable ESP Authentication There is little difference...

Страница 87: ...in Name assigned to this device Fully Qualified User name This name does not have to a valid Internet Domain Name E mail addresses are often used for this entry DER ANS 1 DN This must be a DER ANS 1 D...

Страница 88: ...but takes slightly longer to complete Aggressive Mode provides no identity protection but is quicker Direction Select the desired option Initiator Only outgoing connections will be created Incoming co...

Страница 89: ...n breaking the next key AH Authentication AH Authentication Header specifies the authentication protocol for the VPN header if used AH is often NOT used If you do enable it ensure the algorithm select...

Страница 90: ...4 User s Guide For IKE configuration is now complete Click Next to view the final screen Figure 55 VPN Wizard Final Screen On the final screen click Finish to save your settings then Close to exit the...

Страница 91: ...peration Select a mea ningful name Remote Endpoint 205 17 11 43 202 11 13 211 Other endpoint s WAN Internet IP address Local IP addresses Any Any Use a more restrictive definition if possible Remote I...

Страница 92: ...ode Must match DH Group Group 1 768 bit Group 1 768 bit Must match IKE SA Life time 28800 28800 Does not have to match Shorter period will be used IKE PFS Disable Disable Must match IPSec SA Parameter...

Страница 93: ...es Subnet address 192 168 0 0 255 255 255 0 Allows access to entire LAN Use a more restrictive definition if possible Remote IP addresses 172 16 9 10 For a single client this address is the same as th...

Страница 94: ...cation Enable MD5 Must match client PC ESP encryption Enable DES Must match client PC Windows Client Configuration 1 Select Start Programs Administrative Tools Local Security Policy 2 Right click IP S...

Страница 95: ...re in use Two 2 rules are required incoming and outgoing The outgoing rule will be added first 6 Deselect the Use Add Wizard checkbox then click Add to view the screen below Figure 60 IP Filter List 7...

Страница 96: ...dress is My IP address and the Destination IP address is the address range used on the remote LAN Ensure the Mirrored option is checked 9 Click OK to save your settings and close this dialog Figure 62...

Страница 97: ...e Properties Filter Action 11 Select Require Security then click the Edit button to view the Require Security Proper ties screen Figure 64 Require Security Properties 12 Select Negotiate security this...

Страница 98: ...y Properties screen Figure 66 Require Security Properties 14 Ensure the following settings are correct then click OK to return to the Filter Action tab of the Edit Rule Properties screen VPN Setting W...

Страница 99: ...hen click the Edit to see the screen like the example below Figure 68 Authentication Method 17 Select Use this string to protect the key exchange preshared key then enter your pre shared key in the fi...

Страница 100: ...To Win2K then click Add Figure 70 Windows 2000 XP Client to TW100 BRV304 21 Enter the Source IP address and the Destination IP address as shown below Since this is the incoming filter the Source IP ad...

Страница 101: ...Microsoft VPN Figure 71 Filter Properties Addressing 22 Click OK to save your changes then Close Figure 72 Filter List 23 Ensure the To Win2K filter is selected then click the Filter Action tab 97...

Страница 102: ...Action 24 Select Require Security then click Edit On the Require Security Methods screen below select Negotiate security Figure 74 Security Methods 25 Click the Add button On the resulting Modify Secu...

Страница 103: ...n click OK again to return to the Filter Action screen 27 Select the Tunnel Setting tab and enter the WAN Internet IP address of this PC 172 16 9 10 in this example Figure 76 Tunnel Setting 28 Select...

Страница 104: ...the key exchange preshared key then enter your pre shared key in the field provided 30 Click OK to save your settings then Close to return to the DUT to Win2K Properties screen There should now be 2 I...

Страница 105: ...Microsoft VPN Figure 79 Properties General Tab 32 Click the Advanced button to see the screen below Figure 80 Key Exchange Settings 33 Click the Methods button to see the screen below 101...

Страница 106: ...hms 35 Select SHA1 for Integrity Algorithm 3DES for Encryption algorithm and Low 1 for the Diffie Hellman Group 36 Click OK to save then OK again and then Close to return to the Local Security Setting...

Страница 107: ...84 TW100 BRV304 to Windows 2000 Server TW100 BRV304 Configuration This is the same as for the client setup earlier with the exception of the IP address range for the remote endpoint Setting Single Cl...

Страница 108: ...r both IP Filters the Filter Properties Addressing should be completed as follows Figure 85 Windows 2000 Server Addressing The Source Address should be set to A specific IP Subnet and the IP address a...

Страница 109: ...Certificates Screen Trusted Certificates Subject Name CA The Subject Name is always the company or person to whom the Certificate is issued For trusted certificates this will be a CA Issuer Name The C...

Страница 110: ...ty which issued the Certificate Expiry Time The date on which the Certificate expires You should renew the Certificate before it expires Delete button Use this button to delete a Self Certificate Sele...

Страница 111: ...ure 89 Self Certificate Request 1 2 Complete this screen Name Enter a name which helps to identify this particular certifi cate This name is only for your reference it is not visible to other people S...

Страница 112: ...te request procedure When prompted for the request data supply the data you copied and saved in step 5 above Submit the CA s form If there are no problems the Certificate will then be issued 8 After o...

Страница 113: ...ou will see a screen like the following Figure 93 Upload CRL 4 Upload the CRL file Click the Browse button and locate the CRL file on your PC Select the file The name will appear in the File to Upload...

Страница 114: ...I is specified by user input If using IKE the SPI is generated by the IKE negotiation process SA Type Each SAs Security Association will be either IKE or IPSec VPN Endpoint The IP address of the remot...

Страница 115: ...apter Using Microsoft VPN provides easier setup than using IPSec VPN The following Microsoft VPN configuration screens are provided Server Clients Status Server Setup The TW100 BRV304 incorporates a P...

Страница 116: ...ou must enable at least one method Client Database To login to the PPTP Server above using the Microsoft Windows VPN Adapter remote users must be entered in the VPN client database The Client setup sc...

Страница 117: ...rm Use this to prepare the form for a new entry Any existing data will be cleared Add as New User Use this to save the data in the Properties area as a new entry If a user is selected in the Existing...

Страница 118: ...N Status Screen Server Status Status This indicates whether or not the PPTP VPN Server is enabled Current Connec tions This indicates the number of remote clients currently logged into the PPTP VPN Se...

Страница 119: ...described in the following sections It is assumed that remote users have a Broadband not dial up connection to the Internet Windows 98 ME 1 Click Start Settings Dial up Networking 2 Select Make New C...

Страница 120: ...PN enable the setting This is the default Internet connection on the Dialing tab Do NOT enable this setting if using Dial up or PPPoE client software Windows ME VPN Dialing Properties To establish a c...

Страница 121: ...etwork Connection 2 Select the VPN option Connect to a private network through the Internet as shown above and click Next Figure 101 Windows 2000 Public Network 3 On the screen above Select Do not dia...

Страница 122: ...ove enter the Domain Name or Internet IP address of the TW100 BRV304 you wish to connect to Click Next to continue Figure 103 Windows 2000 Connection Availability 5 Choose whether to allow this connec...

Страница 123: ...lient database on the TW100 BRV304 3 You can choose to have Windows remember the password if desired so you do not have to enter it again Changing the connection settings The PPTP VPN Server in the TW...

Страница 124: ...Settings Network Connections and start the New Connection Wizard Figure 105 Windows XP Network Connection Type 2 Select the option Connect to the network at my workplace as shown above and click Next...

Страница 125: ...ection Name 4 Enter a suitable name for this connection Click Next to continue Figure 108 Windows XP Public Network 5 On the screen above select Do not dial the initial connection Click Next to contin...

Страница 126: ...ct 2 You will then be prompted for the username and password Enter the username and password assigned to you as recorded in the VPN client database on the TW100 BRV304 3 You can choose to have Windows...

Страница 127: ...s all the configuration data Network Diagnostics Ping DNS Lookup PC Database This is the list of PCs shown when you select the DMZ PC Virtual Server or Internet Application This database is maintained...

Страница 128: ...ure 111 Config File Screen Data Config File Screen Backup Config Use this to download a copy of the current configuration and store the file on your PC Click Download to start the download Restore Con...

Страница 129: ...Internet and no connection currently exists you could get a Timeout error In that case wait a few seconds and try again Ping Button After entering the IP address click this button to start the Ping pr...

Страница 130: ...s are automatically added to the database and updated as required By default non Server versions of Windows act as DHCP Clients this setting is called Obtain an IP Address automatically The TW100 BRV3...

Страница 131: ...ected or not powered On you will not be able to add it Buttons Add This will add the new PC to the list The PC will be sent a ping to determine its hardware address If the PC is not available not con...

Страница 132: ...been removed from your LAN The entry is incorrect PC Properties Name If adding a new PC to the list enter its name here It is best if this matches the PC s hostname IP Address Select the appropriate...

Страница 133: ...e MAC address can NOT be left blank Buttons Add as New Entry Add a new PC to the list using the data in the Properties box If Automatic discovery for MAC address is selected the PC will be sent a ping...

Страница 134: ...ssign a password Settings Enable Check this to allow administration management via the Internet To connect see above If Disabled this device will ignore management connection attempts from the Interne...

Страница 135: ...Only the specified IP address is allowed If selected you must enter an IP address in the field provided To connect from a remote PC via the Internet 1 Ensure your Internet connection is established a...

Страница 136: ...4 and ensure the following Windows 2000 settings are correct Open Routing and Remote Access In the console tree select Routing and Remote Access server name IP Routing RIP In the Details pane right cl...

Страница 137: ...equired then click the Update button to save the changes to the selected entry Properties Destination Network The network address of the remote LAN segment For standard class C LANs the network addres...

Страница 138: ...ult Gateway Local Router The local router is the Router installed on the same LAN segment as the TW100 BRV304 This router requires that the Default Route is the TW100 BRV304 itself Typically routers h...

Страница 139: ...dress 192 168 1 0 Network Mask 255 255 255 0 Standard Class C Gateway IP Address 192 168 0 100 TW100 BRV304 s local Router Interface LAN Metric 2 Entry 2 Segment 2 Destination IP Address 192 168 2 0 N...

Страница 140: ...TW100 BRV304 User s Guide For Router B s Default Route Destination IP Address 0 0 0 0 Network Mask 0 0 0 0 Gateway IP Address 192 168 1 80 TW100 BRV304 s local router Interface LAN 136...

Страница 141: ...this file Start Upgrade Click this button to start the Firmware upgrade Note than any users accessing the Internet via the TW100 BRV304 will lose their con nection When the upgrade is finished the TW1...

Страница 142: ...s by supported by Windows ME XP or later If Enabled this device will be visible via UPnP If Disabled this device will not be visible via UPnP Allow Configu ration If checked then UPnP users can change...

Страница 143: ...ithin the range 192 168 0 2 to 192 168 0 254 and thus com patible with the TW100 BRV304 s default IP Address of 192 168 0 1 Also the Network Mask should be set to 255 255 255 0 to match the TW100 BRV3...

Страница 144: ...passing through it so it is not transparent Use the Special Applications feature to allow the use of Internet applications which do not function correctly If this does solve the problem you can use th...

Страница 145: ...uctions may cause harmful interference to radio communica tions However there is no guarantee that interference will not occur in a particular installation If this equipment does cause harmful interfe...

Страница 146: ...ns 1 This device may not cause harmful interference and 2 This device must accept any interference received including interference that may cause undesired operation This transmitter must not be co lo...

Страница 147: ...the product was subject to accident abuse or improper use iii the product was subject to conditions more severe than those specified in the manual Warranty service may be obtained by contacting TRENDw...

Страница 148: ...IAL INDIRECT SPECIAL OR PUNITIVE DAMAGES OF ANY KIND OR FOR LOSS OF REVENUE OR PROFITS LOSS OF BUSINESS LOSS OF INFORMATION OR DATE OR OTHER FINANCIAL LOSS ARISING OUT OF OR IN CONNECTION WITH THE SAL...

Страница 149: ...Appendix B Specifications 145...

Отзывы: