TRENDnet TEW-841APBO Скачать руководство пользователя страница 36


© Copyright 2019 TRENDnet. All Rights Reserved. 


TRENDnet User’s Guide


TEW-841APBO 

33


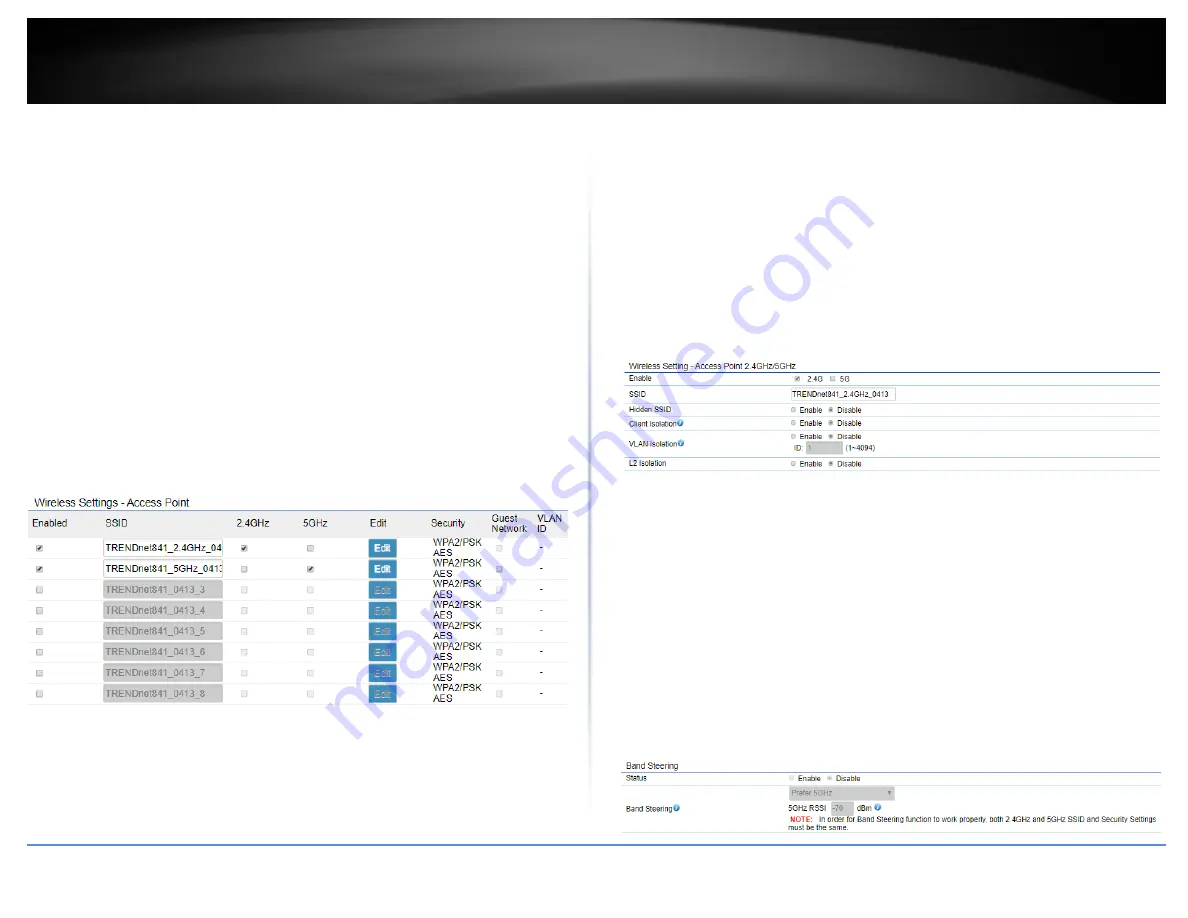
Wireless Settings – Access Point / WDS Access Point 

Note: The following section configures wireless radios that are set to Access Point and 
WDS Access Point operation mode. WDS AP mode may not have all configurations 
available. 

For Access Point and WDS Access Point modes: 


Enabled – Check the box to enable this wireless radio. Deselected box indicates 
radio is off


SSID – The SSID of the radio. 


2.4GHz – Check the box to apply this wireless profile to the 2.4GHz wireless 
radio. 


5GHz – Check the box to apply this wireless profile to the 5GHz wireless radio. 


Edit – To edit the advanced wireless settings, click Edit. Clicking Save in the 
pop-up window will return to the previous page. **if the pop-up window does 
not appear, please disable the browser’s ad/pop-up blocker**


Security – Displays the security type assigned to this SSID.  


Guest Network – Check the box to turn this profile into a guest network with 
its configurable subnet and DHCP server.  


VLAN ID – This displays the VLAN ID or VID of this profile, if one has been 
assigned.  


Clicking Edit from above, Wireless Settings – Access Point opens up the advanced 
configuration options. Be sure to click Save prior to returning to the previous page. 

Wireless Setting – Access Point 2.4GHz/5GHz 


Enable – Check the box next to the radio to apply this wireless profile to.  


SSID – Enter the SSID you would like to assign to this wireless profile. 


Hidden SSID – Select Enable to hide this SSID name from broadcasting. 


Client Isolation – Select Enable to block communication between 
associated clients under the same WLAN. 


VLAN Isolation – When this option is enabled with a specified VLAN ID in 
the SSID profile, all traffic associated with this SSID will be tagged with this 
VLAN ID upon entering the LAN Bridge. 


L2 Isolation – Check the box to isolate on a layer-2 basis. 


Band Steering 


Status – Select Enable to enable the band steering feature. Band steering 
facilitates effective spectrum usage, enabling 5GHz capable clients to 
associate with this AP’s 5GHz radio, thus offloading bandwidth utilization 
in 2.4GHz band. 


Band Steering – Click the dropdown to select the aggressiveness of the 
steering. Band steering f 

o


Prefer 5GHz – Enter an RSSI signal strength value. When the 
connection drops below the value, the client will be moved over 
to the 2.4GHz band. (the more negative the number, the lower 
the signal strength. ex: -40dBm is significantly stronger than -80. 

o


Force 5GHz – This option causes all 5GHz capable clients to 
connect to the 5GHz radio. 

o


Band Balance – Similar to the Prefer 5GHz option, but additionally 
allows configuration of percentage of new clients on the 5GHz. 


Содержание TEW-841APBO

Страница 1: ...TRENDnet User s Guide Cover Page...

Страница 2: ...the WiFi MAC Addresses 12 Hardware Setup 13 TEW 841APBO 1 Configuration 13 TEW 841APBO 2 Configuration 18 Confirm Connectivity 19 Completed Installation Reference 20 Hardware and Mounting Installatio...

Страница 3: ...Copyright 2019 TRENDnet All Rights Reserved TRENDnet User s Guide Table of Contents ii Appendix 47...

Страница 4: ...g applications The wireless multi point bridge can be powered with a PoE switch or PoE injector of your choosing A variety of installation scenarios are facilitated with Access Point WDS Bridge WDS Ac...

Страница 5: ...ireless device s output power antenna gain antenna alignment receiving sensitivity and radio interference Additionally environmental factors such as weather conditions physical obstacles and other con...

Страница 6: ...tures Front View Top View Back View Bottom View without weatherproof kit Side View IP67 Weather Rated Housing with built in directional sector antenna 4 x 5 dBi Omni directional antennas Mounting Poin...

Страница 7: ...gigabit network connectivity to the access point Power PWR LED When the LED is ON this will indicate that the device is receiving power and OFF if the device is not receiving power LAN LED When the LE...

Страница 8: ...nt to point bridge capability can connect link the two physical locations or buildings together through an encrypted wireless connection Although this product supports multiple wireless modes the basi...

Страница 9: ...APBO Wireless Installation Tips There are a number of factors that can impact the range of wireless devices 1 Adjust your wireless devices so that the signal is traveling in a straight path rather tha...

Страница 10: ...s of the device The IP address settings by default is set to DHCP but if no DHCP server is present on the network then it will default to http 192 168 10 100 Important Note Purchasing this model requi...

Страница 11: ...E There are two different sets of antennas one tuned for 2 4GHz the other tuned for 5GHz Be sure to attach each antenna to its respective band for optimal performance Basic Access Point Configuration...

Страница 12: ...type in the default IP address of the access point in the address bar then press Enter The default IP address of the access point is 192 168 10 100 6 When prompted login to the access point management...

Страница 13: ...typed in the field IMPORTANT NOTE This device does not have a hardware reset button When changing the administrator password to the access point configuration page please make sure to write down your...

Страница 14: ...nnect reconnect all clients to the access point using the new credentials 14 To change the wireless network name SSID under the wireless settings Access Point section select which band you would like...

Страница 15: ...o establish a WDS bridge using the 5GHz radio while leaving the 2 4GHz radio standard 802 11 for client connections Note This example installation procedure will be demonstrated using the following ex...

Страница 16: ...re to attach each antenna to its respective band for optimal performance TEW 841APBO 1 Configuration Note It is strongly recommended to configure the access point first prior to mounting 1 Using a RJ...

Страница 17: ...type in the default IP address of the access point in the address bar then press Enter The default IP address of the access point is 192 168 10 100 6 When prompted login to the access point managemen...

Страница 18: ...apply you will return to the login screen Please enter the newly configured credentials to log back in 10 Click on the Basic tab under Network category in the left hand menu 11 Under the IPv4 Settings...

Страница 19: ...nd menu 14 Under 5GHz click the Operation Mode drop down list and select WDS Bridge Keep the 2 4GHz in the default Access Point mode 15 Click Configuration next to Channel Note The channel for TEW 841...

Страница 20: ...croll down on the previous page Wireless tab under the Networking category and identify the WDS Link Settings 5GHz section click on the Security drop down list and select AES Enter your chosen WDS enc...

Страница 21: ...18 under the MAC Address section click the Mode drop down list and select Enable In the fields provided enter the 5GHz WiFi MAC address of TEW 841APBO 1 and click Save at the bottom of the page MAKE...

Страница 22: ...ted In the Target IP Domain Name field enter the IP address 192 168 10 50 Then click Ping The first tab Ping will automatically be selected In the Target IP Domain Name field enter the IP address 192...

Страница 23: ...Copyright 2019 TRENDnet All Rights Reserved 20 TRENDnet User s Guide TEW 841APBO Completed Installation Reference...

Страница 24: ...and remove the placeholder center pin 2 Separate the rubber seal from the claw 3 Verify that you have the following parts 4 Insert one end of an Ethernet cable into the sealing nut 5 Insert the Ether...

Страница 25: ...ockwise to secure it to the main body Pole Mount Installation Note The pole mounting clamp supports poles with a maximum diameter of 66 mm 2 63 in 1 Insert the included pole mounting clamp through the...

Страница 26: ...s point can be either a main relay or remote base station A main base station is typically connected to a wired network via an Ethernet port A relay base station relays data between main base stations...

Страница 27: ...and a network WDS Station In WDS Station mode also known as WDS Client Bridge mode the device acts as a client to any standard wireless connection with the LAN PoE port logically bridged to the wirele...

Страница 28: ...h gain Omni directional antenna makes this access point an ideal solution for establishing WDS point to multipoint wireless bridges or links between multiple physical locations that are a great distan...

Страница 29: ...DHCP server s client list for the assigned IP address If the initial configuration of the access point is done on an isolated network the default IP address is http 192 168 10 100 Assign a static IP...

Страница 30: ...y Displays the country of the access point Current Local Time Displays the current time assigned to the access point This information can be modified under the Management Time Zone section Uptime Disp...

Страница 31: ...hannel Displays the channel that the 2 4GHz radio is using Distance Displays the distance coverage radius in meters that the access point is to cover Wireless LAN Information 5GHz Operation Mode Displ...

Страница 32: ...age WDS Link List Displays connections established when using WDS AP or WDS Bridge Connection List Display all other wireless connections Note The following images are sample images of a few different...

Страница 33: ...k Gateway Enter the desired IPv4 Gateway Primary DNS Enter the desired primary Domain Name Server DNS Secondary DNS Enter the desired secondary Domain Name Server DNS IPv6 Settings Link local Address...

Страница 34: ...ess Network Wireless This page allows configuration of all wireless settings of the access point For more information on the differences between the modes see Application Mode on page 24 1 Log into yo...

Страница 35: ...and select the bitrate using the slider in the pop up window Click Save to save the setting and close the pop up if the pop up window does not appear please disable the browser s ad pop up blocker Cl...

Страница 36: ...rning to the previous page Wireless Setting Access Point 2 4GHz 5GHz Enable Check the box next to the radio to apply this wireless profile to SSID Enter the SSID you would like to assign to this wirel...

Страница 37: ...g server Radius Accounting Port Enter the port of your radius accounting server Radius Accounting Secret Enter the secret key for your radius server Interim Accounting Interval Enter the interval in s...

Страница 38: ...for this guest network o WINS Server IP Enter the IP address for the external WINS Server for name resolution Wireless Settings Client Bridge and WDS Station modes SSID Displays the SSID that this dev...

Страница 39: ...ker the signal strength A 100dBm is essentially an empty signal strength Management VLAN Settings When enabled with a specified VLAN ID the device will only allow management interface access with the...

Страница 40: ...Write Enter the community name designated with Read Write permissions Trap Destination o Port Enter the port number for the SNMP trap destination o IP Address Enter the IP address for the SNMP trap de...

Страница 41: ...settings configured Time Zone Management Time Zone This page configures the time settings for the access point 1 Log into your access point management page see Access your access point management page...

Страница 42: ...r cycle the access point Then set the time in 24 00 format Wi Fi Scheduler Status Check the box to enable the Wi Fi scheduler This enables specific date and times when the Wi Fi radio will be on Wirel...

Страница 43: ...d ping test is 4 pings Press Start to begin the test Traceroute Target IP Domain Name Enter the IP address or domain name of the traceroute target Press Start to begin the test Nslookup Target IP Doma...

Страница 44: ...s Guide TEW 841APBO 41 LED Power Select Enable to turn on the LED Default Enable Other Select Enable to turn on the remaining LED s Default Enable Device Discovery Scan Click Scan to commence a device...

Страница 45: ...In addition it is also important to verify if the latest firmware version is newer than the one your AP is currently running To identify the firmware that is currently loaded on your AP log in to the...

Страница 46: ...set to factory default after User Default has been set must select reset to FACTORY DEFAULT settings or use the physical Reset button located on the device itself or the included PoE Injector Factory...

Страница 47: ...stem log Traffic Log Click Enable to enable the traffic log Log Type Click the dropdown and select the type of logs to display Refresh Click Refresh to refresh the logs Clear Click Clear to clear the...

Страница 48: ...d housing Concurrent dual band Band steering WiFi traffic shaping 802 1Q VLAN assignment per SSID IPv6 support Link Local Static IPv6 LEDs on off 802 11k intelligent radio resource management RSSI Thr...

Страница 49: ...ical 867 Mbps Power IEEE 802 3at Type 2 PoE PD Class 4 Max consumption 12 6W Operating Temperature 22 60 C 7 6 140 F Operating Humidity Max 90 non condensing Certifications FCC IC Dimensions 111 x 174...

Страница 50: ...d Note If you are experiencing difficulties please contact your computer or operating system manufacturer for assistance How to configure your network settings to obtain an IP address automatically or...

Страница 51: ...dapter a static IP address Click OK Windows Vista a Go into the Control Panel click Network and Internet b Click Manage Network Connections right click the Local Area Connection icon and click Propert...

Страница 52: ...utility Note Please note that although the following procedures provided to follow for your operating system on configuring your network settings can be used as general guidelines however it is strong...

Страница 53: ...tatement This equipment complies with FCC radiation exposure limits set forth for an uncontrolled environment This equipment should be installed and operated with minimum distance 20cm between the rad...

Страница 54: ...Omni Directional 5dBi MASTER WAVE MASTER WAVE External Omni Directional 5dBi MASTER WAVE MASTER WAVE Professional installation instruction 1 Installation personal This product is designed for specifi...

Страница 55: ...ace the defective product or there is no comparable model available we will refund the depreciated value of the product If a product does not operate as warranted during the applicable warranty period...

Страница 56: ...E NEGLECT IMPROPER INSTALLATION OR TESTING UNAUTHORIZED ATTEMPTS TO REPAIR OR MODIFY OR ANY OTHER CAUSE BEYOND THE RANGE OF THE INTENDED USE OR BY ACCIDENT FIRE LIGHTNING OR OTHER HAZARD LIMITATION OF...

Страница 57: ......

Отзывы: