


© Copyright 2015 TRENDnet. All Rights Reserved.
TRENDnet User’s Guide
TEW-828DRU
11
3. Please review the settings below. To save changes to this section, click
Apply
when
finished.
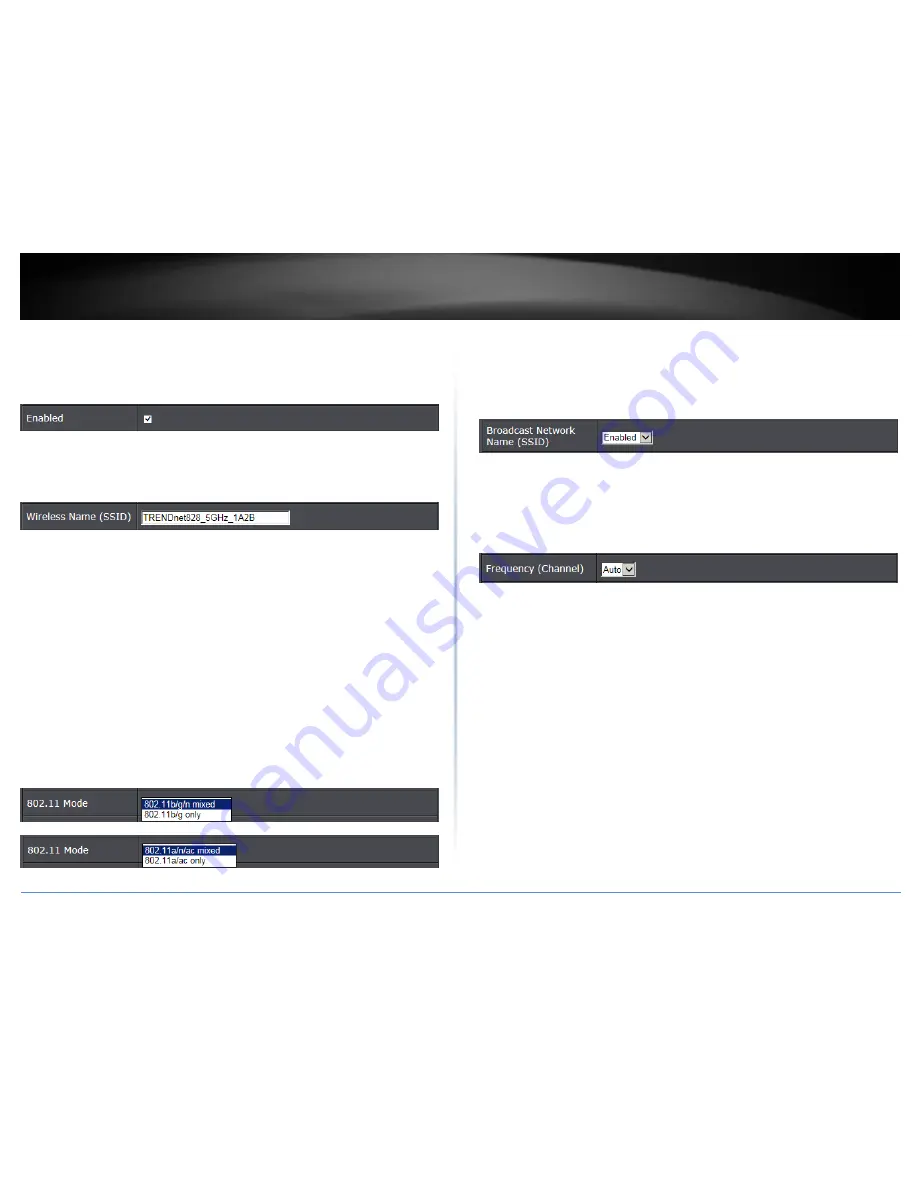
Enabled –
Check the box to enable the wireless radio. Uncheck to disable the
wireless radio.
Note:
It is recommended to keep wireless radios enabled.
Wireless Network Name (SSID):
Enter the wireless name (SSID) for your wireless
network. This acronym stands for Service Set Identifier and is the name of your
wireless network. It differentiates your wireless network from others around you.
By default, the router’s wireless name is unique to the device. If you choose to
change the SSID, change it to a name that you can easily remember.
Wireless Mode:
When applying the Wireless Mode setting, please keep in mind the
following:
Wireless devices that support 802.11n are backwards compatible and can connect
wirelessly at 802.11g or 802.11b.
Wireless devices that support 802.11ac are backwards compatible and can connect
wirelessly at 802.11n or 802.11a.
Connecting at 802.11b or 802.11g will limit the capability of your 802.11n
supported wireless devices from obtaining higher performance and data rates.
Connecting at 802.11a or 802.11n will limit the capability of your 802.11ac
supported wireless devices from obtaining higher performance and data rates.
Allowing 802.11b or 802.11g devices to connect to an 802.11n capable wireless
network may degrade the wireless network performance below the higher
performance and data rates of 802.11n.
Allowing 802.11a or 802.11n devices to connect to an 802.11ac capable wireless
network may degrade the wireless network performance below the higher
performance and data rates of 802.11ac.
Broadcast Network Name (SSID)
o
Enabled (Recommended) -
allows wireless devices to search and discover your
wireless network name (also called SSID) broadcasted by your router.
o
Disabled -
Turns off the ability for wireless devices to find your network. It is still
possible for wireless devices to be configured to connect to your wireless
network. Disabling this setting will disable WPS functionality.
Frequency (Channel)
– Selecting the
Auto
option will set your router to scan for the
appropriate wireless channel to use automatically. The
Auto
option is only available
for 2.4GHz and is not available for 5GHz channel settings. Click the drop-down list
and select the desired Channel for wireless communication. The goal is to select the
Channel that is least used by neighboring wireless networks.
Channel Bandwidth:
Select the appropriate channel width for your wireless
network. This setting only applies to 802.11n and 802.11ac. For greater 802.11n
performance, select
Auto 20/40MHz
(Options: 20MHz or Auto 20/40MHz). It is
recommended to use the default channel bandwidth settings.
For greater 802.11ac performance, select
Auto 20/40/80MHz
(Options: 20MHz,
Auto 20/40MHz, Auto 20/40/80MHz). It is recommended to use the default channel
width settings.
Note:
Please note that the default settings may provide more stability than the
higher channel bandwidth settings such as Auto
20/40/80MHz
for connectivity in
busy wireless environments where there are several wireless networks in the area.
o
20 MHz
– This mode operates using a single 20MHz channel for
wireless devices connecting at 802.11n on both 2.4GHz and 5GHz. This
setting may provide more stability than 20/40MHz (Auto) for
connectivity in busy wireless environments where there are several
neighboring wireless networks in the area.
o
Auto 20/40MHz (11n) or Auto 20/40/80MHz (11ac)
–When this
setting is active, this mode is capable of providing higher performance
only if the wireless devices support the channel width settings.
Содержание TEW-828DRU
Страница 1: ...TRENDnet User s Guide Cover Page...
Страница 72: ......


