


18. Mount the reverb control bracket under the left side of the front rail using 2) #6 x 1/2" screws.
NOTE: Later organs had notched front rails. To allow the control bracket to mount properly on the uneven surface of this
type front rail, use the enclosed aluminum spacer between the control bracket and front rail.
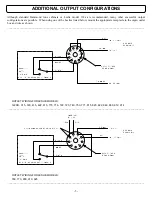
19. Route the reverb control cable to the rear of the organ and through the lower notch in the pre-amp chassis. Mate the 4
pin connector with the 4 right most pins of P-2.
NOTE: The 9BB2C1A reverb spring unit supplied with this pre-amp is specifically designed to be mounted with its open
side up. Other mounting orientations will generally NOT give satisfactory results. If the organ is being made portable, or
there is some other reason why the reverb can not be mounted this way, contact the factory for further instructions.
20. Remove the foam packing block from the reverb spring unit. Install a brass bushing in each of the 4 reverb unit
grommets. Position the reverb unit open side up, with the output end towards the right under the console top. Secure the
unit using a #8 x 3/4" screw through each of the grommeted holes.
21. Route the cable from the reverb unit through the lower notch and mate the 4 pin connector with the 4 left most pins of
P-2.
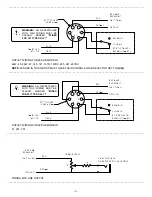
22. Connect the short zipcord from the supplied AC power socket as follows:
Locate the blue and grey wires from the outlet box and the blue and grey wires from the generator line panel. Strip 3/8"
insulation from each wire. Mate the two blue wires along with one conductor of the zipcord with a yellow wire nut.
Mate the two grey wires along with the remaining zipcord conductor with a yellow wire nut.
23. Insert the AC plug of the SSP-3A into the AC power socket.
24. Dress all leads and secure where necessary with supplied twist ties. Reconnect AC power to organ.
25. Turn organ on. Hold a note down and adjust the swell linkage as follows: Set the swell pedal at its softest position.
Temporarily slide the swell arm off the swell control. Rotate the pot shaft so that the wiper is at the -30V (white wire)
end of the control. Slowly advance it until the organ volume just starts to increase. Slide swell arm back onto the
control and tighten the set screw.
26. Adjust percussion level and tone controls to customer preference.
NOTE: Do NOT disturb the null or offset adjustments, they have been set at the factory for optimum performance and will
not require adjustment unless components in the pre-amp have been replaced.
27. Attach cover, being sure that none of the wires passing through the notched openings are pinched.
This completes normal installation.
-3-


