


TANKS TWO-FOUR
Turn the high-speed mixture screw clockwise 15
0
and run
through the second tank of fuel. Repeat this process for the third
and fourth tanks of fuel.
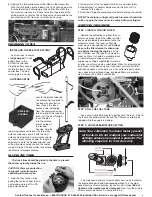
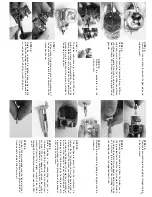
Important: Do not lean the high speed mixture less than 2
turns out from closed (see illustration). Also, be sure to
allow the engine to cool between each run.
TANK FIVE AND BEYOND
The engine can now be tuned for power. Fine tuning adjustments
should be made to the engine when it is at its normal operating
temperature. Refill the fuel tank, prime the engine, and restart.
Drive the truck for a few minutes until the engine is warm. Turn
the mixture screw in (clockwise)
1
/
16
of a turn and continue driving.
Note any increase in speed and performance. Continue to lean
the fuel mixture in
1
/
16
turn increments until you no longer see any
performance increase. At this point, the fuel mixture is too lean.
Turn the mixture screw back out (counterclockwise) the previous
1
/
16
of a turn to reach the optimum fuel mixture setting. Turn the
mixture screw out another
1
/
16
of a turn for non-race applications.
This will extend engine component life. This setting will vary
slightly with each engine depending upon fuel brand, temperature,
humidity, etc.
Watch closely for any signs of overheating. These include:
- Steam or smoke coming from the engine surfaces
- Lagging during high-speed acceleration (as if running out of fuel)
- Popping or clattering sound when decelerating (detonation)
- Idle speed will surge or possibly diminish to the point of stalling.
SETTING THE IDLE SPEED
Now that the engine mixture is tuned, the idle speed may be
set too high. Set the throttle trim on the transmitter so that the
brake on the truck is applied. Next, reset the idle speed by removing
the air filter and adjusting the the idle speed screw on the side of
the carburetor (see drawing on page 12). Turn the screw out
(counter-clockwise) to reduce the idle. Re-adjust the throttle trim
on the transmitter as necessary. The idle must be set as low as
possible in order for the engine to run reliably.
If the idle speed
is set too high, forward/reverse shifting performance could
be adversely affected.
Only set the idle speed when the engine is
at its normal operating temperature.
FORWARD/ REVERSE OPERATION
Forward and reverse gears are selected with the shift button
located in the transmitter handle grip. The switch is normally in the
down position (forward). To engage reverse, bring the T-Maxx to a
complete stop and push the shift button up. Allow at least one
second (count “one thousand and one”) and then apply 3/4 to full
throttle. Abrupt engine throttle solidly locks the transmission into
gear. If you accelerate very slowly after a direction change, the T-
Maxx may appear to malfunction by slipping as the transmission
tries to lock in to gear. To return to forward direction, use the
same procedure and move the shift button down.
If the T-Maxx does not shift into reverse, check the following:
1. IDLE SPEED-
The engine idle speed needs to be set as low
as possible and still allow reliable running. If the idle speed is
set too high, the T-Maxx will not shift.
2. DRIVELINE-
If the T-Maxx driveline is heavily loaded, such as
being stuck on an incline, it may not shift into reverse.
If, accidentally, neither forward or reverse is engaged (neu-
tral), do not rev the engine.
Revving the engine with no load
can cause serious internal damage to the engine, such as a bro-
ken connecting rod. Move the shift button back and forth until a
forward or reverse gear is selected.
ADJUSTMENTS
• SHIFT POINT ADJUSTMENT
The T-Maxx comes equipped with a two-speed transmission.
When the shift point on this transmission is adjusted correctly, it
will maximize acceleration and improve drivability. If necessary,
use a 2.0mm Allen wrench to adjust the shift point.
NOTE: It is important that your engine is properly tuned and
has reached full operating temperature before making shift
point adjustments. Stop the engine before making adjustments.
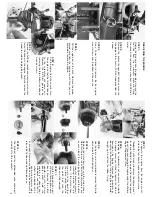
1) Stop engine.
2) Remove the large rubber plug from the transmission housing.
3) Look into the hole in the transmission housing and rotate the
spur gear until the access hole in the aluminum drum is visible.
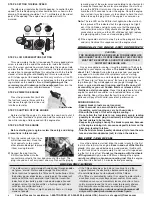
4) Once the access hole is visible, hold the spur gear and use your
finger to turn the primary gear shaft which extends from the
transmission housing (see photo). Note that you will see two set
screws through the access hole.
As you turn the primary gear
shaft counter-clockwise, the
first set screw holds the two-
speed mechanism to the shaft.
Do not loosen this screw. The
second set screw is the adjust-
ment screw.
5) Insert a 2.0 Allen wrench
through the clutch drum and
into the adjustment set screw.
(See diagram)
6) Turn the adjustment screw 1/8
turn clockwise to raise the shift
point (later shifts). Be careful
not to overtighten the adjust-
ment screw or you may damage
the tension spring. Do not make
constant adjustments or you will
loosen the locking device.
7) Turn the adjustment screw 1/8
turn counter-clockwise to lower
shift point (earlier shifts). Be
careful not to loosen the adjust-
ment screw too much or you
may cause the screw and spring
to fall out (requiring major disas-
sembly and repair).
8) Use
1
/
8
turn increments to find the
approximate, desired shift point.
9) Check performance by running a
test lap after each adjustment.
10) Use
1
/
8
-
1
/
16
turn increments to
fine tune the shift point.
NOTE: The transmission may not shift if the adjustment
screw is turned too far in (locked in first gear), or too far out
(locked in second gear). If the truck has quick acceleration
and does not appear to shift, the transmission is never
reaching the shift point. The shift point needs to be lowered
by turning the adjustment screw counter-clockwise. If the
7
2
1
/
2
turns out
2 turns out
Insert 2.0 Allen
wrench here.
Do not remove the rubber
plug from this hole.
Primary Gear
Shaft
Primary
Gear
Shaft
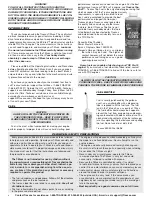
Contact Traxxas for assistance: 1-888-TRAXXAS. 972-265-8000 (outside USA). E-mail us at [email protected]
Содержание T-Maxx
Страница 1: ...OPERATING INSTRUCTIONS MODEL 4910...


