


THE FIRST TANK OF FUEL
• Drive the Nitro Sport on a flat paved surface in an oval configu-
ration. This will cause you to naturally vary your speed over the
entire RPM range. During this break in time, ease in and out of the
throttle slowly to avoid stalling the engine. The goal is to simply
keep the engine running.
• The fuel mixture setting may require slight adjustment to correct
for different altitudes and temperatures. To tell if the engine is running
rich (high volume of fuel flowing through the engine) look for the
following conditions:
1) The engine should accelerate sluggishly
2) There should be a thick trail of blue smoke coming
from the exhaust.
• If you do not observe the conditions above, then turn the high
speed needle out 15° (counterclockwise) and retest.
• Do not run at full speed during the first tank of fuel.
•
Do not rev the engine with the wheels off the ground.
High,
no-load RPMs can damage the engine,
usually resulting in a
broken connecting rod
. At the end of the first tank of fuel, stop
the engine and allow it to cool for 5-10 minutes before proceeding.
TANKS TWO & THREE
Turn the mixture screw in (clockwise) 45-degrees (
1
/
8
of a turn),
refill the fuel tank, prime the engine, and restart as above. Run two
tanks of fuel through the engine at this setting. Allow the engine to
cool 5-10 minutes between tanks. Continue to vary your speed as
you did with the first tank of fuel, occasionally reaching full throttle.
Important: Do not lean the high speed mixture less than 2
turns out from closed (see illustration). Also, be sure to
allow the engine to cool between each run.
TANKS FOUR AND FIVE
Turn the mixture screw in (clockwise) 45-degrees (
1
/
8
of a turn),
refill the fuel tank, prime the engine, and restart. Once again, run
two tanks of fuel through the engine at this setting. Allow the
engine to cool 5-10 minutes between tanks.
TANK SIX AND BEYOND
• All final tuning adjustments must be made to the engine at its
normal operating temperature.
• The engine’s performance depends on the fuel mixture. Leaning
the fuel mixture with the high-speed needle (turning clockwise) will
increase engine power up to engine’s mechanical limits. Leaning
the fuel mixture beyond the safe allowable limits will result in poor
performance and engine damage.
• After the fourth tank of fuel, the break in process should be com-
plete. Now its time to tune the engine for maximum power.
• Turn the mixture screw in (clockwise) 1/16 of a turn and continue
driving. Note any increase in speed and performance.
• Continue to lean the fuel mixture in 1/16 turn increments until :
1) There is no longer any performance increase or
2) The engine begins to cut out at high speed or
3) The engine begins to overheat. Symptoms include:
• Steam or smoke coming from the engine surfaces
• Hesitation during acceleration (as if running out of fuel)
• Popping or clattering sound when decelerating (detonation)
• The idle speed will fluctuate
• Any of the above symptoms indicate that the fuel mixture is past
the maximum safe lean setting. Turn the mixture screw back out
(counterclockwise) the previous 1/16 of a turn to reach the optimum
fuel mixture setting.
• Turn the mixture screw out another 1/16 of a turn for non-race
applications. This will extend engine component life. This setting
will vary slightly with each engine depending upon fuel brand,
SETTING THE IDLE SPEED
Now that the engine mixture is tuned, the idle speed may be
set too high. Only set the idle speed when the engine is at its nor-
mal operating temperature. Adjust the throttle trim on the transmit-
ter so that the brake on the truck is applied. Next, reset the idle
speed by removing the air filter and adjusting the idle speed screw
on the side of the carburetor (see drawing on page 5). Turn the
screw out (counter-clockwise) to reduce the idle. Re-adjust the
throttle trim on the transmitter as necessary (so that the brake is
no longer applied). The idle should be set slow enough that the
truck does not try to move at idle.
7
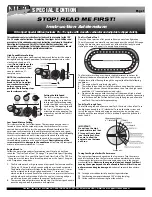
Tank 1: Rich setting (1
3
/
4
turns out)
Tanks 2 & 3: +
1
/
8
turn (45
0
)
Tanks 4 & 5: +
1
/
8
turn (45
0
)
Tank 6: +
1
/
16
turn (22.5
0
)
Maximum lean setting. Engine
begins losing power.
Richen mixture -
1
/
16
turn
Contact Traxxas for assistance: 1-888-TRAXXAS. 972-613-3300 (outside USA). E-Mail us at [email protected]
LEAN
RICH
SAFE RANGE
Optimum
for High-Speed
Performance
Optimum
for Climbing
& Low Speed
Operation
RACING
EVERYDAY
RUNNING
High-Speed Power Loss
Overheating
Sluggish Performance
Break-In Settings
DANGER