


EDITION
EDITION
SPECIAL
SPECIAL
This addendum contains instructions for the break-in procedure for the TRX
Pro .15 engine and instructions for adjusting the slipper clutch. Settings and
procedures in this addendum supercede instructions contained in the printed
Operating Instructions and Quick Start Guide. All other instructions and
precautions not pertaining to the topics discussed on this addendum should
be followed as outlined in the printed documentation.
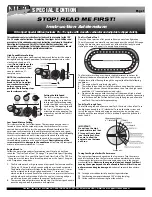
High Speed Mixture Setting
The high-speed mixture screw controls how much fuel enters the engine
during mid and high-speed operation.Turn the high-speed mixture screw
clockwise, by hand, until it
stops
(Do not tighten or the
needle may be damaged).
Now, turn the mixture screw
counter-clockwise 2
1
/
2
complete turns.
NOTE: Your carburetor has
been factory preset for
break-in. Do not re-adjust
your carburetor settings
unless you suspect a
problem. The following steps
are for reference only.
Setting the Idle Speed
The idle screw regulates the
throttle opening to control the
idle speed. The throttle opening
at idle should be set as shown in
the drawing. The opening should
be 1 to 1
1
/
2
millimeters at the
widest point in the opening. The
engine may not idle well until it
is warmed.
Low Speed Mixture Setting
This screw meters the fuel at low speeds.The low-speed mixture screw is
located in the end of the carburetor, inside the throttle arm. This screw
controls how much fuel enters the engine at idle and low throttle. This
adjustment will smooth the idle and improve acceleration to mid-speed.
Make this adjustment with the throttle closed, after setting the idle.
Gently
turn this screw clockwise until it stops against the needle seat. Be very
careful as it is difficult to know when the needle has seated due to the
thread holding material on the needle’s thread.
Overtightening of the
screw may result in damage to the needle seat.
Now turn the low-speed
mixture screw counterclockwise 1
3
/
4
turns.
Engine Break In
Follow the normal procedures for preparing your Nitro Sport until you
reach the “The First Tank of Fuel” (See page 7 in your Nitro Sport Operating
Instructions or Step 15 in your Nitro Sport Quick Start Guide.) The TRX Pro
.15 engine uses the same basic break-in procedure as the Sport .15 engine,
with 2 important exceptions:
1.
The Pro carburetor has high-speed and low-speed fuel mixture needles.
The Sport .15 has only a high-speed needle on a restricted carburetor.
The baseline fuel mixture settings for the Pro carburetor are 2
1
/
2
turns
out from closed on the high-speed needle and 1
3
/
4
turns out from
closed on the low-speed needle. The mixtures were preset at the factory
and should not be adjusted until after the engine is running and you
are able to observe and evaluate the engine’s performance.
2.
There are additional performance tuning steps for the low-speed needle
once the engine break-in procedure is completed.
The First Tank of Fuel
Drive the Nitro Sport on a flat paved surface in an oval configuration.
This will cause you to naturally vary your speed over the entire RPM range.
During this break in time ease in and out of the throttle slowly to avoid
stalling the engine. The goal is to simply keep it running.
The fuel mixture setting may require slight adjustment to correct for
different altitudes and temperature. To tell if the engine is running rich
(high volume of fuel flowing through the engine) look for the following
conditions:
1.
The engine should accelerate sluggishly
2.
There should be a thick trail of blue smoke coming from the exhaust.
3.
If you do not observe the conditions above, then turn the high speed
needle out 15° (counterclockwise) and retest.
4.
Do not rev the engine with the wheels off the ground. High, no-load
RPMs can damage the engine, usually resulting in a broken connecting
rod. At the end of the first tank of fuel, stop the engine and allow it to
cool for 5-10 minutes before proceeding.
Tanks Two Through Four:
Shut off the engine and allow it to cool for 5-10 minutes, then refuel. Turn
the high-speed needle in 15° (clockwise). Turn on the radio system and
restart the engine. Continue driving on your oval course, varying your
throttle, until the second tank of fuel is used up. Repeat this process for
tanks 3 and 4.
Tuning Your Engine for Best Performance
The engine’s performance depends on the fuel mixture. Turn the mixture
needles clockwise to lean the fuel mixture and counterclockwise to richen
it. Leaning the fuel mixture will increase engine power up to the engine’s
mechanical limits.
Never run the engine too lean (not enough fuel flow).
Leaning the engine beyond the safe allowable limits will result in poor
performance and engine damage.
Indications of an overly lean mixture
include:
Cutting out or sudden loss of power during acceleration.
Overheating (temperature beyond 300° at the glow plug)
Little or no blue smoke coming from the exhaust.
▼▼▼
Instruction Addendum
Nitro Sport Special Edition (Includes Pro .15 engine with 2-needle carburetor and adjustable slipper clutch).
STOP! READ ME FIRST!
STOP! READ ME FIRST!
2
1
/
2
turns out
2 turns out
IMPORTANT:
Do not lean the high
speed mixture less than
2 turns out from closed
(see illustration). Also,
be sure to allow the
engine to cool between
each run.
Contact Traxxas for assistance: 1-888-TRAXXAS. 972-613-3300 (outside USA). E-Mail us at [email protected]
Page 1