background image

2 • RAPTOR

3


BEFORE YOU 
PROCEED

3

 SAFETY 

PRECAUTIONS

5


TOOLS, SUPPLIES, 
AND REQUIRED 
EQUIPMENT

6


ANATOMY OF  
THE RAPTOR

7


QUICK START: 
GETTING UP  
TO SPEED

8

 TRAXXAS 


TQ 2.4GHz  
RADIO SYSTEM

16

  ADJUSTING THE 

ELECTRONIC SPEED 
CONTROL

18

  DRIVING YOUR MODEL

20

 ADJUSTING 


YOUR MODEL

22

 MAINTAINING 


YOUR MODEL

INTRODUCTION

Thank you for purchasing the Ford F-150 SVT Raptor by Traxxas. This 
officially-licensed model captures the muscular looks and high-
performance driving experience of the full-size 411-horsepower 
super-truck. Based on the award-winning Traxxas Slash, the Ford 
Raptor model features waterproof electronics for all-weather off-road 
adventure, rugged independent suspension with long-travel oil-filled 
shocks, and a powerful Titan 550 motor that delivers 30+mph top 
speeds. Rubber-sealed ball bearings, heavy-duty steel transmission 
gears, and high-strength materials assure your Raptor model is “Built 
Ford Tough

®

” for exciting R/C performance run after run.  

We know you’re excited about getting your new model on 
the road, but it’s very important that you take some time to 
read through the Owner’s Manual. This manual contains all the 
necessary set-up and operating procedures that allow you to 
unlock the performance and potential that Traxxas engineers 
designed into your model. 

Even if you are an experienced R/C 

enthusiast, it’s important to read and follow the procedures in 
this manual.

We want you to feel confident that you own one of the best-
performing models in the market and that it is backed by a team 
of professionals who aim to provide the highest level of factory 
support possible. Traxxas models are about experiencing total 
performance and satisfaction, not just with your model, but also 
with the company that stands behind it. We truly want you to enjoy 
your new model!

Thank you again for going with Traxxas.  

Traxxas Support

Traxxas support is with you every step of the 
way. Refer to the next page to find out how to 
contact us and what your support options are.

Quick Start

This manual is designed with a Quick 
Start path that outlines the necessary 
procedures to get your model up 
and running in the shortest time possible. If you are an 
experienced R/C enthusiast, you will find it helpful and fast. 
Be sure and read through the rest of the manual to learn 
about important safety, maintenance, and adjustment 
procedures. Turn to page 7 to begin.  

FCC Compliance

This device contains a module that complies with the limits for a Class B digital device as described in part 15 of the FCC rules. Operation is subject to the following two conditions: (1) This device may not cause 
harmful interference, and (2) this device must accept any interference received, including interference that may cause undesired operation.

The limits for a Class B digital device are designed to provide reasonable protection against harmful interference in residential settings. This product generates, uses and can radiate radio frequency energy, and, if 
not operated in accordance with the instructions, may cause harmful interference to radio communications. The user is cautioned that changes or modifications not expressly approved by the party responsible for 
compliance could void the user’s authority to operate the equipment.

Canada, Industry Canada (IC)

This Class B digital apparatus complies with Canadian ICES-003 and RSS-210. This device complies with Industry Canada license exempt RSS standard(s). Operation is subject to the following two conditions: This 
device may not cause interference, and This device must accept any interference, including interference that may cause undesired operation of the device.

Radio Frequency (RF) Exposure Information

The radiated output power of the Traxxas LP Device is below the Industry Canada (IC) radio frequency exposure limits. The antenna for this transmitter must not be co-located with any other transmitters except in 
accordance with FCC and Industry Canada multi-transmitter procedures. Co-location means having a separation distance of less than 20 cm between transmitting antennas.

Содержание F-150 Raptor SVT 5806

Страница 1: ...MODEL 58064 owner s manual...

Страница 2: ...xt page to find out how to contact us and what your support options are Quick Start This manual is designed with a Quick Start path that outlines the necessary procedures to get your model up and runn...

Страница 3: ...ollowed and the precautions are adhered to IMPORTANT POINTS TO REMEMBER Your model is not intended for use on public roads or congested areas where its operation can conflict with or disrupt pedestria...

Страница 4: ...d control uses rechargeable batteries that must be handled with care for safety and long battery life Make sure to read and follow all instructions and precautions that were provided with your battery...

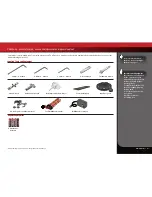
Страница 5: ...a to include in any R C toolbox Safety glasses Traxxas Ultra Premium Tire Glue Part 6468 CA glue Hobby knife Side cutters and or needle nose pliers Phillips screwdriver Soldering iron Supplied Tools a...

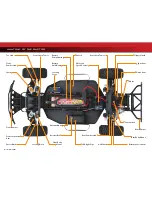
Страница 6: ...LED Light Pipe Battery Hold Down Receiver Box Antenna Mount Front Suspension Arm Front Bumper Steering Servo Shock Toe Link Front Camber Link Rear Camber Link Rear Shock Tower Chassis Front Body Mount...

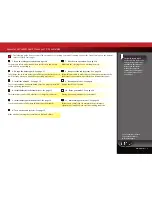
Страница 7: ...page 15 9 Detail your model See page 8 The receiver antenna and antenna tube must be properly installed before operating your model Apply other decals if desired 4 Install batteries in the transmitter...

Страница 8: ...se digital proportional throttle control Electronic speed controls use power more efficiently than mechanical speed controls so that the batteries run longer An electronic speed control also has circu...

Страница 9: ...ure that is forcing the water through the hose 550 and 540 These numbers refer to the size of the motor 550 motors have armatures that are 30 longer than 540 motors IMPORTANT RADIO SYSTEM PRECAUTIONS...

Страница 10: ...High Current Connector Male to Battery XL 5 Electronic Speed Control Channel 2 Steering Servo Channel 1 Your model is equipped with the Traxxas TQ 2 4GHz transmitter The transmitter has two channels...

Страница 11: ...s charging 3 The battery should charge for approximately 8 hours The LED will turn green when the battery is fully charged Disconnect the battery from the charger after charging 2 3 1 Using Other Char...

Страница 12: ...r is engineered to extract all the power your battery has to give RADIO SYSTEM RULES Always turn your transmitter on first and off last This procedure will help to prevent your model from receiving st...

Страница 13: ...ion Use the following procedures to reverse the steering and throttle channels if necessary Servo reversing should only be required if you accidentally reset the direction of a channel Do not reverse...

Страница 14: ...trigger is at neutral 8 Once adjustments are made turn off your model followed by the hand held transmitter Range Testing the Radio System Before each running session with your model you should range...

Страница 15: ...p nut over the antenna tube and screw it onto the antenna post 4 Use the supplied tool to tighten the crimp nut on the post just until the antenna tube is securely in place Do not overtighten or crush...

Страница 16: ...Press and hold the EZ Set button A The LED will first turn green and then red Release the button 5 When the LED blinks RED ONCE pull the throttle trigger to the full throttle position and hold it the...

Страница 17: ...ready to drive Note If you missed the mode you wanted keep the EZ Set button pressed down and the blink cycle will repeat until the button is released and a Mode is selected LED Codes and Protection...

Страница 18: ...etitive hard acceleration Tips for Increasing Run Time Use batteries with the highest mAh rating you can purchase Read and follow all maintenance and care instructions provided by the manufacturer of...

Страница 19: ...r box during wet running This can cause long term problems with the sensitive electronics in the receiver Removing the receiver box cover during storage allows the air inside to dry This step can impr...

Страница 20: ...he model s ride height can be adjusted by adding or removing the clip on spring pre load spacers Adjust the ride height so that the suspension arms are slightly above being parallel to the ground Obse...

Страница 21: ...equipped with a Titan 12T 550 motor The gear combination that comes stock on each model provides good overall acceleration and top speed If you want more top speed and less acceleration install the i...

Страница 22: ...eering system There are several components that will wear out from use the servo saver Traxxas part 3744 the bellcrank bushings Traxxas part 2545 and the tie rod ends Traxxas part 2742 Replace these c...

Страница 23: ...121205 58064OM N EN R00 MODEL 58064 1100 Klein Road Plano Texas 75074 1 888 TRAXXAS owner s manual...

Отзывы: