


24 • E-Revo
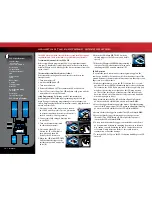
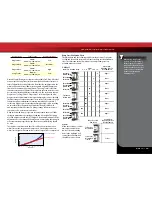
Maximum Alignment Limits (using stock push rod length)
E-Revo’s maximum toe and camber alignment settings can be limited
by the ride height setting. Do not exceed the maximum limits or you
could experience interference between suspension components.
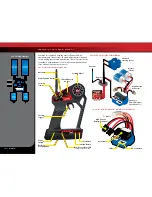
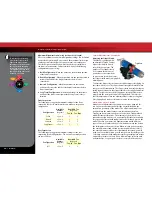
The ride height is controlled by where the push rod is installed in
the lower suspension arm. First determine which of the following
configurations you are using:
a. Stock Configuration
– When the pushrod is in the middle position
of the lower control arm.
b. Raised Configuration
- When the pushrod is in the raised position to
increase the vehicle’s ride height (innermost hole in lower
control arm).
c. Lowered Configuration
- When the pushrod is in the lowered
position to decrease the vehicle’s ride height (outermost hole in
lower control arm).
d. Long Travel Configuration
– When the pushrod is in the middle
position of the lower control arm with the Long Travel rockers
installed.
Front Suspension
The following are suggested maximum settings for the front
suspension in order to avoid interference between suspension
components:
Rear Suspension
The following are suggested maximum settings for the rear
suspension for all configurations. Toe out is not normally used on
the rear of E-Revo.
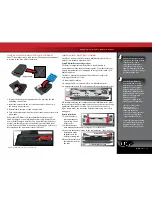
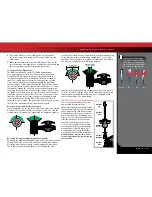
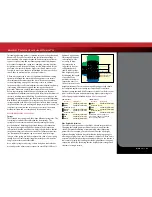
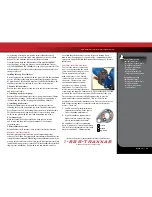
TRANSMISSION TUNING
Adjusting the Slipper Clutch
The E-Revo is equipped with
an adjustable Torque Control
slipper clutch which is built
into the large spur gear. The
purpose of the slipper clutch
is to regulate the amount of
power sent to the rear wheels
to prevent tire spin. When it slips,
the slipper clutch makes a high-pitch,
whining noise.
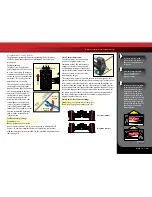
To adjust the slipper clutch, remove the rubber slipper clutch plug on
the transmission cover. The slipper clutch is integrated into the main
spur gear on the transmission. The slipper clutch is adjusted using the
spring-loaded locknut on the slipper shaft. Use the supplied universal
wrench. To tighten or loosen the slipper nut, insert the 2.0mm hex
wrench into the hole in the end of the slipper shaft. This locks the
shaft for adjustments. Turn the adjustment nut clockwise to tighten
(less slippage) and counter-clockwise to loosen (more slippage).
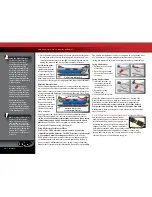
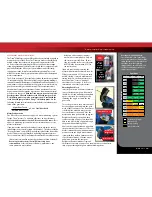
WHEELS AND TIRES
Many types of aftermarket tires and wheels can be adapted for
use on your model. Most will affect the overall width and the
suspension geometry of the model. The offsets and dimensions
designed into the model’s wheels are intentional; therefore,
Traxxas cannot recommend the use of other non-Traxxas wheels
with different specifications. The diameter of the wheels is an
innovative design, and there is a variety of different tires available
for you to experiment with in addition to the included tires on the
model (listed in your parts list). Experimentation with different
types of tires is recommended to see which ones work the best on
the terrain where the model is run. When selecting tires, consider
the overall diameter and the rubber compound (hard or soft). If
the overall diameter of the tire is significantly increased, you will
need to use a smaller pinion gear to compensate for the larger tire.
Soft compound tires with many short spikes generally work better
on hard, dry surfaces. In loose dirt, a tire with large spikes should
perform better. See your parts list for accessory wheels and tires.
Configuration
Available
Camber
(degrees)
Available Toe
(degrees)
Toe In Toe Out
Stock
+3 to -5
3
3
Raised
+3 to -1
1
1
Lowered
+3 to -5
3
3
Long travel
+3 to -1
1
1
Configuration
Available
Camber
(degrees)
Available Toe
(degrees)
Toe In Toe Out
All
+3 to -5
3
2
To achieve a good starting
point for the slipper clutch,
tighten the slipper clutch
adjusting nut clockwise until
the slipper clutch adjusting
spring fully collapses (do not
over tighten), and then turn
the slipper clutch nut counter-
clockwise ¼ to ½ turn.
Tighten
Loosen
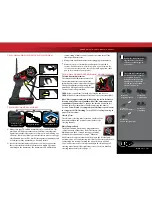
BASIC TUNING ADJUSTMENTS


