background image

14

Helpline No. UK/Northern Ireland 00800-78772368 Rep . Ireland 00800-78772368

Web Support www.Traveler-service.com/uk

Model Number:DC-XZ6

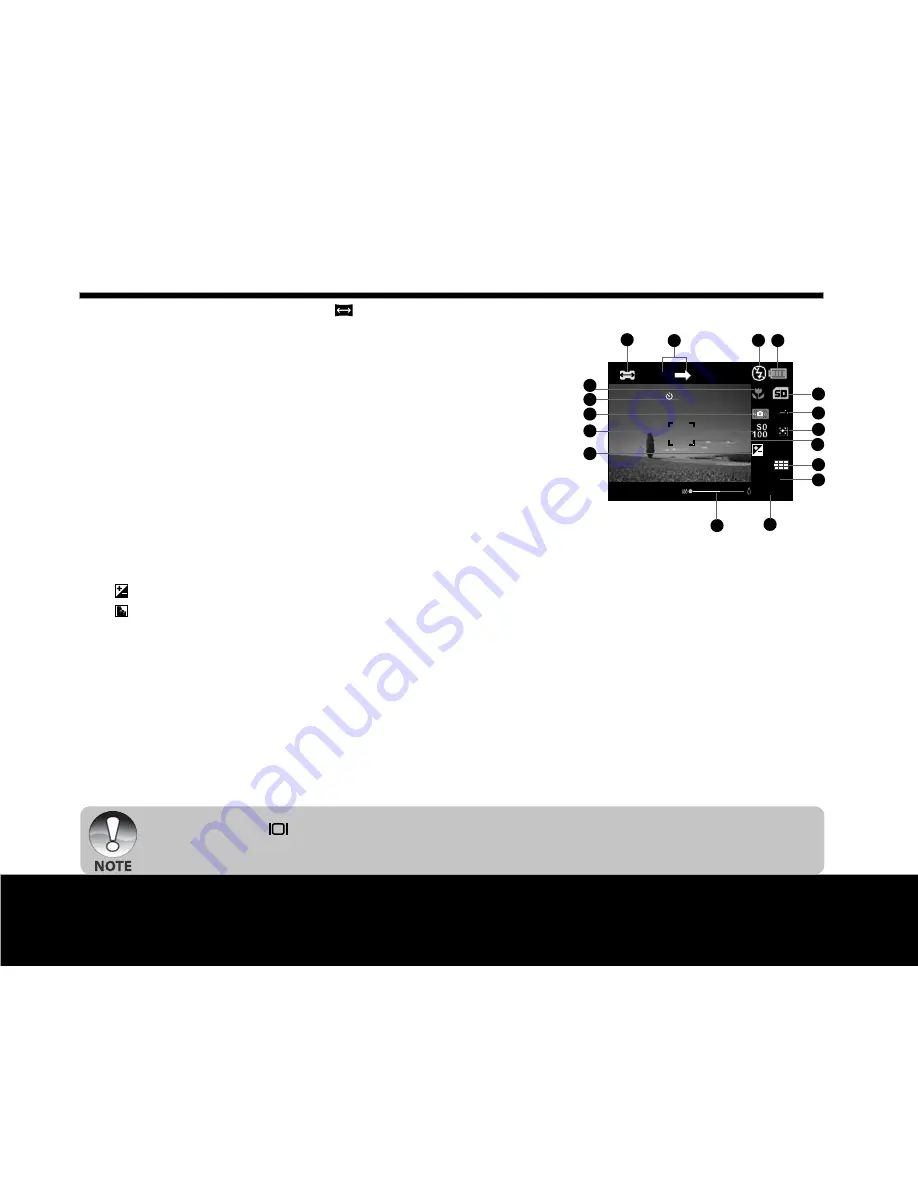
For Photography mode: 

[ ]

1. Mode icon
2. Image to be captured indicator
3. Flash mode
4. Battery condition
5. Storage media
6. White balance
7. Metering
8. Main focus area
9. Image quality
10. Image resolution
11. Available number of shots
12. Zoom status
13. [ ] Exposure compensation

[

] Backlight correction

14. ISO
15. Slow shutter warning
16. Self-timer icon
17. Focus setting

J

Pressing the 

 button changes the LCD display in the sequence of: display with icons, display

without icons.

3

12

4

11

13

15

16

17

14

0.0

1

3

M

5

7

8

9

10

6

00004

2

1

1

1

0

S

Getting to Know the Camera

3

Содержание DC-XZ6

Страница 1: ...mation and Safety Instructions 7 Getting to Know the Camera 16 Getting Started 29 Photography Mode 50 Playback Mode 66 Menu Options 77 Transferring Recorded Images and Videos to Your Computer 80 Conne...

Страница 2: ...B Cable J 1 x AV Cable J 1 x User s Manual J 1 x Car Charger J 1 x Traveler Battery Charger Congratulations on choosing to buy a Traveler product By doing so you now have the assurance and peace of mi...

Страница 3: ...1 Product design and specifications are subject to change without notice This includes primary product specifications software software drivers and user s manual This User Manual is a general referen...

Страница 4: ...ion refer to our website or contact our helpline Use the specified AC power adapter only with the indicated power supply voltage Use with any other power supply voltage might cause fire or electric sh...

Страница 5: ...ge to the person s eyesight Do not subject the LCD monitor to impact This might damage the glass on the screen or cause the internal fluid to leak If the internal fluid enters your eyes or comes into...

Страница 6: ...or the flash This is normal and not a malfunction The camera may feel warm after long periods of continuous use This is normal and not a malfunction If the battery is not to be used for a long periods...

Страница 7: ...ring still images or recording video clips Playback mode Performs image playback and deletion 6 Flash Provides flash illumination 7 Microphone For recording audio with video clips and voice annotation...

Страница 8: ...Thumbnail Allows you to view 9 thumbnail images on the LCD monitor at the same time 4 MENU Menu button Toggles On Screen Display OSD menu on and off 5 Focus button Allows you to choose the appropriate...

Страница 9: ...and manual focus 2 X button Scrolls right Flash button Allows you to choose the appropriate flash setting 3 T button Scrolls downwards Changes value of shutter speed aperture exposure compensation an...

Страница 10: ...ly 4 Tv Shutter Speed You may specify the shutter speed while the camera sets the corresponding Priority aperture value 5 Av Aperture Priority You may specify the aperture value while the camera sets...

Страница 11: ...ange State On Flashing On Flashing On Flashing During power off Battery fully charged The battery is charging An AC power adapter is connected but there is no battery in the camera Battery charging er...

Страница 12: ...ower Medium battery power Low battery power No battery power 5 Storage media Internal memory no card SD memory card 6 Voice memo 7 Self timer icon 10s 10 sec 2s 2 sec 10 2s 10 2 sec 8 Main focus area...

Страница 13: ...ine without icons display without icons 1 Mode icon 2 Date and time 3 Flash mode 4 Battery condition 5 Storage media 6 Voice memo 7 Histogram 8 Main focus area 9 Capture mode icon 10 Image quality 11...

Страница 14: ...e media 6 White balance 7 Metering 8 Main focus area 9 Image quality 10 Image resolution 11 Available number of shots 12 Zoom status 13 Exposure compensation Backlight correction 14 ISO 15 Slow shutte...

Страница 15: ...tting Playback mode Still image playback 1 Mode icon 2 File number 3 Folder number 4 Protect icon 5 Voice memo 6 Digital Print Order Format icon 7 Storage media Playback mode Video playback 1 Video st...

Страница 16: ...ully before using the camera Make sure that the digital camera is turned off before inserting or removing the battery Inserting the Battery 1 Open the battery SD memory card cover in the direction of...

Страница 17: ...eo clips on your desktop You may also use the docking station or connect to other media devices to play back output to a TV monitor for example The docking station will charge the camera battery incon...

Страница 18: ...tly to the DC IN 5V terminal of the docking station J For USB connection or playing back images video clips on the TV connect one end of the AC power adapter directly to the USB A VOUT terminal of the...

Страница 19: ...pter into the DC IN 5V terminal of the battery charger 3 Plug the other end of the car adapter into your car s cigarette lighter outlet J Never expose the car adapter to dripping or sprayed water More...

Страница 20: ...ended to fully discharge the battery before recharging J Charging time varies according to the ambient temperature and the status of battery J This camera must be used with specified AC power adapter...

Страница 21: ...ital camera comes with approx 32 MB of internal memory 26 MB available for image storage allowing you to store captured still images or video clips in the digital camera However you can also expand th...

Страница 22: ...o OFF in the Setup1 Menu for further details J When the power is turned on it may take several seconds to charge the flash While the flash is being charged the status LED lights up orange J The camera...

Страница 23: ...1 Slide the mode switch to and press the MENU button 2 Select Setup2 with the X button 3 Select Date Time with the S T buttons and press the SET button J The Date Time setting screen will be displaye...

Страница 24: ...SET button J The language setting screen will be displayed 4 Select the displayed language with the S T buttons and press the SET button J The setting will be stored 5 To exit from the Setup2 menu pr...

Страница 25: ...SET button 4 Select Execute with the S T buttons and press the SET button J To cancel formatting select Cancel 5 To exit from the Setup1 menu press the MENU button J To format the internal memory do n...

Страница 26: ...s will take up a lot of memory space High resolution and quality settings are recommended for printed output and situations requiring the finest detail Lower resolution quality images take up less mem...

Страница 27: ...Standard Economy Fine Standard Economy Fine Standard Economy 10M 3648x 2736 3M 2048x1536 0 3M 640 x 480 Size SD memory card capacity Quality 1GB The quantity differs depending on the subjects to be c...

Страница 28: ...s speed of your memory card is not high enough over 2MB Sec for random write the video clip will automatically stop or some unexpected situation may occur while recording In this case replace the slow...

Страница 29: ...utton down halfway automatically focuses and adjusts the exposure J The focus area frame turns blue and the status LED lights up green when the camera is focused and exposure is determined J When the...

Страница 30: ...tton 4 Select On with the S T buttons and press the SET button 5 Press the MENU button to exit from the menu J icon is displayed on the screen 6 Compose the image press the shutter button down halfway...

Страница 31: ...ou can also enlarge the centre of the screen and capture images in the digital zoom mode 1 Slide the mode switch to and set the mode dial to one of the photography modes 2 Compose the image with the z...

Страница 32: ...o enable the digital zoom a Press the MENU button b Select Function with the X button c Select Digital Zoom with the S T buttons and press the SET button d Select On with the S T buttons again and pre...

Страница 33: ...e to reduce the red eye phenomenon when you want to capture natural looking images of people and animals in low light conditions When the camera mode is P and M the flash will fire to suit the brightn...

Страница 34: ...to 0 4m Infinity Select the infinity focus setting when you want to capture images of subjects at a distance of infinity 3M 3m Select this when you want to capture images of subjects at a distance of...

Страница 35: ...2s 2 sec 3 Compose the image press the shutter button down halfway then press it down fully The self timer LED flashes and the image will be captured after the preset time has elapsed The countdown i...

Страница 36: ...o P Tv Av or and press the button Each press of the button displays the setting in the order of Backlight Correction and Exposure Compensation 2 Set the exposure value with the S T buttons Press the S...

Страница 37: ...ghting Bright scenes or strong reflected light such as ski slopes When the sky accounts for a large area on the screen negative compensation People illuminated by a spotlight in particular against dar...

Страница 38: ...When scene mode anti shake is ON the Fireworks and Flowing Water are not available and will not appear on the LCD and the scene mode will decrease from 16 to 14 modes Photography Mode 5 The table bel...

Страница 39: ...Select this mode when you want to capture photos of a scene at sunset This mode helps keep the deep hues in the scene Text Select this mode when you want to capture an image that contains black and w...

Страница 40: ...a automatically sets the shutter speed and the aperture to suit the brightness of the subject This allows you to capture an image with ease just like when the mode is selected 1 Slide the mode switch...

Страница 41: ...tter speed with the S T buttons J Press the S button to select faster shutter speeds J Press the T button to select slower shutter speeds J The setting range of the shutter speed is as follows 1 1500...

Страница 42: ...you can capture portrait images with an out of focus background 1 Slide the mode switch to and set the mode dial to Av 2 Adjust the aperture with the S T buttons J Press the S button to increase the v...

Страница 43: ...peed can be varied individually 1 Slide the mode switch to and set the mode dial to M 2 Toggle the button to select the shutter speed or aperture 3 Adjust the shutter speed or aperture with the S T bu...

Страница 44: ...oom button J Optical and digital zoom can be used while composing the scene 3 Fully press down the shutter button J The recording of the video clip will start J Pressing the shutter button one more ti...

Страница 45: ...pture subsequent images in the sequence 5 Finish the sequence by pressing the SET button after the last image has been recorded Anti Shake Mode The anti shake function works according to the luminance...

Страница 46: ...hutter button which causes a semi transparent image of the background to remain on the monitor screen 2 Ask someone else to record a shot of you against your original background telling him her to com...

Страница 47: ...to temporarily record it as a reference image This operation causes a semi transparent image of the background to appear on the monitor screen but the displayed image is not actually saved in camera m...

Страница 48: ...person who recorded the first image 1 Slide the mode switch to and set the mode dial to one of the photography modes except for and a Press the MENU button b Select Function with the X button c Selec...

Страница 49: ...r and a Press the MENU button b Select Function with the X button c Select Capture Mode with the S T buttons and press the SET button d Select Album Shot with the S T buttons and press the SET button...

Страница 50: ...pressing the button when playing back images Each press of the button switches the information display state in the following order J Pressing the S T buttons during image playback will rotate the ima...

Страница 51: ...J The last image appears on the screen 2 Select the desired video clip with the W X buttons J An icon is displayed with the video data 3 Press the SET button to play back a video clip J Press the shut...

Страница 52: ...We recommend that you use the AC power adapter when transferring the recorded images and video files 1 Slide the mode switch to 2 Connect one end of the A V cable to the A V OUT terminal of the camera...

Страница 53: ...Select On with the S T buttons and press the SET button 7 Press the MENU button to exit from the menu 8 Press the shutter button J VOICE RECORDING is displayed on the screen and recording starts 9 To...

Страница 54: ...ttons to select the image to be displayed in regular size 4 Press the SET button J The selected image is displayed at its regular size Page Jump Function This function allows you scan through images i...

Страница 55: ...larges the image J To return to normal magnification press the button J The magnification factor is displayed on the LCD monitor J The image is displayed enlarged and a white frame and green frame are...

Страница 56: ...feature for reviewing captured images and for presentations 1 Slide the mode switch to 2 Press the MENU button J The playback menu is displayed 3 Select Slide Show with the S T buttons and press the...

Страница 57: ...want to protect with the W X buttons 3 Press the MENU button J The playback menu is displayed 4 Select Protect with the S T buttons and press the SET button 5 Select Single or All with the S T button...

Страница 58: ...multiple images simultaneously 1 Select Protect with the S T buttons from the playback menu and press the SET button 2 Select Select with the S T buttons and press the SET button J The images are disp...

Страница 59: ...information on the memory card and print the specified images 1 Set the mode dial to 2 Select the image that you want to set for DPOF with the W X buttons 3 Press the MENU button J The playback menu...

Страница 60: ...is creates a file containing the DPOF information When the operation is finished the screen returns to playback mode J The DPOF icon is displayed on each image that have set up DPOF settings J The dat...

Страница 61: ...memory card Of course you can only do this if you have a memory card installed and files in the internal memory 1 Set the mode dial to 2 Select the image that you want to copy to a memory card with t...

Страница 62: ...Image with the S T buttons and press the SET button 7 Select Execute with the S T buttons and press the SET button J This new start logo image will be activated the next time you turn on the camera J...

Страница 63: ...ables you to delete the last captured image during capture 1 Slide the mode switch to and set the mode dial to one of the photography modes 2 Press the button J The last image and quick delete menu ap...

Страница 64: ...nd press the SET button J Single Erases the selected image or the last image J All Erases all of the images except for the protected images J Select Erases a number of selected images 5 Select Execute...

Страница 65: ...J The deletion menu will be displayed 3 Select Select with the S T buttons and press the SET button J The images are displayed in the thumbnail display 4 Select the image you want to erase with the S...

Страница 66: ...m Color Preview Quick Shutter Date Print Beep Program Tv Av M User Setting Capture Function AE AWB Size Capture Mode White Balance Quality Dub Manual WB Sharpness LCD Bright ISO Contrast Digital Zoom...

Страница 67: ...ayed 3 Select the desired Capture option item with the S T buttons and press the SET button to enter its respective menu 4 Select the desired setting with the S T buttons and press the SET button 5 To...

Страница 68: ...he camera can automatically emphasize the borders between light and dark areas of the image This will make the image s edges look sharper In some scenes you may prefer sharper edge detail In other sce...

Страница 69: ...n 5 To exit from the photography menu press the MENU button Capture Mode This sets the recording method at the time of capturing images Blank Single Capture one image at a time Continuous Permits cont...

Страница 70: ...e Shot Couple Shot or Album Shot capture mode Dub Refer to section in this manual titled Recording Voice Memos for further details On Off LCD Bright Select a brightness level for the LCD monitor The L...

Страница 71: ...ate zoom function at the time of video recording On Off Audio This sets whether or not to record audio at the time of video recording On Off Menu Options 7 Photography Menu AE AWB tab 1 Slide the mode...

Страница 72: ...mits images to be captured that approach the conditions that are seen by the human eye Blank Auto Incandescent 1 Fluorescent 1 2 Fluorescent 2 Day Light Cloudy Manual Manual WB This manually sets the...

Страница 73: ...SO 64 and ISO 400 J Auto setting is not available for Tv Av and M mode Metering This sets the metering method for calculating the exposure Multi The entire area of the screen is measured and the expos...

Страница 74: ...ing with the S T buttons and press the SET button 5 To exit from the menu press the MENU button Slide Show Refer to section in this manual titled Slideshow Display for further details DPOF Digital Pri...

Страница 75: ...on Voice Memo Refer to section in this manual titled Attaching Voice Memos for further details Media Info This displays the free capacity of the SD memory card or internal memory If the SD memory card...

Страница 76: ...ton Auto OFF If no operation is performed for a specific period of time the camera can be set to automatically turn off This feature is useful to reduce battery wear 1 Min 3 Min 5 Min 10 Min Date Time...

Страница 77: ...m Requirements Windows J Pentium 166 MHz or higher J Windows 2000 XP Vista J 128MB RAM J 128MB hard disk space J CD ROM drive J Available USB port System Requirements Macintosh J PowerPC G3 G4 J OS 9...

Страница 78: ...the camera will be assigned drive letter e or higher 7 Double click on the removable disk and locate the DCIM folder 8 Double click on the DCIM folder to open it to find more folders J Your recorded...

Страница 79: ...on folder and choose Paste from the Edit menu You may also drag and drop image files from the camera to a desired location Macintosh Open the untitled disk icon and the destination location on your ha...

Страница 80: ...nt to configure with the S T buttons and press the SET button J Images Select whether you want to print a specific image or all images You may also select printing number for a specific image J Date P...

Страница 81: ...the SET button to confirm 4 Select Exit with the S T buttons and press the SET button 5 Select Print with the S T buttons and press the SET button to start printing 6 The printing starts and the figu...

Страница 82: ...l in one tool for owners of digital cameras WebCams DV camcorders scanners or anyone who strives to effectively organise a large collection of digital media To install Photo Explorer 1 Insert the CD R...

Страница 83: ...it and enhance images with photo editing tools photographic filters and special effects Embellish projects by adding creative design elements such as frames callouts and stamp objects Share results wi...

Страница 84: ...ending and alignment tools ensure excellent results Share finished panoramas via e mail create Web pages or insert them into documents and presentations To install Cool 360 1 Insert the CD ROM that ca...

Страница 85: ...t JPEG DCF EXIF 2 2 DPOF Motion JPEG Lens 6x optical zoom lens F 2 8 W 4 8 T f 7 8mm 46 8mm equivalent to 37mm 222mm on a 35mm camera Shutter speed 1 1 1500 sec Frame rate 25 frames sec based on SD me...

Страница 86: ...was left unattended and unused so the auto power off cuts it off The battery is exhausted It is being used in extreme low temperature Many shots were being captured in dark places indoors where flash...

Страница 87: ...is smaller than the effective range The flash is set to flash off The distance to the subject is greater than flash effective range The flash is too soft The image is captured in a dark place while se...

Страница 88: ...write protected End of memory card life The LCD monitor is too dark Solution Slide the mode switch to playback mode Insert a memory card that was formatted and stored on by this device Cancel protecti...

Страница 89: ...her Problems About connecting to your computer software Symptom Cannot download images Solution Check whether the hard disk has a space for running Windows and if the drive for loading image files has...

Страница 90: ...90 Helpline No UK Northern Ireland 00800 78772368 Rep Ireland 00800 78772368 Web Support www Traveler service com uk Model Number DC XZ6 Other Useful Information 13...

Страница 91: ...and substances which can be dangerous to the environment and harmful to human health if waste of electrical and electronic equipment WEEE is not disposed of correctly Equipment which is marked with t...

Страница 92: ...92 Helpline No UK Northern Ireland 00800 78772368 Rep Ireland 00800 78772368 Web Support www Traveler service com uk Model Number DC XZ6 Warranty Card 14...

Отзывы: