background image

1

2

he SETUP menu by pressing the ENTER key on the 

4  S

ETUP 

M

ENU

4.1  S

ETUP 

M

ENU

O

PERATION

4.1.1  Invoking the Setup Menu 

After the BD player has been turned on, enter t

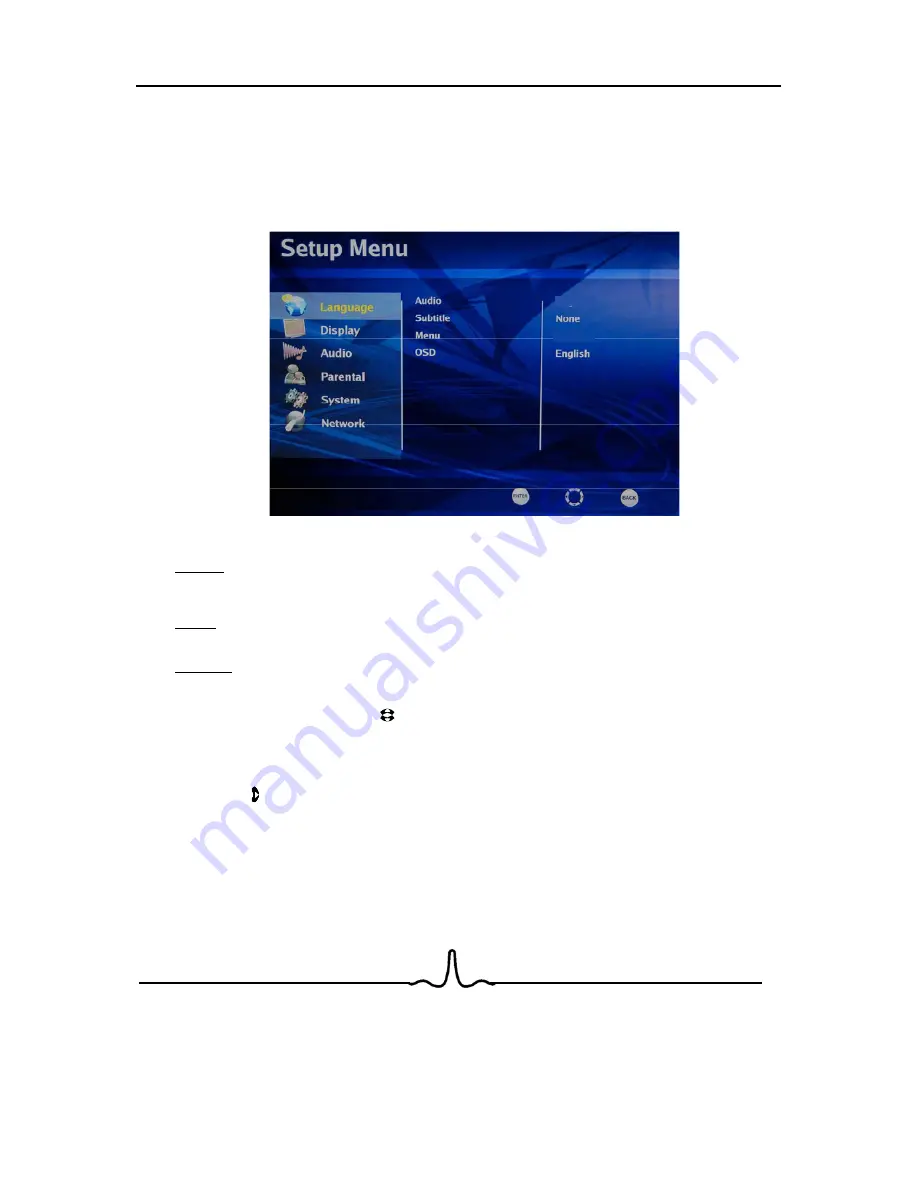
remote.  The following screen will appear: 

As shown in the figure above, the Setup Menu screen is divided into 

three

 separate sections. 

The 

leftmost

 section of the setup menu screen contains setup menu categories.  One of the setup menu 

categories is always highlighted (in yellow).  In the screen above, the setup menu category that is 

highlighted is 

Language

.

The 

middle

 section of the setup menu screen contains menu options for each category.  In the screen 

above, the setup menu options for the Language category are 

Audio

,

Subtitle

,

Menu

, and 

OSD

.

The 

rightmost

 section of the setup menu screen displays the currently saved choice for each menu 

option.  In the screen above, the Language categories’ menu options are currently set to 

Audio: Auto

,

Subtitle: None

,

Menu: Auto

, and 

OSD: English

. (Each of these settings will be described later). 

By pressing the up/down arrow keys ( ) on the remote, different setup menu categories can be 

highlighted. 

4.1.2  Changing Setup Menu Options 

Once the desired Setup Menu category (Language, Display, Parental, etc) is highlighted, pressing the 

right arrow key ( ) on the remote will cause one of the menu items in the center section of the screen to 

be highlighted, and the rightmost portion of the screen will then show the options for each menu item, as 

shown below: 

Auto

Auto

Содержание TC2670BRDVD

Страница 1: ...TC2670BRDVD Blu Ray Disc Player Please read these instructions carefully and retain for furture reference...

Страница 2: ...rt the user to the presence of important operating and maintenance servicing instructions in the literature accompanying the appliance IMPORTANT SAFEGUARDS When using any electrical apparatus always o...

Страница 3: ...around the apparatus to avoid overheating WARNING Do not install near any heat sources such as radiators gas heaters stoves or other apparatus including amplifiers that produce heat Do not leave in d...

Страница 4: ...NG For household use only this apparatus is not intended for commercial use WARNING If this apparatus is to be used by a third party please supply these instructions with it WARNING No liability will...

Страница 5: ...OME THEATRE SYSTEM 4 SETUP MENU 4 1 SETUP MENU OPERATION 4 2 LANGUAGE MENU CATEGORY 4 3 DISPLAY MENU CATEGORY PARENTAL CONTROL S MENU CATEGORY 5 PLAYING A BD OR DVD DISK 5 1 STANDARD OR NORMAL PLAYBAC...

Страница 6: ...er supply cord or plug is damaged liquid has been spilled or objects have fallen into the apparatus the apparatus has been exposed to rain or moisture does not operate normally or has been dropped Pre...

Страница 7: ...Disc Clean with an optional DVD RAM PD disc cleaner LF K200DCA1 where available Do not use cleaners or cloths for CDs to clean BD or DVD RAM RW R discs Wipe off dirt or contamination on the disc with...

Страница 8: ...TS CD DVD RAM Mp3 WMA Jpeg Data CD VCD SVCD NOTES For writeable DVD disks DVD RAM DVD RW DVD R DVD RAM RW R recorded with UDF or ISO9660 format can be played back The disks must be finalized VR mode o...

Страница 9: ...to the disk with a wma or WMA file extension in order to be recognized and played back properly JPEG picture files must be written to the disk with an jpeg or jpg file extension in order to be recogn...

Страница 10: ...laying status time etc See next section Allow for control of playback from the front Panel 6 POWER BUTTON 7 INDICATOR LIGHT Press POWER BUTTON to turn on the player ON mode And press POWER BUTTON agai...

Страница 11: ...RANDOM FORMAT MENU INFO ZOOM A B REPEAT BONUS VIEW SETUP SECONDARYAUDIO SECONDARY SUBTITLE 1 2 3 4 5 6 7 8 9 0 ANGLE SUBTITLE BACK POP MENU TITLE TC2670BRDVD 1 4 2 3 7 9 12 15 16 19 20 21 26 27 29 30...

Страница 12: ...W RANDOM FORMAT MENU INFO ZOOM A B REPEAT BONUS VIEW SETUP SECONDARYAUDIO SECONDARY SUBTITLE 1 2 3 4 5 6 7 8 9 0 ANGLE SUBTITLE BACK POP MENU TITLE TC2670BRDVD 1 4 2 3 7 9 12 15 16 19 20 21 26 27 29 3...

Страница 13: ...W SETUP SECONDARYAUDIO SECONDARY SUBTITLE 1 2 3 4 5 6 7 8 9 0 ANGLE SUBTITLE BACK POP MENU TITLE TC2670BRDVD 1 4 2 3 7 9 12 15 16 19 20 21 26 27 29 30 28 25 24 23 22 18 17 14 13 11 10 8 6 5 8 Allows y...

Страница 14: ...omponent Video 1080i 60 48 720p 60 30 24 576p 60 30 24 480p 60 30 24 NTSC SD 480i 1080i 60 48 720p 60 30 24 576p 60 30 24 480p 60 30 24 PAL SD 576i Composite Video NTSC SD 480i PAL SD 576i 2 3 2 Audio...

Страница 15: ...nect this output to the composite video input of the HD television If your TV does not have component or HDMI video i These are analog old fashioned stereo left right outputs If your TV does not have...

Страница 16: ...only REF output capable of 1080p video and the only output capable of the high definition audio codecs Connect the HDMI output of the player to the HDMI input of the audio receiver You will need to c...

Страница 17: ...the setup menu options for the Language category are Audio Subtitle Menu and OSD The rightmost section of the setup menu screen displays the currently saved choice for each menu option In the screen a...

Страница 18: ...u screen Then press the right arrow key on the remote until the rightmost portion of the setup screen is highlighted The up down arrow keys on the remote can then be used to select English French Span...

Страница 19: ...or DVD disk NOTE Not all languages are available on all disks Most disks only have one menu language available to English French Spanish 4 2 4 Setup Menu OSD Language To set the language that will be...

Страница 20: ...ow keys on the remote can then be used to select your TV s aspect ratio If your TV has a very rectangular 16 9 aspect ratio you will need to choose one of the 16 9 aspect ratios wide or pillarboxed If...

Страница 21: ...ghlighted Then press the right arrow key on the remote until the rightmost portion of the setup screen is highlighted The up down arrow keys on the remote can then be used to select the video output r...

Страница 22: ...CC and forget it 4 3 5 Film Mode This menu item only applies if you are connected to your TV via HDMI Movies are recorded on film at a rate of 24 pictures or frames per second Many of the movies on BD...

Страница 23: ...udio menu category is highlighted on the leftmost portion of the setup menu screen A screen similar to the following will appear Each of the menu choices above will be explained in the subsequent sect...

Страница 24: ...ctly match the quality of the studio master The multichannel lossless PCM formats are only available on the HDMI output A compatible HDMI surround receiver is required in order to play these tracks St...

Страница 25: ...to 1 Do you have a stereo audio receiver or surround sound receiver connected to your BD player If yes go to question 2 If not you should set the output to PCM stereo This is true regardless of wheth...

Страница 26: ...receiver NOTE Setting the digital output to Bitstream HD means that only the primary digital audio track the movie soundtrack will be sent to the sound receiver via the digital outputs Director s com...

Страница 27: ...eceiver connected to the BD player you should set the PCM downsampling to 48 Khz and proceed to the next setup menu item This is true regardless of whether the audio is connected to the TV with HDMI S...

Страница 28: ...u choice in the center of the setup screen is highlighted Then press the right arrow key on the remote until the rightmost portion of the setup screen is highlighted The up down arrow keys on the remo...

Страница 29: ...rd please input Master Password 3308 to reset Use this menu item to tell the BD player what country you are in Currently this menu item has no effect Use this menu item to turn parental control ON or...

Страница 30: ...n the remote to leave the setup menu YSTEM MENU CATEGORY From the main setup menu press the up down arrow keys on the remote until the System menu choice is highlighted and the following screen will a...

Страница 31: ...e the type of disk inserted If the BD player recognizes the type of disk it will then display on the front panel 5a After a brief period of time Chapter 1 of Title 1 on the disk will begin playback Yo...

Страница 32: ...to turn it off 5 2 NON STANDARD PLAYBACK OF A BD OR DVD DISC 5 2 1 Fast Forward When the disk is playing normally press the forward scan button on the remote to begin fast forward at 2x normal playba...

Страница 33: ...he beginning of the currently playing chapter and then press the skip backwards button again to skip to the beginning of the previous chapter The previous chapter will start playing back from the begi...

Страница 34: ...words REPEAT TITLE appear on the screen The title will now continuously loop To stop the title or chapter from looping press the REPEAT button on the remote and the words REPEAT OFF appear on the TV...

Страница 35: ...PLE MP3 WMA AUDIO PLAYBACK Inserting a data CD with a data disk containing MP3 WMA and or JPEG files will automatically invoke the MWJ subsystem Navigate through the disk using the RIGHT LEFT UP and D...

Страница 36: ...udio file during the playback of the song will cause the audio to be muted and the audio counter will increment rapidly in the reverse direction If the beginning of the file is encountered during rewi...

Страница 37: ...laying the image Properties Start Slide Show Rotate Press the MENU key to invoke the pop up menu for the image file in image display mode Select the Properties option in the menu as shown in below fig...

Страница 38: ...etely Zooming the Image The image files can be zoomed in out only while viewing the image The image can zoomed up to 5 levels Pressing the ZOOM IN key while viewing the image to magnifies the image Th...

Страница 39: ...Curtain and None from the sub pop up and press ENTER This will start the slide show from the selected image file with the effect selected above After displaying all the image files in the disk the sli...

Страница 40: ...ill cause the slide show to pause Properties Start Slide Show Rotate Blend Film Shutter Fade Curtain None 6 8 2 Changing the Slide Show Transition Effect Slide Show Play from Pause Pressing Play when...

Страница 41: ...ng the steps above 6 8 4 Setting a Background Song for the Slide Show Note Press the LEFT navigation key to exit the current level of the pop up menu Pressing LEFT on the first level pop up will exit...

Страница 42: ...T on the first level pop up will exit from the pop up view completely Slide Show Effect Slide Show BGM Slide Show Duration Song1 Mp3 wma Song1 Mp3 wma NONE Turning Off the Background Song During the S...

Страница 43: ...nel A ssory F Panel Tool No Display F Panel FL Dimmer F P Color Memory slot USB R Panel Video Out Composite Component HDMI Audio Out Audio L R CoaNoial Optical HDMI Ethernet Power Wide SMPS Convenienc...

Страница 44: ...D MA Passthru only MPEG 1 2 L2 MP3 WMA Audio Format LPCM Decoding Dolby Digital Dolby Digital Plus Dolby TrueHD DTS DTS HD MA MPEG 1 2 L2 MP3 WMA Graphics Subtitle Format Video Video DAC Features NTSC...

Страница 45: ...rd BD DVD VR CD DA MP3 WMA Fast Back BD DVD VR CD DA MP3 WMA Forword Slow BD DVD VR Pause BD DVD VR CD DA MP3 WMA Forward Step BD DVD VR Search Title Track BD DVD VR CD DA Chapter BD DVD VR Time DVD V...

Страница 46: ...ALLY LIMITED TO 90 DAYS Type of Appliance _______________________________________________________________ Model No __________________________________ Purchase Date ____________________ Product Purchas...

Отзывы: