background image

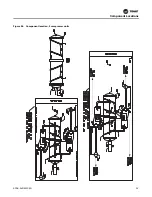
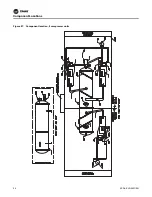
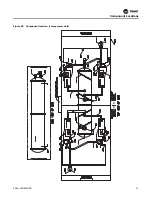
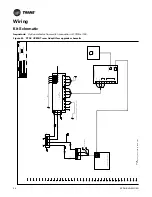
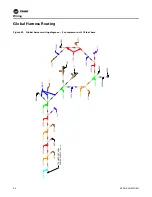
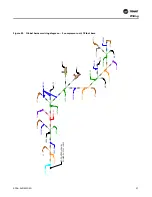
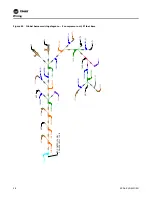
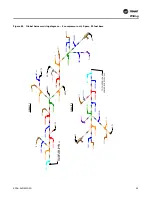
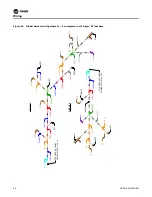
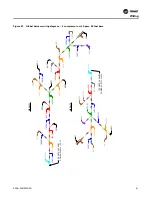
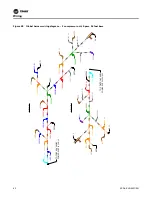
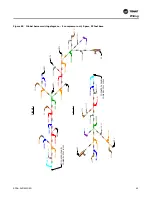
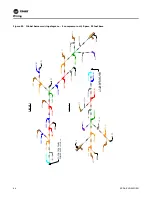
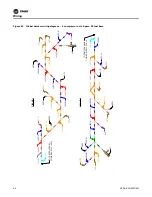
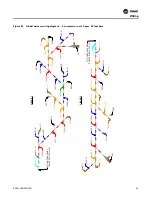
Figure 46.

Global harness wiring diagram — 3 compressor unit, 3-pass, 30 foot base

CIRCUIT 1

CIRCUIT 2

1625-02

TO CONTROL PANEL 

POWER SUPPLY 1U2-J3

1623-01

1622-02

1623-01

3PT2

1622-01

3RT2

1623-01

1622-01

3PT4

1622-03

6RT1

1623-01

1622-01

1623-02

6RT3

1622-02

3PT1

1622-03

1623-02

3LL1

3V1

3PT5

1622-02

3PT3

1623-01

3RT1

1625-02

1623-01

1622-01

1623-02

4PT2

1623-02

1622-03

4LL1

1623-02

1622-02

4RT1

4PT3

1622-02

4V1

1622-02

6RT2

4PT1

TO CONTROL PANEL

POWER SUPPLY 2U2-J3

1623-02

1623-02

Wiring

40

 RCDA-SVN002C-EN

Содержание Tracer AdaptiView

Страница 1: ...tion starting up and servicing of heating ventilating and air conditioning equipment can be hazardous and requires specific knowledge and training Improperly installed adjusted or altered equipment by an unqualified person could result in death or serious injury When working on the equipment observe all precautions in the literature and on the tags stickers and labels that are attached to the equi...

Страница 2: ... equipment that is used in these service procedures In addition some states or municipalities may have additional requirements that must also be adhered to for responsible management of refrigerants Know the applicable laws and follow them WARNING Proper Field Wiring and Grounding Required Failure to follow code could result in death or serious injury All field wiring MUST be performed by qualifie...

Страница 3: ...ane personnel should always follow local regulations Introduction RCDA SVN002C EN 3 Copyright This document and the information in it are the property of Trane and may not be used or reproduced in whole or in part without written permission Trane reserves the right to revise this publication at any time and to make changes to its content without obligation to notify any person of such revision or ...

Страница 4: ...w Configuration and Setpoints 11 Shut Down Power 12 Remove the DynaView Display 12 Prepare Unit for Installation 12 TD7 Enclosure Option 13 Arm Mount Option 15 Adjusting the Tracer AdaptiView Display Arm 16 Routing Cables 16 Back Plate Assembly 17 Restore System Power 19 Programming the Tracer AdaptiView 20 Options 24 Generic BAS Interface 24 Tracer Interface Control 24 ifm efector Flow Switch 27 ...

Страница 5: ... Connector Kit Use 0 Without Global Connector Kit A With Global Connector Kit Digits 16 18 Unit Nominal Capacity 000 Not Required 120 120 Ton Nominal Capacity RTAC unit 130 130 Ton Nominal Capacity RTAC unit 140 140 Ton Nominal Capacity RTAC unit 155 155 Ton Nominal Capacity RTAC unit 170 170 Ton Nominal Capacity RTAC unit 185 185 Ton Nominal Capacity RTAC unit 200 200 Ton Nominal Capacity RTAC un...

Страница 6: ...t An RS 232 Male DB9 to female DB9 pin to pin serial cable to connect the Dynaview to a PC or laptop computer Notes The cable must not be a null modem cable The cable must be less than 50 feet in length Type A to Type B USB cable to connect the Tracer UC800 controller to a PC or laptop computer A PC or laptop computer equipped with the following KestrelView service software version 14 0 Service Pa...

Страница 7: ...hesive Backed for securing cables 11 X19210028010 TIE00122 Cable Ties 0 1 x 3 87 long 15 507118170001 Cord Grip 3 4 NPT Split Grommet 1 507119210001 Cord Grip 1 2 NPT Split Grommet 1 507119220001 Cord Grip Nut 3 4 NPT 1 507119230001 Cord Grip Nut 1 2 NPT 1 507117820001 Bushing Split 1 25 1 X19010309460 Single conductor cable 14awg UL 1230 blk WIRE 8 ft X19180041070 TER00315 Insulated Terminal Fast...

Страница 8: ...10309460 Wire 14 awg UL1230 See ES3401001 6 5 in X19180041070 TER00315 Insulated Terminal Fasten Receptacle 1 X19210028100 TIE00104 Wire Tie Push Mount 3 General Information 8 RCDA SVN002C EN Kit Components Display Mounting Option Table 7 Unit mount option kit 018800360100 Part Number Mnemonic Description Quantity 507118320001 Display Enclosure Assembly 1 507119260001 Flange Head Screw SS 10 32 x ...

Страница 9: ...und 4 oz 1 KIT13723 KIT13723 4 wire Ribbon to Global Connector Adapter 15 X19051622010 CAB01146 2Y Short Wire Harness 1 2 Branching 500 MM 10MM 600V 18AWG 5 X19051622020 CAB01147 2Y Long Wire Harness 1 2 Branching 1000 MM 20MM 600V 18AWG 5 X19051622030 CAB01148 3Y Wire Harness 1 3 Branching 500 MM 10MM 600V 18AWG 5 X19051623010 CAB01149 EXT Short Wire Harness Extension 1000 MM 20MM 600V 18AWG 8 X1...

Страница 10: ...ter 21 X19051622010 CAB01146 Wire Harness 1 2 Branching 500 MM 10MM 600V 18AWG 8 X19051622020 CAB01147 Wire Harness 1 2 Branching 1000 MM 20MM 600V 18AWG 11 X19051622030 CAB01148 Wire Harness 1 3 Branching 500 MM 10MM 600V 18AWG 1 X19051623010 CAB01149 Wire Harness Extension 1000 MM 20MM 600V 18AWG 11 X19051623020 CAB01150 Wire Harness Extension 2000 MM 30MM 600V 18AWG 2 X19051625020 CAB01155 Wire...

Страница 11: ...rol in order to successfully configure the upgraded UC800 controller Using KestrelView on a PC or laptop computer 1 Generate a Chiller Service report from the DynaView with Level 4 active To do this click on Reports Menu and select Chiller Service Report Figure 2 KestrelView screenshot accessing Chiller Service report 2 Select all reports to ensure that you get a complete report and convert the re...

Страница 12: ...s See Figure 3 2 Remove the 4 fasteners holding the DynaView display to the Unit 3 Unplug the 4 wire Phoenix connector from the DynaView display and remove the DynaView display from the unit Figure 3 Louver panel removal Prepare Unit for Installation WARNING Risk of Electrocution Failure to follow instructions could result in death or serious injury Before and during drilling operations ensure tha...

Страница 13: ...e of the control enclosure TD7 Enclosure Option 1 Use a 1 3 8 knockout punch to enlarge the 11 16 diameter hole used to route the Dynaview cable Figure 7 Panel hole enlargement 2 Remove the lid from the TD7 enclosure and temporarily install the 1 1 4 split grommet Aligning the split grommet with the 1 3 8 hole created in the previous step place the enclosure on the panel Level and mark the 4 holes...

Страница 14: ...closure backplate using the four brass M4 screws and washer provided in the kit Figure 11 TD7 to enclosure backplate 7 Assemble the TD7 to the enclosure with 10 32 lock nuts See Figure 12 Figure 12 Assemble the TD7 to the enclosure 8 Connect wire extension X19051625030 and Ethernet cable X19070632020 route cables through the large hole and install the provided grommet 9 Route TD7 cables along the ...

Страница 15: ...lly snapping upwards unexpectedly the moment the weight of the display is removed from it 1 On the side of the control panel carefully position the arm mount hole template Figure 55 p 49 and mark the 4 required holes Note Make sure arm mount location will not interfere with control panel door 2 Using a Q 0 332 bit drill the holes 3 Using a 1 1 4 hole saw or knockout punch create a hole in the uppe...

Страница 16: ...oints 1 and 2 are covered by a plastic cap Remove the plastic cap to access the hex bolt Adjust using a 13 mm wrench as necessary 4 To adjust the swivel of the Tracer AdaptiView display the spin right and left similar to the steering wheel on a car adjust the hex bolt located inside the display arm back plate This adjustment needs to be done BEFORE attaching the display Use a 9 16 in or 14 mm wren...

Страница 17: ...the fuse on the backplate assembly to one of the terminals 1 8 on TB5 4 Using the 14 gauge wire and terminal provided in the kit connect the Line side of the 24volt transformer on the backplate to one of the terminals 9 16 on TB5 Figure 22 Back plate wire routing 5 Cut the connector off of cable X19051625020 and use cable to connect the UC800 to the power supply See schematic 50711917 Figure 40 p ...

Страница 18: ...ication connection 8 Install the USB Service port in the panel and connect to the UC800 Install the USB weatherproof cap See Figure 26 p 18 Figure 26 USB port installation 9 Secure all cables with the adhesive backed zip ties provided in the kit See Figure 27 p 18 Figure 27 Secure all cables Connect TD7 Power to Load Side of Transformer Connect Ethernet Cable from TD7 to UC800 Install USB Port Int...

Страница 19: ...pection of the control panel enclosure before restoring system power a Remove any tools and use a shop vacuum to remove any dirt or debris that may have been created during the installation process b Confirm that all upgrade kit wiring has been correctly routed and that all terminal connections have been properly made c Inspect the rest of the electrical wiring and components within the enclosure ...

Страница 20: ...th new UC800 Damaging a UC800 controller in this manner is not covered under any warranty 2 Obtain a working AC power adapter with which to power the technician s laptop 3 Connect the computer with the Tracer TU service tool software to the service port of the Tracer UC800 controller with a USB type A B cable 4 Open Tracer TU Note The UC800 ships with no software loaded When first connecting to Tr...

Страница 21: ...M4 Curitiba Pueblo Taicang N Standard A Extra Efficiency 460 139 150 M2 M4 Curitiba Pueblo Taicang H High Efficiency 380 161 200 M2 M4 Curitiba Pueblo Taicang N Standard A Extra Efficiency 380 168 200 M2 M4 Curitiba Pueblo Taicang H High Efficiency 220 240 275 M2 M4 Curitiba Pueblo Taicang N Standard A Extra Efficiency 220 251 275 M2 M4 Curitiba Pueblo Taicang H High Efficiency 230 265 275 M2 M4 C...

Страница 22: ...ng H High Efficiency 380 235 275 N2 N4 Curitiba Pueblo Taicang N Standard A Extra Efficiency 380 242 275 N2 N4 Curitiba Pueblo Taicang H High Efficiency 220 344 400 N2 N4 Curitiba Pueblo Taicang N Standard A Extra Efficiency 220 359 400 N2 N4 Curitiba Pueblo Taicang H High Efficiency 230 388 400 N2 N4 Curitiba Pueblo Taicang N Standard A Extra Efficiency 230 399 400 N2 N4 Curitiba Pueblo Taicang H...

Страница 23: ...ions 9 In the case you changed any configuration or setpoint values click the Save button This updates the values on the UC800 controller and takes you to the LLID Binding screen Figure 31 Navigating within the equipment utility configuration tab in Tracer TU Figure 32 Location of the equipment utility tab in Tracer TU 10 In Tracer TU save a copy of the Chiller Service Report From the Reports drop...

Страница 24: ... Program Plugins UC DataBaseDAL New Folder f Select the New Folder file g Click the OK button h The chiller configuration file will now be saved in the New Folder i Compare the KestrelView report with the Tracer TU report to validate configuration settings and setpoints Options Generic BAS Interface For the following option installations see Figure 39 p 32 unit schematic and upgrade schematic When...

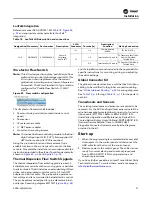
Страница 25: ...put output 4 LLID Output 10V for 2 10v or 20Vdc for 4 20mA Customer connection Chilled Water Setpoint 5 LLID Input 2 10v 4 20mA 6 LLID GND for input output 1U7 BRD04873 X13650728070 Dual Low Voltage Input Module Ice Making Control J11 1 4 Communication UC800 IPC BUS WB J2 1 2 External Input to enable ice making N O contact of 5K18 relay 1U12 BRD04879 X13650806050 Quad Relay Output Module Unit Oper...

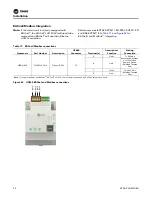
Страница 26: ...net and Modbus integration Table 17 BACnet Modbus connections Mnemonic Part Number Description UC800 Connector Terminal s Description Function Mating Connection MOD01628 X13651144010 Tracer UC 800 J3 5 Link To Building Automation System or other Trane Remote Device Shielded Twisted Pair 6 Link 7 Link To Next Unit Shielded Twisted Pair 8 Link Note If customer already has BACnet BACnet LLID 1U24 mus...

Страница 27: ...rmal dispersion flow switch upgrade is a set of solid state components with no moving parts or paddles to stick or break The kit includes an extended length flow probe cabinet mounted control monitor 1 2 inch NPT adapter and 30 foot cable The probe cable operates on low voltage and is not required to be installed in conduit The probe system is designed for pipe diameters 4 inch and larger See wiri...

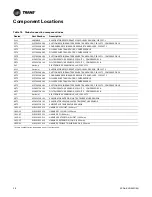
Страница 28: ...VEL SENSOR CIRCUIT 2 4PT1 X13790348080 SUCTION REFRIGERANT PRESSURE TRANSDUCER CIRCUIT 2 COMPRESSOR 2A 4PT2 X13790348080 CONDENSER REFRIGERAND PRESSURE TRANSDUCER CIRCUIT 2 4PT3 X13790348080 OIL PRESSURE TRANSDUCER COMPRESSOR 2B 4PT4 X13790348080 OIL PRESSURE TRANSDUCER COMPRESSOR 2A 4PT5 X13790348080 SUCTION REFRIGERANT PRESSURE TRANSDUCER CIRCUIT 2 COMPRESSOR 2B 4RT1 X13650726100 OIL TEMPERATURE...

Страница 29: ...Figure 36 Component location 2 compressor units Component Locations RCDA SVN002C EN 29 ...

Страница 30: ...Figure 37 Component location 3 compressor units Component Locations 30 RCDA SVN002C EN ...

Страница 31: ...Figure 38 Component location 4 compressor units Component Locations RCDA SVN002C EN 31 ...

Страница 32: ...5 1U6 1T1 1T9 1U10 1U12 1U13 1U4 1U24 1U8 1U23 1U25 1U27 1TB4 1TB5 1TB6 1F7 1F8 1F9 1F10 1F11 1F12 1F21 1F22 1F23 1F13 1F14 1F18 1F19 1F20 1F1 1F2 1F3 1F4 1F5 1F6 1TB7 1F15 1F16 1F17 1U14 1U15 1U16 1U17 1U19 1U21 1U22 1K14 1TB1 or 1CB1 or 1SW1 or Component Locations 32 RCDA SVN002C EN ...

Страница 33: ...Component Locations RCDA SVN002C EN 33 Page Left Intentionally Blank ...

Страница 34: ...J2 1U2 POWER SUPPLY J11 1 J1 4 1 4 1 2 3 WB5 118CA 117CA 115CA J5 1 2 3 4 1 2 3 4 1 2 3 4 J4 J3 162A 161A WHT RED BLK BLU GRY RED GRY BLK BLU GRY WB1 4 1F25 24 VAC LINE UC800 UNIT CONTROLLER RED 24 VDC GND MBUS SERVICE TOOL ETHERNET LINK BLK BLU GRY 4A2 ADAPTIVIEW DISPLAY MONITOR USB PORT WB3 6 BLK RED BLK BLU GRY NOTES 1 1F25 FUSE 1 AMP CLASS CC FNQ R 600V LOAD IF APPLICABLE LINK TO 2U2 7U2 POWER...

Страница 35: ... Figure 41 RTAC UC800 Tracer AdaptiView upgrade schematic continued NOTES 1 1F25 FUSE 1 AMP CLASS CC FNQ R 600V OPTIONAL EFFECTOR FLOW SWITCH 1U11 DUAL HIGH VOLTAGE INPUT J11 WB5 J1 2 1 2 1 17 2 18 3 19 1 20 4 21 5 5 7 8 4 1 2 1TB5 9 16 1TB5 1 8 EVAPORATOR WATER FLOW DETECTOR FIELD INSTALLED ...

Страница 36: ...ng diagram 2 compressor unit 15 foot base 1625 02 1622 02 1622 01 1622 02 1622 01 1622 03 1623 01 1623 03 1623 01 1622 02 1622 03 1623 01 1622 01 1623 01 1622 01 1623 01 3PT3 3RT1 3PT2 4LL1 6RT1 6RT2 4PT1 3PT1 6RT3 3LL1 4PT3 4RT1 4PT2 TO CONTROL PANEL POWER SUPPLY 1U2 J3 3V1 4V1 ...

Страница 37: ... 1625 02 TO CONTROL PANEL POWER SUPPLY 1U2 J3 1622 02 4PT2 1623 01 1622 03 4RT1 1623 01 4PT3 1622 01 3LL1 1622 03 1623 01 3PT1 6RT3 1622 03 1623 01 4V1 3V1 1622 02 4PT1 1622 03 6RT2 1623 01 6RT1 1622 02 4LL1 1622 03 1623 02 3PT2 1623 01 3PT3 3RT1 Wiring RCDA SVN002C EN 37 ...

Страница 38: ...CONTROL PANEL POWER SUPPLY 1U2 J3 1622 02 4PT2 1622 02 4RT1 1622 02 4PT3 1622 03 3LL1 1623 01 6RT3 1622 02 1623 01 3PT1 1623 01 1622 03 4V1 3V1 1623 01 1622 02 1623 01 4PT1 1622 03 6RT2 1623 01 6RT1 1622 01 1623 01 1622 03 4LL1 1623 02 3PT2 3RT1 1623 01 3PT3 Wiring 38 RCDA SVN002C EN ...

Страница 39: ... 1623 01 3PT2 1622 01 3RT2 1623 01 1622 01 3PT4 1622 03 1622 02 3PT3 1623 01 3RT1 6RT1 1622 02 6RT2 1622 01 1623 02 6RT3 1622 02 3PT1 1622 03 1623 01 3PT5 1623 01 1623 01 3V1 3LL1 1625 02 1623 01 1622 01 1623 02 4PT2 1623 01 1622 03 4LL1 1623 01 1622 02 4RT1 4PT3 1622 02 1623 01 4PT1 4V1 TO CONTROL PANEL POWER SUPPLY 2U2 J3 Wiring RCDA SVN002C EN 39 ...

Страница 40: ...2 02 1623 01 3PT2 1622 01 3RT2 1623 01 1622 01 3PT4 1622 03 6RT1 1623 01 1622 01 1623 02 6RT3 1622 02 3PT1 1622 03 1623 02 3LL1 3V1 3PT5 1622 02 3PT3 1623 01 3RT1 1625 02 1623 01 1622 01 1623 02 4PT2 1623 02 1622 03 4LL1 1623 02 1622 02 4RT1 4PT3 1622 02 4V1 1622 02 6RT2 4PT1 TO CONTROL PANEL POWER SUPPLY 2U2 J3 1623 02 1623 02 Wiring 40 RCDA SVN002C EN ...

Страница 41: ... 1622 02 1623 01 3PT2 1622 01 3RT2 1623 01 1622 01 3PT4 1622 03 1622 02 1623 01 3RT1 3PT3 6RT1 1622 02 6RT2 1622 01 1623 02 6RT3 1622 02 3PT1 1622 03 1623 01 3PT5 1623 01 3LL1 3V1 1625 02 1623 02 1622 01 1623 02 4PT2 1623 01 1622 03 4LL1 1623 01 1622 02 4RT1 4PT3 1622 02 4V1 1623 01 4PT1 TO CONTROL PANEL POWER SUPPLY 2U2 J3 Wiring RCDA SVN002C EN 41 ...

Страница 42: ...2 02 1623 01 3PT2 1622 01 3RT2 1623 01 1622 01 3PT4 1622 03 1622 02 3PT3 1623 01 3RT1 6RT1 1623 01 1622 01 1623 02 6RT3 1622 02 3PT1 1622 03 1623 02 1623 02 1623 02 3LL1 3V1 1625 02 1623 02 1622 01 1623 02 1623 02 4PT2 1622 03 4LL1 1623 02 1622 02 4RT1 4PT3 1622 02 4V1 1622 02 4PT1 6RT2 TO CONTROL PANEL POWER SUPPLY 2U2 J3 3PT5 Wiring 42 RCDA SVN002C EN ...

Страница 43: ... 1623 01 3PT2 1622 01 3RT22 1623 01 1622 01 3PT4 1622 03 6RT1 1622 02 1622 02 3PT3 1623 01 3RT1 6RT2 1622 01 1623 02 6RT3 1622 02 3PT1 1622 03 1623 02 1623 02 1623 02 3PT5 3LL1 3V1 1625 02 1623 01 1623 02 1622 01 1623 02 4PT2 1623 02 1622 03 4LL1 1623 02 1622 02 4RT1 4PT3 1622 02 1623 01 4PT1 4V1 TO CONTROL PANEL POWER SUPPLY 2U2 J3 Wiring RCDA SVN002C EN 43 ...

Страница 44: ... 1623 01 3PT2 1622 01 3RT2 1623 01 1622 01 3PT4 1622 03 1622 02 3PT3 1623 01 3RT1 6RT1 1623 01 1622 01 1623 02 6RT3 1622 02 3PT1 1622 03 1623 02 1623 02 1623 02 3PT5 3V1 3LL1 1625 02 TO CONTROL PANEL POWER SUPPLY 2U2 J3 1623 01 1623 02 1622 01 1623 02 4PT2 1623 02 1622 03 4LL1 1623 02 1622 02 4RT1 4PT3 1622 02 4V1 1622 02 6RT2 4PT1 Wiring 44 RCDA SVN002C EN ...

Страница 45: ...02 3RT2 1622 02 3PT3 1622 02 1622 03 1622 01 3RT1 3PT4 6RT1 1623 01 6RT2 1623 01 1622 01 1623 01 6RT3 1622 02 1622 02 1622 01 3V1 3LL1 3PT1 1623 01 3PT5 TO CONTROL PANEL POWER SUPPLY 2U2 J3 1625 02 1623 01 1622 02 1623 01 4PT2 1622 01 4RT2 1622 02 4PT4 1622 02 1622 02 4RT1 4PT3 1623 01 1622 01 4LL1 1623 01 1622 01 4V1 1622 01 4PT1 1623 01 4PT5 1623 01 Wiring RCDA SVN002C EN 45 ...

Страница 46: ...622 02 3RT2 1622 02 3PT4 1622 02 1622 02 3RT1 3PT3 1623 01 1622 01 6RT1 1623 01 1622 01 1623 01 6RT3 1622 02 1622 02 3PT1 3PT5 1622 01 1623 01 3V1 3LL1 TO CONTROL PANEL POWER SUPPLY 2U2 J3 1625 02 1623 01 1622 02 1623 01 4PT2 1922 01 4RT2 4PT4 1622 02 4RT1 4PT3 1623 01 1622 01 4LL1 1623 01 1622 03 1623 01 6RT2 4V1 1622 02 1623 01 4PT1 4PT5 1622 02 Wiring 46 RCDA SVN002C EN ...

Страница 47: ...622 01 3RT2 1622 01 3PT3 1622 02 1622 02 3RT1 3PT4 1623 01 1622 03 6RT1 1623 01 6RT2 1623 01 1622 01 1623 01 6RT3 1622 02 1622 02 3PT1 3PT5 1622 01 1623 01 3LL1 3V1 1625 02 1623 02 1622 02 1623 01 4PT2 1622 01 4RT2 1622 02 4PT4 1622 02 1622 02 4RT1 4PT3 1623 01 1622 01 4LL1 1623 01 1622 01 4V1 1622 02 4PT1 1623 01 4PT5 TO CONTROL PANEL POWER SUPPLY 2U2 J3 Wiring RCDA SVN002C EN 47 ...

Страница 48: ...622 02 3RT2 1622 02 3PT4 1622 02 1622 02 3RT1 3PT3 1623 01 1622 01 6RT1 1623 01 1622 01 1623 01 1622 02 1622 02 3PT1 3PT5 1622 01 1623 01 3LL1 3V1 TO CONTROL PANEL POWER SUPPLY 2U2 J3 1625 02 1623 02 1622 02 1623 01 4PT2 1622 01 4RT2 4PT4 1622 02 4RT 4PT3 1623 01 1622 01 4LL1 1623 01 1622 03 1623 01 4V1 1622 02 4PT1 1623 01 4PT5 1622 02 1622 02 6RT3 6RT2 Wiring 48 RCDA SVN002C EN ...

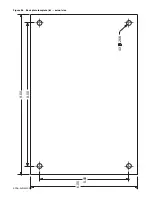
Страница 49: ...es See Figure 55 p 49 for arm mount hole template See Figure 56 p 51 for back plate template See document RCDA SVN003 EN for enclosure hole template Figure 55 Arm mounting holes template mm in Note Template is shown ACTUAL SIZE ...

Страница 50: ......

Страница 51: ...Figure 56 Back plate template in actual size 8 00 9 00 6 00 5 00 4X 266 RCDA SVN002C EN 51 ...

Страница 52: ...Page left intentionally blank ...

Страница 53: ......

Страница 54: ......

Страница 55: ......

Страница 56: ...are committed to using environmentally conscious print practices Trane by Trane Technologies NYSE TT a global climate innovator creates comfortable energy efficient indoor environments for commercial and residential applications For more information please visit trane com or tranetechnologies com RCDA SVN002C EN 27 Apr 2020 Supersedes RCDA SVN002B EN Feb 2018 ...

Отзывы: