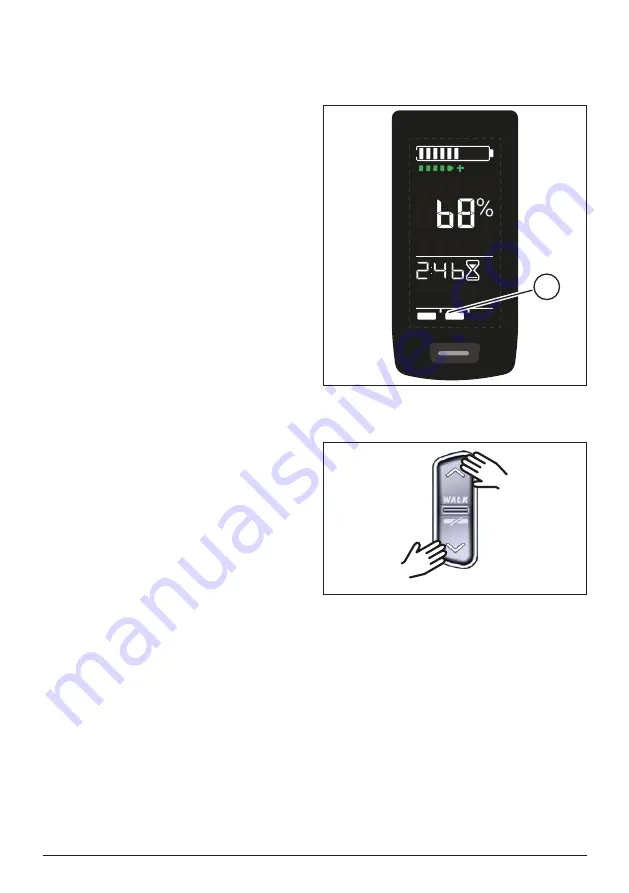
background image

EN - 13

Select assist mode

You can choose between 3 assist 

modes or switch off the assist from 

the drive unit. The selected assist 

mode I, II or III is shown on the Display 

with the corresponding number of 

bars (see pos. 1 in Fig. 5).


— With a short press on the button 

UP of the Remote (see Fig. 6) you 

increase the assist mode.


— With a short press on the button 

DOWN of the Remote (see Fig. 6) 

you decrease the assist mode.


— With a long press (>3 s) on the 

DOWN button of the Remote (see 

Fig. 6), you switch off the assist 

from the drive system.

Fig. 5: 

Visualization of the selected 

assist mode

1

Fig. 6: 

Select assist mode on the 

Remote

Содержание Display V02

Страница 1: ...Display V02 Remote V01 User Manual EN...

Страница 2: ...additional documentation for the other components of the HPR50 drive system as well as the documentation enclosed with the e bike 1 1 Hazard classification HAZARD The signal word indicates a hazard wi...

Страница 3: ...r before doing any work e g cleaing chain maintenance etc on the e bike Switch off the drive system at the Display and wait until the Display has disappeared Otherwise there is a risk that the drive u...

Страница 4: ...he e bike and its functions without assistance from the drive unit at first Then gradually increase the assistance mode 1 6 Safety instructions for using Bluetooth and ANT Do not use Bluetooth and ANT...

Страница 5: ...nce and Economic Development Canada s licence ex empt RSS s Operation is subject to the following two conditions 1 This device may not cause interference 2 This device must accept any interference inc...

Страница 6: ...23 F to 104 F 0 C to 40 C 32 F to 140 F Tab 1 Technical data Display Declaration of Conformity We TQ Systems GmbH Gut Delling M hlstr 2 82229 Seefeld Germany declare that the HPR Display V02 bicycle c...

Страница 7: ...e of charge range extender max 5 bars 1 bar corresponds 20 3 Display panel for different screen views with riding informa tion see section 6 on page 10 4 Assist mode OFF I II III 5 Button 3 2 Overview...

Страница 8: ...y charged before operation Switch on drive system Switch on the drive unit by shortly pressing the button see Fig 3 on the Display Switch off drive system Switch off the drive unit by long pressing th...

Страница 9: ...km or angloamerican mi Acoustic acknowledge signal ON sounds with each buttonpress ON OFF Walk assist ON ON OFF Tab 3 Settings in Setup Mode Use the buttons on the Remote to scroll through the respec...

Страница 10: ...at the bottom edge With a short press on the button on the Display pos 5 in Fig 1 you switch to the next screen view Screen view Riding information Battery state of charge in percent 68 in this exampl...

Страница 11: ...nt drive unit power in watts 203 W in this example Current speed 36 km h in this example in kilometers per hour KPH or miles per hour MPH Average speed AVG 19 km h in this example in kilometers per ho...

Страница 12: ...utton and DOWN button at the same time Depending on wheter the e bike is equipped with light and TQ smartbox please see the smartbox manual for more information Deactivated light LIGHT OFF Switch off...

Страница 13: ...ars see pos 1 in Fig 5 With a short press on the button UP of the Remote see Fig 6 you increase the assist mode With a short press on the button DOWN of the Remote see Fig 6 you decrease the assist mo...

Страница 14: ...tore for IOS and the Google Play Store for Android Download the Trek Connect app Select your bike you only need to pair your smartphone the first time Enter the numbers shown on the Display in your ph...

Страница 15: ...ce approx 10 meters Pair your bicycle computer Bluetooth or ANT Select at least the three shown sensors see Fig 8 Your e bike is now connected Artwork courtesy of Trek Bicycle Company Add sensors Cade...

Страница 16: ...vate walk assist CAUTION Risk of injury Make sure that both wheels of the e bike are in contact with the ground When the walk assist is activated make sure that your legs are a suffi cient safety dist...

Страница 17: ...Mode is indicated first and RESET is followed see Fig 10 Make your choice with the buttons on the Remote and confirm it by pressing the button on the Display When resetting to factory settings the fo...

Страница 18: ...on the pedals The higher the force applied to the pedals the greater the Drive Unit assistance You can also ride the e bike without Drive Unit assistance e g when the drive system is switched off or...

Страница 19: ...ic components in accordance with country specific regulations Dispose of electrical components in accordance with country specific regulations In EU countries for example observe the national imple me...

Страница 20: ...the error still occurs ERR 40C DRV SW ERR 40D DRV SW ERR 40E DRV SW ERR 40F DRV SW ERR 415 DRV SW Configuration error Contact your TQ dealer ERR 416 BATT COMM General software error Restart the syste...

Страница 21: ...tion error timeout ERR 469 BATT GEN Critical Battery error ERR 475 BATT COMM Battery initalization error ERR 479 DRV SW General software error ERR 47A DRV SW ERR 47B DRV SW ERR 47D DRV HW Drive Unit o...

Страница 22: ...RR 48B DRV SW ERR 48C DRV SW ERR 48D DRV SW ERR 48E DRV SW ERR 48F DRV SW ERR 490 DRV SW ERR 491 DRV SW ERR 492 DRV SW ERR 493 DRV HW Drive Unit voltage error ERR 494 DRV HW Supply voltage problem ERR...

Страница 23: ...DRV SW Torquesensor error ERR 4A6 BATT COMM Battery communication error ERR 4A7 DRV SW General software error ERR 4A8 SPD SENS Speedsensor error Check the distance between magnet and Speedsensor or ch...

Страница 24: ...dirt Restart the system Contact your TQ dealer if the error still occurs ERR 5401 DRV CONN Communication error between Drive Unit and Display Restart the system Contact your TQ dealer if the error st...

Страница 25: ...EN 25...

Страница 26: ...corrections are included in subsequent editions All trademarks mentioned in this manual are the property of their respective owners Copyright TQ Systems GmbH TQ Systems GmbH TQ E Mobility Art No HPR50...

Отзывы: