background image

TL-WN610G/TL-WN650G/TL-WN651G

108M Wireless Adapter User Guide


4

Chapter 2  Installation Guide 

2.1  Hardware Installation 

2.1.1  TL-WN650G/TL-WN651G Hardware Installation 

To install the adapter, follow these steps listed below: 

1.  Turn off your desktop PC and disconnect the power. 

2.  Remove your PC case and locate an available PCI slot on the mainboard. Remove the metal 

slot cover on the back of the PC. Check with your computer manufacturer for instructions if 

needed. 

3.  Slide the PCI Adapter into the PCI slot. Make sure that all of its pins are touching the slot's 

contacts. Once the adapter is firmly in place, secure its fastening tab to your PC's chassis 

with a mounting screw. Then, close your PC case. 

4.  Reconnect your PC’s power and turn on your desktop PC. 

2.1.2  TL-WN610G Hardware Installation 

To install the adapter, follow these steps listed below: 

1.  Locate an available CardBus slot on your laptop.   

2.  With the connector pin end facing the CardBus slot and the label facing up, slide the Adapter 

into the CardBus slot until it locks in place. 

3.  The promoted Found New Hardware Wizard screen will pop up when the adapter is 

installed correctly. 

2.2 Software 

Installation 

2.2.1  Overview 

The Adapter’s Setup Wizard will guide you through the Installation procedure for Windows 

98SE, ME, 2000, XP,


Vista. The Setup Wizard will install the TP-LINK Wireless Client Utility 

(TWCU) and drivers. 

When you install the hardware before installing the software, the system will prompt “Found 

New Hardware Wizard” window, click 

Cancel

, and run the Setup Wizard program on the 

CD-ROM.  

The Setup steps for Windows 98SE, Me, 2000 and XP are very similar. The following setup 

steps are for Windows 2000 and the section 2.2.3 for Windows Vista. 

Содержание TL-WN610G

Страница 1: ...Rev 1 0 1 1910010040...

Страница 2: ...are trademarks or registered trademarks of their respective holders No part of the specifications may be reproduced in any form or by any means or used to make any derivative such as translation tran...

Страница 3: ...itions 1 This device may not cause harmful interference 2 This device must accept any interference received including interference that may cause undesired operation Any changes or modifications not e...

Страница 4: ...on remark Bulgaria General authorization required for outdoor use and public service France Outdoor use limited to 10 mW e i r p within the band 2454 2483 5 MHz Military Radiolocation use Refarming of...

Страница 5: ......

Страница 6: ......

Страница 7: ...Installation for Windows Vista 9 Chapter 3 Configuration 12 3 1 Current Status 12 3 2 Profile Management 14 3 2 1 Add or Modify a Configuration Profile 14 3 2 2 Remove a profile 18 3 2 3 Switch anoth...

Страница 8: ...ation Guide One resource CD for TL WN610G TL WN650G TL WN651G including TP LINK Wireless Client Utility TWCU and Drivers User Guide Other Helpful Information Note If any of the listed contents are dam...

Страница 9: ...transmission distance is 2 3 times of traditional 11g b solutions up to 855 36m tested in China Transmission range is extended to 4 9 times It adopts 108M Super GTM WLAN Transmission Technology which...

Страница 10: ...Activity Green Flashing Alternately The adapter is trying to scan a networking connection Status Green Intermittently Activity Green Intermittently The adapter is already connected but is not transmit...

Страница 11: ...C 2 1 2 TL WN610G Hardware Installation To install the adapter follow these steps listed below 1 Locate an available CardBus slot on your laptop 2 With the connector pin end facing the CardBus slot an...

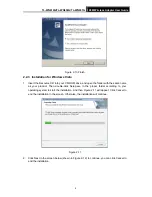
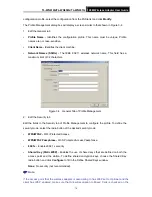
Страница 12: ...ncel to end the installation on the Preparing Setup screen Figure 2 1 Otherwise the Setup Wizard will display a screen similar to that shown in Figure 2 2 after a moment Figure 2 1 TP LINK Wireless Cl...

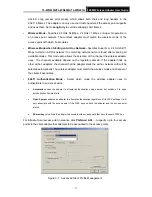
Страница 13: ...allation Click Back to return to the previous page or click Cancel to end the Installation Figure 2 3 Select the setup type 5 Figure 2 4 should appear Click Yes to continue the Installation or click N...

Страница 14: ...ders list shown in Figure 2 6 It is recommended that you keep the default value Click Next to continue the Installation Click Back to return to the previous page or click Cancel to end the Installatio...

Страница 15: ...rs have been tested thoroughly and are able to work with the operating system Figure 2 8 Widows 2000 Warning Box Note In Windows XP the warning box is similar to that shown Figure 2 9 Please select Co...

Страница 16: ...th the same name as your product Then double click Setup exe in the proper folder according to your operating system to start the installation And then Figure 2 11 will appear Click Cancel to end the...

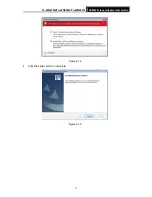
Страница 17: ...that the files will be copied as the next screen shown shown in Figure 2 13 To end the Installation click Cancel Figure 2 13 Note During the installation the system will warn about Windows Security t...

Страница 18: ...TL WN610G TL WN650G TL WN651G 108M Wireless Adapter User Guide 11 Figure 2 14 4 Click the Finish button to complete Figure 2 15...

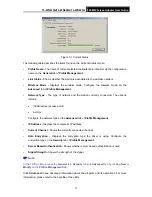
Страница 19: ...s poor signal strength and the RSSI is less than 5dB If the icon is yellow there is poor signal strength and the RSSI is between 5dB and 10dB If the icon is green there is good signal strength and the...

Страница 20: ...ptions include Infrastructure access point Ad Hoc Configure the network type on the Advanced tab of Profile Management IP Address Displays the computer s IP address Current Channel Shows the currently...

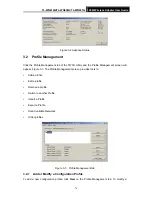
Страница 21: ...ent screen will appear Figure 3 3 The Profile Management screen provides tools to Add a profile Edit a profile Remove a profile Switch to another Profile Import a Profile Export a Profile Scan Availab...

Страница 22: ...t 2 Edit the Security tab Edit the fields in the Security tab of Profile Management to configure the profile To define the security mode select the radio button of the desired security mode WPA WPA2 W...

Страница 23: ...Edit the Advanced tab Power Save Mode Maximum Selects maximum mode to let the access point buffer incoming messages for the wireless adapter The adapter will detect the access point if any messages a...

Страница 24: ...on the regulatory domain If the adapter finds no other ad hoc adapters the channel that the adapter starts the ad hoc network with will be selected automatically The wireless adapter must match the wi...

Страница 25: ...ile 1 From the Profile Management tab click Import The Import Profile will then appear 2 Browse to the directory where the profile is located 3 Highlight the profile name 4 Click Open the imported pro...

Страница 26: ...agement window will open the General tab Fill in the Profile name and click OK to create the configuration profile for that network Figure 3 10 Scan Available Networks Dialog 3 2 7 Auto Profile Select...

Страница 27: ...by checking Auto Select Profiles on the Profile Management tab the client adapter will scan for an available network The profile with the highest priority and the same SSID as one of the found networ...

Страница 28: ...Access the adapter information from the Diagnostics tab Card Name The name of the wireless network adapter MAC Address The MAC address of the wireless network adapter Driver The driver name and path...

Страница 29: ...TL WN610G TL WN650G TL WN651G 108M Wireless Adapter User Guide 22 Figure 3 13 Advanced Statistics...

Страница 30: ...onnection has been established Icon means there is no connection If the icon does not appear please follow the steps below If the icon still does not appear the driver may be installed incorrectly or...

Страница 31: ...TL WN651G 108M Wireless Adapter User Guide 24 Figure 4 3 3 To continue click Connect Anyway Click the Cancel button to end the Installation Figure 4 4 4 After that the installation will proceed as sho...

Страница 32: ...TL WN610G TL WN650G TL WN651G 108M Wireless Adapter User Guide 25 Figure 4 5 5 The screen below will appear if the connection is successful Figure 4 6...

Страница 33: ...o 830m Adopt 2x to 3x eXtended RangeTM WLAN transmission technology it is limited to the environment Radio Data Rate 10854 48 36 24 18 12 9 6Mbps or 11 5 5 3 2 1Mbps Auto Rate Sensing Modulation 1M DB...

Страница 34: ...nsmission distance is about 300m A TP LINK 2x to 3x eXtended RangeTM based client and access point can maintain a connection transmission distance may be up to 830m 802 11b The 802 11b standard specif...

Страница 35: ...iability integrity and security In other words more bandwidth is consumed than in the case of narrowband transmission but the trade off produces a signal that is in effect louder and thus easier to de...

Отзывы: