background image

22

Chapter 3


Customize Your Network

3. 6.  Use WPS for Wireless Connection

Wi-Fi Protected Setup (WPS) provides an easier approach to set up a security-protected 
Wi-Fi connection.

Note:

•  The WPS function cannot be configured if the wireless function of the access point is disabled. Please 

make sure the wireless function is enabled before configuration.

•  When working in Range Extender or Client mode, the WPS function of the access point is not available.

•  The WPS function is enabled by default. You can go to

 Settings

 > 

Wireless

 > 

WPS

 > 

Advanced

 to disable 

the function as needed.

1. Visit 

http://tplinkap.net

, and log in with the password you set for the access point.

2. Go to 

Settings

 > 

Wireless

 > 

WPS

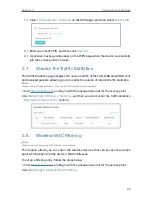
3. Follow one of the following methods to connect your WPS-enabled client to the 

access point’s Wi-Fi network.

•  Method 1: Using the WPS button

1 )  Click the 

Start WPS

 button on the WPS page. 

2 )  Within 2 minutes, press the WPS button on your client.
3 )  A success message will appear on the WPS page when the device successfully 

join the access point’s network.

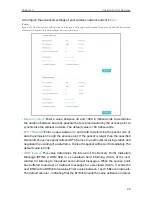
•  Method 2: Enter the access point’s PIN on your client

1 )  Click 

Other Methods -- PIN Code

 on the WPS page, and then select 

Router’s PIN

.

2 )  Check your access point’s PIN. You can use the default PIN or generate a new 

one.

3 )  Enter this PIN on your client for it to join the access point’s network.

•  Method 3: Enter the client’s PIN

Содержание TL-WA1201

Страница 1: ...REV2 0 0 1910012547 User Guide AC1200 Wireless Gigabit Access Point TL WA1201 ...

Страница 2: ...stomize Your Network 13 3 1 View the Network Status 14 3 2 Change the LAN Settings 14 3 3 Specify DHCP Server Settings 15 3 4 Customize Wireless Settings 16 3 4 1 Customize Wireless Settings 16 3 4 2 Extend Another Host Network 17 3 4 3 Customize the Extended Network 19 3 5 Set Portal Authentication 20 3 6 Use WPS for Wireless Connection 22 3 7 Monitor the Traffic Statistics 23 3 8 Wireless MAC Fi...

Страница 3: ...4 5 Upgrade the Firmware 31 4 6 Backup and Restore Configuration Settings 32 4 7 Set Reboot Schedule 33 4 8 Administration 34 4 9 Diagnostics 35 4 10 System Log 37 FAQ 39 ...

Страница 4: ...Note Ignoring this type of note might result in a malfunction or damage to the device Tips Indicates important information that helps you make better use of your device Maximum wireless signal rates are the physical rates derived from IEEE Standard 802 11 specifications Actual wireless data throughput and wireless coverage are not guaranteed and will vary as a result of 1 environmental factors inc...

Страница 5: ...Chapter 1 Get to Know About Your Access Point This chapter introduces what the access point can do and shows its appearance It contains the following sections Product Overview Panel Layout ...

Страница 6: ...rinter or network attached storage device The access point supports a host of different functions that make your wireless networking experience more flexible than ever before Now you can enjoy a better internet experience when downloading gaming video streaming or with any other application that you may wish to use 1 2 Panel Layout 1 2 1 Top View The access point s LEDs view from left to right are...

Страница 7: ...our access point Blinking twice every second WPS connection is in progress This may take up to 2 minutes Off Power is off Ethernet On The Ethernet port is connected to a powered on device Off The Ethernet port is not connected to a powered on device 2 4GHz On The 2 4GHz wireless band is enabled Off The 2 4GHz wireless band is disabled 5GHz On The 5GHz wireless band is enabled Off The 5GHz wireless...

Страница 8: ... button to power on or off the access point Reset Press and hold this button until the Power LED blinks to reset the access point to its factory default settings WPS Press this button and immediately press the WPS button on another device to quickly establish a wireless connection Ethernet Port For connecting an Ethernet enabled device such as a router or desktop Antennas Used for wireless operati...

Страница 9: ...Chapter 2 Set Up Internet Connection This chapter introduces how to quickly set up the access point It contains the following sections Position Your Access Point Set Up Your Access Point ...

Страница 10: ...h operation mode you need and complete the corresponding setup 2 2 1 Access Point Mode Default In this mode the access point transforms your existing wired network to a wireless one This mode is suitable for dorm rooms or homes where there s already a wired router but you need a wireless network Existing Router Internet A B C D TL WA1201 s SSID 1 Connect the access point according to Step A to D i...

Страница 11: ... In this mode the access point extends the range of an existing Wi Fi network This mode is suitable when you are in a Wi Fi dead zone or a place with weak wireless signal and you want to have a larger effective range of the wireless signal throughout your home or office Internet WA1201 s SSID Host AP s SSID B A OR OR TV Other Wired Device 1 Connect the access point according to Step A and B in the...

Страница 12: ...ot appear please refer to the FAQ section 5 Go to Quick Setup select Range Extender mode and click Next 6 Follow the step by step instructions to complete the configuration 7 Relocate the access point about halfway between your host router and the Wi Fi dead zone Tip To maximize the signal strength refer to the FAQ section Router Devices Halfway 8 Now connect your devices to the access point wirel...

Страница 13: ... internet wirelessly Internet Host AP s SSID B A OR OR TV Other Wired Device 1 Connect the access point according to Step A to B in the diagram 2 Turn on the power and wait until the Wireless LEDs are lit and stable 3 Use the default SSID and Password printed on the label of the access point to join its Wi Fi network 4 Launch a web browser and enter http tplinkap net Create a password to log in No...

Страница 14: ...cted to different wireless networks and become isolated by VLANs SSID 1 for VLAN 1 SSID 2 for VLAN 2 SSID 3 for VLAN 3 VLAN 1 VLAN 2 VLAN 3 Wired Router Internet C D A B 1 Connect the access point according to Step A to D in the diagram 2 Turn on the power and wait until the Wireless LEDs are lit and stable 3 Use the default SSID and Password printed on the label of the access point to join its Wi...

Страница 15: ...ction 6 Follow the step by step instructions to complete the configuration 7 Go to Settings Wireless Wireless Settings to modify VLAN IDs 8 Now connect your wireless devices to the Wi Fi networks isolated by VLANs and enjoy the internet ...

Страница 16: ...It contains the following sections View the Network Status Change the LAN Settings Specify DHCP Server Settings Customize Wireless Settings Set Portal Authentication Use WPS for Wireless Connection Monitor the Traffic Statistics Wireless MAC Filtering Wireless Advanced Throughput Monitor ...

Страница 17: ...ccess point to dynamically obtain an IP address and gateway from the main router AP It is recommended to keep the default LAN settings to avoid IP conflict with the main router AP or other devices on your local network If it is necessary to change the LAN settings for example your network requires a specific IP subnet follow the steps below 1 Visit http tplinkap net and log in with the password yo...

Страница 18: ...hen the DHCP server of the host router AP is enabled so as to avoid IP conflict You can change the DHCP server settings if necessary Note If you disable the DHCP server and there is no other DHCP server within your LAN you have to configure the IP address for each client manually 1 Visit http tplinkap net and log in with the password you set for the access point 2 Go to Settings Network DHCP Serve...

Страница 19: ... This Entry check box 6 Click Save 3 4 Customize Wireless Settings The access point is preset with the wireless network name SSID and password You can find them on the product label or customize wireless settings according to your needs 3 4 1 Customize Wireless Settings Note When working in Range Extender mode or Client mode refer to Extend Another Host Network and Customize the Extended Network t...

Страница 20: ...s Connect to Network 3 Enable Connect to 2 4GHz Network or Connect to 5GHz Network and click Wireless Scanner to find all available networks 4 Select the 2 4GHz or 5GHz host network you want to extend If the selected network is encrypted enter the password Note If the network you want to extend is on but not listed please try the following steps 1 Move the access point closer to your router and cl...

Страница 21: ...ner to find all available networks 4 Select the host network you want to extend If the selected network is encrypted enter the password Note If the network you want to extend is on but not listed please try the following steps 1 Move the access point closer to your router and click Rescan in the top right corner of the list 2 You can manually enter the SSID network name and password of the network...

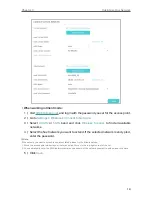
Страница 22: ...ion of a certain band just clear the Enable checkbox In this case all the wireless settings of this band will be invalid 4 Click Save To change the wireless network name SSID 1 Visit http tplinkap net and log in with the password you set for the access point 2 Go to Settings Wireless Extended Network 3 Create a new SSID in Extended 2 4GHz SSID or Extended 5GHz SSID Or click Copy Host SSID The valu...

Страница 23: ...tunity to promote your shop which makes portal authentication an excellent choice Customers will be directed to a web page for access verification on which your personalized promotion is displayed Moreover you can specify a web link so that the newly connected guest will be redirected to for example the official website of your shop Note When working in Range Extender mode or Client mode Portal Au...

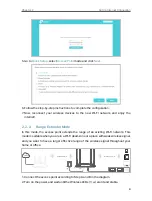
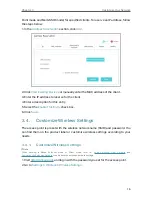
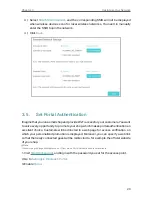
Страница 24: ...you want to allow clients to access the network without any authentication 6 Select a time for Authentication Timeout A client has to reconnect to the network when its authentication expires 7 Optional Enable Redirect and enter your desired website The newly connected client will be redirected to the specified website 8 Optional Click Click to Edit to personalize the authentication login page 9 Cl...

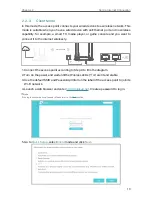
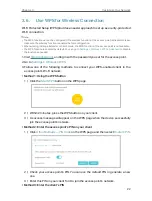
Страница 25: ... http tplinkap net and log in with the password you set for the access point 2 Go to Settings Wireless WPS 3 Follow one of the following methods to connect your WPS enabled client to the access point s Wi Fi network Method 1 Using the WPS button 1 Click the Start WPS button on the WPS page 2 Within 2 minutes press the WPS button on your client 3 A success message will appear on the WPS page when t...

Страница 26: ... When working in Range Extender or Client mode Traffic Statistics is not available 1 Visit http tplinkap net and log in with the password you set for the access point 2 Go to Settings Wireless Statistics and then you can monitor the traffic statistics in Wireless Stations Online section 3 8 Wireless MAC Filtering Note When working in Client mode MAC Filtering is not available This feature allows y...

Страница 27: ...st Or enter a MAC address manually to add a device that is not connected 7 Enter a brief description 8 Click the Enable This Entry check box and click Save 3 9 Wireless Advanced You can view or change advanced wireless settings if necessary It is recommended to keep them as default Note When working in Range Extender or Client mode Wireless Advanced is not available 1 Visit http tplinkap net and l...

Страница 28: ...the packet size of data transmission trough the access point If the packet is larger than the specified threshold the access point will send RTS frames to a particular receiving station and negotiate the sending of a data frame Or else the packet will be sent immediately The default value is 2346 DTIM Interval This value determines the interval of the Delivery Traffic Indication Message DTIM A DTI...

Страница 29: ... network from interacting with each other but still able to access the Internet AP isolation is disabled by default 3 10 Throughput Monitor The throughput chart displays the current data traffic of the network The curves in different colors represent the received RX and transmitted TX rates of the 2 4GHz and 5GHz frequencies respectively You can choose to view individual or multiple data rates by ...

Страница 30: ...w you how to configure and manage your access point It contains the following sections Set Up System Time Control LEDs SNMP Ping Watchdog Upgrade the Firmware Backup and Restore Configuration Settings Set Reboot Schedule Administration Diagnostics System Log ...

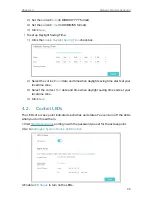
Страница 31: ... set for the access point 2 Go to Settings System Tools Time Settings To get time from the internet 1 In the Set Time field select Get automatically from the Internet 2 Select your local Time Zone from the drop down list 3 In the NTP Server I field enter the IP address or domain name of your desired NTP Server 4 Optional In the NTP Server II field enter the IP address or domain name of the second ...

Страница 32: ...e when daylight saving time starts at your local time zone 3 Select the correct End date and time when daylight saving time ends at your local time zone 4 Click Save 4 2 Control LEDs The LEDs of access point indicate its activities and status You can turn off the LEDs when you don t need them 1 Visit http tplinkap net and log in with the password you set for the access point 2 Go to Settings Syste...

Страница 33: ...physical location in SysLocation of the node to be managed 5 Enter the community name in Get Community field that allows read only access to the device s SNMP information The community name is considered as a group password The default setting is public 6 Enter the IP address or subnet in Get Source field that management systems can read information from this get community 7 Enter the community na...

Страница 34: ... Go to Settings System Tools Ping Watchdog 3 Enable Ping Watchdog 4 Enter the IP address of the target host in IP Address To Ping field that you want to send ping packets to 5 Enter the time interval in 10 300 seconds between two continuous ping packets in Ping Interval field 6 Enter the time delay in 60 300 seconds before the first ping packet is sent out when the device is restarted in Startup D...

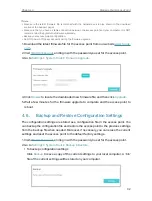
Страница 35: ...lick Browse to locate the downloaded new firmware file and then click Upgrade 5 Wait a few minutes for the firmware upgrade to complete and the access point to reboot 4 6 Backup and Restore Configuration Settings The configuration settings are stored as a configuration file in the access point You can backup the configuration file and restore the access point to the previous settings from the back...

Страница 36: ... settings 1 Click Factory Restore to reset the access point 2 Wait a few minutes for the resetting and rebooting Note During the resetting process do not turn off or reset the access point We strongly recommend you backup the current configuration settings before resetting the access point 4 7 Set Reboot Schedule Reboot Schedule allows you to specify a time when the access point will reboot automa...

Страница 37: ...kap net and log in with the password you set for the access point 2 Go to Settings System Tools Administration Account Management 3 Enter the old password and then enter a new password twice both case sensitive 4 Click Save and use the new password for future logins To recover the login password 1 Visit http tplinkap net and log in with the password you set for the access point 2 Go to Settings Sy...

Страница 38: ...can refer to their Help page to learn the SMTP server address Generally Enable Authentication should be selected if the login of the mailbox requires username and password 5 Click Save Then You can click Test Email to test whether the configuration is successful To recover the login password please visit http tplinkap net click Forgot password on the login page and follow the instructions to set a...

Страница 39: ... or gateway Tracerouter This diagnostic tool tests the performance of a connection 2 Enter the destination IP address such as 192 168 0 254 or Domain name such as www tp link com in the IP Address Domain Name field 3 Optional Click Advanced and enter the Ping Court and Ping Packet Size It s recommended to keep the default value 4 Click Start to check the connectivity of the Internet The Diagnostic...

Страница 40: ...tp tplinkap net and log in with the password you set for the access point 2 Go to Settings System Tools System Log 3 Choose the Type and Level of the system logs as needed 4 Click Save Log to save the system logs to a local disk To send the system log to a mailbox at a fixed time 1 Visit http tplinkap net and log in with the password you set for the access point 2 Go to Settings System Tools Syste...

Страница 41: ...outlook com You can refer to their Help page to learn the SMTP server address 4 Click the Enable Authentication check box Tips Generally Enable Authentication should be selected if the login of the mailbox requires username and password 5 Username Enter the email address used for sending the system log 6 Password Enter the password to login the sender s email address 7 Click the Enable Auto Mail c...

Страница 42: ...nt If the password has been altered please connect your computer to the access point using an Ethernet cable and follow the steps below 1 Visit http tplinkap net and log in with the password you set for the access point 2 Go to Settings Wireless Wireless Settings to retrieve or reset your wireless password Q4 WhatshouldIdoifIforgetmyloginpasswordofthewebmanagement page 1 Refer to Q1 to reset the a...

Страница 43: ...he location you choose is within the range of the host router If that is not possible place it closer to your wireless router to ensure stable performance Fewer obstacles ensure better performance Choose a location with less obstacles around that may block the signal between the access point and the host network An open corridor or a spacious location is ideal Less interference provides more stabi...

Страница 44: ...product names are trademarks or registered trademarks of their respective holders No part of the specifications may be reproduced in any form or by any means or used to make any derivative such as translation transformation or adaptation without permission from TP Link Technologies Co Ltd Copyright 2019 TP Link Technologies Co Ltd All rights reserved ...

Страница 45: ... If this equipment does cause harmful interference to radio or television reception which can be determined by turning the equipment off and on the user is encouraged to try to correct the interference by one or more of the following measures Reorient or relocate the receiving antenna Increase the separation between the equipment and receiver Connect the equipment into an outlet on a circuit diffe...

Страница 46: ...pply Model Number T120150 2B1 Responsible party TP Link USA Corporation d b a TP Link North America Inc Address 145 South State College Blvd Suite 400 Brea CA 92821 Website http www tp link com us Tel 1 626 333 0234 Fax 1 909 527 6803 E mail sales usa tp link com This equipment has been tested and found to comply with the limits for a Class B digital device pursuant to part 15 of the FCC Rules The...

Страница 47: ...equipment complies with FCC RF radiation exposure limits set forth for an uncontrolled environment This device and its antenna must not be co located or operating in conjunction with any other antenna or transmitter To comply with FCC RF exposure compliance requirements this grant is applicable to only Mobile Configurations The antennas used for this transmitter must be installed to provide a sepa...

Страница 48: ...ure Information This device meets the EU requirements 2014 53 EU Article 3 1a on the limitation of exposure of the general public to electromagnetic fields by way of health protection The device complies with RF specifications when the device used at 20 cm from your body National restriction Attention This device may only be used indoors in all EU member states and EFTA countries Canadian Complian...

Страница 49: ... l intérieur afin de réduire les risques de brouillage préjudiciable aux systèmes de satellites mobiles utilisant les mêmes canaux Radiation Exposure Statement This equipment complies with IC radiation exposure limits set forth for an uncontrolled environment This equipment should be installed and operated with minimum distance 20cm between the radiator your body Déclaration d exposition aux radia...

Страница 50: ...限用物質及其化學符號 鉛 Pb 鎘 Cd 汞 Hg 六價鉻 CrVI 多溴聯苯 PBB 多溴二苯醚 PBDE PCB 外殼 電源供應器 備考1 超出0 1 wt 及 超出0 01 wt 系指限用物質之百分比含量超出百分 比含量基準值 備考2 系指該項限用物質之百分比含量未超出百分比含量基準值 備考3 系指該項限用物質為排除項目 Продукт сертифіковано згідно с правилами системи УкрСЕПРО на відповідність вимогам нормативних документів та вимогам що передбачені чинними законодавчими актами України Safety Information Keep the device away from water fire humidity o...

Страница 51: ... that no accidents or damage will occur due to improper use of the device Please use this product with care and operate at your own risk Explanations of the symbols on the product label Symbol Explanation DC voltage Indoor use only RECYCLING This product bears the selective sorting symbol for Waste electrical and electronic equipment WEEE This means that this product must be handled pursuant to Eu...

Отзывы: