background image


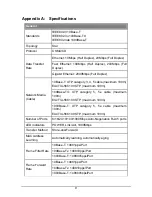
Appendix A:  Specifications 

General


Standards 

IEEE802.3 10Base-T 
IEEE802.3u 100Base-TX 
IEEE802.3ab 1000Base-T 

Topology Star 

Protocol CSMA/CD 

Ethernet: 10Mbps (Half Duplex), 20Mbps (Full Duplex) 

Fast Ethernet: 100Mbps (Half Duplex), 200Mbps (Full 
Duplex) 

Data Transfer 
Rate 

Gigabit Ethernet: 2000Mbps (Full Duplex) 

10Base-T: UTP category 3, 4, 5 cable (maximum 100m)
EIA/TIA-568 100 STP (maximum 100m) 

100Base-TX: UTP category 5, 5e cable (maximum 
100m) 
EIA/TIA-568 100 STP (maximum 100m) 

Network Media 
(Cable)  

1000Base-T: UTP category 5, 5e cable (maximum 
100m) 
EIA/TIA-568 100 STP (maximum 100m) 

Number of Ports 

8/16/24 10/100/1000Mbps Auto-Negotiation RJ-45 ports

LED indicators 

POWER, Link/Act, 1000Mbps 

Transfer Method    Store-and-Forward 

MAC Address 
Learning  

Automatically learning, automatically aging 

10Base-T: 14881pps/Port 

100Base-Tx: 148810pps/Port 

Frame Filter Rate 

1000Base-T: 1488095pps/Port 

10Base-T: 14881pps/Port 

100Base-Tx: 148810pps/Port 

Frame Forward 
Rate 

1000Base-T: 1488095pps/Port 


Содержание TL-SG1008

Страница 1: ...User Guide TL SG1008 8 Port Gigabit Switch TL SG1016D 16 Port Gigabit Switch TL SG1024D 24 Port Gigabit Switch Rev 2 0 1 7106503502 ...

Страница 2: ...es are trademarks or registered trademarks of their respective holders No part of the specifications may be reproduced in any form or by any means or used to make any derivative such as translation transformation or adaptation without permission from TP LINK TECHNOLOGIES CO LTD Copyright 2011 TP LINK TECHNOLOGIES CO LTD All rights reserved http www tp link com ...

Страница 3: ... be required to correct the interference at his own expense This device complies with part 15 of the FCC Rules Operation is subject to the following two conditions 1 This device may not cause harmful interference 2 This device must accept any interference received including interference that may cause undesired operation Any changes or modifications not expressly approved by the party responsible ...

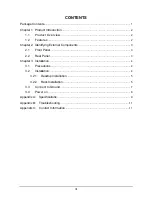
Страница 4: ...dentifying External Components 3 2 1 Front Panel 3 2 2 Rear Panel 3 Chapter 3 Installation 4 3 1 Precautions 4 3 2 Installation 4 3 2 1 Desktop Installation 5 3 2 2 Rack Installation 5 3 3 Connect to Ground 7 3 4 Power on 8 Appendix A Specifications 9 Appendix B Troubleshooting 11 Appendix C Contact Information 11 ...

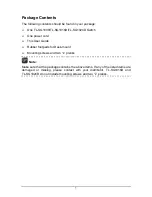
Страница 5: ...ch One power cord This User Guide Rubber footpads for Desk mount Mounting screws and two L planks Note Make sure that the package contains the above items If any of the listed items are damaged or missing please contact with your distributor TL SG1016D and TL SG1024D do not include mounting screws and two L planks ...

Страница 6: ...protects your existing network investments while providing you with a straightforward migration path to faster Gigabit speeds The TL SG1008 TL SG1016D TL SG1024D Switch is plug and play and no configuration is required Auto MDI MDI X cable detection on all ports eliminate the need for crossover cable or Uplink port Each port can be used as general ports or Uplink ports and any port can be simply p...

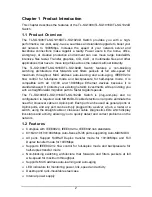
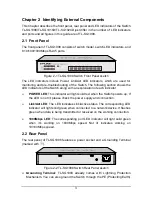
Страница 7: ...lanation of each indicator POWER LED This indicator will light solid red when the Switch powers up If the LED is not lit please check the power supply and connection Link Act LED The LED indicates Link Active status The corresponding LED indicator will light solid green when connected to a network device It flashes green when data is being transmitted or received on the working connection 1000Mbps...

Страница 8: ...uirement of the input voltage of the Switch Do not push any objects into the openings of the Switch Ensure the vent hole is well ventilated and unblocked Do not open or remove the cover of the Switch 2 Location Requirements When you choose a location for the Switch please follow these guidelines Install the Switch on a flat and stable surface that can support the entire weight of the Switch with a...

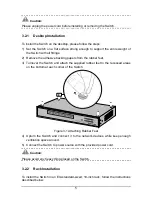
Страница 9: ... the rubber feet 3 Turnover the Switch and attach the supplied rubber feet to the recessed areas on the bottom at each corner of the Switch Figure 3 1 Attaching Rubber Feet 4 Upturn the Switch and connect it to the network devices while keep enough ventilation space around 5 Connect the Switch to power source with the provided power cord Caution Please avoid any heavy thing placed on the Switch 3 ...

Страница 10: ...g Brackets 2 After the brackets are attached to the Switch use suitable screws not provided to secure the brackets to the rack as illustrated in the following figure Figure 3 3 Mounting Switch 3 Connect the Switch to network devices 4 Supply power to the Switch with the provided power cord Note TL SG1016D and TL SG1024D do not support rack installation ...

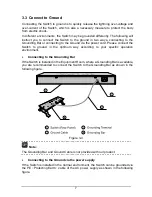
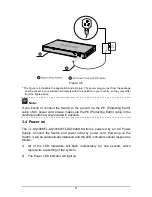
Страница 11: ...ower cord Please connect the Switch to ground in the optimum way according to your specific operation environment Connecting to the Grounding Bar If the Switch is installed in the Equipment Room where a Grounding Bar is available you are recommended to connect the Switch to the Grounding Bar as shown in the following figure Figure 3 4 Note The Grounding Bar and Ground Cable is not provided with ou...

Страница 12: ...able of AC power cord please make sure the PE Protecting Earth cable in the electrical outlet is well grounded in advance 3 4 Power on The TL SG1008 TL SG1016D TL SG1024D Switch is powered by an AC Power Supply Connect the Switch and power outlet by power cord Powering on the Switch it will be automatically initialized and the LED indicators should respond as follows 1 All of the LED indicators wi...

Страница 13: ...m 100Base TX UTP category 5 5e cable maximum 100m EIA TIA 568 100 STP maximum 100m Network Media Cable 1000Base T UTP category 5 5e cable maximum 100m EIA TIA 568 100 STP maximum 100m Number of Ports 8 16 24 10 100 1000Mbps Auto Negotiation RJ 45 ports LED indicators POWER Link Act 1000Mbps Transfer Method Store and Forward MAC Address Learning Automatically learning automatically aging 10Base T 1...

Страница 14: ...10 Environmental and Physical Operating Temperature 0 40 32 104 Storage Temperature 40 70 40 158 Operating Humidity 10 90 non condensing Storage Humidity 5 90 non condensing ...

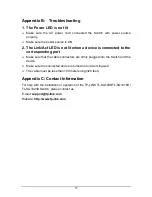
Страница 15: ... the corresponding port Make sure that the cable connectors are firmly plugged into the Switch and the device Make sure the connected device is turned on and working well The cable must be less than 100 meters long 328 feet Appendix C Contact Information For help with the installation or operation of the TP LINK TL SG1008 TL SG1016D TL SG1024D Switch please contact us E mail support tp link com We...

Страница 16: ......

Отзывы: