background image

51

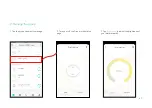
1. Tap 

Schedule a Scene 

then select a scene you have created. 

For example: I want to turn on my 

Good


Morning

 scene, which turns on my switch and my 

music speaker (plugged in to a Kasa smart plug) with just a tap, at 7: 20 AM every weekday.

2. Set the time and frequency at which you want 

your scene to be activated.

3. Configure Schedule a Scene

e.g.  I want to turn on the scene I have created automatically at scheduled time.

Содержание ES20M

Страница 1: ...User Guide Kasa Smart Wi Fi Dimmer Switch Motion Activated 2021 TP Link 1910013026 REV1 0 0...

Страница 2: ...Main Device Controls 10 Adjust Brightness 11 Set Preset Brightness 12 Configure Smart Control 13 Set Schedules 20 Set Timer 23 Set Away Mode 24 Manage Device Settings 25 Reset Your Smart Dimmer Switch...

Страница 3: ...ions In this guide the following convention is used Convention Description Teal Key information appears in teal including management page text such as menus items buttons and so on Underline Hyperlink...

Страница 4: ...g The equipped sensors detect motion and ambient lighting so your lights only trigger on at night Smart Control Set different light triggers based on your routine for effortless control Easy Installat...

Страница 5: ...Wi Fi Stay Green for 30s Connected to Wi Fi Blinking Amber Resetting Red No Wi Fi connection White Lit up when the light is off to show the switch location in the dark Press to reboot the dimmer switc...

Страница 6: ...o to App Store or Google Play or scan the QR code below to download the Kasa Smart app on your Android or iOS device 2 Log in or sign up Open the app Use your TP Link ID to log in If you don t have a...

Страница 7: ...5 4 Install the Dimmer Switch 1 Turn off the circuit breaker first 2 Remove the old wallplate and expose the wiring...

Страница 8: ...6 4 Install the Dimmer Switch 3 Look for a bundle of white wires and label one of it as Neutral 4 Look for a green or copper wire and label it as Ground...

Страница 9: ...7 4 Install the Dimmer Switch 5 Turn on power 6 Use a voltage detector to find the energized wire this is the Line wire The othe wire is the Load wire Then label the Line and Load wire...

Страница 10: ...8 4 Install the Dimmer Switch 7 Turn off power again 8 Install the dimmer switch and then attach the wallplate Then connect the wires Turn on power again...

Страница 11: ...9 5 Set Up the Dimmer Switch After installation follow step by step app instructions to complete the setup...

Страница 12: ...ll devices that you ve added to Kasa Tap your dimmer switch to control and manage it Home Page You can see all your Kasa devices listed in the Home page Turn on off the dimmer switch Turn on off your...

Страница 13: ...ightness Adjust the brightness of your light from 1 to 100 to have the perfect atmosphere for any activities Go to the status page and tap the Brightness tab Your light will change brightness to the v...

Страница 14: ...t up to 4 preset brightness levels 1 Go to the status page and tap the Brightness tab Tap the circle on the top and choose a brightness A preset brightness is set successfully 2 Change the preset brig...

Страница 15: ...your dimmer switch with the built in ambient light sensor and motion sensor For example you want your light to turn on automatically when you go to the bathroom at night 1 Tap in the status page 2 Tap...

Страница 16: ...ppears automatically Drag the end points or the whole segment to adjust time or enter the start and end time The specific rule settings are listed down below 5 Slide up to see the rule settings Tap to...

Страница 17: ...ly Motion Detected Turn on light automatically when motion is detected See Customize Motion Sensor Settings to change motion sensor settings Motion Detected When It s Dark Turn on light automatically...

Страница 18: ...16 7 Set the brightness that you want your light to turn on to Brightness Select an exact brightness value Last On State Return to the brightness when the light was last on...

Страница 19: ...ng the set time period Manual Only Only turn the light off manually No motion detected Choose a time period and the light will be off automatically if no motion is detected during the selected time pe...

Страница 20: ...its settings if you want Then tap Save on the top right corner to save your Smart Control rules Note Smart Control can work differently in different time periods and repeats every day 10 Change rule...

Страница 21: ...19 11 Turn the Smart Control off in one tap 12 Delete the Smart Control Tap Edit Rule then slide up and tap Delete at the bottom...

Страница 22: ...light at set times according to your daily routine 1 Tap your Smart Dimmer Switch in the Home page and then tap 2 Tap on the top right corner 3 Choose an action that you want your light to do for exam...

Страница 23: ...21 4 Set fade rate i e how long you would like your light to fade in or fade out after your schedule starts 5 Select the time and repeating frequency at which you want your schedule to run...

Страница 24: ...22 5 Tap Save and you ll see your schedule listed in the Schedule Page Now your light will be turned on to 80 brightness at 7 30 AM every weekday You can add more schedules following the same steps...

Страница 25: ...Tap your Smart Dimmer Switch in the Home page and then tap 2 Set the time after which the light will be automatically turned on off For example when I turn on the light I want it to be off after 30 mi...

Страница 26: ...ake the appearance that someone is at home 1 Tap your Smart Dimmer Switch in the Home page and then tap 2 Set the start and end time during which the light will be automatically turned on and off at r...

Страница 27: ...25 Manage Device Settings You can change the settings in the Device Settings page Tap your Smart Dimmer Switch in the Home page and then tap to enter the Device Settings page...

Страница 28: ...26 Change the name and icon of the dimmer switch Change Device Name Icon...

Страница 29: ...27 Set Fade On Off to slowly turn the light on and off You can set the duration for the light to turn on or off Fade On Off...

Страница 30: ...motion is detected or when motion is detected and it s dark you don t want your steps to trigger the light on immediately after you manually turn off the light Then you can set a buffer time before th...

Страница 31: ...quickly switch to the desired lioght effect Set gentle off which turns your light slowly or set a preset brightness Note that the preset brightness levels are the same as what shown in status page Pr...

Страница 32: ...the motion trigger your light will be triggered on when motion is detected during the time period you set You can change the sensitivity of the motion sensor If Motion Sensor is turned off then the mo...

Страница 33: ...n is detected Preset ambient brightness in different environment is provided and can be changed Current Ambiance is detected by your dimmer switch which is a reference for you to adjust the preset amb...

Страница 34: ...32 Set the effects you want your light to show when you double tap or long press your dimmer switch Change Smart Dimmer Configuration Settings...

Страница 35: ...er swith from the LED If you have set the dimmer switch to be off if no motion is detected for a specific time period the LED of the dimmer switch will flash as a sign when it s about to be off Turnin...

Страница 36: ...Calibrate your light to avoid flickering Test the dimming range of your dimmer switch by slowly reducing the brightness of your light until you find the minimum level of brightness Dimming Calibratio...

Страница 37: ...are three methods to reset your Smart Dimmer Switch Method 1 Swipe left any of your Smart Dimmer Switch and tap Delete Then tap Remove Device Your Smart Dimmer Switch will be removed from your Kasa a...

Страница 38: ...thod 2 Tap your Smart Dimmer Switch and go to the Devices Settings page Then tap Remove Device in the bottom Your Smart Dimmer Switch will be removed from your Kasa account and restored to factory set...

Страница 39: ...e Reset button on the panel of the dimmer switch for 10s to restore your it to factory default settings Press and hold the Reset button on the panel of the dimmer switch for 5s to reset Wi Fi while ke...

Страница 40: ...mart devices to a group for unified management 1 Create groups for your Smart Light Switch 1 Tap the button in the Home page of the Kasa Smart app and select Group 2 Select your Smart Dimmer Switch an...

Страница 41: ...39 4 The created group is listed in the Home page You can tap ON or OFF to turn on or off the devices together in the group...

Страница 42: ...40 2 Manage the group 1 Tap the group you want to manage 2 Turn on or off the Group in the status page 3 Tap Brightness to adjust the brightness of your dimmer switch...

Страница 43: ...e settings page You can change the group name or devices in the group as you like 5 Tap Remove Group if you want to remove the group from your device list Then double confirm it All devices in the gro...

Страница 44: ...special occasion To create a scene with your Smart Dimmer Switch you need other Kasa smart devices a smart plug for example 1 Tap at the bottom then tap at the top right corner 2 Select a scene or cr...

Страница 45: ...43 4 Pick an icon for your scene 5 Name your scene 6 Your scene is created successfully Just tap the scene to activate it...

Страница 46: ...omfortable 1 Tap at the bottom then tap Add an Action 2 Select an automation type for your Smart Actions Motion Sensing Take actions when a Kasa camera senses a motion Control With a Switch Extend the...

Страница 47: ...Tap Motion Sensing then select a camera 2 Select your Smart Dimmer Switch 1 Configure Motion Sensing If you already have a Kasa Camera e g I want to turn the light on when my Kasa camera senses a mot...

Страница 48: ...t the time when you want the action to run You can choose Always or tap Custom to choose time according to your needs For example I want the motion to trigger the light on from 11 00 PM to 7 00 AM eve...

Страница 49: ...47 4 Optional Set an auto off timer then tap Complete Then your living room light will be turned off after the time you set 5 Name your action for easy identification...

Страница 50: ...48 6 The Smart Action is created successfully and displayed in the Smart Actions list...

Страница 51: ...iving room light is plugged in 2 Configure Control With a Switch If you already have other Kasa smart devices e g When I turn on my dimmer switch I also want to turn on the living room light which is...

Страница 52: ...50 3 Name your action for easy identification 4 Now Your Smart Action is created successfully and is displayed in the smart actions list...

Страница 53: ...scene which turns on my switch and my music speaker plugged in to a Kasa smart plug with just a tap at 7 20 AM every weekday 2 Set the time and frequency at which you want your scene to be activated...

Страница 54: ...52 3 Name your action for easy identification 4 The Smart Action is created successfully and displayed in the Smart Actions list...

Страница 55: ...Off Timer then select your dimmer switch 2 Set the time after which your dimmer switch will be off 4 Configure Auto Off Timer e g I want to turn off my Kasa Smart Dimmer Switch after 30 minutes whenev...

Страница 56: ...54 3 Name your action for easy identification 4 The Smart Action is created successfully...

Страница 57: ...ll hands free experience Kasa helps manage the rest of your smart home too working with Samsung SmartThings to trigger changes when you arrive home or leave for the day Launch the Kasa Smart app Go to...

Страница 58: ...and if not installed and used in accordance with the instructions may cause harmful interference to radio communications However there is no guarantee that interference will not occur in a particular...

Страница 59: ...e limits set forth for an uncontrolled environment This device and its antenna must not be co located or operating in conjunction with any other antenna or transmitter To comply with FCC RF exposure c...

Страница 60: ...est autoris e aux deux conditions suivantes 1 L appareil ne doit pas produire de brouillage 2 L appareil doit accepter tout brouillage radio lectrique subi m me si le brouillage est susceptible d en...

Страница 61: ...rominated diphenyl ethers PBDE PCB 1 0 1 wt 0 01 wt Note 1 Exceeding 0 1 wt and exceeding 0 01 wt indicate that the percentage content of the restricted substance exceeds the reference percentage valu...

Страница 62: ...tric Shock More than one disconnect switch may be required to de energize the equipment before servicing A circuit breaker which disconnects the Live and Neutral conductor simultaneously is suitable E...

Страница 63: ...or Waste electrical and electronic equipment WEEE This means that this product must be handled pursuant to European directive 2012 19 EU in order to be recycled or dismantled to minimize its impact on...

Отзывы: