background image

TNS 510    

73

ROUTE GUIDANCE

3

Setting route —
—  Search condition

You can designate the road conditions of 

the route to the destination.

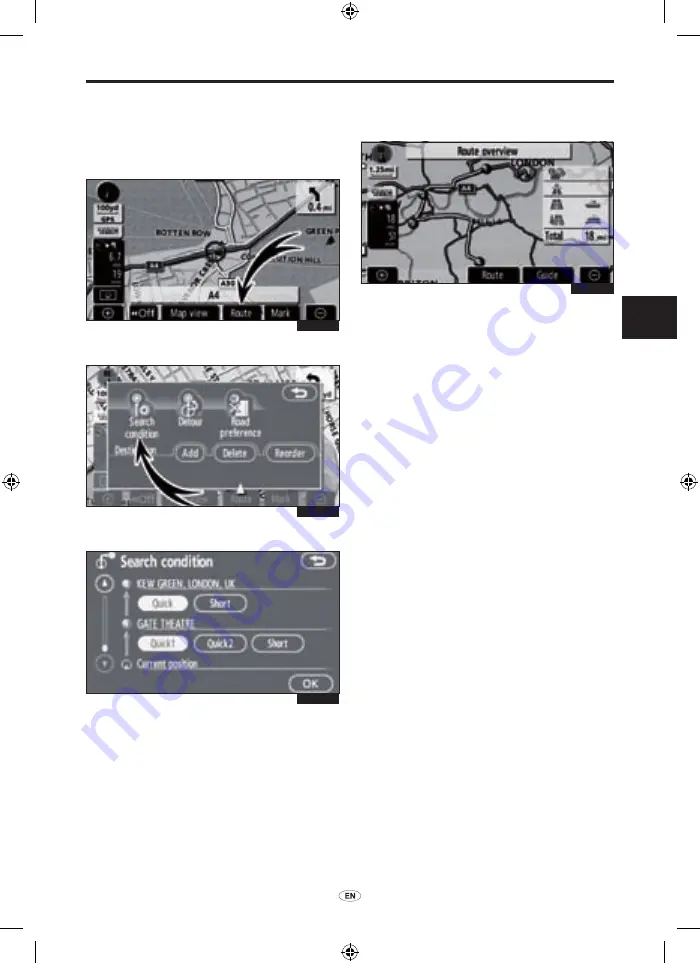
1.  Touch “Route”.

2.  Touch “Search condition”.

3.  Touch  “Quick”,  “Quick1”,  “Quick2” 

or “Short” and touch “OK”.


The entire route from the starting point to 

the destination is displayed.

“Guide”:

 To start guidance.

“Route”:

 To change a route. (See pages 

70 and 73.)

3E5009G

3E5018G

3E5016G

3E5017G

01955_TNS 510_OM.indd   73

21/10/2008   16:17:15

Содержание Verso TNS510

Страница 1: ...ased on AISIN AW maps whose information source comes from NAVTEQ maps The calculated routes may not be the shortest nor the least traffic congested Your own personal local knowledge or short cut may at times be faster than the calculated routes The navigation system s database includes about 40 Point of Interest categories to allow you to easily select destinations such as restaurants and hotels I...

Страница 2: ...r ability to perform properly The accuracy of the vehicle s position depends on the satellite condition road configuration vehicle condition or other circumstances For more information on the limitations of the system refer to pages 248 through 249 TOYOTA MOTOR CORPORATION 01955_TNS 510_OM indd 2 21 10 2008 16 16 30 ...

Страница 3: ...ication may be reproduced without prior written permission from Toyota Motor Europe Safety Instruction To use this system in the safest possible manner follow all the safety tips shown below This system is intended to assist in reaching the destination and if used properly can do so The driver is solely responsible for the safe operation of your vehicle and the safety of your passengers Do not use...

Страница 4: ...vehicle position correctly there is a possibility of incorrect late or non voice guidance The data in the system may occasionally be incomplete Road conditions including driving restrictions no left turns street closures etc frequently change Therefore before following any instruction from the system look to see whether the instruction can be done safely and legally This system cannot warn about s...

Страница 5: ...peration Initial screen 22 Touch screen operation 23 Inputting letters and numbers List screen operation 24 Function help 27 Map screen operation 28 Current position display 28 Screen scroll operation 28 Switching the screens 33 Map scale 35 Orientation of the map 36 Example of navigation system operation 36 Guiding the route 36 Registering home 38 Quick Guide 1 2 3 4 5 6 7 Index 01955_TNS 510_OM ...

Страница 6: ...arch by Coordinates 58 Destination search by Phone no 58 Destination search by UK postal code 59 Starting route guidance 59 3 Route Guidance Route guidance screen 64 Typical voice guidance prompts 67 Distance and time to destination 69 Setting and deleting destination 70 Adding destinations 70 Reordering destinations 71 Deleting destinations 72 Setting route 73 Search condition 73 Detour setting 7...

Страница 7: ...ints 100 Setup 101 RDS TMC 111 5 Other Functions Maintenance information 120 Maintenance information setting 120 Dealer setting 122 Calendar with memo 124 Adding a memo 126 Editing a memo 127 Memo list 127 Hands free system for cellular phone 129 Enter a Bluetooth phone 132 Call on the Bluetooth phone 136 Receive on the Bluetooth phone 141 Talk on the Bluetooth phone 141 Change the settings of the...

Страница 8: ...er operation 192 SD USB player operation 202 Bluetooth audio operation 211 AUX operation 226 iPod operation 228 Audio remote controls 237 Audio system operating hints 238 7 Appendix Limitations of the navigation system 248 Map database information and updates 250 INDEX 253 01955_TNS 510_OM indd 8 21 10 2008 16 16 31 ...

Страница 9: ...TNS 510 9 01955_TNS 510_OM indd 9 21 10 2008 16 16 31 ...

Страница 10: ...screen buttons 104 Displaying the traffic information RDS TMC 111 Searching destination Page Searching the destination by home POI phone no etc 42 Changing the country 42 Operating the map location of the selected destination 59 Route guidance Before starting route guidance Page Setting the destination 59 Viewing alternative routes 59 Starting route guidance 59 Before starting or during route guid...

Страница 11: ...seful functions Memory points Page Registering memory points 89 Marking icons on the map 88 Information Page Displaying vehicle maintenance 120 Displaying the calendar 124 Hands free system for cellular phone Page Initiating Bluetooth 132 Making a call on the Bluetooth phone 136 Receiving a call on the Bluetooth phone 141 01955_TNS 510_OM indd 11 21 10 2008 16 16 31 ...

Страница 12: ...e is receiving signals from the GPS this mark is displayed 248 4 RDS TMC mark This mark is displayed when RDS TMCinfo is received 111 5 Border guidance When a vehicle crosses a borderline the national flag of that country is displayed 6 Zoom out switch Touch this switch to reduce the map scale 35 7 Mark switch Touch this switch to register the cursor position as a memory point 29 8 Route switch To...

Страница 13: ...configuration switch Touch this switch to change the screen mode 33 Distance and time to destination Displays the distance the estimated travel time to the destination and the estimated arrival time at the destination 69 Ä TEL button Push this button to display the Telephone screen 132 Å MENU button Push this button to display the Menu screen 16 Ç DEST button Push this button to display the Destin...

Страница 14: ...oints of Interest that have already been stored in the system s database 48 3 POI near cursor A destination can be selected from the POI category 52 4 Previous A destination can be selected from any of the last 100 previously set destinations and from the previous starting point 56 5 Memory The location can be selected from the registered Memory points To register memory points see Registering mem...

Страница 15: ...2 Quick access touch screen button One of 5 preset destinations can be selected by touching the screen directly To use this function it is necessary to set the Quick access for each memory point To register a Quick Access see Editing memory points on page 90 45 Home touch screen button A personal home address can be selected without entering the address each time To use this function it is necessa...

Страница 16: ...me of voice guidance and other settings of the navigation system 17 2 RDS TMC Sets traffic information 111 3 Information Sets the maintenance data the Bluetooth audio the language to be used in the system and various other system settings 22 120 124 176 179 4 Display Turns the screen off adjusts screen brightness and selects day mode 175 01955_TNS 510_OM indd 16 21 10 2008 16 16 34 ...

Страница 17: ...ice guidance 85 3 Function help for the Navigation screen can be viewed on this screen 27 4 Map SD Displays information regarding the SD memory card version or covered area 251 5 Select user Up to 3 different settings for different users can be memorized 86 6 Setup Enables various settings of the navigation system 18 101 7 Memory Enables changes to Memory points Home and Areas to avoid Enables del...

Страница 18: ...ime to the destination on the route guidance screen can be set 102 3 Keyboard layout Key layout can be changed 103 4 Off function The choice whether to display each touch screen button and current street name on the map screen can be set 104 5 Display POI icons A selection of 6 icons displayed on the Display POI Icons top screen is possible 104 6 3D landmark Selection of either On or Off to displa...

Страница 19: ...dance Automatic voice guidance can be set 108 Pop up message Selection of either On or Off to display the pop up message is possible 108 Calibration Adjustment of the current vehicle position mark can be done manually or mis calculationbychangingtyrewillbeadjusted 109 Default This touch screen button initializes all of the settings 101 Ä Function help for the Setup screen can be viewed 27 01955_TN...

Страница 20: ...20 TNS 510 01955_TNS 510_OM indd 20 21 10 2008 16 16 36 ...

Страница 21: ...tting letters and numbers List screen operation 24 Function help 27 Map screen operation 28 Current position display 28 Screen scroll operation 28 Switching the screens 33 Map scale 35 Orientation of the map 36 Example of navigation system operation 36 Guiding the route 36 Registering home 38 01955_TNS 510_OM indd 21 21 10 2008 16 16 36 ...

Страница 22: ...en Show map is touched on the screen the map screen will be displayed Maintenance information This system informs about when to replace certain parts or components and shows dealer information if registered on the screen When the vehicle reaches a previously set driving distance or date specified for a scheduled maintenance check the Information screen will be displayed when the navigation system ...

Страница 23: ...y touch buttons on the screen with the finger When a button on the screen is touched a beep sounds Do not use objects other than your finger to touch the screen INFORMATION If the system does not respond to a touch on a touch screen button move the finger away from the screen and then touch it again Dimmed touch screen buttons cannot be operated Wipe off fingerprints using a glass cleaning cloth D...

Страница 24: ...t can be changed See page 103 To input letters To display the alphabet keys touch A Z or À Ý Enter letters by touching the alphabet keys directly Touching this button erases one letter By holding this button letters will continue to be erase On certain letter entry screens letters can be entered in upper or lower case To enter in lower case To enter in upper case 1E5008G 01955_TNS 510_OM indd 24 2...

Страница 25: ...his button displays other symbols 2 2 To display the list To search for an address or a name touch List Matching items from the database are listed even if the entered address or name is incomplete If the number of matches is four or less the list is displayed without touching List INFORMATION The number of matching items is shown to the right side of the screen If the number of matching items is ...

Страница 26: ...ext section of the name Touch to move to the beginning of the name Sorting The order of a list displayed on the screen can be rearranged TYPE A 1 Touch Sort by 2 Select the desired sorting criteria Sorting criteria are as follows Distance To sort in the order of distance from your current location Date To sort in the order of the date Category To sort in the order of the category Icon To sort in t...

Страница 27: ...he destination is displayed to the right of the name Name sort To sort in alphabetical order by name Function help Explanations for the functions of the Destination Setup and Navigation screens can be viewed Touch To view the previous page To view the next page To return to the previous screen 1E5013G 1E5057G 1E5058G 01955_TNS 510_OM indd 27 21 10 2008 16 16 40 ...

Страница 28: ...een scroll operation one touch scroll When any point on the map is touched that point moves to the centre of the screen and is shown by the cursor mark 1 Use the scroll feature to move the desired point to the centre of the screen for looking at a point on the map that is different from the current position of the vehicle If the finger is continuously held on the screen the map will continue scrol...

Страница 29: ...ays the map location of the selected destination and the road preference See Starting route guidance on page 59 To register the cursor position as a memory point Memory point registration enables easy access to a specific point Touch Mark When you touch Mark the following screen appears for a few seconds and then the map screen returns 1E5018G 1E5018G 1E5019G 01955_TNS 510_OM indd 29 21 10 2008 16...

Страница 30: ...points on page 90 Up to 106 memory points can be registered If there is an attempt to register more than 106 a message appears for confirmation To see information about the icon where the cursor is set To display information about an icon set the cursor on it 1E5020aG 1E5021G 01955_TNS 510_OM indd 30 23 10 2008 11 21 25 ...

Страница 31: ...ination If there is already a set destination Add to and Replace are displayed Add to To add a destination Replace To delete the existing destinations and set a new one To register this POI as a memory point touch Mark See Registering memory points on page 89 If is touched the registered telephone number can be called INFORMATION The desired Point of Interest can be displayed on the map screen See...

Страница 32: ...place To delete the existing destinations and set a new one To edit a memory point touch Edit See Editing memory points on page 90 To delete a memory point touch Delete If is touched the registered telephone number can be called DESTINATION INFORMATION When the cursor is set on a destination icon the name and Info are displayed on the top of the screen Touch Info Information such as the name addre...

Страница 33: ... screen configuration buttons cannot be selected To display the single map screen See page 34 To display the dual map screen See page 34 To display the compass mode screen See page 35 To display the turn list screen See page 66 To display the arrow screen See page 66 Todisplaythemotorwayinformation screen See page 64 Todisplaytheintersectionguidance screen and the guidance screen on the motorway S...

Страница 34: ...the dual map screen The screen shows the dual map The map on the left is the main map The right side map can be edited by touching any specific point on the right side map This screen can perform the following procedures 1 Changing the map scale 2 Displaying the POI icons 3 Show RDS TMC info See page 111 4 Changing the orientation of the map Touch OK when you complete editing The screen returns to...

Страница 35: ... Map scale Touch or to change the scale of the map display The scale bar and indicator at the bottom of the screen indicates the map scale menu The scale range is 50 m 50 yards to 500 km 300 miles Touch or until the scale bar changes normally By continuing to touch the button the scale bar changes smoothly The scale of the map display can be changed by touching the scale bar directly If appears yo...

Страница 36: ...f vehicle travel North is always up Heading up symbol The direction of vehicle travel is always up A red arrow indicates North Example of navigation system operation Guiding the route Guidance to a destination occurs by specifying the destination using the POI 1 Push the DEST button 2 Touch POI INFORMATION There are 13 different methods to searchdestinations See Destination search on page 42 1E505...

Страница 37: ...e are dimmed out When there are four or fewer database items these items are displayed in a list Even if the entered name is incomplete touching List displays the list 4 Select the destination from the displayed list 5 Touch Enter The system starts route search and displays recommended routes 1E5052G 1E5039G 1E5040G 01955_TNS 510_OM indd 37 21 10 2008 16 16 48 ...

Страница 38: ... 64 and 67 INFORMATION It is possible to change the route See Starting route guidance on page 59 Registering home The home button on the Destination screen can be used if your home has been registered See Destination search by Home on page 44 1 Push the MENU button 2 Touch Navigation 3 Touch Memory 4 Touch Register 1E5042G 1E5044aG 01955_TNS 510_OM indd 38 21 10 2008 16 16 49 ...

Страница 39: ...be selected in the database are dimmed out When there are four or fewer database items these items are displayed in a list Even if the entered name is incomplete touching List displays the list 8 Select the street name from the displayed list 9 Enter the house number 10 Touch Enter Registration of home is complete and the Memory points screen is displayed 1E5060G 1E5050G 1E5051aG 01955_TNS 510_OM ...

Страница 40: ...IC FUNCTION Registered Home information will be displayed The icon quick access name location and phone number can be changed See Editing memory points on page 90 1E5049bG 01955_TNS 510_OM indd 40 21 10 2008 16 16 51 ...

Страница 41: ...ss 45 Destination search by POI 48 Destination search by POI near cursor 52 Destination search by Memory 55 Destination search by Previous 56 Destination search by Map 56 Destination search by Intersection 57 Destination search by Coordinates 58 Destination search by Phone no 58 Destination search by UK postal code 59 Starting route guidance 59 Point of Interest 01955_TNS 510_OM indd 41 21 10 2008...

Страница 42: ...THE SEARCH AREA ON THE DESTINATION SCREEN 1 Push the DEST button 2 Touch the search area touch screen button on the Destination screen to display a map of the Europe The search area depends on the map SD memory card installed in the navigation system For map database information and updates see Map database information and updates on page 250 3 Touch the button indicating the country to select a s...

Страница 43: ...s see Map database information and updates on page 250 2 Touch the button indicating the country to select a search area 3 Touch OK and the previous screen returns Format Western Europe Button Countries A Austria 1 AND Andorra B Belgium CH Switzerland 1 D Germany DK Denmark E Spain 2 F France 3 FIN Finland FL Liechtenstein I Italy 4 IRL Ireland L Luxembourg MC Monaco N Norway NL Netherlands P Port...

Страница 44: ...lovenia Format Russia Button Countries RU Russia Destination search by Home 1 Push the DEST button 2 Touch the home touch screen button on the Destination screen The screen changes and displays the map location for home and the road preference See Starting route guidance on page 59 To use this function it is necessary to set Home for the memory point To register Home see page 95 2E5074G 01955_TNS ...

Страница 45: ...r each memory point To register Quick access see page 92 Destination search by Address 1 Push the DEST button 2 Touch Address onthe Destination screen 3 To search by town the following four methods are possible Input town name To input the town name See page 46 Nearest 5 towns To select from the 5 nearest towns See page 47 Input postal code To input the postal code See page 47 Last 5 towns To sele...

Страница 46: ...nge on that screen can be selected Inputting the town name 1 Touch Input town name 2 Input the town name 3 Touch the button of the desired town name from the displayed list To display the selected destination and the road preference See Starting route guidance on page 59 The current screen changes to the screen for inputting a street name After inputting a street name the screen may change to the ...

Страница 47: ...en may change to the screen for inputting a house number or a street map Inputting the postal code 1 Touch Input postal code 2 Input the postal code 3 Touch the button of the desired postal code from the displayed list The current screen changes to the screen for inputting a street name After inputting a street name the screen may change to the screen for inputting a house number or a street map 2...

Страница 48: ...use number or a street map Destination search by POI 1 Push the DEST button 2 Touch POI on the Destination screen 3 Input the name of the Point of Interest 4 Touch the button of the desired destination The screen changes and displays the map location of the selected destination and the road preference See Starting route guidance on page 59 When inputting the name of a specific Point of Interest an...

Страница 49: ...MATION The desired Point of Interest can be displayed on the map screen See Display POI icons on page 76 a Selecting a town to search Touch Town To search by town the following four methods are possible 1 Input the town name 2 Select from the nearest 5 towns 3 Input the postal code 4 Select from the last 5 towns INFORMATION To change the search area touch Search area To cancel the town setting tou...

Страница 50: ...own name 2 Input the town name 3 Touch the button of the desired town name from the displayed list SELECTING FROM THE NEAREST 5 TOWNS 1 Touch Nearest 5 towns 2 Touch the button of the desired town name 2E5027G 2E5028G 2E5026G 01955_TNS 510_OM indd 50 21 10 2008 16 16 58 ...

Страница 51: ...tal code 3 Touch the button of the desired postal code from the displayed list SELECTING FROM THE LAST 5 TOWNS Touch the button of the desired town name If the navigation has never been used no towns will be displayed on the screen 2E5029G 2E5030G 2E5031G 01955_TNS 510_OM indd 51 21 10 2008 16 16 59 ...

Страница 52: ...ination search by POI near cursor The destination can be set by selecting the search point and the POI category 1 Push the DEST button 2 Touch POI near cursor on the Destination screen 3 Set the search point by the following method 1 Input the town centre 2 Set the current position as the search point 3 Set the search point via the map screen 4 Set the search point from any destination It is possi...

Страница 53: ...ar cursor screen will be displayed SETTING THE CURRENT POSITION AS THE SEARCH POINT Touch Current position The search point is set at the current position and the POI near cursor screen is displayed SETTING THE SEARCH POINT VIA THE MAP SCREEN 1 Touch Map When an arrow facing the desired point is touched the map scrolls in that direction Releasing the finger from the arrow will stop the scrolling 2...

Страница 54: ...t When the search point is set the POI near cursor screen will be displayed Select the desired POI categories List If the desired POI categories have already been selected a list of POI will be displayed from among the selected categories The selected category icon appears on the top left of the screen If the desired POI category is not on the screen touch List all categories to list all POI categ...

Страница 55: ...ition is set as the search point On route When the indicator is illuminated by touching this button the list of the items searched along the route is displayed Destination search by Memory 1 Push the DEST button 2 Touch Memory onthe Destination screen To displays your list of registered memory points To register or edit memory points see Memory on page 88 3 Touch the button of the desired memory p...

Страница 56: ...the selected destination and the road preference See Starting route guidance on page 59 INFORMATION The list of previous destinations can be deleted See Deleting previous points on page 100 Destination search by Map 1 Push the DEST button 2 Touch Map on the Destination screen The screen changes and displays the map location that was previously displayed just before the destination input operation ...

Страница 57: ...two intersecting streets the screen changes and displays the map location of the selected destination and the road preference See Starting route guidance on page 59 If the same two streets cross at more than one intersection the screen changes and displays the menu to select the town name where the streets intersect Select the town and the map location of the selected destination and the road pref...

Страница 58: ...estination search by Phone no 1 Push the DEST button 2 Touch Phone no on the second page of the Destination screen 3 Input a telephone number 4 After inputting a telephone number touch OK The screen changes and displays the map location of the selected destination and the road preference See Starting route guidance on page 59 If there is more than one site having the same number the following scre...

Страница 59: ...reen changes and displays the map location of the selected destination and the road preference 1 When an arrow facing the desired point is touched themapscrolls in that direction Releasing the finger from the arrow will stop the scrolling 2 Touch Enter The system starts route search and displays recommended routes If there is already a set destination Add to and Replace are displayed Add to To add...

Страница 60: ...ot be the same as that for going The route guidance to the destination may not be the shortest route nor a route without traffic congestion Route guidance may not be available if there is no road data for the specified location When setting the destination on a map with a scale larger than 0 5 miles 1 km the map scale changes to 0 5 miles 500 m automatically Set the destination again If a destinat...

Страница 61: ...rry the route guidance shows a sea route After you travel by ferry the current vehicle position may be incorrect Upon reception of GPSsignals it is automatically corrected 3 ROUTES SELECTION 1 To select the desired route from three routes touch 3 routes 2 Touch Quick1 Quick2 or Short to select the desired route Quick1 Recommended route This route is indicated by an light blue line Quick2 Alternati...

Страница 62: ...62 TNS 510 DESTINATION SEARCH 1 Time necessary for the entire trip 2 Distance of the entire trip 3 Toll road 4 Motorway 5 Ferry 6 Car train 2E5063G 01955_TNS 510_OM indd 62 21 10 2008 16 17 07 ...

Страница 63: ...nd deleting destination 70 Adding destinations 70 Reordering destinations 71 Deleting destinations 72 Setting route 73 Search condition 73 Detour setting 74 Road preference 75 Starting route from adjacent road 76 Map view 76 Display POI icons 76 Route overview 79 Route preview 80 Route trace 81 Point of Interest 01955_TNS 510_OM indd 63 21 10 2008 16 17 08 ...

Страница 64: ... traveled on When you arrive at your destination the destination name will be displayed on the top of the screen Touching Off clears the display During motorway driving During motorway driving this screen displays the distance to the next junction and exit or POIs in the vicinity of the motorway exit 1 Current position 2 Points of Interest that are close to a motorway exit or exit number and junct...

Страница 65: ...een appears When touching or pushing the MAP VOICE button the guidance screen on motorway reappears When approaching an intersection When the vehicle approaches an intersection the intersection guidance screen will be displayed 1 Next street name 2 Distance to the intersection 3 Current position 4 Lane guidance The intersection guidance screen disappears and the map screen appears When touching or...

Страница 66: ... name 2 Turn direction 3 Distance to the next turn 4 Current street name ARROW SCREEN On this screen information about next turns on the guidance route can be viewed Touching during guidance displays the arrow screen 1 Exit number street name containing number or next street name 2 Turn direction 3 Distance to the next turn 4 Current street name 3E5005G 3E5006G 01955_TNS 510_OM indd 66 21 10 2008 ...

Страница 67: ...FORMATION Even if the surface street and motor way have a similar configuration voice guidance will be made at the different point The following guidance will be narrated when the navigation system recognizes the next action of the vehicle is a U turn 1 In half a mile make a U turn 2 Make a U turn if possible 3E5039a 3E5040a 4 2 miles 0 25 miles 01955_TNS 510_OM indd 67 29 10 2008 15 18 16 ...

Страница 68: ... keep right 2 Keep right then keep right towards Bern INFORMATION Voice guidance may be made early or delayed If the system cannot determine the current position correctly you may not hear voice guidance or may not see the magnified intersection on the screen If you did not hear the voice guidance command push the MAP VOICE button to hear it To adjust the voice guidance volume see Volume on page 8...

Страница 69: ...s ü CAUTION Be sure to obey the traffic regulations and keep the road condition in mind especially when you are driving on IPD roads The route guidance may provide wrong information such as the direction of a one way street Distance and time to destination When the vehicle is on the guidance route the distance and the estimated travel arrival time to the destination are displayed When the vehicle ...

Страница 70: ...g the route is displayed Travel time and arrival time is calculated based on the set vehicle speed information See page 102 However when the vehicle is not on the guidance route the distance is the linear distance between the current position and the destination Setting and deleting destination Adding destinations Adding destinations and searching again for the routes can be done 1 Touch Route 2 T...

Страница 71: ...ton Reordered number of arrival is displayed on the right side of the screen Touching Undo will cancel each selected order number from the previously input number 4 After selecting the destinations touch OK The system searches for the guidance route again and displays the entire route Even if OK is not touched the entire route is displayed automatically within a few seconds when the order is fixed...

Страница 72: ...To delete all destinations on the list A message appears to confirm the request to delete 4 To delete the destination s touch Yes If Yes is touched the data cannot be recovered If No is touched the previous screen will return 5 If more than one destination is set touch OK after deleting the destinations The system searches for the guidance route again and displays the entire route 3E5009G 3E5014G ...

Страница 73: ...destination 1 Touch Route 2 Touch Search condition 3 Touch Quick Quick1 Quick2 or Short and touch OK The entire route from the starting point to the destination is displayed Guide To start guidance Route To change a route See pages 70 and 73 3E5009G 3E5018G 3E5016G 3E5017G 01955_TNS 510_OM indd 73 21 10 2008 16 17 15 ...

Страница 74: ...ired detour distance 1 mile km 3 miles km or 5 miles km Touch one of these buttons to start the detour process After detouring the system returns to the original guidance route Whole route By touching this button the system will calculate an entire new route to the destination Around traffic If you touch this button the system will search for the route based on the traffic congestion information r...

Страница 75: ...le to calculate a detour route depending on the selected distance and surrounding road conditions Road preference A number of choices are provided on the conditions which the system uses to determine the route to the destination 1 Touch Route 2 Touch Road preference to change the conditions that determine the route to the destination 3 Select the desired road preference by touching the button When...

Страница 76: ...e displayed Map view Display POI icons Points of Interest such as petrol stations and restaurants can be displayed on the map screen You can also set their location as a destination and use them for route guidance 1 Touch Map view 2 Touch Display POI icons to display a particular type of Point of Interest on the screen A screen with a limited choice of Points of Interest will be displayed To chang...

Страница 77: ... the nearest Point of Interest select the desired category button then touch this button The system will list the points within 30 km 20 miles See page 78 Touch Other POI s on the Display POI icons screen When a Point of Interest category is selected from either the limited list or the complete list the screen will display symbols of those locations on the map screen Select the desired POI categor...

Страница 78: ...play the local POI list Points of Interest that are within 30 km 20 miles of the current position will be listed from among the selected categories 1 Touch List nearest POI s on the Display POI icons screen 2 Touch the button of the desired Point of Interest The selected Points of Interest are displayed on the map screen On route When the indicator is illuminated by touching this button the list o...

Страница 79: ...is measured as a straight line from the current vehicle position to the POI 2 When the desired Point of Interest overlaps with the cursor touch Enter The screen changes and displays the map location of the selected destination and road preference See Starting route guidance on page 59 Route overview 1 Touch Map view 2 Touch Route overview The entire route from the current position to the destinati...

Страница 80: ... name change will not appear on the list The street names will be displayed in order from the starting point along with the distance to the next turn These marks indicate the direction in which you should turn at an intersection Touch Map of the Turn list screen The point which you choose is displayed on the map screen Route preview 1 Touch Map view 2 Touch Route preview 3E5033G 3E5034G 3E5024G 3E...

Страница 81: ...on or starting point To review the route to the previous destination or starting point in fast forward mode Toindicatethepreviousdestination or starting point Route trace It is possible to store the traveled route up to 200 km 124 miles and retrace the route on the display INFORMATION This feature is available on the map with more detailed map scale than 50 km 30 miles Touch Map view 3E5024G 01955...

Страница 82: ...recording the route trace If you touch Stop the following screen will be displayed Touching Yes stops recording and the route trace remains displayed on the screen Touching No stops recording and the route trace is erased 3E5037G 3E5038G 01955_TNS 510_OM indd 82 21 10 2008 16 17 24 ...

Страница 83: ...ance 84 Volume 85 User selection 86 Memory 88 Registering memory points 89 Editing memory points 90 Deleting memory points 94 Registering home 95 Deleting home 96 Registering area to avoid 96 Editing area to avoid 97 Deleting area to avoid 100 Deleting previous points 100 Setup 101 RDS TMC 111 01955_TNS 510_OM indd 83 21 10 2008 16 17 24 ...

Страница 84: ...ithout route guidance the Suspend guidance cannot be used The screen will change to the current position map with route guidance To resume guidance 1 Push the MENU button 2 Touch Navigation on the Menu screen 3 Touch Resume guidance The screen will change to the current position map with route guidance 4E5002G 4E5004G 01955_TNS 510_OM indd 84 24 10 2008 11 18 22 ...

Страница 85: ...en selected the number or Off will be highlighted 4 Touch OK to confirm your selection INFORMATION During route guidance the voice guidance continues even if the navigation screen is changed to other screens Adaptive volume control By turning Adaptive volume control on the volume is turned up automatically when the vehicle speed exceeds 80 km h 50 mph To turn the Adaptive volume control system on ...

Страница 86: ...d preference Maintenance notification RDS TMC 1 Push the MENU button 2 Touch Navigation 3 Touch Select user To register 1 Touch Memorise The confirmation screen will be displayed 2 To register touch Yes To return to the previous screen touch No or When a button that is already registered is touched the following screen appears To replace touch Yes To cancel the replacement touch No or 4E5006aG 4E5...

Страница 87: ...e message appears then the map screen will be displayed To delete user 1 Touch Delete The confirmation screen will be displayed 2 To delete touch Yes To return to the previous screen touch No or 4E5009aG 4E5010aG 4E5011aG 4E5012aG 01955_TNS 510_OM indd 87 21 10 2008 16 17 28 ...

Страница 88: ...isters memory points See Registering memory points on page 89 2 Edits memory points See Editing memory points on page 90 3 Deletes memory points See Deleting memory points on page 94 4 Registers or deletes home See Registering home on page 95 or Deleting home on page 96 5 Registers areas to avoid See Registering area to avoid on page 96 6 Edits areas to avoid See Editing area to avoid on page 97 7...

Страница 89: ...r the location in the same way as for a destination search See Destination search on page 42 After memory point registration is completed the Memory points screen will be displayed 6 Touch OK To edit registered information see Editing memory points on page 90 INFORMATION Up to 106 memory points can be registered 4E5014aG 4E5149G 4E5016aG 01955_TNS 510_OM indd 89 21 10 2008 16 17 29 ...

Страница 90: ...y point button 6 Touch the button to be edited Icon To select icons to be displayed on the map See page 91 Quick access To set an attribute Memory points with a set attribute can be used as a Quick access or Home button See page 92 Name To edit memory point names The names can be displayed on the map See page 93 Location To edit location information See page 93 Phone no To edit telephone numbers S...

Страница 91: ...hes the memory point the selected sound will be heard 1 Touch With sound on the Change icon screen 2 Touch the desired sound icon The next screen appears when Bell with direction is touched Touch either or to adjust the direction Touch Enter The bell sounds only when the vehicle approaches this point in the direction that has been set 4E5019G 4E5020G 4E5021G 01955_TNS 510_OM indd 91 21 10 2008 16 ...

Страница 92: ...ick access on page 45 1 Touch Quick access on the Memory points screen 2 Touch the desired attribute It is possible to replace a registered attribute 3 To replace the attribute touch Yes To return to the previous screen touch No or INFORMATION One Home and five Quick access can be set DELETING Quick access 1 Touch Delete 2 To delete an attribute touch Yes To return to the previous screen touch No ...

Страница 93: ...AMES The name of a memory point that may be displayed on the map can be set To show the name touch On on the Memory points screen To not show it touch Off To change Location 1 Touch Location on the Memory points screen 2 Touch the eight directional touch screen button to move the cursor to the desired point on the map 3 Touch Enter The previous screen will be displayed 4E5026G 4E5027aG 4E5028G 019...

Страница 94: ...will be displayed Deleting memory points 1 Push the MENU button 2 Touch Navigation on the Menu screen 3 Touch Memory on the Navigation screen 4 Touch Delete 5 Touch the button to be deleted Del all To delete all memory points in the system 6 To delete the memory point touch Yes To cancel the deletion touch No 4E5029aG 4E5030aG 4E5031G 01955_TNS 510_OM indd 94 21 10 2008 16 17 34 ...

Страница 95: ... button 2 Touch Navigation on the Menu screen 3 Touch Memory on the Navigation screen 4 Touch Register 5 Enter the location in the same way as for a destination search See Destination search on page 42 When registration of home is completed the Memory points screen will be displayed 6 Touch OK To edit registered information see Editing memory points on page 90 4E5032aG 4E5150G 4E5034aG 01955_TNS 5...

Страница 96: ...eas you want to avoid because of traffic jams construction work or other reasons can be registered as areas to avoid 1 Push the MENU button 2 Touch Navigation on the Menu screen 3 Touch Memory on the Navigation screen 4 Touch Register 5 Enter the location in the same way as for a destination search or display the map of the area to be avoided See Destination search on page 42 4E5035aG 4E5036aG 4E5...

Страница 97: ...e area to be avoided may be shown Upto10locationscanberegistered as points areas to avoid If there are 10 locations already registered the following message will be displayed Unable to register additional points Perform the operation again after deleting unnecessary points Editing area to avoid The name location and or area size of a registered area can be edited 1 Push the MENU button 2 Touch Nav...

Страница 98: ...void screen To turn off the feature touch Off on the Edit area to avoid screen 7 Touch OK To change Name 1 Touch Name on the Edit area to avoid screen 2 Enter the name using alphanumeric keys Up to 24 letters can be entered 3 Touch OK The previous screen will be displayed DISPLAYING NAMES OF AREAS TO BE AVOIDED The name of an area to be avoided that may be displayed on the map can be set To show t...

Страница 99: ...on to move the cursor to the desired point on the map 3 Touch Enter The previous screen will be displayed To change Area size 1 Touch Area size on the Edit area to avoid screen 2 Touch either or to change the size of the area to be avoided 3 Touch OK The previous screen will be displayed 4E5044G 4E5039G 01955_TNS 510_OM indd 99 21 10 2008 16 17 38 ...

Страница 100: ...he area touch Yes To cancel the deletion touch No Deleting previous points The previous destination can be deleted 1 Push the MENU button 2 Touch Navigation on the Menu screen 3 Touch Memory on the Navigation screen 4 Touch Delete previous points 5 Touch the button to be deleted Del all To delete all previous points in the system 6 To delete the point touch Yes To cancel the deletion touch No 4E50...

Страница 101: ... reset all setup items touch Default Distance unit Distance unit can be changed 1 Push the MENU button 2 Touch Navigation on the Menu screen 3 Touch Setup on the Navigation screen 4 Touch km or miles of Distance to choose the distance unit The selected button is highlighted 5 Touch OK INFORMATION This function is available only in English To switch language see Selecting a language on page 179 4E5...

Страница 102: ...ountry road and Motorway To set the default speeds touch Default 6 After setting of the desired speeds is completed touch OK INFORMATION The displayed time to the destination is the approximate driving time that is calculated based on the selected speeds and the actual position along the guidance route The time shown on the screen may vary greatly depending on progress along the route which may be...

Страница 103: ...MENU button 2 Touch Navigation on the Menu screen 3 Touch Setup on the Navigation screen 4 Touch ABC QWE or AZE of Keyboard layout to choose the keyboard layout LAYOUT TYPE ABC type QWE type AZE type The selected button is highlighted 5 Touch OK 4E5137G 01955_TNS 510_OM indd 103 21 10 2008 16 17 42 ...

Страница 104: ...e button to be turned off The button becomes dimmed To set the default touch Default 6 Touch OK POI category change Display POI icons Select from among the 6 icons displayed on the Display POI icons top screen so that setting of the icons to be displayed on the map screen can be done easily 1 Push the MENU button 2 Touch Navigation on the Menu screen 3 Touch Setup on the Navigation screen Then tou...

Страница 105: ...rk feature is turned on the system will display the 3D landmark on the map To turn the 3D landmark mode on 1 Push the MENU button 2 Touch Navigation on the Menu screen 3 Touch Setup on the Navigation screen Then touch to display page 2 of the Setup screen 4 Touch On of 3D landmark The selected button is highlighted 5 Touch OK 4E5063G 4E5064G 4E5141G 01955_TNS 510_OM indd 105 21 10 2008 16 17 43 ...

Страница 106: ...Setup screen 4 Touch On of Traffic notification The selected button is highlighted 5 Touch OK Time zone Time zone can be changed 1 Push the MENU button 2 Touch Navigation on the Menu screen 3 Touch Setup on the Navigation screen Then touch to display page 2 of the Setup screen 4 Touch Change of Time zone The Change time zone screen will be displayed on the display 5 Touch the desired time zone The...

Страница 107: ...in all modes can be heard When the Voice guide in all modes feature is turned off the voice guide cannot be heard when using the audio system To turn the Voice guide in all modes on 1 Push the MENU button 2 Touch Navigation on the Menu screen 3 Touch Setup on the Navigation screen Then touch twice to display page 3 of the Setup screen 4 Touch On of Voice guide in all modes The selected button is h...

Страница 108: ...screen 3 Touch Setup on the Navigation screen Then touch twice to display page 3 of the Setup screen 4 Touch On of Automatic voice guidance The selected button is highlighted 5 Touch OK Pop up message When the Pop up message is turned on the pop up message will be displayed To turn the Pop up message on 1 Push the MENU button 2 Touch Navigation on the Menu screen 3 Touch Setup on the Navigation sc...

Страница 109: ...nt vehicle position mark can be adjusted manually Miscalculation of the distance caused by tyre replacement can also be adjusted 1 Push the MENU button 2 Touch Navigation on the Menu screen 3 Touch Setup on the Navigation screen Then touch twice to display page 3 of the Setup screen 4 Touch Adjust of Calibration 5 Touch the desired button INFORMATION For additional information on the accuracy of a...

Страница 110: ...you can manually adjust the current vehicle position mark 1 Touch Position Direction 2 Touch the eight directional touch screen button to move the cursor to the desired point on the map 3 Touch Enter 4 Touch either the or to adjust the direction of the current vehicle position mark 5 Touch Enter The map screen will be displayed 4E5075G 4E5076G 4E5077G 01955_TNS 510_OM indd 110 21 10 2008 16 17 47 ...

Страница 111: ... To perform a distance calibration procedure touch Tyre change on the Calibration screen The message appears and the quick distance calibration is automatically started A few seconds later a map screen will be displayed RDS TMC Radio Data System Traffic Message Channel This system has a function by which you can receive the traffic information from the RDS TMC station based on FM multiple broadcas...

Страница 112: ...formation 1 Push the MENU button to display the Menu screen and touch the RDS TMC 2 Touch Show RDS TMC info 3 Touch All on or All off and OK On map screen On Motor way mode screen 4E5100G 4E5080G 4E5081G 01955_TNS 510_OM indd 112 21 10 2008 16 17 48 ...

Страница 113: ...C information is received When regulatory information is received the indicator becomes a touch button Receiving Receiving regulatory information Receive regulatory information pertaining to the route touch switch b Auto avoid traffic Using RDS TMC information the system automatically calculates a new route When the system calculates a new route a confirmation to accept the new route is displayed ...

Страница 114: ...ome traffic events on the guidance route the system will guide you using voice 1 Push the MENU button to display the Menu screen and touch RDS TMC 2 Touch Voice guidance d Change area The system automatically changes the area according to the current vehicle position 01955_TNS 510_OM indd 114 21 10 2008 16 17 49 ...

Страница 115: ... to display RDS TMC Radio station screen To select the station touch the corresponding station touch screen button The screen returns to the previous screen to display the selected station f RDS TMC text information When you touch the RDS TMC icon on the map RDS TMC info bar appears on the top of the screen 1 Touch Info on the bar to display the Traffic information screen 2 Touch Detail to display...

Страница 116: ...screen g Traffic on route 1 Push the MENU button to display the Menu screen and touch RDS TMC 2 Touch Traffic on route to display the Traffic on route screen Guidance route traffic information is displayed on the screen Touch Map or Detail See f RDS TMC text information on page 115 4E5091G 4E5092G 4E5094G 01955_TNS 510_OM indd 116 21 10 2008 16 17 51 ...

Страница 117: ...een 3 Touch the desired road name from the list When the system receives RDS TMC info from two or more countries the screen below appears Touch the country name from the list When the system receives RDS TMC information from U K the screen below appears To select road type touch the corresponding touch screen button 4E5096G 4E5097G 4E5098G 01955_TNS 510_OM indd 117 21 10 2008 16 17 52 ...

Страница 118: ...l traffic information which the system can receive from RDS TMC station is displayed regardless of the guidance route 5 Touch Map or Detail See f RDS TMC text information on page 115 4E5099G 01955_TNS 510_OM indd 118 21 10 2008 16 17 52 ...

Страница 119: ...memo 127 Memo list 127 Hands free system for cellular phone 129 Enter a Bluetooth phone 132 Call on the Bluetooth phone 136 Receive on the Bluetooth phone 141 Talk on the Bluetooth phone 141 Change the settings of the Bluetooth phone 143 Set a Bluetooth phone 167 Screen adjustment 175 Screen setting 176 Beep setting 178 Selecting a language 179 01955_TNS 510_OM indd 119 24 10 2008 11 27 24 ...

Страница 120: ...N ITEMS on page 121 Delete all To cancel all conditions which have been inputted Reset all To reset the item which has satisfied a condition Set dealer To register or edit dealer information See Dealer setting on page 122 If On is selected the system gives maintenance information with the Information screen and voice sound when the system is turned on See page 22 If Off is selected the Information...

Страница 121: ...parately from provided ones 5 Input the conditions Notice of Date The next maintenance date can be input Notice of Distance The driving distance until the next maintenance check can be input Delete To cancel the date and distance conditions Reset To reset the date and distance conditions 6 Touch OK The screen then returns to the Maintenance screen INFORMATION For scheduled maintenance information ...

Страница 122: ...e same way as for a destination search See Destination search on page 42 When Set dealer registration is finished the edit dealer screen will be displayed 6 Touch the button to be edited Dealer To enter the name of a dealer See page 123 Contact To enter the name of a dealer member See page 123 Location To set a location See page 123 Phone no To set a telephone number See page 124 Delete dealer To ...

Страница 123: ...Up to 24 letters can be entered 3 Touch OK The previous screen will be displayed To edit Location 1 Touch Location on the Set dealer screen 2 Touch the eight directional touch screen button to move the cursor to the desired point on the map 3 Touch Enter The previous screen will be displayed 5E5105G 5E5106G 01955_TNS 510_OM indd 123 27 10 2008 13 35 31 ...

Страница 124: ...endar with memo It is possible to enter memos for particular dates on the calendar The system informs you of the memo entry when the system is turned on See page 23 Memos can also be used for route guidance if the memo has been registered with location information 1 Push the MENU button 2 Touch Information 3 Touch Calendar 5E5107aG 01955_TNS 510_OM indd 124 21 10 2008 16 17 56 ...

Страница 125: ...ited by touching the list button See Editing a memo on page 127 Add memo To add a memo See Adding a memo on page 126 Mark To change the colour of the mark displayed next to the date To default the mark colour touch Delete on the Mark colour screen Date To change the colour of the date To default the date colour touch Delete on the Date colour screen Prev day To go to the Memo screen of the previou...

Страница 126: ...d a memo on the Calendar screen 5 Touch Add memo Up to 100 memos can be added 6 Touch Memo 7 Enter text using the keys Up to 24 letters can be entered After entering the text touch OK at the bottom right of the screen 8 When registering information on the memo touch Location A screen similar to the destination search screen appears Search the same way as searching a destination See Destination sea...

Страница 127: ...oute guidance on page 59 Delete To delete the memo Memo list It is possible to display a memo list by setting a condition 1 Push the MENU button 2 Touch Information on the Menu screen 3 Touch Calendar on the Information screen 4 Touch List on the Calendar screen 5 Touch the desired search condition to list the memos This week To display the list of memos for the current week This month To display ...

Страница 128: ...s To cancel the deletion touch No To display memos for a specified period of time 1 Touch Period on the Search List screen 2 Enter the period using the numeral keys The period from January 1 2008 through December 31 2027 can be set for searching 3 After setting the period touch OK The Memo list screen will be displayed 5E5116G 5E5117G 01955_TNS 510_OM indd 128 21 10 2008 16 17 59 ...

Страница 129: ... Do not leave your cellular phone in the car The temperature indoor may be high and damage the phone INFORMATION In the following conditions the system may not function The cellular phone is turned off The current position is outside the communication area The cellular phone is not connected The cellular phone has a low battery If Bluetooth devices are used for hands free phone and Bluetooth audio...

Страница 130: ... navigation system will be muted INFORMATION Talk alternately with the other party on the phone If you talk at the same time the voice may not reach each other It is not a malfunction Keep the volume of receiving voice down Otherwise echo is coming up When you talk on the phone speak clearly towards the microphone In the following situations your voice may not reach the other party Driving on unpa...

Страница 131: ... the one of your cellular phone This system doesn t have a charging function 3 Indicates the receiving area Rm is displayed when receiving in Roaming area Ho is displayed when receiving in Home area 4 Indicates the level of reception Too bad Excellent The level of reception does not always correspond with the one of your cellular phone INFORMATION This system supports the following service HFP Han...

Страница 132: ...f personal data is registered when you use the Hands free system When you release your car initialize your data See c Delete personal data on page 177 If you initialize it the former state will never come back again Pay much attention when initializing the data You can initialize the following data in the system Phonebook data Dialed numbers and received calls Speed dial Bluetooth phone data Secur...

Страница 133: ...IG Inc 5 When this screen is displayed input the passcode displayed on the screen into the phone For the operation of the phone see the manual that comes with your cellular phone If you want to cancel it touch Cancel 6 When the connection is completed this screen is displayed You do not need to enter the phone in case of using the same one E5006GS E5009GS 01955_TNS 510_OM indd 133 21 10 2008 16 18...

Страница 134: ...established Each time you touch Auto connect auto connection will be switched on or off Vehicles with smart entry and start system Whenthe ENGINESTARTSTOP switch is in the ACCESSORY or IGNITION ON mode the selected Bluetooth phone will be automatically connected and the connection result is displayed This screen appears when the Bluetooth phone is first connected after the ENGINE START STOP switch...

Страница 135: ...screen appears when the Bluetooth phone is first connected after the engine switch is in ACC or ON position MANUALLY When the auto connection failed or turned off you have to connect Bluetooth manually Touch Connect after having enabled the Bluetooth connection on the phone When the connection is completed this screen is displayed Now you can use the Bluetooth phone 5E5310G E5009GS 01955_TNS 510_O...

Страница 136: ...cted with a poor reception from the Bluetooth network when the engine switch is in ACC or ON position the system automatically reconnects the Bluetooth phone In this case the connection result is not displayed IftheBluetooth isdisconnectedonpurpose such as you turned your cellular phone off this does not happen Reconnect it by the following methods Select the Bluetooth phone again Enter the Blueto...

Страница 137: ...ferred from your cellular phone The system has one phonebook You can register up to 1000 numbers 1 Touch Phonebook to display Phonebook screen 2 Select the desired number from the list Touch or push of the steering wheel 5E5330G 5E5325G 5E5326G 01955_TNS 510_OM indd 137 21 10 2008 16 18 04 ...

Страница 138: ...ber is deleted 1 Touch Call log to display Dialled numbers screen When you call by phonebook the name if registered is displayed When you call the same number continuously only the newest number is registered 2 Select the desired number from the list Touch or push of the steering wheel 5E5330G 5E5331G 5E5333G 01955_TNS 510_OM indd 138 21 10 2008 16 18 05 ...

Страница 139: ...egistered in the phonebook is received the name and the number are displayed Received calls which you did not answer are also memorized in the system and Abs is displayed on the left side of the number Unnoticed telephone number such as a public telephone is not memorized in the system 3 Select the desired number from the list Touch or push of the steering wheel A international phone call may not ...

Страница 140: ... dial on page 144 for registering the speed dial 1 Touch Speed dial to display Speed dial screen 2 Touch the desired number to call You can change the page by touching Speed dial 2 or Speed dial 3 By POI call You can call by touching when it is displayed on the screen from navigation system See page 31 for details 5E5334G 5E5335G 5E5339G 01955_TNS 510_OM indd 140 21 10 2008 16 18 06 ...

Страница 141: ...phone While you are talking on the phone this screen is displayed You can do the operation below on the screen To adjust the volume of the other party s voice Touch or or use the volume switch of the steering wheel To hang up the phone Touch or push of the steering wheel To mute your voice Touch Mute To input a Key Touch 0 9 To transfer the call Touch Transfer call When you change from cellular ph...

Страница 142: ...efore marked sign will be sent When you touch Exit this function will be finished and normal tone screen appears To hang up the phone Touch or push of the steering wheel Thecontinuoustonesignalisthemarkedsign p or w and the number following telephone number ex 056133w0123p 1 You can do this operation when you want to operate an answering machine or use a telephone service in bank for example You c...

Страница 143: ... speed tone see b Registering the speed tone on page 146 1 Touch Speed tone 2 Touch the desired button to send a tone Change the settings of the Bluetooth phone Touch Settings to display Settings screen You can change the settings of the phone 5E5466G 5E5467G 5E5347G E5006GS 01955_TNS 510_OM indd 143 30 10 2008 15 46 56 ...

Страница 144: ... Speed dial settings screen 2 Touch Register of Speed dial 3 Select the data you want to register 4 Touch the desired telephone number 5 Touch the touch screen button you want to register in The latest dialed number is registered in the 6th item speed redial If you select a touch screen button you registered before this screen is displayed 6 Touch Yes if you want to overwrite it E5006GS 5E5351G 5E...

Страница 145: ...ly If you delete them all at once all of 17 numbers are deleted 1 Touch Delete of Speed dial 2 Touch the touch screen button you want to delete 3 Touch Yes Deleting all of the speed dial 1 Touch Delete all of Speed dial 2 Touch Yes 5E5356G 5E5357G 5E5359G 5E5360G 5E5358G 01955_TNS 510_OM indd 145 21 10 2008 16 18 12 ...

Страница 146: ...of Speed tone 2 Use the software keyboard to input the name 3 Input the number and touch OK 4 Touch the desired touch screen button you want to register in If you select a touch screen button you register before this screen is displayed 5 Touch Yes if you want to overwrite it 5E5468G 5E5469G 5E5470G 5E5471G 5E5472G 01955_TNS 510_OM indd 146 21 10 2008 16 18 13 ...

Страница 147: ...u can edit the speed tone 1 Touch Edit of Speed tone 2 Touch the touch screen button you want to edit 3 Use the software keyboard to input the name 4 Input the number and touch OK 5E5473G 5E5474G 5E5475G 5E5476G 01955_TNS 510_OM indd 147 21 10 2008 16 18 14 ...

Страница 148: ... you delete them all at once all of 6 numbers are deleted 1 Touch Delete of Speed tone 2 Touch the touch screen button you want to delete 3 Touch Yes Deleting all the speed tone 1 Touch Delete all of Speed tone 2 Touch Yes 5E5478G 5E5479G 5E5480G 5E5481G 5E5482G 01955_TNS 510_OM indd 148 21 10 2008 16 18 15 ...

Страница 149: ...djusting the other party s voice Ring volume Adjusting the ring volume Automatic volume settings for high speed You can set the volume one step up when the speed is over 80 km h 50 mph When it is under 70 km h 43 mph previous volume is back Each time you touch Adaptive volume control you can switch on or off E5006GS 5E5362G 01955_TNS 510_OM indd 149 21 10 2008 16 18 16 ...

Страница 150: ...u can initialize the settings Touch Default Touch Yes d Setting the screen 1 Touch Screen to display the Screen settings screen 2 Do the detail settings of the screen and touch OK 5E5362G 5E5363G E5006GS 5E5365G 01955_TNS 510_OM indd 150 21 10 2008 16 18 17 ...

Страница 151: ... mode The message is displayed on the upper side of the screen You can only operate the steering switch Auto answer When a call is received the display automatically changes to the talking screen and you can start to talk on the phone without touching any button after the preset time Touch On of Auto answer and or to adjust the waiting time of auto answer within 1 60 seconds 5E5365G 5E5366G 01955_...

Страница 152: ...played Vehicles without smart entry and start system When the engine switch is in ACC or ON position and the Bluetooth is automatically connected the connection check is displayed Touch On or Off of ShowBluetooth connection status at ignition on Bluetooth is a registered trademark of Bluetooth SIG Inc Initializing the settings You can initialize the settings Touch Default Touch Yes 5E5309G 5E5366G...

Страница 153: ...ephone number You can transfer the telephone numbers in your Bluetooth phone to the system Up to 1000 person s data up to 2 numbers a person can be registered in the phonebook Transfer it while the engine is running 1 Touch Transfer data to display Select group screen 2 Select the group you want to transfer to 3 Touch Overwrite or Add to E5006GS 5E5370G 5E5371G 5E5372G 5E5373G 01955_TNS 510_OM ind...

Страница 154: ...d until then can be memorized in the system 5 When this screen is displayed the transfer is completed When this screen is displayed try the transfer operation again Registering the phonebook data You can register the phonebook data 1 Touch Register of Phonebook 2 Touch the desired touch screen button to edit the phonebook 3 When you complete the edit touch OK E5029GS 5E5375G 5E5376G 5E5377G 01955_...

Страница 155: ...e the software keyboard to input the name Editing the phone number You can register the phone number in TEL1 and TEL2 separately Up to 2 numbers a person can be registered 1 Touch TEL1 or TEL2 2 Input the number and touch OK 3 Select the desired icon 5E5383G 5E5385G 5E5386G 01955_TNS 510_OM indd 155 21 10 2008 16 18 22 ...

Страница 156: ...up display You can select No Group or Group 01 to Group 19 No Group is displayed if you don t set the group 1 Touch Group 2 Select the desired group Adding the data to the phonebook You can add data to the phonebook 1 Touch Add to 2 Select the data you want to add log data to 3 Confirm the added data on the screen and touch OK 5E5392G 5E5393G 5E5388G 01955_TNS 510_OM indd 156 21 10 2008 16 18 23 ...

Страница 157: ...e registered data 1 Touch Edit 2 Select the data you want to edit 3 Touch the desired touch screen button When you edit the data touch OK When you also touch Edit on this screen you can edit it 5E5395G 5E5396G 5E5398G 01955_TNS 510_OM indd 157 21 10 2008 16 18 24 ...

Страница 158: ...all your data on the system 1 Touch Delete of Phonebook 2 Touch the desired touch screen button 3 Touch Yes You can also delete it in the following way 1 Touch Phonebook 2 Select the desired data 3 Touch Delete 5E5399G 5E5330G 5E5400G 5E5403G 5E5401G 5E5404G 01955_TNS 510_OM indd 158 21 10 2008 16 18 26 ...

Страница 159: ...ting all the phone data 1 Touch Delete all of Phonebook 2 Select the deleting method Group data Deleting all the phone data in group All contact data Deleting all the phone data 5E5406G 5E5405G 5E5407G 01955_TNS 510_OM indd 159 21 10 2008 16 18 27 ...

Страница 160: ...a the Select group screen is displayed 4 Select the desired group 5 Touch Yes You can also delete it in the following way 1 Touch Phonebook 2 Touch Delete all 3 Touch Yes 5E5408G 5E5330G 5E5409G 5E5411G 5E5412G 01955_TNS 510_OM indd 160 21 10 2008 16 18 28 ...

Страница 161: ... by default You can change Group 01 Group 19 into desired names 1 Touch Register of Group name 2 Select the group you want to register 3 When you complete all the edit touch OK Selecting a group icon 1 Touch Icon 2 Select the desired icon 5E5413G 5E5417G 5E5414G 5E5418G 5E5415G 01955_TNS 510_OM indd 161 21 10 2008 16 18 29 ...

Страница 162: ...e You can delete the group names individually or all at once If you delete a group name that group will return to the default setting excluding No Group 1 Touch Delete of Group name 2 Select the group you want to delete the name of 3 Touch Yes 5E5419G 5E5421G 5E5420G 5E5422G 5E5423G 01955_TNS 510_OM indd 162 21 10 2008 16 18 30 ...

Страница 163: ... 2 Touch Yes Deleting the log data You can delete the log data individually or all at once When you release your car delete all the data on the system INDIVIDUALLY 1 Touch Delete on the Log data screen 2 Touch Yes 5E5424G 5E5426G 5E5425G 5E5427G 01955_TNS 510_OM indd 163 21 10 2008 16 18 31 ...

Страница 164: ...nt people from using some functions of the Hands free system It is useful when you leave your car with the hotel or you don t want others to see the data you registered When you set or unlock the security you have to input the security code Be sure to change the default code when you use the security for the first time 5E5428G 5E5429G 01955_TNS 510_OM indd 164 21 10 2008 16 18 32 ...

Страница 165: ...curity when you forget it If you forget the security code initialize your personal data When you initialize it not only the phonebook data but also the memory points in the navigation system etc will be deleted See Initializing the security code on page 167 1 Touch Phonebook lock 2 Touch Change 3 Input the security code Each time you touch an input digit is deleted 4 Touch Yes E5006GS 5E5431G 5E54...

Страница 166: ...ay of speed dial screen registering deleting the speed dial and speed dialing Display of the other party s name for calls being received or made Display of dialed numbers screen and received calls screen deleting dialed numbers and received numbers Display of phone information screen Changing the security code 1 Touch On 2 Input the security code and touch OK 5E5435G 5E5436G 01955_TNS 510_OM indd ...

Страница 167: ...uch OK 3 Touch Yes Set a Bluetooth phone Selecting a Bluetooth phone In case you register more than one Bluetooth phone you need to choose a favorite one 1 Touch Settings to display Settings screen 2 Touch Select telephone to display Select telephone screen 5E5439G 5E5440G 5E5441G 5E5302G E5006GS 01955_TNS 510_OM indd 167 21 10 2008 16 18 35 ...

Страница 168: ...d when you choose the phone Although you can register up to 6 Bluetooth phones in the system only one Bluetooth phone can function at a time 3 Touch OK When the result message is displayed you can use the Bluetooth phone When another Bluetooth phone is trying to connect this screen is displayed Touch Yes or No 5E5443G 5E5446G 5E5444G E5009GS 01955_TNS 510_OM indd 168 21 10 2008 16 18 36 ...

Страница 169: ...th phone which is displayed on the screen You can change it into a desired name Bluetooth device address The address peculiar to the system You cannot change it 1 Select the desired phone and touch Information Bluetooth is a registered trademark of Bluetooth SIG Inc 2 When you complete confirming it touch 5E5447G 5E5448G 01955_TNS 510_OM indd 169 28 10 2008 10 28 27 ...

Страница 170: ...mation on the system The information displays the following items Device name The name in the Bluetooth network You can change it Passcode The password when you register your cellular phone in the system You can change it into the figure of 4 8 digits Device address The address peculiar to the system You can not change it If you have registered two Bluetooth phones with the same device name or pas...

Страница 171: ... Change of Device name or Passcode Bluetooth is a registered trademark of Bluetooth SIG Inc 3 Use the software keyboard to input the device name You can input up to 20 characters 4 Input a passcode with 4 8 digits When you touch the input number is deleted E5006GS E5016GS 01955_TNS 510_OM indd 171 21 10 2008 16 18 38 ...

Страница 172: ...s 1 Touch Default 2 Touch Yes Deleting a Bluetooth phone 1 Touch Delete of Bluetooth telephone 2 Select the telephone you want to delete and touch OK 3 Touch Yes Bluetooth is a registered trademark of Bluetooth SIG Inc E5017GS E5018GS 5E5461G 5E5462G 01955_TNS 510_OM indd 172 21 10 2008 16 18 39 ...

Страница 173: ...ion of the Bluetooth phone you delete You can display the information of the Bluetooth phone before you delete it and you can make sure whether the telephone you delete is correct or not 1 Select the telephone you want to display the information about 2 When you complete confirming it touch 5E5446G 5E5464G 5E5465G 01955_TNS 510_OM indd 173 21 10 2008 16 18 40 ...

Страница 174: ...ed Standard s or other means of providing conformity IEC 60950 1 2001 First Edition and EN60950 1 2001 A11 2004 Protection requirements concerning EMC 3 1 b Applied Standard s or other means of providing conformity EN 300 440 1 V1 3 1 2001 09 EN 300 440 2 V1 1 2 2004 07 EN 301 489 1 V1 6 1 2005 09 EN 301 489 3 V1 4 1 2002 08 EN 301 489 17 V1 2 1 2002 08 EN 300 328 V1 7 1 2006 10 Measures for the e...

Страница 175: ...ay screen back on push any button such as MENU etc The selected screen appears INFORMATION When you do not touch any button on the Display screen for 20 seconds the previous screen will be displayed Depending on the position of the headlight switch the screen changes to the day mode or night mode To display the screen in the day mode even with the headlight switch on touch Day mode on the adjustme...

Страница 176: ...an select a function that enables automatic return to the navigation screen from the audio screen Select On or Off and then touch OK On The navigation screen automatically returns from the audio screen 20 seconds after the end of audio screen operation Off The audio screen remains on 5E5122G 01955_TNS 510_OM indd 176 21 10 2008 16 18 41 ...

Страница 177: ...e following personal data can be deleted or returned to their default settings Maintenance conditions Maintenance information off setting Memory points Areas to avoid Previous points Route trace User selection settings Phonebook data Dialed numbers and received calls Speed dial Bluetooth phone data Security code 5E5122G 01955_TNS 510_OM indd 177 21 10 2008 16 18 41 ...

Страница 178: ... Confirmation for deleting all personal data screen appears 3 Touch Yes Beep setting You can set a beep sound off 1 Push the MENU button 2 Touch Information 3 Touch Beep off Beep off is highlighted To switch the beep sound on touch Beep off again 5E5123G 5E5124G 5E5122G 01955_TNS 510_OM indd 178 21 10 2008 16 18 43 ...

Страница 179: ...an be changed 1 Push the MENU button 2 Touch Information 3 Touch Language On this screen you can select the language shown on the screen 4 Touch the desired button on the screen GB English D German F French I Italian NL Dutch E Spanish S Swedish DK Danish N Norwegian P Portuguese 1E5003G 01955_TNS 510_OM indd 179 21 10 2008 16 18 43 ...

Страница 180: ...180 TNS 510 OTHER FUNCTIONS 01955_TNS 510_OM indd 180 21 10 2008 16 18 43 ...

Страница 181: ...ur audio system 183 Some basics 183 Radio operation 188 CD player operation 192 SD USB player operation 202 Bluetooth audio operation 211 AUX operation 226 iPod operation 228 Audio remote controls 237 Audio system operating hints 238 01955_TNS 510_OM indd 181 21 10 2008 16 18 44 ...

Страница 182: ...old the þ TRACK or the TRACK ý button to seek up or down for a station For details see pages 189 195 198 207 220 and 233 4 VOL or VOL button Push VOL or VOL button to adjust the volume For details see page 184 5 PWR button Push this button to turn the audio system on and off For details see page 184 6 USB port Plug a USB memory device for the USB player into this port For details see page 204 7 AU...

Страница 183: ... see page 186 CD slot Insert a disc for the CD player into this slot For details see page 193 Using your audio system Some basics Vehicles with smart entry and start system Your audio system works when the ENGINE START STOP switch is in the ACCESSORY or IGNITION ON mode Vehicles without smart entry and start system Your audio system works when the engine switch is in ACC or ON position NOTICE To p...

Страница 184: ...ion that enables automatic return to the previous screen from the audio screen See a Automatic transition on page 176 for details Switching between functions 1 Push the MODE button 2 Touch the desired mode button The screen of the selected mode is displayed Touch these buttons if you want to switch from one mode to another Changing modes to DAB CDCH Bluetooth audio iPod SD USB or AUX is not possib...

Страница 185: ...TNS 510 185 AUDIO SYSTEM 6 if the iPod connecting cable is connected 6E5109G 6E5117G E6102GS 01955_TNS 510_OM indd 185 21 10 2008 16 18 46 ...

Страница 186: ...e surface ofthedisplayusingaglasscleaning cloth Tone and balance Tone How good an audio program sounds to you is largely determined by the mix of the treble midrange and bass levels In fact different kinds of music and vocal programs usually sound better with different levels of treble midrange and bass Balance A good balance of the left and right stereo channels and of the front and rear sound le...

Страница 187: ...e AUDIO button 2 Touch DSP Automatic sound levelizer ASL When the audio sound becomes difficult to hear due to road noise wind noise or other noises while driving touch HIGH MID or LOW The system adjusts to the optimum volume and tone quality according to the noise level When the system is on the sound adjustment level is displayed on the screen To turn off the system touch the OFF switch Equalize...

Страница 188: ...details refer to the DAB tuner owner s manual CD changer If an optional CD changer is installed CDs can be played continuously with no need of changing CDs Push the MODE button and then touch CDCH to select CDCH mode For details refer to the CD changer owner s manual iPod connecting cable If an optional iPod connecting cable is installed an iPod can be used by connecting the cable For details see ...

Страница 189: ...an store up to 6 stations To change the preset station to a different one follow the same procedure The preset station memory is cancelled when the power source is interrupted by battery disconnection or a blown fuse Selecting a station Tune in the desired station using one of the following methods Preset tuning Touch the channel selector 1 6 for the station you want The touch screen button is hig...

Страница 190: ...G OFF mode AF appears on the screen For switching over to the broadcasting station providing good reception within the same RDS network convenient for following the appropriate stations in a wide region AF ON REG ON mode AF and REG appear on the screen For switching over to a broadcasting station within the same local program network AF OFF REG OFF mode TheAF function does not work TA Traffic Anno...

Страница 191: ...d start searching a TP station again If the TP signal is halted for 20 seconds after the TP mode was set the radio will seek another TP station automatically EON Enhanced Other Network system If the RDS station with EON data you are listening to is not broadcasting a traffic information program in the TA Traffic Announcement mode the radio will be switched to the traffic information program automa...

Страница 192: ... the system compares the volume before TA is received and the memorized TA volume and automatically selects the louder volume However the range of volume memory is limited if the volume received previously is less than the minimum this volume will be used You can adjust the volume independently from the memorized TA volume range while receiving a TA station Traffic announcement can be canceled by ...

Страница 193: ... smart entry and start system The engine switch must be set at ACC or ON position Setting a disc Insert a disc After insertion the set disc is automatically loaded If the label faces down the disc cannot be played In this case Check CD appears on the screen Ejecting a disc Push the Ş button The disc will be ejected A disc can then be inserted 01955_TNS 510_OM indd 193 21 10 2008 16 18 50 ...

Страница 194: ...n the CD player The CD screen will be displayed c Operating an audio CD Playing an audio CD Push the AUDIO button to display this screen CD text only The disc title and track title will appear on the screen when pushing the MODE button and touch CD button 6E5117G 01955_TNS 510_OM indd 194 21 10 2008 16 18 50 ...

Страница 195: ...lected track from the beginning By touching this button the list moves up by 6 track groups If this button is touched when the top page of the list is displayed the last page is displayed By touching this button the list moves down by 6 track groups If this button is touched when the last page of the list is displayed the top page is displayed Fast forward Push the þ TRACK button and hold it to fa...

Страница 196: ... will continue scanning at track 1 After all the tracks are scanned in one pass normal play resumes Other functions RPT Use it for automatic repeat of the track you are currently listening to While the track is playing touch RPT briefly RPT appears on the screen When the track is finished the CD player will automatically go back to the beginning of the track and play the track again To cancel it t...

Страница 197: ...selects a track on the disc being listened to in random order To cancel it touch RAND once again If a CD TEXT disc is inserted the title of the disc and track will be displayed Up to 16 letters can be displayed d Operating a MP3 WMA DISC Playing a MP3 WMA disc Push the AUDIO button to display this screen 6E5119G 01955_TNS 510_OM indd 197 21 10 2008 16 18 52 ...

Страница 198: ...splayed the top page is displayed FILE The file list is displayed DETAIL Details of the file currently playing is displayed Selecting a desired file þ TRACK or TRACK ý button Use for direct access to a desired file Push the þ TRACK or TRACK ý button and repeat until the desired file number appears on the display As you release the button the CD player will start playing the selected file from the ...

Страница 199: ...e list moves up by 6 file groups If this button is touched when the top page of the list is displayed the last page is displayed By touching this button the list moves down by 6 file groups If this button is touched when the last page of the list is displayed the top page is displayed FOLDER The folder list is displayed DETAIL Details of the file currently playing is displayed 6E5120G 6E5121G 0195...

Страница 200: ...t will continue scanning from file 1 After all the files are scanned in one pass normal play resumes Searching for a desired folder While the disc is playing touch SCAN and hold it until the FLD SCAN appears on the screen The program at the beginning of each folder will be played for 10 seconds To continue listening to the program of your choice touch SCAN once again After all the folders are scan...

Страница 201: ...e folder and play the folder again To cancel it touch RPT once again RAND Use it for automatic and random selection of the folder or the disc which you are currently listening to Playing the files in one folder in random order While the disc is playing touch RAND briefly RAND appears on the screen The system selects a file in the folder you are currently listening to To cancel it touch RAND once a...

Страница 202: ...he disc It indicates that the inside of the player unit may be too hot due to the very high ambient temperature Remove the disc from the player allow the player to cool down If NO MUSIC FILE appears on the display It indicates that the disc has no playable data If the malfunction is not rectified Take your vehicle to authorized Toyota dealer or repairer and most auto parts stores or another qualif...

Страница 203: ...t be set at ACC or ON position Setting an SD memory card Remove the map SD memory card before inserting another SD memory card For details see page 203 While the map SD memory card is removed the navigation system cannot be used Insert an SD memory card After insertion the set SD memory card is automatically loaded Ejecting an SD memory card 1 Push the MENU button 2 Touch Information 3 Touch Remov...

Страница 204: ...vice Vehicles with smart entry and start system The ENGINE START STOP switch must be in the ACCESSORY or IGNITION ON mode Vehicles without smart entry and start system The engine switch must be set at ACC or ON position Setting a USB memory device Plug a USB memory device into the port After insertion the set USB memory device is automatically loaded 01955_TNS 510_OM indd 204 21 10 2008 16 18 55 ...

Страница 205: ...memory device 1 Push the MENU button 2 Touch Information 3 Touch Remove device 4 Touch USB 5 Unplug the USB memory device The USB memory device will be ejected A USB memory device can then be inserted 01955_TNS 510_OM indd 205 21 10 2008 16 18 56 ...

Страница 206: ...r USB if the SD memory card USB memory device are already loaded in the SD USB player The SD or USB screen will be displayed d Operating an SD memory card USB memory device Playing an SD memory card USB memory device Push the AUDIO button to display this screen 01955_TNS 510_OM indd 206 21 10 2008 16 18 56 ...

Страница 207: ...ayed FILE The file list is displayed DETAIL Details of the file currently playing is displayed Selecting a desired file þ TRACK or TRACK ý button Use for direct access to a desired file Push the þ TRACK or TRACK ý button and repeat until the desired file number appears on the display As you release the button the SD USB player will start playing the selected file from the beginning When RAND or FL...

Страница 208: ...button the list moves up by 6 file groups If this button is touched when the top page of the list is displayed the last page is displayed By touching this button the list moves down by 6 file groups If this button is touched when the last page of the list is displayed the top page is displayed FOLDER The folder list is displayed DETAIL Details of the file currently playing is displayed 01955_TNS 5...

Страница 209: ... the folder it will continue scanning from file 1 After all the files are scanned in one pass normal play resumes Searching for a desired folder While the disc is playing touch SCAN and hold it until the FLD SCAN appears on the screen The program at the beginning of each folder will be played for 10 seconds To continue listening to the program of your choice touch SCAN once again After all the fol...

Страница 210: ...To cancel it touch RPT once again RAND Use it for automatic and random selection of the folder or the SD memory card USB memory device which you are currently listening to Playing the files in one folder in random order While the disc is playing touch RAND briefly RAND appears on the screen The system selects a file in the folder you are currently listening to To cancel it touch RAND once again Pl...

Страница 211: ...ure Remove the disc from the player allow the player to cool down If No playable music data in SD Card or No playable music data in USB memory appears on the display It indicates that the SD memory card USB memory device has no playable data If the malfunction is not rectified Take your vehicle to authorized Toyota dealer or repairer and most auto parts stores or another qualified professional Blu...

Страница 212: ...The portable player is not connected The portable player has a low battery Depending on the portable player that is connected to the system certain functions may not be available If Bluetooth devices are used for hands free phone and Bluetooth audio connections at the same time the following may occur The Bluetooth connection may be cut off Noise may occur in the audio played from the portable pla...

Страница 213: ...e Bluetooth connec tion is built in to the display The indication of the Bluetooth connection may turn yellow and the system may not function when you use the Bluetooth portable player in the following conditions Your portable player is hidden from the display behind the seat or in the glove box or console box Your portable player touches or is covered with metal materials Leave the Bluetooth port...

Страница 214: ... Standard s or other means of providing conformity IEC 60950 1 2001 First Edition and EN60950 1 2001 A11 2004 Protection requirements concerning EMC 3 1 b Applied Standard s or other means of providing conformity EN 300 440 1 V1 3 1 2001 09 EN 300 440 2 V1 1 2 2004 07 EN 301 489 1 V1 6 1 2005 09 EN 301 489 3 V1 4 1 2002 08 EN 301 489 17 V1 2 1 2002 08 EN 300 328 V1 7 1 2006 10 Measures for the eff...

Страница 215: ...s with your portable player for operation of the portable player 1 Push the MENU button 2 Touch Information 3 Touch Bluetooth settings to display the BT audio settings screen 4 Touch Register to connect your portable player to the system 5 When this screen is displayed enter the passcode displayed on the screen into the portable player For the operation of the portable player see the manual that c...

Страница 216: ... used to register the portable player in the vehicle s audio system You can create a password of your choice See Changing the Bluetooth audio settings on page 221 For portable players lacking passcode entry capability such as those without operation switches change the audio system s passcode to that of the portable player See Changing the Bluetooth audio settings on page 221 Refer to the manual t...

Страница 217: ...n result is displayed This screen appears when the Bluetooth portable player is first connected after the ENGINE START STOP switch is turned to the ACCESSORY or IGNITION ON mode Vehicles without smart entry and start system When the engine switch is in the ACC or ON position the selected Bluetooth portable player will be automatically connected and the connection result is displayed This screen ap...

Страница 218: ...stem is disconnected with a poor reception from the Bluetooth network when the ENGINE STARTSTOP switch is in the ACCESSORY or IGNITION ON mode the system automatically reconnects the Bluetooth audio player In this case the connection result is not displayed Vehicles without smart entry and start system If the Bluetooth audio system is disconnected with a poor reception from the Bluetooth network w...

Страница 219: ...portable player that is connected to the system functions such as display of the artist name or control buttons shown here may not be available Bluetooth is a registered trademark of Bluetooth SIG Inc Playing a Bluetooth audio Touch and the music will start playing Touch șș and the music will pause E6104GS E6102GS 01955_TNS 510_OM indd 219 21 10 2008 16 19 02 ...

Страница 220: ...lected track from the beginning Fast forward Push and hold the þ TRACK button to fast forward the player When you release the button the player will resume playing from that position Reverse Push and hold the TRACK ý button to reverse the player When you release the button the player will resume playing Selecting a desired album ALBUM Touch this button to select the next album ALBUM Touch this but...

Страница 221: ...n touch RAND once again INFORMATION Depending on the portable player that is connected to the system certain functions may not be available c Change the Bluetooth audio settings Selecting a portable player If you register a second portable player either one can be selected for connection 1 Touch Select portable player to display the Select portable player screen You can select from a maximum of tw...

Страница 222: ...The connection method can be switched between From vehicle and From portable player Bluetooth is a registered trademark of Bluetooth SIG Inc 1 Select desired portable player and then touch Portable player info 2 When you complete confirming it touch Changing the device name You can change a device name If you change a device name the name registered in your portable player is not changed 1 Touch E...

Страница 223: ...ed Bluetooth is a registered trademark of Bluetooth SIG Inc Displaying the Bluetooth audio settings You can see the Bluetooth audio information settings on the system Device name The name in the Bluetooth network You can change it Passcode The password when you register your portable audio player in the system You can change it into the figure of 4 8 digits Device address The address peculiar to t...

Страница 224: ... at Device name or Passcode 3 Use the software keyboard to input the device name You can input up to 20 characters Bluetooth is a registered trademark of Bluetooth SIG Inc 4 Input a Passcode with 4 8 digits When you touch the input number is deleted E6123GS 01955_TNS 510_OM indd 224 21 10 2008 16 19 05 ...

Страница 225: ...ettings You can initialize the settings 1 Touch Default 2 Touch Yes Deleting a portable player 1 Touch Bluetooth settings 2 Touch Remove at Bluetooth audio 3 Select the portable player you want to delete and touch OK 01955_TNS 510_OM indd 225 21 10 2008 16 19 06 ...

Страница 226: ...ON Place the portable audio device in a location that will not interfere with SRS airbag deployment Failure to do so may result in death or serious injury due to the inability of the airbag to function properly or if the portable audio device is thrown during SRS airbag deployment Refer to the vehicle instruction manual for details of the SRS airbag deployment location Avoid placing the portable a...

Страница 227: ...tch to another mode prior to disconnecting or connecting Changing the portable audio device power supply while in AUX mode may lead to distortion and speaker damage Always ensure to turn off the audio system power or switch to another mode prior to changing the portable audio device power supply Please note that the volume level will vary due to differing output levels depending on the connected d...

Страница 228: ... audio device is output from the speakers iPod operation This function can be operated only when an optional iPod connecting cable is connected iPod music files can be played by connecting your iPod to the audio system Furthermore it is also possible to perform such operations as selecting tracks from the play list and changing the shuffle mode at the audio system This system supports only an iPod...

Страница 229: ...h the exception of the remote control As soon as the iPod is connected its power is automatically turned on Disconnecting your iPod Press the sides of the dock connector in the direction shown by the arrows above to disconnect your iPod Dock connector port Dock connector iPod connecting cable iPod adapter Dock connector 01955_TNS 510_OM indd 229 21 10 2008 16 19 08 ...

Страница 230: ...note that operation cannot be performed using your iPod while Toyota is displayed If your iPod is connected to the audio system with the iPod power OFF Toyota will not display and the Charging complete mark may display If this happens push any button on your iPod to display Toyota Vehicles with smart entry and start system While the ENGINE START STOP switch is in the ACCESSORY or IGNITIONONmode th...

Страница 231: ... will be turned off about two minutes after the ENGINE START STOP switch is turned off Vehicles without smart entry and start system The connected iPod will be turned off about two minutes after the engine switch is turned to the LOCK position b Operating to your iPod Push the MODE button and touch iPod The iPod screen will displayed 01955_TNS 510_OM indd 231 21 10 2008 16 19 08 ...

Страница 232: ...m does not function properly disconnect your iPod from the dock connector and then turn the ENGINE START STOP switch off Turn the iPod off then back on Turn the ENGINE START STOP switch back to the ACCESSORY or IGNITION ON mode and then connect the iPod to the dock connector again Vehicles without smart entry and start system If the system does not function properly disconnect your iPod from the d...

Страница 233: ...rd Push and hold the þ TRACK button or continue touching to fast forward the player When you release the button the player will resume playing from that position Reverse Push and hold the TRACK ý button or continue touching to reverse the player When you release the button the player will resume playing TRACK LIST When TRACK LIST is touched the list of files in which the music files currently bein...

Страница 234: ...Music menu screen The screen shown at step 4 displays when Songs is selected 3 Touch the desired list on the mode list screen Touch Play to playback the first music file in the selected list Touch ALL to select all displayed lists When there are 5 lists or more touch or to change the list Touch to return to the level above 4 Touch the applicable touch screen button to select the music file to be p...

Страница 235: ...selected mode and the first music file is played Playlist Plays back the iPod Playlist Songs Plays back all songs Artists Plays back the Artists list Genres Plays back the Genres list Albums Plays back the Albums list Composers Plays back the Composers list 3 Touch or Touch to select the next list music files in Songs mode Touch to select the previous list music files in Songs mode INFORMATION Whe...

Страница 236: ... music files in albums are played back from the first music file To cancel it touch ALBUM RANDOM once again Supported iPods The following iPods can be used with the audio system However operation may not be possible depending on the condition of the iPod iPod 4th generation 5th generation iPod photo iPod nano 1st generation 2nd generation 3rd generation iPod classic iPod touch INFORMATION iPod is ...

Страница 237: ... ý switch until you hear a beep Do this again to find the next station If you push either the þ or ý switch in seek mode the seek mode will cancel CD player Bluetooth audio and SD USB player Use this button to skip up or down to a different track or file in either direction To select a desired track or file Quickly push and release the þ or ý switch until the track or file you want to play is set ...

Страница 238: ...ng which increase with the distance from the radio transmitter They are often accompanied by distortion Multi path FM signals are reflective making it possible for two signals to reach your antenna at the same time If this happens the signals will cancel each other out causing a momentary flutter or loss of reception Static and fluttering These occur when signals are blocked by buildings trees or ...

Страница 239: ...available for files recorded at these frequencies The sound quality of MP3 WMA files generally improves with higher bit rates In order to achieve a reasonable level of sound quality discs SD memory card and USB memory device recorded with a bit rate of at least 128 kbps are recommended Playable bit rates MP3 files MPEG1 LAYER3 64 to 320 kbps MPEG2 LSF LAYER3 64 to 160 kbps WMA files Ver 7 8 CBR 48...

Страница 240: ... of the unit It may not be possible to play discs recorded on a personal computer depending on the application settings and the environment Record with the correct format For details contact the appropriate application manufacturers of the applications CD R CD RW discs may be damaged by direct exposure to sunlight high temperatures or other storage conditions The unit may be unable to play some da...

Страница 241: ...skip If moisture gets into your CD player you may not hear any sound even though your CD player appears to be working Remove the discs from the CD player and wait until it dries ü CAUTION CD player uses an invisible laser beam which could cause hazardous radiation exposure if directed outside the unit Be sure to operate the player correctly CD player Use only discs marked as shown above The follow...

Страница 242: ...lucent low quality or labeled discs such as those shown in the illustrations The use of such discs may damage the player or changer or it may be impossible to eject the disc This system is not designed for use of Dual Disc Do not use Dual Disc because it may cause damage to the player 6E5A08 6E5A11 6E5A09 6E5A10 01955_TNS 510_OM indd 242 21 10 2008 16 19 13 ...

Страница 243: ...to repeat a section of a track To see a pin hole hold the disc up to the light Remove discs from the player when you are not using them Store them in their plastic cases away from moisture heat and direct sunlight To clean a disc Wipe it with a soft lint free cloth that has been dampened with water Wipe in a straight line from the centre to the edge of the disc not in a circle Do not use a convent...

Страница 244: ...power sources such as USB audio devices may not be recognized correctly even if the ENGINE START STOP switch is turned to ACCESSORY or IGNITION ON mode In this case turn the ENGINE START STOP switch to ACCESSORY or IGNITION ON mode again or remove the USB memory device and then plug it in again Vehicles without smart entry and start system USB memory devices with external power sources such as USB...

Страница 245: ...TBIT MINI 1GB SONY 07718BBCB 1GB POCKETBIT MINI 512MB SONY 08214BCCV 512MB USB FLASH MEMORY 1GB TOSHIBA 7441H910168NM8N 1GB Swivel Flash Drive 8GB Imation 8E80 0014 8GB Swivel Flash Drive 256MB Imation 8E80 0016 256MB USB Drive 4GB Verbatim 07070406604G088058AA 4GB Cruzer Contour 8GB San Disk 8E80 0020 8GB Cruzer Micro 512MB White San Disk 8E80 0021 512MB USB Drive 2GB Verbatim 07071706602G030669A...

Страница 246: ...ernational standard for the formatting of CD ROM folders and files For the ISO 9660 format there are two levels of regulations Level 1 The file name is in 8 3 format 8 character file names with a 3 character file extension File names must be composed of one byte capital letters and numbers The _ symbol may also be included Level 2 The file name can have up to 31 characters including the separation...

Страница 247: ...TNS 510 247 APPENDIX 7 Section 7 APPENDIX Limitations of the navigation system 248 Map database information and updates 250 01955_TNS 510_OM indd 247 21 10 2008 16 19 14 ...

Страница 248: ...ion errors will be corrected within a few seconds When your vehicle is receiving signals from the satellites the GPS mark appears at the top left of the screen The GPS signal may be physically obstructed leading to inaccurate vehicle position on the map display Tunnels tall buildings trucks or even the placement of objects on the instrument panel may obstruct the GPS signals The GPS satellites may...

Страница 249: ...09 b Inappropriate route guidance may occur in the following cases When turning at an intersection off the designated route guidance If you set more than one destination but skip any of them auto reroute will display a route returning to the destination on the previous route When turning at an intersection for which there is no route guidance When passing through an intersection for which there is...

Страница 250: ...ruction on roads may be in progress For that reason information on some areas in this system might be different from the actual location The map database is normally updated once a year Contact any authorized Toyota dealer or repairer and most auto parts stores or another qualified professional for information about the availability and pricing of an update The European map database is divided int...

Страница 251: ...then set the next destination Do not attempt to store audio or other data files in the map SD memory card Confirming the database version and SD memory card coverage area 1 Push the MENU button 2 Touch Navigation 3 Touch Map SD Confirm the SD memory card name and the database version on this screen To display the SD memory card coverage area touch Covered area Confirm the covered area on the scree...

Страница 252: ...lightly to remove it 6 Insert the new map SD memory card The map database is normally updated once a year Consult www toyota mapupdates eu or contact any authorized Toyota dealer or repairer and most auto parts stores or another qualified professional for information about the availability and pricing of an update 01955_TNS 510_OM indd 252 31 10 2008 13 33 09 ...

Страница 253: ...TNS 510 253 INDEX INDEX For navigation system function please also refer to the Navigation system function index on page 10 01955_TNS 510_OM indd 253 21 10 2008 16 19 16 ...

Страница 254: ...lot 182 Cellular phone 129 Change Area size 99 Change Icon 91 Change Location 93 99 Change Name 93 98 Change Phone no 94 Change Quick access 92 Change area 114 Change the route 61 Change the settings of the Bluetooth phone 143 Changing a device name 170 222 Changing the Bluetooth settings 170 223 Changing the map SD memory card 252 Changing the security code 165 Compass mode 35 Compass mode screen...

Страница 255: ...4 Dual map screen 33 E Edit Dealer or Contact 123 Edit Location 123 Edit Phone no 124 Editing a group name 162 Editing a memo 127 Editing area to avoid 97 Editing memory points 90 Editing the data 157 Editing the name 155 Editing the phone number 155 Editing the speed tone 147 Eject button 193 Enter a Bluetooth audio player 215 Enter a Bluetooth phone 132 Equalizer system 187 Estimated arrival tim...

Страница 256: ...Off function 12 18 104 On route button 55 78 One touch scroll 28 Operating a Bluetooth audio player 219 Operating a MP3 WMA disc 197 Operating an audio CD 194 Operating an SD memory card USB memory device 206 Operating a portable audio devices 228 Operating to your iPod 231 OPP Object Push Profile 131 Orientation of the map 36 P Phonebook 153 Phonebook lock 166 Phone no button 14 Playing a Bluetoo...

Страница 257: ...file 200 209 Searching for a desired folder 200 209 Searching for a desired track 196 Searching for the desired music file from the Music menu 234 Searching for the desired music files from direct mode 235 Security code 164 Select RDS TMC station 115 Select user button 17 Selecting a desired file 198 207 Selecting a desired folder 198 207 Selecting a desired track 195 220 Selecting a group icon 16...

Страница 258: ...n list screen 33 66 80 Turning the system on and off 184 Typical voice guidance prompts 67 Tyre change calibration 111 U UK postal code button 14 USB port 182 User selection 86 V Voice guide in all modes 18 107 VOL button 182 184 Volume 85 141 149 184 190 237 Volume button 17 Z Zoom in switch 12 Zoom out switch 12 01955_TNS 510_OM indd 258 21 10 2008 16 19 18 ...

Отзывы: