background image

12

2. Settings

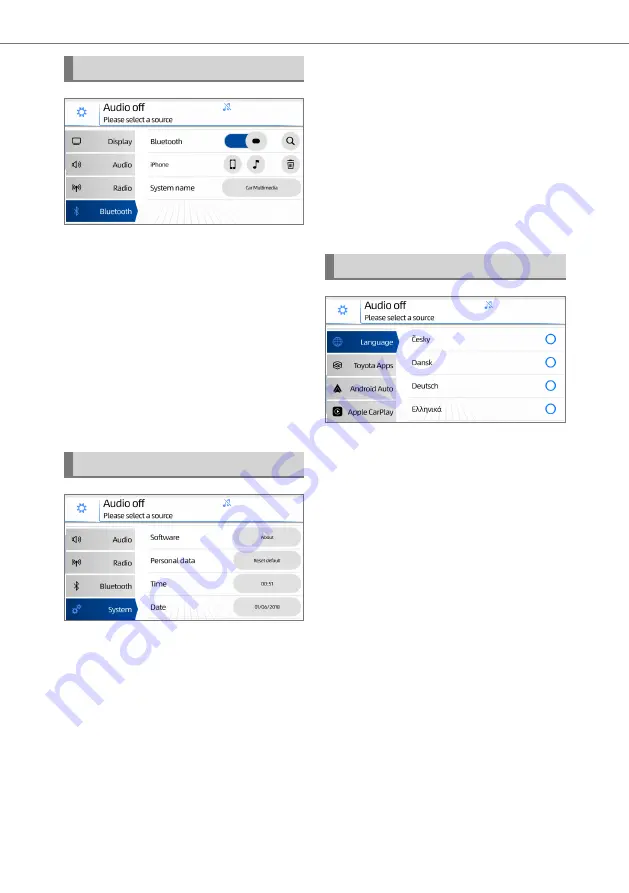
Bluetooth

®

 Settings

The Bluetooth

®

 Settings can be used 

to control the following settings:


z

Turn On/Off Bluetooth

®

 .


z

Search for a new device.


z

Manage existing paired devices.


z

Change the system name for 

Bluetooth

®

 (which appears on the 

phone).

To lean about Bluetooth

®

 pairing, see 

“5. Bluetooth

®

” on page 21.

System Settings

The System settings provides access 

to the following functions:


z

Touch the 

About

 button to view the 

information about the Multimedia 

System. A screen containing the 

software version, serial number 

and the link to the software license 

information will be displayed.


z

Touch the 

Reset Default

 button 

to change all settings to Factory 

Default Settings. This action will 

delete all User Configurations, 

Settings, Device lists and Tuner 

presets and restart the system.


z

Touch the 

Date

 or 

Time

 button to 

adjust the Date and Time values on 

the Multimedia System. The setting 

will be remembered when the unit is 

switched off. The setting will not be 

remembered if the battery supply is 

disconnected. 

Language Settings

The Language settings can be used 

to select the current system lan-

guage.

The selected language will take effect 

immediately and all screens will be 

adjusted to the newly selected lan-

guage.

Содержание TAS500

Страница 1: ...TAS500 Owner s Manual ...

Страница 2: ...TAS500 Owner s Manual ...

Страница 3: ... Settings 10 Equaliser EQ and Balance 10 Beeps 10 Ring Tone 10 Phone Call 11 ASL 11 Radio Settings 11 Bluetooth Settings 12 System Settings 12 Language Settings 12 Toyota Apps 13 Android Auto Settings 13 Apple CarPlay Settings 14 3 AM and FM radio Activating FM AM radio 15 Selecting a radio station 15 Manual Tuning 15 Station List 15 Recalling a preset 15 RDS Radio Data System 16 Alternative Frequ...

Страница 4: ...oth audio files 25 6 Apple CarPlay Requirements 27 Starting Apple CarPlay 27 Exiting Apple CarPlay Screen 28 7 Android Auto Requirements 29 Starting Android Auto 29 Exiting Android Auto 30 8 Toyota Apps Requirements 31 Connecting a device 31 Starting an app 31 9 Updates 10 Rear View Monitor System Screen Description 36 Rear View Monitor Precautions 37 Area displayed on the screen 37 Camera 37 Diff...

Страница 5: ...4 ...

Страница 6: ...phony PHONE 2 Media Source Selection MEDIA AM FM radio iPod USB Bluetooth 3 Projection Applications APPS Toyota Apps SDL Android Auto or Apple CarPlay 4 Device currently connected to Bluetooth Shortcut to Bluetooth set tings 5 Shortcut to Media Source that is currently active 6 Shortcut to Maps application if available 7 Shortcut to Settings 8 Toggle Display On Off 9 Mini Player showing currently ...

Страница 7: ...f the reverse camera is on Long Press greater than 6 seconds Option to restart the Multimedia System Volume Controls Buttons Press the button 2 to adjust the volume Refer to the table below for more information Button Action Action Short Press Decrease Increase volume of current source by one step Long Press Decrease Increase volume of current source continuously until button release or until mini...

Страница 8: ... screen Flick Quickly move the screen by flicking with your finger Scrolling through lists NOTE Do not apply pressure when touch ing the screen Screen damage could result if excessive pressure is applied Only use your fingers to touch the screen Wipe off fingerprints using a soft cleaning cloth Using chemical cleaners may dam age the screen Steering Wheel Controls The Multimedia System can be con ...

Страница 9: ...et station position for radio Select next previous track while playing back USB iPod Bluetooth Audio Pro jection mode content Long Press Perform seek up seek down function for radio Perform fast forward rewind of the current track for USB iPod Bluetooth and Pro jection mode content This requires preset stations to be stored Unassigned preset positions will be skipped Mode Button The Mode button 3 ...

Страница 10: ...ghtness modes z zDisplay brightness z zColour themes Display Brightness Modes There are three modes available Auto Day Night z zThe Auto mode switches the dis play brightness to Day Night auto matically based on the illumination state of the instrument panel If illumination is OFF then Day mode is set and if illumination is ON then night mode is set z zThe Day and Night buttons can be used to sele...

Страница 11: ...cting the preset Custom equalisations for Bass Mid and Treble can be made by dragging the slider up and down Balance Touch and Drag the icon to adjust the sound balance towards the front rear left or right Beeps Beeps will play on the front speakers when you touch on an icon or text label on the screen or when a Steer ing Wheel Control button is pressed z zTouch Low Mid or High to set the beep vol...

Страница 12: ...e func tion off or adjust the sensitivity of the feature z zTouch Low Mid or High to set the strength of the volume adjustment accordingly When the selection is changed the new volume adjust ment strength is immediately applied to the audio output z zTouch Off to turn off ASL Radio Settings The Radio Settings check boxes can be used to enable disable the follow ing settings z zTraffic Announcement...

Страница 13: ...n serial number and the link to the software license information will be displayed z zTouch the Reset Default button to change all settings to Factory Default Settings This action will delete all User Configurations Settings Device lists and Tuner presets and restart the system z zTouch the Date or Time button to adjust the Date and Time values on the Multimedia System The setting will be remember...

Страница 14: ...oyota Apps feature The slider button can be used to turn Toyota Apps ON or OFF Android Auto Settings The Android Auto Settings can be used to control the Android Auto device list When an Android Device is connected to the Multimedia System it is added to this list The slider button can be used to turn Android Auto ON or OFF for a par ticular device If the status is ON Android Auto will be launched...

Страница 15: ...Multimedia System it is added to this list shown in this menu The slider button can be used to turn Apple CarPlay ON or OFF for a par ticular device If the status is ON Apple CarPlay will be launched when the device is connected If the status is OFF the device will be connected as a USB device The device can be deleted by touch ing the icon next to the slider button ...

Страница 16: ...ally Each touch of the keys will change the tuner frequency by one step in the selected direction z zDrag the tuner slider left or right to the desired frequency z zTouch and hold the or icons to perform a seek operation The radio will scroll through the frequencies until a radio station is found Station List Select the Station List key to go to the Station list screen from where you can select th...

Страница 17: ...ing the appropriate stations in a wide region ON mode For switching over to a broadcasting station within the same local program network To enable disable this feature see Radio Settings on page 11 Regionalisation will automatically be deactivated when Alternative Fre quency is disabled Traffic Announcement When enabled the tuner will auto matically seek a station that regularly broadcasts traffic...

Страница 18: ...lection screen 2 The device connected to the USB port will appear on the screen 3 Touch the USB or iPod device under the media source selection screen 1 Touch Library to display the media library folders and con tent Use the touchscreen to scroll up or down through the library to locate your desired folder or track list and select a track to start playback 2 Touch to Play Pause 3 Touch or to play ...

Страница 19: ...ry to display the media library folders and content Use the Touch screen to scroll down through the library to locate the Videos category 2 Touch the Video filename to begin playback 3 Touch the arrow s on the video thumbnail to display the video in full screen mode 4 In full screen mode playback can be controlled via the following icons 1 Touch to return to the pre vious screen 2 Touch to Play Pa...

Страница 20: ...o scroll down through the library to locate the Images category 2 Touch the Image filename to begin playback 3 Touch the arrow s on the image thumbnail to display the image in full screen mode In full screen mode viewing can be controlled via the following icons 1 Touch to return to the pre vious screen 2 Touch or to display the Previous or Next image 1 2 2 ...

Страница 21: ...d IOS Android WMA wma Yes No Yes MP3 mp3 Yes Yes Yes AAC m4a Yes No Yes Video Format Extension Dimension USB iPod IOS Android MPEG4 avi 128 x 96 Yes No No 160 x 120 176 x 144 320 x 240 352 x 240 mp4 128 x 96 Yes No No 160 x 120 176 x 144 320 x 240 352 x 240 Image Extension Dimension USB iPod IOS Android jpg 128 x 96 Yes No Yes 160 x 120 176 x 144 320 x 240 352 x 240 ...

Страница 22: ...ing NOTE Devices must support Bluetooth version 2 1 or higher recommended Ver 4 0 EDR or higher NOTE For a list of devices confirmed to be compatible with your Multimedia System please check with your Toyota dealer Device Pairing To pair your compatible Bluetooth device follow the steps below 1 Touch the settings icon on the HOME screen to display the functions menu 2 Touch on the Bluetooth menu i...

Страница 23: ... from any screen 2 Touch Bluetooth PHONE to display hands free telephony function 3 Touch Dial Pad to display the keypad and enter a number to call 4 Touch to start the call Call using the contact list The contact list synchronizes with the phonebook data of the connected phone To make a call through the contact list 1 Touch Contacts 2 Select the name of the person you want to call The contact det...

Страница 24: ... and select the contact you would like to add 2 Touch and hold on a phone num ber to add the contact to your Favourites Method 2 3 Touch Call List and find the con tact or phone number you would like to add 4 Touch and Hold on the contact in the call list for a prompt to add the contact to your Favourites NOTE A maximum of 10 favourites can be stored To make a call through the favourites list 5 To...

Страница 25: ...splayed 1 Touch to hang up the phone The Mode button on the steering wheel can also be pressed to hang up the phone 2 Touch Mute to mute your voice to the other party The icon will be highlighted during mute mode To cancel muting your voice select this icon again 3 Touch Add to dial a second number 4 Touch Keypad to open the dial pad to send a tone 5 Touch Private to switch from a hands free call ...

Страница 26: ... to call the number or contact directly from the message NOTE Display of text messages will be blocked while the vehicle is in motion Playing Bluetooth audio files The Multimedia System is capable of streaming music from Bluetooth version 2 1 or newer enabled devices To allow this function make sure the device is paired for music via the settings screen Use the following steps to playback audio fr...

Страница 27: ...ocate your desired folder or track list and select a track to start playback Some devices may not support Browsing through Libraries For these devices the Library label will appear inactive greyed out 2 Touch to Play Pause 3 Touch or to play the Previous or Next file 4 Touch to cycle through the Repeat modes 5 Touch to shuffle 6 Touch the Media label to return to the media selection screen 1 7 5 3...

Страница 28: ...nd compat ibility ensure that you use a USB cable certified or approved by the manufacturer A pop up will appear with the option to launch Apple CarPlay for the con nected device Ensure the Parking Brake is engaged and select YES Follow the instructions on the phone to activate and launch Apple CarPlay NOTE Above steps are only required when launching Apple CarPlay from the device the first time T...

Страница 29: ...28 6 Apple CarPlay Exiting Apple CarPlay Screen To exit the Apple CarPlay screen short press the POWER HOME button Apple CarPlay will continue running in the background ...

Страница 30: ...es Android Auto might not be available from Google Play store NOTE To launch Android Auto ensure date is set to the current date in your device and multimedia system Starting Android Auto To use Android Auto device open the USB port cover and connect a compatible device NOTE For best performance and compat ibility ensure that you use a USB cable certified or approved by the manufacturer If the And...

Страница 31: ... be updated to display the Android Auto feature now available Touch the Android Auto icon on the HOME screen to launch Android Auto You can also use the Maps shortcut to open a navigation applica tion directly Exiting Android Auto To exit the Android Auto screen short press the POWER HOME button Android Auto will continue running in the background You can also use the icon to return to the HOME sc...

Страница 32: ...Android Auto disable the device to avoid Apple CarPlay or Android Auto from launching see Android Auto Settings on page 13 and Apple CarPlay Settings on page 14 Open the USB port cover and con nect a compatible device NOTE Android devices must be paired with Bluetooth to enable full functionality NOTE For best performance and compat ibility ensure that you use a USB cable certified or approved by ...

Страница 33: ...32 8 Toyota Apps ...

Страница 34: ...33 9 Updates 9 Updates For software updates please contact your local Toyota Authorized dealer ...

Страница 35: ...34 9 Updates ...

Страница 36: ...re only guidelines When and how much to turn the steering wheel will vary according to traffic conditions road surface conditions vehicle condition etc when parking It is necessary to be fully aware of this before using the rear view monitor system PRECAUTION z z When parking be sure to check that the parking space will accom modate your vehicle before maneuvering into it Do not use rear view moni...

Страница 37: ...e actual vehicle width 2 Vehicle centre guide line This line indicates the estimated vehicle centre on the ground 3 Distance guide line Shows distance behind the vehicle Displays a point approximately 0 5 m 1 5 ft red from the edge of the bumper 4 Distance guide line Shows distance behind the vehicle Displays a point approximately 1 m 3 ft blue from the edge of the bumper The rear view monitor sys...

Страница 38: ...TE The rear view monitor system may not operate properly in the following cases z z If the back of the vehicle is hit the position and mounting angle of the camera may change z z As the camera has a water proof construction do not detach dis assemble or modify it This may cause incorrect operation z z When cleaning the camera lens flush the camera with a large quan tity of water and wipe it with a...

Страница 39: ... guide lines and the left and right dividing lines of the parking space may not be equal even when they appear to be so Be sure to check visually z zThe distance guide lines give a dis tance guide for flat road surfaces In any of the following situations there is a margin of error between the fixed guide lines on the screen and the actual distance course on the road When the ground behind the vehi...

Страница 40: ...s due to the number of passengers or the distribution of the load there is a margin of error between the fixed guide lines on the screen and the actual distance course on the road Approaching three dimensional objects The distance guide lines are dis played according to flat surfaced objects such as the road It is not possible to determine the position of three dimensional objects such as vehicles...

Страница 41: ...dth guide lines In reality if you back up as guided by the vehicle width guide lines the vehicle may hit the truck Distance guide lines Visually check the surroundings and the area behind the vehicle On the screen it appears that a truck is par king at point B However in reality if you back up to point A you will hit the truck On the screen it appears that A is closest and C is farthest away Howev...

Страница 42: ...lly checking the vehicle s sur roundings Use the monitor again once conditions have been improved The image is blurry Dirt or foreign matter such as water droplets snow mud etc is adhering to the camera Flush the camera with a large quantity of water and wipe the camera lens clean with a soft and wet cloth The image is out of alignment The camera or surrounding area has received a strong impact Ha...

Страница 43: ...42 10 Rear View Monitor System ...

Страница 44: ...es default files PV602 EU Declaration on Conformity pdf Harman International Industries Incorporated vakuuttaa että radiolaitteisto jonka mallinumero on PV602 on direktiivin 2014 53 EU mukainen EU n vaatimustenmukaisuusvakuutuksen teksti on kokonaisuudessaan saatavilla seuraavasta internetosoitteesta https www harman com sites default files PV602 EU Declaration on Conformity pdf Par la présente Ha...

Страница 45: ...rman International Industries Incorporated заявляет что радиооборудование модели PV602 соответствует требованиям директивы 2014 53 EU Полный текст декларации соответствия ЕС доступен по следующему адресу в Интернете https www harman com sites default files PV602 EU Declaration on Conformity pdf Spoločnosť Harman International Industries Incorporated týmto vyhlasuje že rozhlasové zariadenie model č...

Страница 46: ...PW600 0D001 EN AOM 001 685 0 ...

Отзывы: