background image

3

SAFETY PRECAUTIONS

3

 1.  Your Slow Ride EP should not be considered a toy, but 

rather a sophisticated, working model that functions very 
much like a full-size airplane. Because of its performance 
capabilities, this model, if not assembled and operated 
correctly, could possibly cause injury to yourself or 
spectators and damage to property.

 2.  You must assemble the model according to the instructions. 

Do not alter or modify the model, as doing so may result in 
an unsafe or unflyable model. In a few cases the instructions 
may differ slightly from the photos. In those instances the 
written instructions should be considered as correct.

 3.  You must take time to 

build straight, true and strong

.

 4.  You must use an R/C radio system that is in first-class 

condition.

 5.  You must correctly install all R/C and other components 

so that the model operates correctly on the ground and 
in the air.

 6.  You must check the operation of the model before every 

flight to ensure that all equipment is operating and that 
the model has remained structurally sound. Be sure to 
check clevises or other connectors often and replace 
them if they show any signs of wear or fatigue.

 7.  If you are not an experienced pilot or have not flown this 

type of model before, we recommend that you get the 
assistance of an experienced pilot in your R/C club for 
your first flights. If you’re not a member of a club, your 
local hobby shop has information about clubs in your area 
whose membership includes experienced pilots.

 8. 


IMPORTANT:

 While this ARF has been flight tested to 

exceed normal use with the recommended power system 
components, the structure of the plane was purposely 
designed to be light weight. This results in a plane that 
is not as durable as most models. Also be careful when 
handling the plane. 

We recommend that you do not fly 

at full throttle and apply full 3D throws.

 This plane will 

perform excellent 3D maneuvers flying slowly. 

We, as the ARF manufacturer, provide you with a top 

quality, thoroughly tested plane and instructions. But, 

ultimately the quality and flyability of your finished model 

depends on how you build it. Therefore, we cannot in 

any way guarantee the performance of your completed 

model, and no representations are expressed or implied 

as to the performance or safety of your completed model.

REMEMBER:

 Take your time and follow the instructions 

to end up with a well-built model that is straight and true.

As the user of this product, you are solely responsible for 

operating in a manner that does not endanger yourself and 

others or result in damage to the product or the property 

of others.

  Always keep a safe distance in all directions around 

your model to avoid collisions or injury. This model is 

controlled by a radio signal subject to interference from 

many sources outside your control. Interference can 

cause momentary loss of control.

  Always operate your model in open spaces away from 

full-size vehicles, traffic and people.

  Always carefully follow the directions and warnings for 

this and any optional support equipment (chargers, 

rechargeable battery packs, etc.).

  Always keep all chemicals, small parts and anything 

electrical out of the reach of children.

  Always avoid water exposure to all equipment not 

specifically designed and protected for this purpose. 

Moisture causes damage to electronics.


  Never place any portion of the model in your mouth as 

it could cause serious injury or even death.

  Never operate your model with low transmitter batteries.

  Always keep aircraft in sight and under control.

  Always use fully charged batteries.

  Always keep transmitter powered on while aircraft is 

powered.

  Always remove batteries before disassembly.

  Always keep moving parts clean.

  Always keep parts dry.

  Always let parts cool after use before touching.

  Always remove batteries after use.

  Always ensure failsafe is properly set before flying.

  Never operate aircraft with damaged wiring.

  Never touch moving parts.

Protect Your Model, Yourself & Others…

Follow These Important Safety Precautions

58575.1 TOWA2042 Slow Ride Manual Update.indd   3

5/22/18   9:31 AM

Содержание Slow Ride

Страница 1: ...onsible manner could result in injury or damage to the product or other property This product is not intended for use by children without direct adult supervision Do not use with incompatible components or alter this product in any way outside of the instructions provided by Horizon Hobby LLC This manual contains instructions for safety operation and maintenance It is essential to read and follow ...

Страница 2: ...e right way There are over 2 500 AMA chartered clubs across the country Contact the AMA at the address or toll free phone number below Academy of Model Aeronautics 5151 East Memorial Drive Muncie IN 47302 9252 Ph 800 435 9262 Fax 765 741 0057 Or via the Internet at www modelaircraft org IMPORTANT Two of the most important things you can do to preserve the radio controlled aircraft hobby are to avo...

Страница 3: ...RF manufacturer provide you with a top quality thoroughly tested plane and instructions But ultimately the quality and flyability of your finished model depends on how you build it Therefore we cannot in any way guarantee the performance of your completed model and no representations are expressed or implied as to the performance or safety of your completed model REMEMBER Take your time and follow...

Страница 4: ...the motor in an area of loose gravel or sand the propeller may throw such material in your face or eyes NEVER touch the motor during or right after operation The motor gets HOT NEVER switch off the transmitter with the motor batteries plugged in NEVER reach through the arc of the propeller when plugging the battery into the ESC WARNING A spinning propeller has the potential to cause serious and pe...

Страница 5: ...peak charger to charge a LiPo battery NEVER charge in excess of 4 20V per cell unless the battery is rated for a higher voltage NEVER charge at currents greater than 1C unless the battery is rated for a higher charge rate NEVER trickle charge a LiPo battery NEVER allow the battery temperature to exceed 140 degrees F 60 degrees C NEVER disassemble or modify the pack wiring in any way or puncture th...

Страница 6: ... EP CA Debonder GPMR6039 Robart Super Stand II ROBP1402 Servo Horn Drill HCAR0698 Precision Magnetic Prop Balancer TOPQ5700 Radio Components 4 Channel Transmitter minimum Four mini servos with 84 oz in 6 1 kg cm Two 12 16 305 406mm servo extensions Two 20 24 508 mm 610 mm servo extensions 1 7 16 36mm 5 8 16mm Electric Power 42 40 800 BL Motor 60 75 Amp Brushless ESC 3S 4S 2100 4000mAh 25C LiPo Bat...

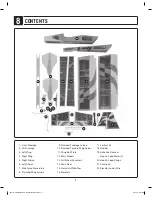
Страница 7: ...rators 8 Plywood Wing Joiners 9 Plywood Fuselage Joiners 10 Plywood Forward Wing Joiner 11 Wing Bolt Plate 12 Main Wheels 13 Tail Wheel Assembly 14 Main Gear 15 Horizontal Stabilizer 16 Elevators 17 Vertical Fin 18 Rudder 19 Adhesive Backed Hook Loop Material 20 Hook Loop Straps 21 Pushrods 22 Elevator Joiner Wire 58575 1 TOWA2042 Slow Ride Manual Update indd 7 5 22 18 9 31 AM ...

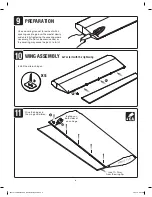
Страница 8: ...ght wing Use a covering iron set to low heat with a covering sock to go over the model slowly and carefully tightening the covering where necessary Do Not use excessive heat or the covering may cause the parts to twist Install the aileron hinges Glue the hinges in the wing and aileron 58575 1 TOWA2042 Slow Ride Manual Update indd 8 5 22 18 9 31 AM ...

Страница 9: ... hardware included with servo Right Aileron Servo Left Aileron Servo 5 64 2mm Use heat shrink tubing or tape to secure plugs 1 16 1 5 mm Tie string to the servo extension and pull through the wing 12 13 Prepare the aileron servos Install the aileron servo Use the hardware included with the servo 58575 1 TOWA2042 Slow Ride Manual Update indd 9 5 22 18 9 31 AM ...

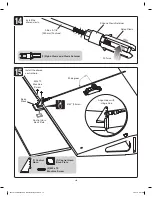
Страница 10: ...Turns 90 degrees 3 32 2 5mm Control Horn Back Plate Balsa Block M2x12 Machine Screw 1 Control Horn 1 Control Horn Back Plate 2 M2 x 12 Machine Screw Align Holes with Hinge Line 14 15 Install the aileron clevis Install the aileron control horn 58575 1 TOWA2042 Slow Ride Manual Update indd 10 5 22 18 9 31 AM ...

Страница 11: ...ake a 90 degree bend and trim to 1 4 6mm Connect the aileron pushrod to the aileron servo arm using a Faslink Return to step 1 and assemble the left wing 1 2 12mm 2 6 x40 mm Wing Dowel 18 JOIN THE WING PANELS Install the wing dowels 58575 1 TOWA2042 Slow Ride Manual Update indd 11 5 22 18 9 31 AM ...

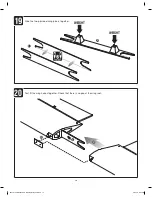
Страница 12: ...EIGHT WEIGHT 1 3 2 19 20 Glue the two plywood wing joiners together Test fit the wing halves together Check that there is no gap at the wing root 58575 1 TOWA2042 Slow Ride Manual Update indd 12 5 22 18 9 31 AM ...

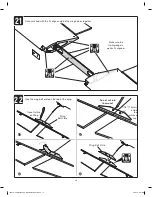
Страница 13: ...ing Do not cut into the wood Wing Bolt Plate 21 22 Once satisfied with the fit align and glue the wing halves together Make sure the trailing edge is perfectly aligned Glue the wing bolt plate on the top of the wing 58575 1 TOWA2042 Slow Ride Manual Update indd 13 5 22 18 9 31 AM ...

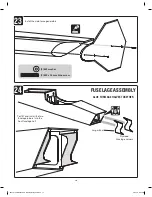
Страница 14: ...elage Joiners Larger End 23 24 Install the side force generators FUSELAGE ASSEMBLY GLUE FUSELAGE HALVES TOGETHER Test fit and install the two fuselage joiners into the front fuselage half 58575 1 TOWA2042 Slow Ride Manual Update indd 14 5 22 18 9 31 AM ...

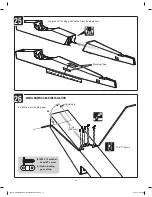
Страница 15: ...asher head ST screw 90º 1 16 1 5mm 9 3 4 248 mm 9 3 4 248mm Centerline 25 26 Glue the aft fuselage half to the front fuselage half MAIN LANDING GEAR INSTALLATION Install the main landing gear 58575 1 TOWA2042 Slow Ride Manual Update indd 15 5 22 18 9 31 AM ...

Страница 16: ... 1 2 Bottom of Horizontal Stabilizer 3 x 15mm Dowel Do not cut through the covering on the top Top of Horizontal Stabilizer 2 3 x 15mm Dowel 28 TAIL SURFACE INSTALLATION Test fit the horizontal stabilizer on the fuselage 58575 1 TOWA2042 Slow Ride Manual Update indd 16 5 22 18 9 31 AM ...

Страница 17: ...o not cut into the wood Install the wing and view the plane from the back If the horizontal stabilizer is not parallel to the wing lightly sand the high side of the fuselage stabilizer seat checking the fit of the stabilizer often Use 6 minute epoxy to glue the horizontal stabilizer to the fuselage 58575 1 TOWA2042 Slow Ride Manual Update indd 17 5 22 18 9 31 AM ...

Страница 18: ...the elevator joiner wire together Check that both elevator halves are aligned If they are not adjust the bend in the elevator joiner wire until the elevator halves are aligned Glue the elevators with joiner wire installed to the horizontal stabilizer Install the vertical fin 58575 1 TOWA2042 Slow Ride Manual Update indd 18 5 22 18 9 31 AM ...

Страница 19: ...19 1 2 3 4 1 X3 6 Drops Each Side 34 35 Install the tail gear Install the rudder 58575 1 TOWA2042 Slow Ride Manual Update indd 19 5 22 18 9 31 AM ...

Страница 20: ...k tubing or tape to secure plugs 36 37 INSTALL THE ELEVATOR AND RUDDER SERVOS AND RECEIVER Assemble the elevator and rudder servo Cut a 20mm long piece of adhesive backed hook and loop material Mount the receiver to the fuselage floor with the piece of hook and loop material 58575 1 TOWA2042 Slow Ride Manual Update indd 20 5 22 18 9 31 AM ...

Страница 21: ...inner edge of the elevator 38 39 Install the elevator servo in the fuselage with the screws included with the servo Install the elevator push rod and control horn following the same procedure used to install the aileron push rods Plug the elevator servo leads into the elevator channel of your receiver 58575 1 TOWA2042 Slow Ride Manual Update indd 21 5 22 18 9 31 AM ...

Страница 22: ...he same as the elevator servo and pushrod Plug the rudder servo lead into the rudder channel of your receiver 4 M3 x12 Machine Screws 4 M3 Flat Washer 41 MOTOR INSTALLATION Install the motor on the front of the fuselage 58575 1 TOWA2042 Slow Ride Manual Update indd 22 5 22 18 9 31 AM ...

Страница 23: ...throttle channel of the ESC Follow the instructions included with your ESC to arm it Advance the throttle and check the rotation of the motor It should rotate counterclockwise when viewed from the front If it is rotating in the wrong direction switch two of the motor wires Disconnect the motor battery and switch off the transmitter Install the remaining adhesive backed hook and loop strip to the b...

Страница 24: ...24 1 25mm Battery Strap 44 45 From the non adhesive backed hook and loop material make a battery strap Install the battery strap 58575 1 TOWA2042 Slow Ride Manual Update indd 24 5 22 18 9 31 AM ...

Страница 25: ...als using the same method 47 GET THE MODEL READY TO FLY APPLY THE DECALS Check the Control Directions CAUTION DO NOT install the propeller until instructed to do so 1 Temporarily install the wing with the aileron servos connected Switch on the transmitter with the throttle stick in the lowest position and connect the flight battery to the ESC Center the trims on the transmitter and the servo arms ...

Страница 26: ...ransmitter Check the fail safe by switching off the transmitter with the motor battery connected to the ESC and the motor running at a slow speed The motor must stop running when the transmitter is switched off Once you have determined that it is operating correctly switch off the receiver or unplug the motor battery and then switch off the transmitter ELEVATOR HIGH RATE LOW RATE 2 3 8 60mm 24 Up ...

Страница 27: ...ler 2 Install the propeller prop washer and washer and prop nut 1 Bolt the wing on the fuselage with the two 8 32 x 1 1 2 38mm nylon wing bolts 2 Install the flight battery but DO NOT plug it into the ESC Install the battery hatch cover 58575 1 TOWA2042 Slow Ride Manual Update indd 27 5 22 18 9 31 AM ...

Страница 28: ...s installed but not plugged in use a Great Planes C G Machine or apply narrow 1 16 2mm strips of tape at the front and rear C G locations Lift the model between the strips of tape with your fingers to check the C G location Do not balance the model outside this C G range 3 First move the flight battery forward or aft to adjust the C G location If the plane still balances outside the range use Grea...

Страница 29: ...ound Check and Range Check Follow the radio manufacturer s instructions to ground check the operational range of your radio before the first flight of the day This should be done once with the motor off and once with the motor operating at various speeds If the control surfaces do not respond correctly do not fly Find and correct the problem first Look for loose servo connections or broken wires c...

Страница 30: ... landing approaches by reducing the throttle to see how the model handles at slower speeds Add power to see how she climbs as well Continue to fly around executing various maneuvers and making mental notes of what trim or C G changes may be required to fine tune the model so it flies the way you like Mind your flight time but use this first flight to become familiar with your model before landing ...

Страница 31: ... State Zip Phone Number FAA Number AMA Number 9 12 13 18 45 24 50 60 AILERONS LOW RUDDER LOW RUDDER HIGH RUDDER 3D ELEVATOR 3D ELEVATOR HIGH AILERONS HIGH AILERONS 3D ELEVATOR LOW 58575 1 TOWA2042 Slow Ride Manual Update indd 31 5 22 18 9 31 AM ...

Страница 32: ...ce For questions or assistance please visit our website at www horizonhobby com submit a Product Support Inquiry or call the toll free telephone number referenced in the Warranty and Service Contact Information section to speak with a Product Support representative Inspection or Services If this Product needs to be inspected or serviced and is compliant in the country you live and use the Product ...

Отзывы: