Touch Dynamic Lite FS100 Скачать руководство пользователя страница 9


Chapter 1 — Welcome  


Features  

This


POS


terminal


comes


equipped


with


the


following


features:


Noise

free


The


fan

less,


noise


free


design


of


the


FS100


is


ideal


for


noise

intolerant


environment.


Low


power


ULV


(Ultra


Low


Voltage)


design


of


the


device


is


consumption


embedded


with


a


unique


chip


set


and


CPU


renders


power


saving


function.


Saving


cost


of


Modular


design


provides


the


owner


with


the


ownership


following


benefits:


(a)


cost


effectiveness,


(b)


customization


flexibility,


and


(c)


easy


maintenance.


Compact


size/


Slimmest


in


the


POS


industry


standard


(24


mm).


Aesthetic


This


elegant,


economic


POS


system


features


a


sleek,


design


compact


design


base


that


saves


counter


space


and


adds


appeal


to


the


service


environment.


Dust/water


FS100


series


features


a


highly


durable,


proof


rigorously


tested


design


that


is


reliable


and


dependable


in


rugged


environments.


WEPOS/XPE


Solution


is


recommended


to


be


bundled


with


solution


embedded


solution


for


high


performance


and


other


added


values.


Environment


Environmental


friendly,


RoHS


compliant


product.


protection


Higher


The


FS100


has


a


longer


overall


system


stability


MTBF


to


provide


a


higher


stability


during


operation.


4  

Содержание Lite FS100

Страница 1: ...FS100 All in One System Lite Pro User s Manual...

Страница 2: ...ly before using the product Keep the box and packaging in case the product needs to be shipped in the future Follow the product and warning label instructions Any changes or modifications that do not...

Страница 3: ...he equipment from overheat Do not leave the equipment in a non air conditioned environment where the storage temperature may go above 60 C 140 F as this can cause damage to the equipment Maintenance G...

Страница 4: ...er there is no guarantee that interference will not occur in a particular installation If this equipment does cause harmful interference to radio or television reception which can be determined by swi...

Страница 5: ...e Installation 8 Installing the Adapter and Internet for Lite type 8 Installing the Adapter and Internet for Pro type 9 Installing the Customer Display for Lite type 10 Installing the Customer Display...

Страница 6: ...of FS100 Lite Counter space saver Model CPU Chipset HDD Storage devices Pro Powerful expansion capability Dual display for advertising FS100 Lite Pro VIA Eden GHz Fan less VIA CN700 8237R 2 5 x 1 2 5...

Страница 7: ...er I O Ports Lite Pro DESCRIPTION 1 Line Out 2 LAN port 3 USB port x 2 4 COM 3 5 CF Card slot 6 2nd VGA port Pro only 7 K B M S Combo port 8 24V DC input Lower I O Ports Pro only DESCRIPTION 1 Powered...

Страница 8: ...ightness Press the Brightness and Brightness button to active the 4 Brightness adjustment mode then press Brightness and Brightness button for brightness adjustment The setting will be saved after rel...

Страница 9: ...asy maintenance Compact size Slimmest in the POS industry standard 24 mm Aesthetic This elegant economic POS system features a sleek design compact design base that saves counter space and adds appeal...

Страница 10: ...ur vendor immediately FS100 Touch Customer Display Terminal optional AC Power Cord Power Adapter Accessory Package 2nd Customer Display optional Magnetic Stripe Reader optional 1 Screws black for MSR...

Страница 11: ...9 810x family network adapter The Terminal has be built in the PXE Boot ROM function within the BIOS to execute Boot ROM already 4 For installation and compatibility using the DDR RAM Module from the...

Страница 12: ...ower Connector DC Plug DC 24V Printer Power Connector Hosiden 3PIN Note Location LCD Panel Side LCD Panel Side LCD Panel Side On Mother Card Bottom side On Interface Board Bottom side On Interface Boa...

Страница 13: ...the adapter and Internet cable for Lite type do the following 1 Connect the Internet RJ 45 cable and the power cable to the connectors and arrange the cables in the clamps as shown RJ 45 Power adapte...

Страница 14: ...cable clamps from the accessory package and attach them to the position as shown Connect the Internet RJ 45 cable and the power cable to the connectors and arrange the cables in the clamps RJ 45 conn...

Страница 15: ...screws 3 Attach the Customer Display to the base of the FS100 Terminal with two M3 screws 4 Lock the Customer Display to the customer display pole bracket with two M3 screws Installing the Customer Di...

Страница 16: ...le in the clamp as shown DB 15 connector Cable clamp 2 Replace the base cover Connect one end of the DC 12V adapter cable to the base and allow the other end of the cable pass through the hole on the...

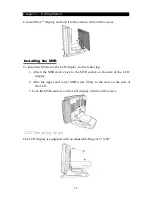
Страница 17: ...the LCD display do the following 1 Attach the MSR device jack to the MSR socket on the side of the LCD display 2 Affix the upper and lower MSR wires firmly to the slots on the side of the LCD 3 Lock t...

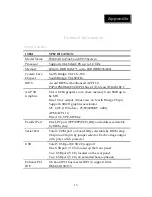
Страница 18: ...l VGA output Dual view on North Bridge Chips Supports 3D 2D graphics accelerator NT 4 0 5 0 Windows 95 98 2000 XP utility APM ACPI 1 0 Direct 9 0 VPE MPEG2 Parallel Port One LPT port SPP EPP ECP IRQ a...

Страница 19: ...act switch ATX Trigger below the LCD Control display with bottom Ethernet Port Realtek RTL8100C Ethernet chip on board 10 100 Mbps Intel Ethernet chips on board 10 100 base T Gigabyte Auto extendible...

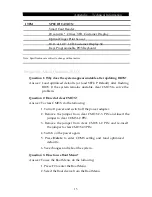
Страница 20: ...stem remains unstable clear CMOS to solve the problem Question 2 How do I clear CMOS Answer To clear CMOS do the following 1 Turn off power and switch off the power adapter 2 Remove the jumper from cl...

Отзывы: