Toto Washlet C110 SW523 Скачать руководство пользователя страница 12

23

22

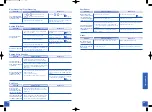
Remove the water filter.

To access the “junction valve” filter, the
junction valve cover must be removed. Use a
large flathead screwdriver or coin and turn the
valve cover counter-clockwise.

Place a container underneath the junction
valve. After removing the junction valve cover,
gently pull the filter out.

Clean the filter.

Remove sediment from the filter using a
toothbrush.

Insert the junction valve cover with
filter.

Push the junction valve cover with filter into
the junction valve and turn it clockwise.

Be sure to tighten it securely.


Junction Valve Cover

(turn clockwise to reset)

Open the water shut off valve and
junction valve.

Open the junction valve with a flathead
screwdriver.

Make sure that there is no water leaking from
the water filter with drain valve or from the
junction valve cover.
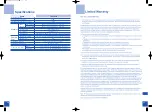
Maintenance

Cleaning the Water filter with drain valve.

If you feel as though the water pressure has weakened, clean the water filter with drain valve.

Turn off the water shut off valve and the
junction valve.

Please close the water shut off valve and the junction
valve with a flathead screwdriver.

Turn the toilet tank lever and run the water out of the tank.
(This will relieve pressure in the water supply hose.)

Press       to let the nozzle extend and press      again (to
release the pressure from the water supply pipe).

• Do not remove the water filter with

drain valve when the water shut
off valve and the junction valve
are opened.

• Other wise, water will gush out.

Prohibited

Caution

Tighten the water filter with
drain valve securely. 
• Failure to tighten it securely

could result in leaks.

Mandatory

Caution

Remove the water filter with drain
valve.

After loosening the water filter with drain valve

with a flat head screwdriver pull on it to remove
it from the main unit.

Clean.

Wash and remove sediment blocking the filter
with water.

For fine sediment, use a toothbrush or similar
implement in order to remove everything completely.
Please use a cotton swab or similar implement to
remove sediment that is caught in the hole for the
water drain valve (with water filter).

Install the water filter with drain valve.

Push the water drain valve (with water filter) into
place and tighten securely using a flathead
screwdriver.

1

Cleaning the filter
• Please use plain water (without detergent) for washing.
• Do not remove or break the filter.
• If the filter becomes extremely dirty, we recommend that you replace it with a new one.

1


filter holder


 D08248-2  09.1.9 2:04 PM  ページ 22

Содержание Washlet C110 SW523

Страница 1: ...e Features Parts and Features Before Using the Washlet 2 6 7 8 9 10 Introduction How to Use the Washlet For Best Results Adjusting the Temperature Turning Off the Water or Seet Heaters Energy Saving F...

Страница 2: ...lectrical cords may result in a short circuit electrical shock or fire Do not crack bend twist or pull the cords Do not treat or heat the cords or place heavy objects on top of them Do not use a loose...

Страница 3: ...24 for instructions on how to prevent frozen pipes To prevent sudden water leakage do not remove the water filter with drain valve when the water shutoff valve is open Refer to Page 22 for instructio...

Страница 4: ...n should be made by qualified service personnel If it is necessary to use an extension cord use only a three wire extension cord that has a three blade grounding plug and a three slot receptacle that...

Страница 5: ...he water toilet seat and warm air dryer 12 13 Seat sensor The sensor detects when someone sits on the toilet seat Soft Close Gently lowers the toilet seat and lid Timer Energy Saver Conserve energy by...

Страница 6: ...or ON OFF and temperature control of the toilet seat and water please refer to the Temperature Control Method in page 12 2 Sit back on the toilet seat By so doing you can wash easily in position and w...

Страница 7: ...lights also goes out 4 The temperature adjustment lights and the display lights turn on 1 2 The temperature adjustment light turns on and the current temperature level is displayed The temperature adj...

Страница 8: ...When the Timer Energy Saver is on the ENERGY SAVER LED green will light up on the Washlet main unit operation panel When you want to change the Timer Energy Saver start time first shut off the Timer E...

Страница 9: ...clean Many of the functions will not work if it becomes dirty Cleaning very dirty components Wet a soft cloth with diluted dish detergent mild alkaline and wipe down the Washlet surfaces Then wipe off...

Страница 10: ...ve force to them They may break Clean the Washlet main unit toilet seat and lid Follow the procedures shown in Daily Care and Maintenance on page 17 Pull directly upwards with both hands Pull directly...

Страница 11: ...ght side of the Washlet main unit and pull it forward Do not pull the connection hose or power cord with force when removing the Washlet main unit Clean Remove any dust that is on the blades of the pl...

Страница 12: ...er and run the water out of the tank This will relieve pressure in the water supply hose Press to let the nozzle extend and press again to release the pressure from the water supply pipe Do not remove...

Страница 13: ...the lid Keep the inside of Washlet warm 1 When freezing temperatures are anticipated Please do not use the power saving features The product could be damaged by freezing See page 15 about stopping the...

Страница 14: ...the water flow out from the nozzle 1 If no water flows out because the remaining water froze warm the inside of the toilet and also warm the supply hose and the water shutoff valve using a cloth soak...

Страница 15: ...on the seat and lid the seat and lid close too quickly Due to the added weight of the cover the seat and lid close more quickly This is not a malfunction Due to changes in room temperature or the freq...

Страница 16: ...31 30 1 888 295 8134 Contents 0 0 1 2 3 4 5 2 1 6 7 6 7 6 3 8 3 6 7 6 7 6 3 8 3 9 2 9 3 5 1 71 3 5 1 5 5 5 1 5 1 8 5 1 5 1 8 1 8 1 12 5 8 1 5 Items Specifications D08248 2 09 1 9 2 04 PM 30...

Отзывы: