background image

8

ENGLISH

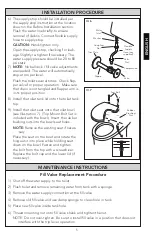
MAINTENANCE INSTRUCTIONS

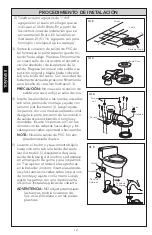
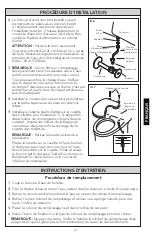
1)  Shut off the water supply.
2)     Flush the toilet to remove the water 

inside the tank.

3)  Remove the tank lid and place 

somewhere safe.


NOTE: 

Before removing anything 

from the tank, note the placement 
of the drain valve, chain and refill 
tube.

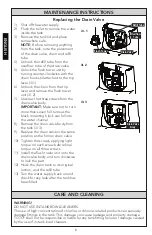
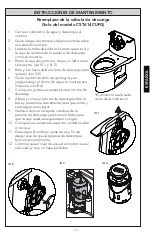
4)  Unhook the refill tube from the 

overflow tube of the drain valve.

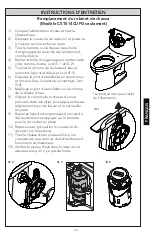
5)  Unlock the flush tower unit by 

turning counter-clockwise with the 
chain hook still attached to the trip 

lever (ill.1).

6)  Unhook the chain from the trip 

lever and remove the flush tower 
unit (ill. 2).

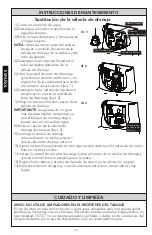
7)  Unscrew the three screws from the 

drain valve body. 

IMPORTANT: 

Make sure not to turn 

more than seven full turns as the 
black mounting block can fall into 
the water channel.

8)  Remove the drain valve body from 

the tank (ill. 3). 

9)     Replace the drain valve in the same 

position as the former drain valve.

10)  Tighten the screws, applying light 

torque on each screw before final 
torque on all three screws.

11)  Install the flush tower unit onto the 

drain valve body and turn clockwise 
to lock the part.

12)  Hook the chain back to its original 

loction, and the refill tube.

13)  Turn the water supply back on and 

check for any leak after the tank has 
been filled.

Flush Tower

Drain Valve

Refill Tube

ill. 1

ill. 2

ill. 3

Drain Valve

Body

Overflow 

Tube

WARNING!


DO NOT USE IN-TANK BOWLCLEANERS.

The use of high concentration of chlorine or chlorine-related products can seriously 

damage fittings in the tank. This damage can cause leakage and property damage. 

TOTO

®

 shall not be responsible or liable for any tank fitting failure or damage caused 

by the use of in-tank bowl cleaners.

CARE AND CLEANING

Replacing the Drain Valve

Содержание MS614114CEF

Страница 1: ...icy or coverage please con tact TOTO U S A Inc Customer Service Department 1155 Southern Road Morrow GA 30260 888 295 8134 or 678 466 1300 when calling from outside of U S A Installation Manual Manual...

Страница 2: ...eplacement Parts 27 Check to make sure you have all these parts from the package COMMON TOOLS NEEDED INCLUDED PARTS 12 pipe wrench 10 adjustable wrench Carpenter s Level Tape Measure Plier MATERIALS R...

Страница 3: ...ure that you have the correct outlet connection part 2 The water supply must be approximately 8 inches or 10 inches to the left facing the bowl from the center line of the closet flange and approximat...

Страница 4: ...en bolts an additional turn Secure the back side of the outlet connection to the floor using the 4 screws and wash ers Insert the T bolts into the slots with the head down and threaded shank pointed u...

Страница 5: ...bowl Insert the rubber bushing nuts into the bowl seat holes NO TE Remove the existing seat if neces sary Place the seat on the bowl and rotate the hinge unit into place while holding seat down on th...

Страница 6: ...justments The fill valve has been preset at the factory Top of Overflow Tube Water Level Ill 1 Fill Valve Replacement Procedure continued 7 Connect water supply to fill valve shank and hand tighten on...

Страница 7: ...ove it see Ill 3 6 Remove the grey rubber seal gasket and rinse under running water to clean see Ill 4 7 Place the gasket back on the ush tower 8 Align and place the ush tower into hous ing and gently...

Страница 8: ...he drain valve body from the tank ill 3 9 Replace the drain valve in the same position as the former drain valve 10 Tighten the screws applying light torque on each screw before final torque on all th...

Страница 9: ...ase is required TOTO encourages warranty registration upon purchase to create a record of Product ownership at http www totousa com Product registration is completely voluntary and failure to register...

Страница 10: ...e de que tiene todas las piezas del empaque Llave para Tuber a de 12 Llave Adjustable de 10 Nivel de Carpintero Cinta para Medir Pinzas Destornillador MATERIALES NECESARIOS Tubo Abastecedor Conector T...

Страница 11: ...rado 9 7 11 Aseg rese de tener la parte de conexi n de salida correcta 2 El suministro de agua debe estar a aproximadamente 8 10 pulgadas mirando de frente al recipiente desde la l nea del centro de l...

Страница 12: ...ego ajuste los pernos con una media vuelta adicional Asegure la parte posterior de la conexi n de salida al piso utilizando 4 tornillos y arandelas Inserte los pernos en T en las ranuras con las cabez...

Страница 13: ...ente Inserte las tuercas revestidas de goma en los orificios del asiento del recipiente NO TA retire el asiento existente si fuera necesa rio Coloque el asiento sobre el recipiente y gire la unidad de...

Страница 14: ...llenado Esto es NORMAL y las gotas dejar n de caer Ajuste del nivel del agua Dependiendo de la planta de fabricaci n usted debe tener una o ambas de las siguientes v lvulas de llenado Tipo A Tipo B Wa...

Страница 15: ...bajo el chorro de agua corriente para limpiarla ver Ill 4 7 Coloque la junta nuevamente sobre la torre de descarga 8 Alinee y coloque la torre de descarga sobre la base y presi nela suavemente para q...

Страница 16: ...del tanque ilust 3 9 Sustituya la v lvula de drenaje coloc ndola en la misma posici n que la v lvula de drenaje anterior 10 Ajuste los tornillos aplicando torsi n ligera sobre cada tornillo antes de...

Страница 17: ...uir sus derechas de garant a limitada 5 ESTA GARANT A LE DA DERECHOS LEGALES ESPEC FICOS USTED PODR ATENER OTROS DERECHOS QUE PUEDEN VARIAR DEPENDIENDO DEL ESTADO O PROVINCIA EN EL QUE SE ENCUENTRE 6...

Страница 18: ...ue vous avez toutes ces parties de l emballage PI CES INCLUSES Cl Tube de 12 po Cl Molette de 10 po Niveau Bulle d Air M tre Ruban Pince MATERIEL REQUIS Tuyau d alimentaion Raccord Robinet d Arr t Bou...

Страница 19: ...ce de raccord de sortie 2 L alimentation en eau doit se situer environ 8 po ou 10 po face la cuvette depuis la ligne centrale de la bride de sol et environ 4 1 2 po au dessus du sol 1 Nettoyez la bri...

Страница 20: ...Puis serrez les boulons d un demi tour suppl mentaire Fixez la par tie arri re du raccord de sortie au sol l aide des 4 vis et rondelles Ins rez les boulons en T dans les fentes t te en bas et pointe...

Страница 21: ...ague en caoutchouc dans les orifices du si ge de la cuvette des toillettes REMARQUE Retirez la lunette existante si n cessaire Placez la lunette sur la cuvette et faire tourner la charni re pour la po...

Страница 22: ...age Ceci est NORMAL et s arr tera rapidement R glage de niveau d eau Suivant l usine de fabrication vous pouvez disposer de l un ou deux robinets de rem plissage suivants Type A Type B Water Level Pou...

Страница 23: ...z l eau courante pour nettoyer voir Ill 4 7 Replacez le joint d tanch it sur la colonne de la chasse d eau 8 Alignez la colonne de la chasse d eau et placez la dans le bo tier puis appuyez dessus l g...

Страница 24: ...a m me position que l ancienne valve du drain 10 Serrez les vis en exer ant un serrage l ger sur chaque vis avant le serrage final des trois vis 11 Installez l unit de la chasse d eau sur le corps de...

Страница 25: ...volontaire et d faut de l enregistrement ne va pas limiter votre droit au garantie limit e 5 CETTE GARANTIE DONNE DES DROITS SP CIFIQUES IL EST POSSIBLE QUE L ACHETEUR AIT D AUTRES DROITS QUI VARIENT...

Страница 26: ...3 16 MS644114CEF G 28 3 4 16 1 8 25 5 8 16 1 2 MS874114S G 28 15 27 1 2 16 1 2 MS884114 28 15 23 3 4 16 1 2 MS904114 29 1 2 15 23 1 2 21 1 4 MS934214 S E F 28 1 8 16 1 8 27 1 2 18 5 8 MS934304 S E F 2...

Страница 27: ...cement Parts for Flapper Type Drain Valve Replacement Parts for Tower Type Drain Valve Flapper Tap n Clapet THU499S THU499S 9BU094 THU499S THU499S THU499S THU499S THU499S THU499S THU499S N A Model Mod...

Страница 28: ...quiry For product warranty registration TOTO U S A Inc recommends online warranty registration Please visit our web site http www totousa com If you have questions regarding warranty policy or coverag...

Отзывы: