background image

17

SETTING UP YOUR TV

Engl

ish

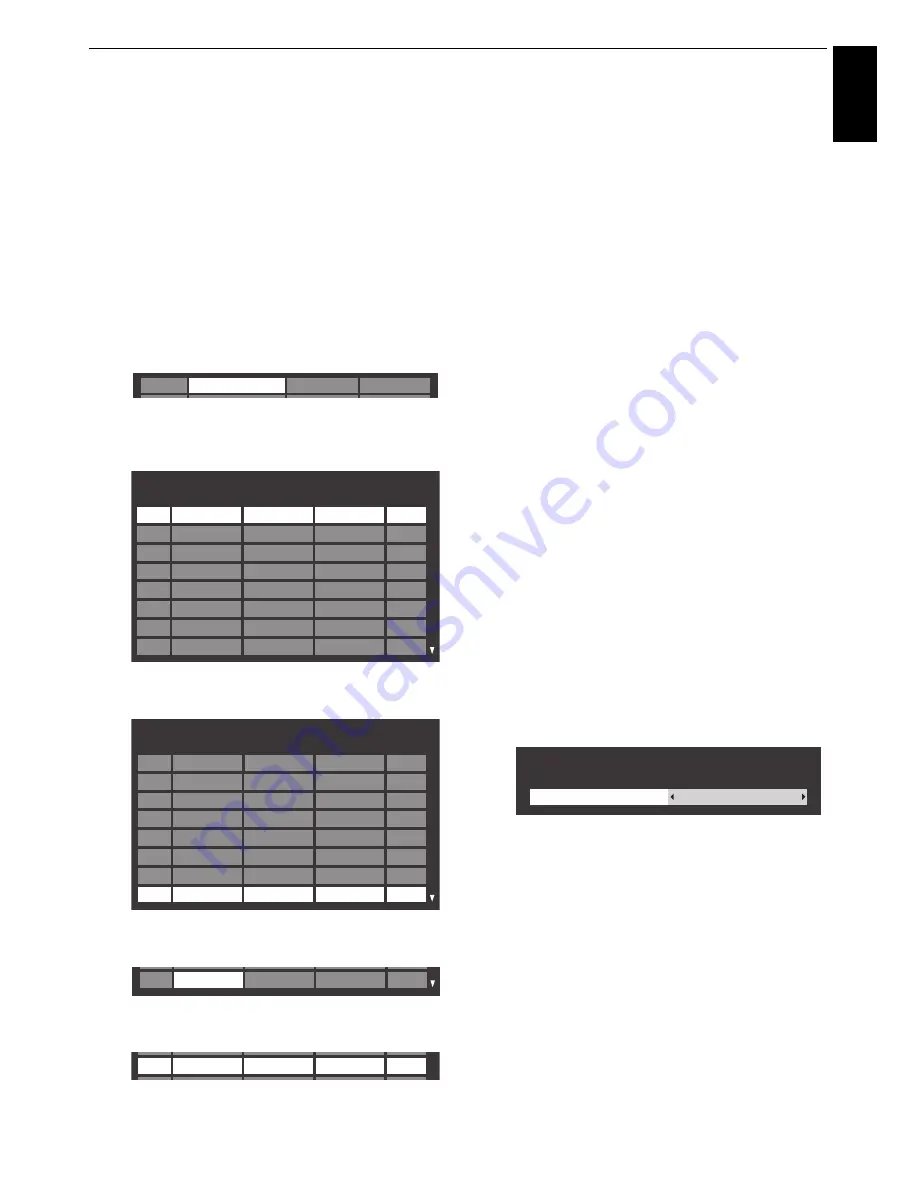
To edit the satellite settings:

a

In the 

Satellite Settings

 menu, press 

B

 to highlight 

Switch Type

.

b

Press 

C

 or 

c

 to select 

None

ToneBurst

DiSEqC 

2way

 or 

DiSEqC 4way

 as your satellite switch type.

c

Press 

b

 to highlight 

LNB Power

 and press 

C

 or 

c

 to 

select 

On

 or 

Off

.

To add a transponder:

a

In the 

Satellite Settings

 menu, press 

B

 or 

b

 to 

highlight the line you want to edit and press 

OK

.

b

Press the 

GREEN

 button. The 

Transponder Settings


screen will appear.

c

Press 

B

 to highlight a new line.

d

Press 

OK

.

e

Edit each parameter as required and press 

OK

.

To delete a transponder:

a

In the 

Transponder Settings

 menu, press 

B

 or 

b

 to 

highlight the line you want to delete.

b

Press the 

RED

 button.

To edit the Transponder Settings:

a

In the 

Transponder Settings

 menu, press 

B

 or 

b

 to 

highlight the line you want to edit and press 

OK

.

b

Press 

C

 or 

c

 to select 

Frequency

Polarisation

Symbol Rate

 or 

S/S2

, and set the item using the 

number buttons if necessary.

c

Press 

OK

 to save your settings.

d

Repeat steps 1 through 3 for other lines.

e

Press the 

BLUE

 button to finish editing and return to 

Satellite Settings.

Press the 

GREEN

 button to cancel any edits that were 

made.

Press the 

YELLOW

 button to reset all transponder 

settings to their initial default settings.

To select the Dish Type:

a

In the 

Satellite Settings

 menu, press 

B

 or 

b

 to select 

the required satellite line and press 

OK

.

b

Press 

C

 or 

c

 to highlight 

Dish

 and press the 

GREEN


button.

c

Press 

C

 or 

c

 to select 

Dish Type

. You can select 

Movable

 or 

Fixed

 as the Dish Type.

ASTRA 19.2˚E

1

1

1

Transponder Settings

1

10743

H

Frequency

Polarisation

Symbol Rate

S/S2

7

10861

8

10876

2

10773

3

10788

4

10817

5

10832

6

10847

H

V

H

V

V

H

V

22000

22000

22000

22000

22000

22000

22000

22000

S

S

S

S

S

S

S

S

Transponder Settings

76

12640

V

Frequency

Polarisation

Symbol Rate

S/S2

82

12728

83

77

12662

78

12669

79

12692

80

12699

81

12721

V

H

V

H

V

H

22000

22000

22000

22000

22000

22000

22000

S

S

S

S

S

S

S

83

0

H

0

S

83

12731

H

22000

S2

Dish Settings

Dish Type

Fixed

Dish : 1

Содержание TL86* Digital Series

Страница 1: ...TL86 Digital Series ...

Страница 2: ...24 Quick Menu 24 Selecting channels 24 The Time Display analogue only 24 Stereo and Bilingual transmissions 24 Using 3D functions 25 Viewing 3D images 25 Switching display mode or selecting 3D format 25 Setting the auto start mode 27 Setting the 3D PIN code 27 Setting 3D Start Message 27 Setting 3D Lock 28 Setting 3D Timer Lock 28 Setting Enable 3D Timer 28 Displaying 3D Important Info 28 Switchin...

Страница 3: ...ock 54 Digital settings Channel Options 55 Selecting favourite channels 55 Favourite Channel Lists 55 Skip channels 55 Locking channels 55 Digital settings other settings 56 Subtitles 56 Audio languages 56 Common Interface 56 Software Upgrade and Licences 57 Searching for New Software 57 Network Upgrade 57 Software Licences 57 System Information and Reset TV 57 System Information 57 Reset TV 57 PC...

Страница 4: ...ll in accordance with the installation instructions See page 5 DO be careful with glass panels or doors on equipment DO NOT obstruct the ventilation openings of the equipment with items such as newspapers tablecloths curtains etc Overheating will cause damage and shorten the life of the equipment DO NOT allow electrical equipment to be exposed to dripping or splashing or objects filled with liquid...

Страница 5: ...uired for installation To install a wall mount from another manufacturer use the SPACERS supplied 1 Unplug and remove any cables and or other component connectors from the rear of the TV 2 Carefully lay the front of the unit face down on a flat cushioned surface such as a quilt or blanket 3 Follow the instructions provided with your wall bracket Before proceeding make sure the appropriate bracket ...

Страница 6: ...ould be age 6 or above Children and teenagers may be more susceptible to health issues associated with viewing in 3D and should be closely supervised to avoid prolonged viewing without rest Watching TV while sitting too close to the screen for an extended period of time may cause eye strain The ideal viewing distance should be at least three times the screen height Notes on IR communication Do not...

Страница 7: ... covered under the manufacturer s warranty Regular use of other size modes e g Super Live will prevent permanent retention Please take note EXCLUSION CLAUSE Toshiba shall under no circumstances be liable for loss and or damage to the product caused by i Fire ii Earthquake iii Accidental damage iv Intentional misuse of the product v Use of the product in improper conditions vi Loss and or damage ca...

Страница 8: ...tons Textandinteractiveservicecontrolbuttons Remove the back cover to reveal the battery compartment and make sure the batteries are inserted the proper way Suitable battery types for this remote are AA IEC R6 1 5V Do not combine a used old battery with a new one or mix battery types Remove dead batteries immediately to prevent acid from leaking into the battery compartment Dispose of them in acco...

Страница 9: ...HDMI High Definition Multimedia Interface is for use with a DVD decoder or electrical equipment with digital audio and video output For acceptable video or PC signal formats through the HDMI terminals see page 69 NOTE Although this television is able to connect to HDMI equipment it is possible that some equipment may not operate correctly LAN port is used to connect the TV to your home network Thi...

Страница 10: ... Dolby Digital AC 3 sampling rate 32 44 1 48kHz Connect an HDMI cable type A connector to the HDMI terminal For proper operation it is recommended that you use an HDMI cable with the HDMI Logo If your HDMI connection is capable of 1080p and or your television is capable of refresh rates greater than 50Hz you will need a Category 2 cable Conventional HDMI DVI cable may not work properly with this m...

Страница 11: ...icture may be obscured This is due to scaling of the picture by the set it is not a malfunction When PC input mode is selected some of the television s features will be unavailable e g Colour System in the SETUP menu Some PC models may output unique signals that the television may be unable to detect see page 68 If connecting a certain PC model with a unique PC signal the PC signal may not be dete...

Страница 12: ...LAN cable 1 Coaxial or telephone cable depending on your modem type 2 Standard LAN cable 3 Do NOT connect a phone jack directly to the TV s LAN port Please refer to Wireless Setup section on page 37 How to use this Dual Band Wireless LAN Adaptor If this device is going to be operated in the frequency range of 5 15 GHz to 5 35 GHz it is restricted to indoor use If this device is going to be operate...

Страница 13: ...ted via the USB 1 or USB 2 port or on a network device NOTE The USB socket has limited functionality and Toshiba can take no responsibility for damage to other connected equipment The USB 2 socket has to be used with the TOSHIBA Dual Band WLAN Adaptor WLM 20U2 in order to access a wireless network You must use the TOSHIBA Wireless LAN device to ensure correct operation of this feature This feature...

Страница 14: ...tellite the Satellite Settings startup screen will appear automatically after completing the Antenna or Cable scan and pressing OK h Select Next and press OK The Auto Tuning start up screen will appear with the option to select between DTV and ATV DTV or ATV if available Use C or c to select the appropriate mode i Press B or b to highlight Start Scan and press OK The television will start to searc...

Страница 15: ...l strength Highlight Done and press OK n If the reception testing completes successfully the Auto Tuning startup screen will display You can select Scan Option from Free to Air and All o Press B or b to highlight Start Scan and press OK The television will start to search for available DVB S channels The progress bar will indicate the scan status Whenthesearchiscomplete the AutoTuning results scre...

Страница 16: ...frequency at which the scan will end DTV Modulation You can choose from five QAM modulation settings DTV Symbol Rate This is the baud rate KS s of the scan DTV Network ID This is the Network ID to be utilized for the scan This item is grayed out when DTV Scan Type is set to Full Scan Fromthe SystemSetupmenu youcan addthesatellites that you wish to tune and configure detailed settings for each one ...

Страница 17: ...S2 and set the item using the number buttons if necessary c Press OK to save your settings d Repeat steps 1 through 3 for other lines e Press the BLUE button to finish editing and return to Satellite Settings Press the GREEN button to cancel any edits that were made Press the YELLOW button to reset all transponder settings to their initial default settings To select the Dish Type a In the Satellit...

Страница 18: ...he SETUP menu and selected a tuning mode other than DTV choose the optimum ATV broadcasting system B G I D K or L The television will start to search for all available DTV and or ATV services You must allow the television to complete the search When thesearchiscomplete theAutoTuning screen will display the services found For Satellite Tuning Ascreenwillappearwarningthatpreviousprogrammes and setti...

Страница 19: ...experienced See page 63 9 Station Station identification Use the B b and C c buttons to enter up to seven characters To allocate a position on the television for a decoder and media recorder turn the decoder on insert a pre recorded film in the media recorder press PLAY and manually tune a In the SETUP menu press b to select ATV Manual Tuning and press OK b Use B or bto select the desired position...

Страница 20: ...Skipped positions cannot be selected by PU and Pu or by the controls on the television but can still be accessed by the number buttons on the remote control Channels may be moved and saved to the position of your choice a Select ATV Manual Tuning from the SETUP menu b With the list of channels showing use B or b to highlight the channel you want to move and press c c Press B or b to move through t...

Страница 21: ...s follows Frequency input a specific frequency to be scanned Modulation choose from one of five QAM modulation options Symbol Rate input a specific baud rate KS s to be used for the manual scan Highlight Start Scan and press OK When Ant Cable Satellite is set to Satellite DTV Manual Tuning items are as follows Use B or b to highlight an item Satellite Transponder Frequency Symbol Rate Polarisation...

Страница 22: ... Press the B or b buttons to select the channel you wish to move and press OK to check If you wish to move multiple channels at once select another channel and check in the same way Repeat as necessary Once all desired channels have been checked press the B or b buttons to place the focus at the position to which you wish to move the channels The channels will be inserted above the highlighted cha...

Страница 23: ...ct either Home or Store mode Home is recommended for normal home use Select Store when using the television for displaying in a shop etc a Select Location from the SETUP menu b Press C or c to select Home or Store This is a digital television which is integrated to allow the use of both digital and analogue services However during the lifetime of this set it is very likely that analogue services w...

Страница 24: ...will appear Stereo Press s to select Stereo or Mono Bilingual Bilingual transmissions are rare If they are transmitted the word Dual will be displayed Choose the required programme number and if the word Dual appears press s to select Dual 1 Dual 2 or Mono Quick Menu Mode Quick menu item Description When viewing a TV programme or pictures from the external input Single Window or 3D Single Window P...

Страница 25: ...3D Glasses There are three modes for watching TV 3D format select If a right and left images are same in Native mode select SBS If a top and bottom images are same in Native mode select TB 3D formats are the following This format cannot be selected manually The 3D button s operation Thebehaviour of3Dwhen viewingin Native mode is different depending on the input mode Depending on the input mode the...

Страница 26: ...b Press B or b to select 2D Format Select and press OK c Press C or c to select Native NOTE When Frame Packing is input 2D Format Select will be grayed out Trigger of Switching Display Mode Quick menu Input Signal 3D Fomat Select Type Additional Info Format Source Signal SBS TB 3D Format Signal With 3D Auto Detect Information FP SBS TB Without 3D Auto Detect Information SBS TB 2D Format Signal 3D ...

Страница 27: ...hange PIN or Delete PIN and press OK NOTE PIN code cannot be set to 0000 If PIN is deleted 3D Safety Settings is grayed out and the settings are reset to the factory default When this feature is set to On a message is displayed onscreen when a 3D signal is received a In the PREFERENCES menu press B or b to select 3D Setup and press OK b Press B or b to select 3D Safety Settings and press OK c Ente...

Страница 28: ... On This feature helps to remind you not to watch 3D video for extended periods of time Once a set period of time has passed a dialogue will be shown asking you if you wish to continue viewing or not a In the PREFERENCES menu press B or b to select 3D Setup and press OK b Press B or b to select 3D Safety Settings and press OK c Enter your 4 digit 3D PIN code d Press B or b to select Enable 3D Time...

Страница 29: ...e Enhancement b Press C or c to select On or Off Dynamic Bass Boost enhances the depth of the sound on the TVspeakers Thedifferencewill only benoticeable on sound with strong bass a In the Advanced Sound Settings menu press B or b to select Dynamic Bass Boost b Press Cor cto selectthe desired bassexpansion level Low High or Off Stable Sound reduces the volume level differences between channels It ...

Страница 30: ...eadphone Settings and press OK b Press Bor bto select Speaker Link and press Cor c to select On or Off c If you select Off then highlight Headphone Level and use C or c to adjust the headphone sound Audio Description is an additional narrative sound track for visually impaired individuals to understand and enjoy the story line more fully The letters AD will be displayed in the channel banner when ...

Страница 31: ...rmat broadcast this settingwill raisethepicturetoensure that all the text is displayed CINEMA When watching all sides panel format films videotapes thissetting will eliminate or reduce the black bars at all sides of the screen by zooming in and selecting the image without distortion WIDE Use this setting when watching a widescreen DVD widescreen video tape or a 16 9 broadcast when available Due to...

Страница 32: ...setting will show the picture without overscan i e WYSIWYG This option is only available when watching a PC signal source via HDMI or PC terminal PC WIDE This setting will show the picture without overscan or side panels This option is only available when watching a PC signal source via HDMI or PC terminal Dot by Dot is a non scaling display Depending on the input signal format thepictureisdisplay...

Страница 33: ...nt picture mode for each input You can customize current picture mode settings as desired For example whileselecting Dynamic ifyouchangethefollowing items such as Backlight Contrast Brightness Colour Tint Sharpness and the Advanced Picture Settings items your new settings are saved for Dynamic picture mode a In the PICTURE menu press B or b to select either Backlight Contrast Brightness Colour Tin...

Страница 34: ...ff When Active Backlight Control is activated it will automatically optimize the backlighting levels for dark scenes a In the Advanced Picture Settings menu press B or b to select Active Backlight Control b Press C or c to select On or Off Black White Level increases the strength of dark areas of the picture to improve the definition a In the Advanced Picture Settings menu press B or b to select B...

Страница 35: ...een will turn blue and the sound will be muted on analogue channels and external input modes when no signal is received NOTE Some external input sounds may not be muted a In the PREFERENCES menu press B or b to select Blue Screen b Press C or c to select On or Off The picture position may be adjusted to suit personal preference and can be particularly useful for external inputs a In the PREFERENCE...

Страница 36: ...ther adverse conditions Wireless LAN and your Health Wireless LAN products like other radio devices emit radio frequency electromagnetic energy The level of energy emitted by Wireless LAN devices however is far less than the electromagnetic energy emitted by wireless devices such as mobile phones Because Wireless LAN products operate within the guidelines found in radio frequency safety standards ...

Страница 37: ...s B or b to select Wireless Setup and press OK c Press B or b to select Assisted Setup and press OK d Press B or b to select the desired AP and press OK NOTE Check the MAC address on the label of the AP or in the manual and select your AP e Highlight Security Key and press OK The Software Keyboard window will appear f Input the Security Key by using the Software Keyboard see page 41 To save your s...

Страница 38: ...ressed before Done is selected Wireless Information The settings configured in Wireless Setup can be confirmed a Press QUICK to open the Quick Menu b Press B or b to select Wireless Information and press OK c When the Network Type is Wireless a Wireless Information window will appear NOTE Press the RED button to scan for all APs Item Description Status Connected is displayed when the TV is connect...

Страница 39: ...l be grayed out when Auto Setup is set to On Manual Setup a In the PREFERENCES menu press B or b to select Network Setup and press OK b PressBorbtoselect AdvancedNetworkSetupand press OK c Press B or b to select IP Address Setup and press OK d Highlight Auto Setup and press C or c to select Off e Press B or b to select IP Address f Press C or c to highlight the field you want to change and then us...

Страница 40: ...ss OK NOTE DNS address field numbersmust be between 0 and 255 If you input an incompatible number and press OK the field number will reset to the previous value g Press B or b to select Secondary DNS Address and edit in the same way as Primary DNS Address MAC Address You can view the fixed MAC address for the TV and for the Dual Band WLAN Adaptor if one is installed a In the PREFERENCES menu press...

Страница 41: ...n firmware update and or additional bandwidth dedicated to this product Third party internet services may changeorbediscontinuedorrestrictedatanytime Toshiba makes no warranties representations or assurances about the content availability or functionality of third party content or services Use of third party internet services may require registration by a computer and or payment of charges and mem...

Страница 42: ...load and begin playing back content Service content and the look and feel of the interface may be changed at any time without prior notice Using Hybrid TV Standard if available Hybrid TV Standard enables the TV to receive HbbTV services TV services which support this feature often show press RED on the screen NOTE You need to configure a home network before using this feature see page 12 a Press M...

Страница 43: ...ting a Press MENU C c to highlight APPLICATIONS icon b Press b to select USB Media Player and press OK c Press B or b to select Setup d Press B or b to select USB Auto Start and press C or c to select On or Off Auto Start a Insert USB device into the USB socket on the left side of the TV A prompt will appear b Press C or c to select Yes and press OK c Press B or b to select Photo Movie or Music an...

Страница 44: ...ill be on the top left thumbnail in the Multi View a Press B b C c to move the highlight in one window If all of the photos will not fit in one screen when pressing C at the top left thumbnail the screen will move to the previous page Conversely when pressing c at the bottom right thumbnail the screen will move to the next page PU or Pu or buttons can be used to page up down the Multi View when th...

Страница 45: ... to adjust the setting NOTE When in the DMS and Multi View modes this feature cannot be used To set Background Music USB only a Press QUICK to open the Quick Menu while in the Slide Show mode b Press B or b to select Background Music and press C or c to select On The music file in the same folder as the displayed photo will start playing NOTE To stop music file playback select Off in Background Mu...

Страница 46: ...reverse or fast forward directions press CC or ccduring playback Each time you press the CCor cc the playback speed will change To locate a specific file press Z or z repeatedly Press to display the file status information content number movie title progress time etc NOTE The information may not be correctly displayed depending on the contents or DMS During playback you can adjust the PICTURE and ...

Страница 47: ...and press OK b Press B or b to highlight DivX VOD Registration and press OK c The DivX VOD window will appear and you will see the registration code For details on registration please visit the DivX website at http vod divx com d Copy the activation file to a memory device and play it on the TV To deactivate your device a In step 2 above highlight DivX VOD Deactivation and then press OK b A confir...

Страница 48: ...ton When the RED button is pressed it will display the title change window at the bottomon the screen same as Subtitle or Audio change window The title is changed cyclically each time the RED button is pressed Playback will start from start time of selected title every press RED button NOTE Depending on the content data will not be operated You can listen to music from a Multi View of available fi...

Страница 49: ... information NOTE The information may not be correctly displayed depending on the contents or DMS To close the Music Player a Press EXIT File Compatibility See page 70 Other features Panel Lockdisablesthebuttonsonthetelevision Allbuttonson the remote control can still be used a Press MENU C c to highlight PREFERENCES icon When Panel Lock is On a reminder will appear when the buttons on the televis...

Страница 50: ...e a In the APPLICATIONS menu press b to select On Timer and press OK b Press B or b to select Enable On Timer and press C or c to select On c Press bto selectEnable DTVClock andthenpress C or c to select On or Off d Press B or b to go through the list adding the details of the On Timer by using the number buttons and C and c to make selections Power On Time only for DTV Clock On mode Set the time ...

Страница 51: ...is feature is set to On when Location is set to Home 1 minute before switching to standby a Warning message will appear When the following features are set the feature that is set for the nearest time will function Automatic Power Down Sleep Timer Photo Frame Auto Power Off Auto shutdown after 1 hour of inactivity after power on by On Timer No signal auto power off after 15 minute of no signal The...

Страница 52: ...on and press OK On screen Information icons Information Change 6 00 Thu 11 Oct 8888 ITV1 London ASTRA 19 2 E Now MLB Young s two run triple leads AL over NL MLB Young s two run triple leads AL over NL 15 min left News 8 00 9 00 6 00 8 00 Next Also HD AD 18 16 9 D 3D 2D AD English Side by Side World News and Sports Icon Description Service info Service type TV Radio Text Skip Audio info Mono Stereo...

Страница 53: ...e BLUE button to bring up the Programme Timers menu f Press Pu to advance to the next page or press PU to go back to the previous page From the Guide screen you can use the genre selection and search features a In the Guide screen press QUICK b Press B or b to highlight Genre Colour in the Quick Menu and press OK c With the focus on a particular genre press the desired coloured button to assign Fo...

Страница 54: ... and press OK b Use C or c to choose an option None or an age setting 4 17 or 4 18 depending on the Country setting To view blocked programmes enter the PIN To reactivate the Parental Control turn the TV off and then on again You can use the Network Lock feature to prevent the Web browserfromlaunching WhenthisfeatureissettoOn PINinput will be necessary to use YouTube This feature will be grayed ou...

Страница 55: ... Quick Menu press b to select Channel Options and press OK c Press c repeatedly to highlight the skip 8 box d Press OK to select A tick will appear in the box e Repeat steps 1 through 4 for other channels f Press EXIT NOTE Skipped channels cannot be selected by Puor PU but still be accessed by direct number entry when tuned a 8 icon will be displayed in the banner to indicate as a skipped channel ...

Страница 56: ...vailable use the s button to select between them TheCommonInterfaceSlot situatedonthesideofthetelevision enables the insertion of a CAM Conditional Access Module and card These are purchased from a service provider and allow additional subscription broadcasts to be viewed For information see a service provider a Insert the CAM and card into the Common Interface Slot following the instructions prov...

Страница 57: ...r b to select Software Licences and press OK A screen will appear displaying all the licensing information required for the televisions software System Information and Reset TV This feature can be used to check the version of software currently installed When in DTV mode it includes additional diagnostic information such as signal strength signal quality centre frequency modulation etc a In the SE...

Страница 58: ... the Sampling Clock alters the number of pulses per scan this will clear vertical lines on the screen a In the Display Settings menu press B or b to select PC Settings and press OK b Press B or b to select Sampling Clock c Press C or c to adjust until the picture clears Use Reset to return all items to the original factory settings a In the Display Settings menu press B or b to select PC Settings ...

Страница 59: ...nmoreconvenient by allowing you to skip unused inputs a Press MENU C c to highlight PREFERENCES icon b Press B or b to select AV Connection c Press OK to display the AV Connection menu d Press B or b to highlight Input Labeling and press OK e Press Bor bto select the input you want to skip and then press the RED button to turn on the skip f To turn off the skip press the RED button again The input...

Страница 60: ...puts PCM format to the digital audio output socket Auto This mode outputs Dolby Digital if available or PCM to the digital audio output socket Dolby Digital S Dolby Digital Dolby Digital Plus S Dolby Digital MPEG S PCM HE AAC S Dolby Digital Audio Delay Press C or c to select Auto or Manual Auto This mode automatically adjusts the audio timing to meet the video timing NOTE The time lag might be la...

Страница 61: ... will change indicating that these pages have been loaded These sub pages will remain available to view until another page is chosen or in normal TV mode the channel is changed If Fastext is available four coloured titles will appear at the base of the screen To access one of the four given subjects press the relevant coloured button on the remote control For further information on your particular...

Страница 62: ... At times it is convenient to hold a page of text Press B and B will appear in the top left of the screen The page will be held on screen until the button is pressed again C To enlarge the text display size Press C once to enlarge the top half of the page press again to enlarge the bottom half of the page Press again to revert to normal size D To temporarily erase the text screen Press D once to e...

Страница 63: ...hen select the correct input by pressing o Q Why is there a picture but no sound A Check all lead connections No sound or unacceptable format sound may be received Check the volume has not been turned down or that sound mute has not been selected Check shared audio settings SETUP Country Germany Colour System Auto Menu Language English Q What else can cause a poor picture A Interference or a weak ...

Страница 64: ...a roof or loft aerial If the text is unreadable or garbled check the aerial Go to the main index page of the text service and look for the User Guide This will explain the basic operation of text in some detail If further information is needed on how to use text see the text section Q Why is a page number visible at the top of the screen but no text A Text has been selected but Teletext informatio...

Страница 65: ...page 57 Q What do the LEDs on the front of the television indicate A Check the table below LED indication Condition LED 1 LED 2 Green Orange Power ON Programme Timer is set Green OFF Power ON Programme Timer is NOT set Red Orange Power OFF Standby Programme Timer is set Red OFF Power OFF Standby Programme Timer is NOT set Orange Orange Active Standby for OAD Programme Timer is set Orange OFF Activ...

Страница 66: ...ENSE FOR THE PERSONAL AND NONCOMMERCIALUSEOFACONSUMERTO i ENCODEVIDEO IN COMPLIANCE WITH THE AVC STANDARD AVC VIDEO AND OR ii DECODE AVC VIDEO THAT WAS ENCODED BY A CONSUMER ENGAGED IN A PERSONAL AND NONCOMMERCIALACTIVITYAND OR WASOBTAINEDFROM A VIDEO PROVIDER LICENSED TO PROVIDE AVC VIDEO NO LICENSE IS GRANTED OR SHALL BE IMPLIED FOR ANY OTHER USE ADDITIONAL INFORMATION MAY BE OBTAINED FROM MPEG ...

Страница 67: ...untry please contact your local city office or the shop where you purchased the product Disposal of batteries and or accumulators The crossed out wheeled dust bin symbol indicates that batteries and or accumulators must be collected and disposed of separately from household waste If the battery or accumulator contains more than the specified values of lead Pb mercury Hg and or cadmium Cd defined i...

Страница 68: ...r PC to conform to a signal in the table below Pin No Signal name Pin No Signal name Pin No Signal name 1 R 6 Ground 11 NC 2 G 7 Ground 12 NC 3 B 8 Ground 13 H sync 4 NC 9 NC 14 V sync 5 Ground 10 Ground 15 NC Format Resolution V Frequency H Frequency Pixel Clock Frequency VESA Standard DMT VGA 640 480 59 940Hz 31 469kHz 25 175MHz 72 809Hz 37 861kHz 31 500MHz 75 000Hz 37 500kHz 31 500MHz SVGA 800 ...

Страница 69: ...500kHz 27 000 27 027MHz 576p 720 576p 50 000Hz 31 250kHz 27 000MHz 1080i 1920 1080i 59 940 60 000Hz 33 716 33 750kHz 74 176 74 250MHz 1080i 1920 1080i 50 000Hz 28 125kHz 74 250MHz 720p 1280 720p 59 940 60 000Hz 44 955 45 000kHz 74 176 74 250MHz 720p 1280 720p 50 000Hz 37 500kHz 74 250MHz 1080p 1920 1080p 59 940 60 000Hz 67 433 67 500kHz 148 352 148 500MHz 1080p 1920 1080p 50 000Hz 56 250kHz 148 50...

Страница 70: ...e resolution Motion JPEG 640 480 Other 1920 1080 Some files may not be played MPEG 2 PS MPEG 2 TS mpg mpeg ts trp tp MPEG 1 Video MPEG 2 PS MPEG 2 VOB MPEG 2 Video H 264 MPEG 4 AVC MPEG 2 TS only VC 1 WMV9 MPEG 2 TS only MPEG 1 2 Layer2 MPEG 1 2 Layer3 Dolby Digital AC 3 L PCM MPEG 4 LC AAC MPEG 2 TS only MPEG 4 HE AAC MPEG 2 TS only yes yes MPEG 2 VOB vob no MOV mov H 264 MPEG 4 AVC MPEG 4 part2 ...

Страница 71: ...otion JPEG avi mp4 mkv JPEG L PCM ADPCM yes no Music MP3 mp3 MPEG 1 2 Layer 3 yes yes USB Maximum number of files 1000 folder MP4 m4a MPEG 2 4 LC AAC yes yes WMA wma WMA7 8 9 Std yes yes WMA9 Pro yes no RealAudio m4a rm rmvb Dolby Digital AC 3 MPEG 2 4 LC AAC yes yes WAV wav LPCM ADPCM MPEG 1 2 Layer 3 WMA7 8 9 Std WMA9 Pro yes no Media Player Media Format File Extention Video codec Audio codec US...

Страница 72: ...Half Top and Bottom 50 000Hz 75 000kHz 148 500MHz Frame Packing 37 500kHz 74 250MHz Side by Side Half Top and Bottom 1920 1080i 16 9 59 940 60 000Hz 33 716 33 750kHz 74 176 74 250MHz Side by Side Half Top and Bottom 50 000Hz 28 125kHz 74 250MHz Side by Side Half Top and Bottom 1920 1080p 16 9 24 000Hz 54 000kHz 148 500MHz Frame Packing 27 000kHz 74 250MHz Side by Side Half Top and Bottom 30 000Hz ...

Страница 73: ...Side Half Top and Bottom 720p 16 9 59 940 60 000Hz Side by Side Half Top and Bottom 50 000Hz Side by Side Half Top and Bottom 1080i 16 9 59 940 60 000Hz Side by Side Half Top and Bottom 50 000Hz Side by Side Half Top and Bottom 1080p 16 9 24 000Hz Side by Side Half Top and Bottom 30 000Hz Side by Side Half Top and Bottom 50 000Hz Side by Side Half Top and Bottom 59 940 60 000Hz Side by Side Half T...

Страница 74: ...compatible Headphone socket 3 5mm stereo Stereo A2 Nicam 2 carrier system Visible Screen Size approx 32 40 46 80cm 102cm 117cm Display 16 9 Sound output at 10 distortion Main 10W 10W Power consumption approx 32TL 40TL 46TL 101W 123W 144W Standby power consumption approx 0 3W On mode power consumption approx 32TL 40TL 46TL 42 9W 63 5W 81W Average annual energy consumption approx 32TL 40TL 46TL 62 6...

Отзывы: