background image

E-45

Option

• Select menu name “Option”.

See “Menu Operation Method” on Page 

E-28

 for information about performing menu operations. The item name display will

differ depending on the input signal. See “List of Item Names Offering Input Selection and Adjustments/Settings” on Page 

E-33

.

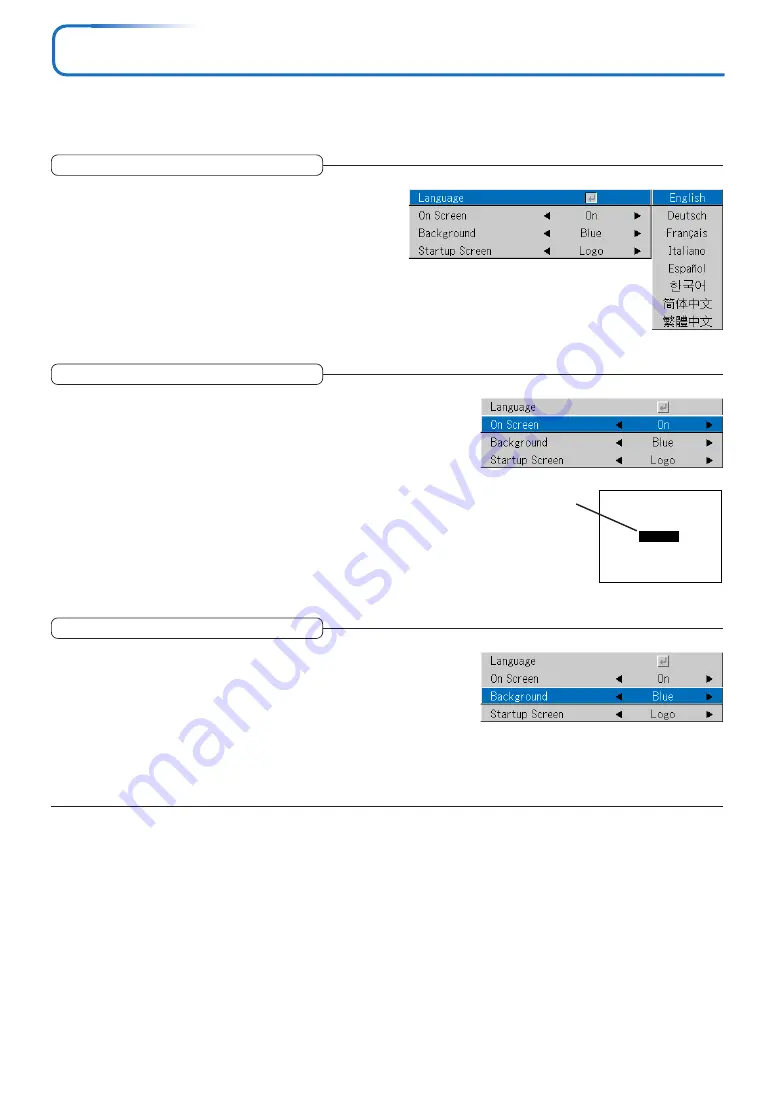
Language

This function sets the language that is displayed on screen in
the messages and menu displays.

Select item name “Language” and press the ENTER button to open
the Language sub menu.
Select the language with the SELECT (

왖왔

) buttons.

On Screen

This function switches on/off the messages displayed with a black
frame such as the input signal information and the aspect ratio.

Select item name “On Screen” and select the setting contents with the
SELECT (

왗왘

) buttons.

On ............... The message is displayed.
Off .............. The message is not displayed.

Example of a display when the
ASPECT button is pressed

Wide

Background

This function sets the screen color when the input source is no-
signal.

Select item name “Background” and select the setting contents with
the SELECT (

왗왘

) buttons.

Blue ............ Sets a blue screen when there is no signal
Black ........... Sets a black screen when there is no signal

Содержание TDP-P7

Страница 1: ...s or registered trademarks of International Business Machines Corporation U S A S VGA is a registered trademark of Video Electronics Standards Association Microsoft Windows and PowerPoint are either registered trademarks or trademarks of Microsoft Corporation in the United States and other countries Macintosh is a trademark of Apple Computer Inc U S A Note that even in the absence of explanatory n...

Страница 2: ...our local authorities or the Electronic Industries Alliance www eiae org USA only USA only MODEL NAME TDP P7 FCC Radio Frequency Interference Statement Note This equipment has been tested and found to comply with the limits for a Class A digital device pursuant to part 15 of the FCC Rules These limits are designed to provide reasonable protection against harmful interference when the equipment is ...

Страница 3: ...sure to heed the following Pointing the laser beam at the eyes could lead to reduced vision or vision impairment Never look at the laser pointer s light source Do not point the laser beam at people Do not let children use the laser pointer This label is located on the side of the remote control ...

Страница 4: ...operating and other instructions 2 Power Sources This product should be operated only from the type of power source indicated on the marking label If you are not sure of the type of power supply to your home consult your product dealer or local power company For products intended to operate from battery power or other sources refer to the operating instructions 3 Source of Light Do not look into t...

Страница 5: ...the like 7 Cleaning Unplug this product from the wall outlet before cleaning Do not use liquid cleaners or aerosol cleaners Use a soft cloth for cleaning 8 Power Cord Protection Power supply cords should be routed so that they are not likely to be walked on or pinched by items placed upon or against them paying particular attention to cords at plugs convenience receptacles and the point where they...

Страница 6: ...to this product through openings as they may touch dangerous voltage points or short out parts that could result in a fire or electric shock Never spill liquid of any kind on the product 12 Do not place the product vertically Do not use the product in the upright position to project the pictures at the ceiling or any other vertical positions It may fall down and dangerous 13 Stack Inhibited Do not...

Страница 7: ...at are covered by the operating instructions as an improper adjustment of other controls may result in damage and will often require extensive work by a qualified technician to restore the product to its normal operation e If the product has been dropped or damaged in any way f When the product exhibits a distinct change in performance this indicates a need for service 17 If glass components inclu...

Страница 8: ...rvice or repairs to this product ask the service technician to perform safety checks to determine that the product is in proper operating condition 21 Do not leave thermal paper documents or easily deformed items on top of the unit or near the air exhaust for long periods of time The heat from the unit could erase the information on the thermal paper or cause deformation or warping 22 Do not use t...

Страница 9: ...ts To prevent the unit from possible damage do not use the unit for at least 2 hours when there is an extreme or sudden change in temperature Place and Manner of Installation Do not place in hot locations such as near heating equipment Doing so could cause malfunction and shorten the life of the projector Avoid locations with oil or cigarette smoke Doing so will dirty the optical parts shortening ...

Страница 10: ...oshiba Corporation accepts no liability whatsoever for any damages arising from not having followed the descriptions in this Instruction Manual Toshiba Corporation accepts no liability whatsoever for any damages arising from malfunctions arising from combination with equipment or software that is not related to Toshiba Corporation Avoid Volatile Liquid Do not use volatile liquids such as an insect...

Страница 11: ...emarks of International Business Machines Corporation Digital Light Processing Digital Micromirror Device and DMD are trademakes of Texas Instruments Macintosh is a registered trademark of Apple Computer Inc Windows is a registered trademark of Microsoft Corporation in the U S and other countries Adobe is a registered trademark and Acrobat Reader is a trademark of Adobe Systems Incorporated REMOTE...

Страница 12: ...E 1 WARNING Handling the cables supplied with this product will expose you to lead a chemical known to the State of California to cause birth defects or other reproductive harm Wash hands after handling ...

Страница 13: ... VIDEO Connectors E 13 Video Equipment with S VIDEO Connectors E 13 Connections with Component Signals E 14 When the Video Equipment Has a YCbCr Connector or YPbPr Connector E 14 Connections with the AUDIO Jack E 15 Power Cord Connections and Switching the Power On Off E 16 Operating E 16 Finishing E 18 Adjustment of the Projection Screen E 19 Adjustment of the Projection Screen E 19 Making Adjust...

Страница 14: ...Off E 42 Menu Position E 43 Lamp Mode E 43 Input Format E 44 Presentation Timer E 44 Option E 45 Language E 45 On Screen E 45 Background E 45 Startup Screen E 46 Info E 47 Status E 47 Factory Default E 47 Lamp Timer Reset E 47 Resolution Frequency E 48 Lamp Timer E 48 When an Indicator is Lit or Flashing E 49 Troubleshooting E 50 Cleaning E 51 Replacing the Lamp Cartridge E 52 Specifications E 55 ...

Страница 15: ...ons OWNER S MANUAL CD ROM edition 1 OWNER S MANUAL Simplified Edition 1 O N S TA N D B Y ST AT U S M EN U Q U IC K M EN U Outside pocket HOW TO PUTTHE PROJECTOR INTO THE CARRYING CASE Close the lens cover of the projector and then put the pro jector into the case Put the remote control unit and the included cables in the outside pocket Wireless remote control unit with laser pointer 1 Size AAA bat...

Страница 16: ...B Y S T A T U S M E N U Q U IC K M E N U Adjuster button E 20 Also on opposite side Focus ring E 20 Exhaust vents Front adjusters E 20 Lamp cover E 53 Remote control sensor E 8 Lens Ventilation slots Rear adjuster E 20 Speaker Lens cover Zoom ring E 19 Built in security slot ...

Страница 17: ...ion slots AC IN connector E 16 Remote control sensor E 8 RGB connector E 11 14 S VIDEO connector E 13 VIDEO connector E 13 AUDIO connector E 15 Ventilation slot STATUS indicator E 16 49 Buttons used in menu and quick menu operations E 27 28 SOURCE button E 21 MENU button E 28 ON STANDBY indicator E 16 49 AUTO button E 21 ENTER button E 17 ON STANDBY button E 16 SELECT 왖왔왗왘 buttons QUICK MENU butto...

Страница 18: ...ton E 22 Temporarily cancels the video and audio TIMER button E 24 Presentation timer time setting display ZOOM button E 23 Digital zoom adjustment Buttons used for input selection E 21 RGB button and VIDEO button Video S Video LASER button E 25 Turns the laser point on and off QUICK button E 27 Displays a simplified menu Buttons used for the PC mouse function E 26 JOG button and R CLICK button No...

Страница 19: ... with new ones If the batteries are dead or if you will not use the remote control for a long time remove the batteries to prevent battery acid from leaking into the battery compartment Remote Control Range Point the infrared transmitter of the remote control toward the remote control sensor located at the front or rear of the main unit and operate Reception of the remote control signal should gen...

Страница 20: ... note that with DLP type projectors in rare cases there may be black spots or bright spots among the picture elements Note Purchase a screen A component cable which is available separately is required to connect a DVD player or other equipment with YCbCr connectors A component cable which is available separately is required to connect high definition HD video equipment or other equipment with YPbP...

Страница 21: ...he main unit Screen Size Designation Inches There is a tolerance of 5 due to design values This table uses the lens apex and lens center as references and requires that the projector be in a horizontal condition with front and rear adjusters fully withdrawn 26 40 60 80 100 120 150 180 200 250 300 0 53 0 40 0 81 0 61 1 22 0 91 1 63 1 22 2 03 1 52 2 44 1 83 3 05 2 29 3 66 2 74 4 06 3 05 5 08 3 81 6 ...

Страница 22: ...signal with resolutions other than 1024 768 dots Make changes to a displayable resolution at the personal computer side Check with Table of Supported Frequency on Page E 56 The setting method for the personal computer will differ depending on the specific model Please read the personal computer instruction manual or the on line help information or contact the manufacturer of your personal computer...

Страница 23: ...oes not necessarily mean that an external output signal is being output REFERENCE When Resolution or Frequency is not displayed under Info on the menu of the projector this means that the external output signal is not being output from the personal computer See Resolution Frequency on Page E 48 2 Should a sign not be output from the notebook computer try the operation described below For an IBM PC...

Страница 24: ...ng the menu sequence of Setup Input Format Video See Input Format on Page E 44 Video Equipment with S VIDEO Connectors Connect to the projector s S VIDEO connector by using a commercially available S Video cable The input setting of the S VIDEO connector has been set to Auto at the factory however if the projector does not project change the input setting to Your Country s Television Broadcast Sys...

Страница 25: ...ut setting to Component by using the menu sequence of Setup Input Format RGB See Input Format on Page E 44 When projecting the YCbCr signal or YPbPr signal if the color of the overall image strongly leans toward being greenish or another color change the setting under the menu of Color Color Space See Color Space on Page E 38 Component cable Available as an option Mini D sub 15 pin to RCA 3 Compon...

Страница 26: ...udio converter cable The built in speaker of the projector provides monaural audio To enjoy convincing audio reproduction please connect the audio output of the video equipment to your audio system The built in speaker outputs the audio of the equipment connected to the AUDIO jack R L AUDIO OUT White Red Audio conversion cable Mini jack RCA pin plug Commercially available Audio cable Mini plug Com...

Страница 27: ...ANDBY button The first time the power is switched on after purchase Menu Language Select will be displayed See Page E 17 for infor mation about language selection When the power is turned on the ON STANDBY indicator starts flashing green then stops flashing after about 60 seconds If the STATUS indicator lights green at this time the lamp mode is set to Eco See E 43 for instructions on selecting If...

Страница 28: ...ns of the Remote con trol and align the deep blue cursor with English Cursor 2 Press the ENTER button to set This will set the language and Menu Language Select will close This completes the selection of the display language Note Menu Language Select will not appear the next time the power is switched on Should a change of language become necessary see Language on Page E 45 Power Cord Connections ...

Страница 29: ... when the unit enters the standby mode Important Notice Do not unplug the power cord while the ON STANDBY indicator is flashing amber Doing so may shorten the life of the lamp or damage the projector Power Off OK ON STANDBY STATUS button on main unit Flashing amber Approximately 90 seconds Lit amber Standby mode STATUS ON STANDBY STATUS ON STANDBY STATUS ON STANDBY Lit green 3 Unplug the power cor...

Страница 30: ...ts with the Adjust ers on Page E 20 3 If the image is slanted adjust by turning the right or left adjuster See Making Adjustments with the Adjusters on Page E 20 4 A projection image such as that illustrated in the diagram is the result of the projector not being perpendicular to the screen Set the projector so that it is pointing straight toward the screen 5 If the image shows keystone distortion...

Страница 31: ...projector to align the image with the screen then release your fingers Turn the left and right front adjusters for fine adjustment Adjust so that there is no shaking of the projector Lowering the projection image Lower the front adjusters using the operation described above To lower the projection screen further raise the rear ad juster Fine adjustments are made by turning the left and right front...

Страница 32: ...at has an input signal When Auto Source is Off The projector switches to the selected source regardless of whether an input sig nal is present Note When you do not operate source selection the projector will assume the input selec tion condition that was previously used See Auto Source on Page E 42 for information about the Auto Source on and off conditions S O U R C E A U T O FREEZE MUTE LASER AU...

Страница 33: ...al conditions MUTE LASER AUTO TIMER VOL ZOOM RGB VIDEO R CLICK CANCEL QUICK MENU ENTER STANDBY Q 1 2 3 4 FREEZE FREEZE LASER AUTO TIMER VOL ZOOM RGB VIDEO R CLICK CANCEL QUICK MENU ENTER STANDBY Q 1 2 3 4 MUTE Adjustment of the Volume This function adjusts the volume of the built in speaker 1 Press the 왖 or 왔 VOL button to adjust the volume The volume adjustment display appears when one of the but...

Страница 34: ...nctions are cancelled when the input is switched The greater the zoom enlargement the less distinct the image will appear The reason for this is that the dots are being digitally corrected so that they are not conspicuous Movement of the screen will not be possible when the menu screen is being displayed Zoom 0 Zoom 21 3 Press the CANCEL button to immediately close the display The display will clo...

Страница 35: ...e time The setting contents are Off and from 10 to 60 minutes in 10 minute intervals Settings can also be made with the SELECT 왗왘 buttons Gauge Blue Press the ENTER button to restart the timer The timer will start with the same time setting Press the CANCEL button to close the timer display The timer setting will return to Off Moving the Position of the Timer Display The SELECT 왖왔왗왘 buttons on the...

Страница 36: ... C L IC K C A N C E L Q U IC K M E N U E N T E R S T A N D B Y Q 1 2 3 4 LASER CAUTION Do not look at the laser pointer s light source Be sure to heed the following Pointing the laser beam at the eyes could lead to reduced vision or vision impairment Never look at the laser pointer s light source Do not point the laser beam at people Do not let children use the laser pointer This label is located ...

Страница 37: ...2000 and XP For Macintosh computers this function cannot be used with operating systems other than OS 9 and later When the cable is disconnected and then reconnected to the USB port of the personal computer or the MOUSE connector of the projector allow at least 5 seconds before reconnecting Do not repeatedly disconnect and reconnect the cable in a momentary fashion The personal computer may not be...

Страница 38: ...ected with use of either the SELECT 왖 or 왔 button 2 Press the cursor 왗 or 왘 button to make the adjustment 3 To close the display immediately press the CANCEL button In the absence of operations for a period of about 10 seconds the display will close automatically Brightness Adjusts the brightness of the image See page E 35 Contrast Adjusts the contrast of the image See page E 35 Keystone Corrects ...

Страница 39: ...that can be used with the input signal are displayed on the menu Names and Functions of Buttons Used for Menu Operations Remote Control SELECT 왖왔왗왘 buttons S O U R C E A U T O ON STANDBY STATUS MENU QUICK MENU Main Unit ENTER button MENU button Used to display menus to return to menu name selections and to close menus i e closing sub menu displays FREEZE MUTE LASER AUTO TIMER VOL ZOOM RGB VIDEO QU...

Страница 40: ...ts setting adjustment of the item located at the cursor position Item Name This is the name of the ad justment or setting Icon Pressing the ENTER but ton displays the sub menu or set ting contents Settings Contents Item Name Sub menu Adjustment Bar Adjustment Bar and Settings Contents Adjustment Bar The increases and decreases in bar length ex press the adjustment condition Setting Contents Displa...

Страница 41: ... diagram depicts an example in which the Keystone item name is selected 1 Press the MENU button to display the menu Menu Display The menu name that existed when the menu was closed previously will be displayed Note Please check that the cursor of the item name has disappeared at the time of menu name selection Press the CANCEL button to make the cursor disappear 2 Press the SELECT 왗왘 button to sel...

Страница 42: ...e the various item descrip tions Sub menu 5 Press the SELECT 왗왘 button and make the adjustment or setting while viewing the image When a button is pressed the image will also change Making Adjustments Settings Adjustment display Each press of the button results in a change of 1 point and continued presses cause changes to proceed in order Setting display The setting contents display changes with e...

Страница 43: ...menu name Menu names cannot be selected when the item name cursor is displayed Note A press of the QUICK button while the menu is displayed will close the menu and display the quick menu A press of the MENU button while the quick menu is displayed will close the quick menu and display the menu FREEZE MUTE LASER AUTO TIMER RGB VIDEO R CLICK CANCEL QUICK ENTER STANDBY Q MENU FREEZE MUTE LASER AUTO T...

Страница 44: ...V I D E O S V I D E O Menu name Image Color View Brightness E 35 嘷 嘷 嘷 嘷 Item Name Sub Menu Item Name Contrast E 35 嘷 嘷 嘷 嘷 嘷 Picture Adj Fine Picture E 35 H Position E 36 V Position E 36 嘷 嘷 嘷 嘷 E 36 Reset E 36 嘷 嘷 嘷 嘷 Gamma E 37 嘷 嘷 嘷 嘷 Quick Color Adj E 37 嘷 Color Temp E 38 嘷 嘷 嘷 嘷 White E 38 嘷 嘷 嘷 嘷 Color Space E 38 嘷 White Balance E 39 嘷 Aspect E 40 嘷 嘷 嘷 嘷 Filter E 40 嘷 嘷 嘷 嘷 Horizontal Flip...

Страница 45: ...3 Input Format E 43 RGB 嘷 嘷 嘷 嘷 嘷 嘷 嘷 嘷 嘷 嘷 嘷 嘷 嘷 嘷 嘷 嘷 Video E 44 S Video E 44 Presentation Timer E 44 E 44 嘷 嘷 Language On Screen Background Startup Screen Option E 45 嘷 嘷 嘷 嘷 E 45 嘷 嘷 嘷 嘷 E 45 嘷 嘷 嘷 嘷 E 46 嘷 嘷 嘷 嘷 Status E 47 嘷 嘷 嘷 嘷 Factory Default E 47 嘷 嘷 嘷 嘷 Lamp Timer Reset E 47 嘷 嘷 嘷 嘷 嘷 嘷 嘷 嘷 嘷 嘷 Resolution E 48 嘷 Frequency E 48 嘷 Lamp Timer E 48 嘷 嘷 嘷 嘷 I n p u t S i g n a l Menu Operat...

Страница 46: ...int can only be adjusted when inputting NTSC composite S Video signals or component signals Item Name Brightness Contrast Color Tint Sharpness SELECT 왗 Button SELECT 왘 Button Darker Less contrast Less dense color More red Softer image Brighter More contrast Denser color More green Sharper image Picture Adj Fine Picture H Position V Position Usually automatic adjustment is performed at the time of ...

Страница 47: ... Position Adjust this when the picture is shifted up or down Select the V Position item name and adjust with the SELECT 왗왘 buttons Reset This function resets i e returns to the standard settings the adjust ment setting value of the Image menu name A press of the ENTER button forces the reset Note The item name Fine Picture at the time of RGB input will not be reset Reset of the menu name Image can...

Страница 48: ...the SELECT 왗왘 buttons Normal Correction with standard settings Natural Corrects for natural color tones Real Corrects with emphasis on brightness Note When Color or Standard is selected for Quick Color Adj the Gamma adjust ment item is displayed in gray and cannot be selected or adjusted Select the preset color mode Select the Quick Color Adj item name and select the setting contents with the SELE...

Страница 49: ...t the item name White and use the SELECT 왗왘 buttons to select the setting contents Select the desired degree of white from among Low Medium and High Note When Color or Standard is selected for Quick Color Adj the White adjust ment item is displayed in gray and cannot be selected or adjusted See Quick Color Adj on E 37 Color Temp The screen color is affected by the color of the illumination and oth...

Страница 50: ...computer will be set to black 3 Press the ENTER button The display will change to Adjusting Black and the black level will be adjusted 4 The adjustment of the black level is completed and the display changes to Input White Signal 5 The screen background color of the connected personal computer will be set to white 6 Press the ENTER button The display will change to AdjustingWhite and the white lev...

Страница 51: ...s the aspect ratio and projects a picture of the maximum displayable size Real Projects the input signal without pixel conversion Input Signal Auto Direct Real The setting is higher than the display reso lution of the projector The setting is lower than the display reso lution of the projector Note Note that using this monitor for the purpose of commercial gain or the attraction of public attentio...

Страница 52: ...projection conditions it may not be possible to eliminate keystone distortion completely Depending on the amount of keystone adjustmennt and the content of images some information may be lost or the picture quality may suffer Keystone adjust ment will not change the shape of the menues Keystone Save This function is used to save the keystone adjustment values Setting Keystone Save to on will set t...

Страница 53: ...mately 10 seconds The power is switched off about 5 minutes after this If a signal is input during the appearance of the display and an operation button other than the ON STANDBY button is pressed the display is closed and the function is cancelled Note Some video decks and other equipment output a blue background or other video when playback ends When this happens a signal is being input to the p...

Страница 54: ...screen and the picture is too bright or when projecting images in dark rooms Select the item name Lamp Mode and select the setting contents with the SELECT 왗왘 buttons Eco The lamp s brightness is reduced to approximately 80 extending the lamp s service life STATUS indicator is green Normal The lamp brightness is set to 100 and the screen is bright STATUS indicator is off Note Frequent switching th...

Страница 55: ...eo is the color system setting for the S VIDEO connector Auto Automatic identification NTSC Fixed to the NTSC system NTSC 4 43 Fixed to the NTSC 4 43 system PAL Fixed to the PAL system PAL M Fixed to the PAL M system PAL N Fixed to the PAL N system PAL 60 Fixed to the PAL 60 system SECAM Fixed to the SECAM system Presentation Timer The presentation is given while checking the timer displayed on th...

Страница 56: ... Select the language with the SELECT 왖왔 buttons On Screen This function switches on off the messages displayed with a black frame such as the input signal information and the aspect ratio Select item name On Screen and select the setting contents with the SELECT 왗왘 buttons On The message is displayed Off The message is not displayed Example of a display when the ASPECT button is pressed Wide Backg...

Страница 57: ...to display the logo screen at startup time Select item name Startup Screen and select the setting contents with the SELECT 왗왘 buttons Logo Displays the logo Blank Does not display the logo Note When Logo is selected at the startup screen the TOSHIBA logo is dis played ...

Страница 58: ...eturns the adjustments and settings of all the in put sources to the standard factory default values Select item name Factory Default and press the ENTER button There is a change to the display Press ENTER to Factory Default Set Press the ENTER button to initialize To cancel press the CANCEL button and there will be a return to the menu Items that are not set to the factory default Horizontal Flip...

Страница 59: ...en the modes Because these are averages some lamps will require earlier replacement When Lamp Life Has Been Reached Replace the Lamp Cartridge is displayed on the screen for 10 seconds in a 1 minute interval Replace the lamp with a new one See Replacing the Lamp Cartridge on Page E 52 for information about lamp cartridge replacement When Over 100 Hours Have Elapsed Since Reaching Lamp Life Includi...

Страница 60: ...ool place If the projector s internal temperature is high check the cooling fan s ventilation slots and clean them if they are clogged When the temperature protector is activated the power turns off and in some cases will not turn back on immediately In this case wait about 90 seconds then try again The fan has stopped Unplug the power cord and contact a store that sells the TDP P7 for repairs The...

Страница 61: ...tical parts If this happens wait until the condensation has evaporated before using the projector For a computer input are the horizontal and vertical positions properly ad justed Does the input signal have a compatible resolution and frequency Check the computer s resolution If the image is crushed in the horizontal or vertical direction or if it is not displayed over the entire screen select a d...

Страница 62: ...or body with your nails or other hard object since this will cause scratches Dirty Lens Clean using the same method you would use to clean a camera lens Use a commercial blower for camera use or cleaning paper for eye glasses Be careful not to scratch the lens at this time Dust of the Intake and Outflow Holes Dust that collects in the intake and outflow holes will obstruct the ventilation and caus...

Страница 63: ...e lamp s service life is reached the power is set to the standby mode and no longer turns on Contact a store that sells the TDP P7 for a replacement lamp Indicate you need a TLP LP7 replacement lamp for the TDP P7 CAUTION Replacement of the lamp cartridge is performed after switching off the power waiting for the cooling fan to stop disconnecting the power plug from the well outlet and then leavin...

Страница 64: ...plug the power cord 2 Turn the projector upside down 3 Remove the lamp cover 1 Turn the lamp cover s set screw counterclockwise and loosen until the screw turns freely The screw does not come off 4 Remove the lamp cartridge 1 Fully loosen the lamp cartridge s two screws The screws do not come off 2 Grasp the lamp cartridge s handle and pull upward to re move the lamp cartridge 2 Open the lamp cove...

Страница 65: ...e Lamp Timer Reset on Page E 47 Note After reaching the lamp service life if the lamp is used for more than another 100 hours it will not be possible to switch on the power Should this happen while the projector is in the standby mode simultaneously holding down the projector s SOURCE button and AUTO button for more than 5 seconds will clear the lamp timer Checking that the STATUS indicator is out...

Страница 66: ...manual switching RGB Horizontal 15 to 80 kHz Vertical 50 to 85 Hz Color Reproduction Full color 16 770 000 colors Resolution VGA 640 480 expansion true S VGA 800 600 expansion true XGA 1024 768 true S XGA 1280 1024 compression Input Current 1 9 A Power Requirement 100 240 V AC 50 60 Hz Power Consumption 190 watts 170 watts in eco mode Mechanical Dimensions Excluding Stand 186 mm W 46 mm H 176 mm D...

Страница 67: ...ntosh HDTV 1080i 720p SDTV 576p 480p ⳮ ⳮ 640 350 640 400 720 350 720 400 640 350 640 400 720 400 640 480 640 480 640 480 640 480 800 600 800 600 800 600 800 600 800 600 1024 768 1024 768 1024 768 1024 768 1024 768 1280 1024 640 480 823 624 1024 768 1152 870 1920 1080 1920 1080 1280 720 720 576 720 480 15 734 15 625 31 5 31 5 31 5 31 5 37 9 37 9 37 9 31 5 37 9 37 5 43 3 35 2 37 9 46 9 48 1 53 7 48 ...

Страница 68: ...E 57 S O U R C E A U T O ON STANDBY STATUS MENU QUICK MENU Cabinet Dimensions Unit mm inch 186 7 3 46 1 8 176 6 9 ...

Страница 69: ......

Отзывы: