background image

35

Maintenance

English

Français

Español

Deutsch

Italiano

Português

Svenska

34

Used Lamps

This projector’s lamps contain trace amounts of environmentally harmful inorganic
mercury. Be careful not to break used lamps, and dispose of them in accordance with
local regulations.

Lens and main unit cleaning

 WARNING

• Request cleaning and maintenance of a ceiling-mounted unit from your projector dealership.

Attempting to clean/replace the lamp at a high site by yourself may cause you to fall
down, thus resulting in injury.

Lens cleaning

• Clean the lens with a commercially available blower and/or

lens cleaner.

• The lens is easily scratched, so do not rub it with hard objects,

or strike it.

Main unit cleaning

• Clean the main unit after unplugging the power cord.
• Wipe dirt off the main unit gently with a soft cloth.
• Do not wipe the main unit with a damp cloth. Doing

so may allow water to get inside, resulting in an
electric shock or failure.

• Do not use benzene, thinner and the like as they may

deform or discolor the unit or damage the paint
surface.

• When using a chemically treated cloth, follow the

precautions included with the cloth.

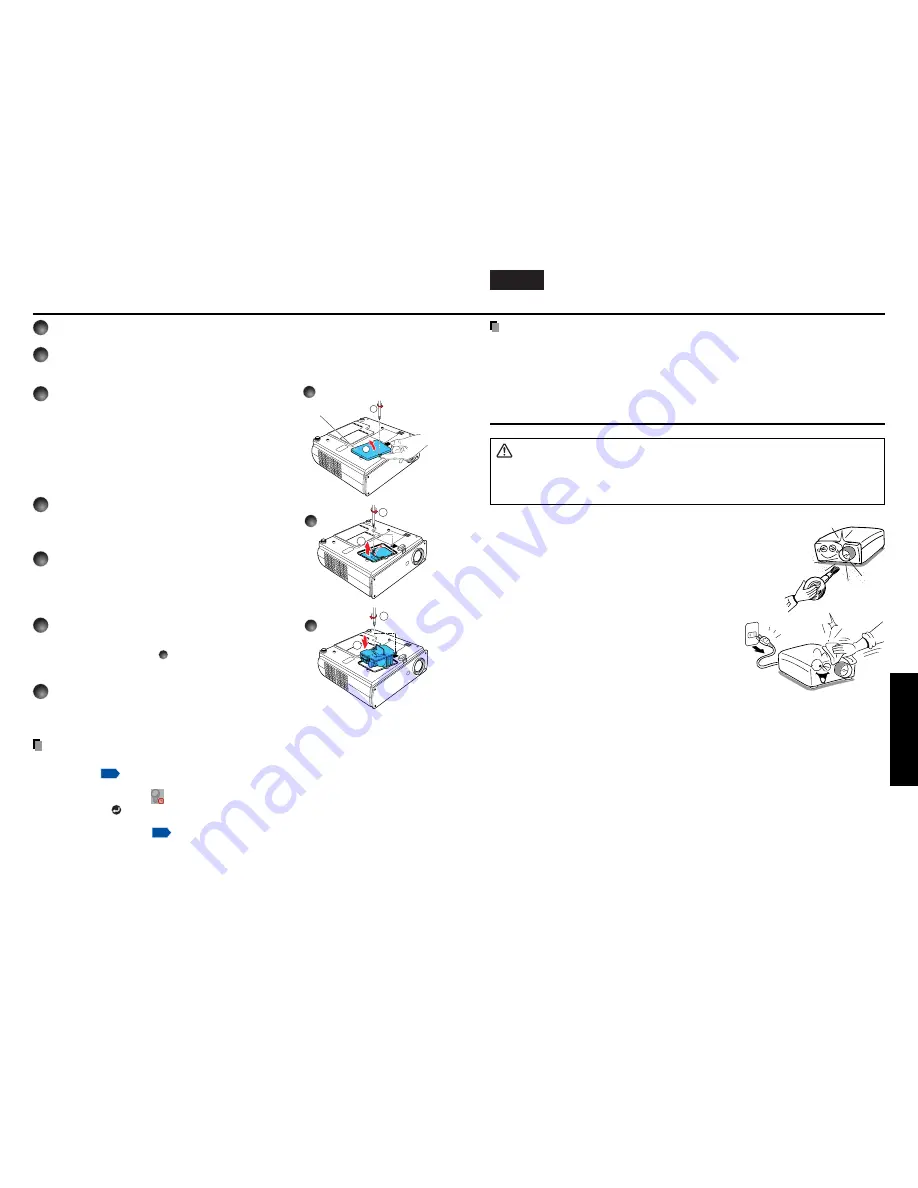
Lamp replacement (Continued)

1

Unplug power cord.

2

Wait until lamp is sufficiently cooled.

Wait for at least 1 hour.

3

Remove the lamp cover.

Loosen the 1 screw, then pull up to the direc-
tion of the arrow with your fingers as shown to
remove the lamp cover. Use care to avoid any
damage to nails and/or tip of your finger(s). If
you have any difficulty in removal, you can use
a screwdriver or any other smaller tool for your
convenience.

4

Pull out the lamp.

Loosen the 2 screws holding the lamp in place,
and pull up the handle to remove the lamp.

5

Mount the new lamp.

Align the orientation, press down until the bottom is
reached, and lock in place using the two lamp
locking screws.

6

Replace the lamp cover.

Align the cover, and press it in, then tighten the
screws loosened in step 

3

 until the lamp cover is

no longer loose.

7

Reset the lamp timer.

See the lamp’s manual for instructions on resetting
the lamp timer.

Notes and Precautions

• The Lamp time item in the Status display menu indicates the time of lamp se (as a

rough guide). 

p.32

• It is recommended that the lamp be replaced after 2,000 hours of use. When Lamp time

reaches 2,000 hours, the 

 icon and a message will appear. This display disappears

when you press 

 button.

• Attach the lamp cover correctly so that it is not loose. If it is not attached correctly, the

lamp may fail to come on 

p.36

, and the lamp’s lifetime may be shortened.

• Always replace the lamp with a new one.
• The lamp is made out of glass. Do not touch the glass surface with your bare hands,

bang it, or scratch it. (Dirt, jolts, scratches and the like could break the lamp.)

2

1

2

1

1

2

3

4

5

Lamp cover

Содержание TDP-MT400

Страница 1: ...Others Maintenance Operations Preparations Before Using English Français Español Deutsch Italiano Português Svenska OWNER S MANUAL DLP PROJECTOR TDP MT400 ...

Страница 2: ... interference that may cause undesired operation This equipment has been tested and found to comply with the limits for a Class B digital device pursuant to part 15 of the FCC Rules These limits are designed to provide reasonable protection against harmful interference in a residential installation This equipment generates uses and can radiate radio frequency energy and if not installed and used i...

Страница 3: ...S CAUTION PLEASE READ AND OBSERVE ALL WARNINGS AND INSTRUCTIONS GIVEN IN THIS OWNER S MANUAL AND THOSE MARKED ON THE UNIT RETAIN THIS BOOKLET FOR FUTURE REFERENCE This unit is fully transistorized and does not contain any parts that can be repaired by the user DO NOT REMOVE THE CABINET COVER OR YOU MAY BE EXPOSED TO DANGEROUS VOLTAGE REFER SERVICING TO QUALIFIED SERVICE PERSONNEL ONLY 1 Read Owner...

Страница 4: ...s and a lamp If such parts should break please handle with care to avoid injury and contact your dealer for repair service The broken pieces of glass may cause to injury In the unlikely event of the lamp rupturing thoroughly clean the area around the projector and discard any edible items placed in that area 18 Servicing Do not attempt to service this product yourself as opening or removing covers...

Страница 5: ... a TV or radio may cause interference to the images or audio sound If this happens move it away from the TV or radio Moving the projector from a low temperature room to a high temperature room may cause condensation on the lens or internal parts in the instrument If you continue to use it in that situation the malfunction may result Ensure to wait until the condensation naturally disappears In a h...

Страница 6: ...ity in the case of damages arising from natural disaster such as earthquakes lightning etc fire not liable to Toshiba Corporation acts by third parties other accidents or use under abnormal conditions including erroneous or improper operation and other problems Toshiba Corporation bears no responsibility for incidental damages lost profit work interruption corruption or loss of the memory contents...

Страница 7: ...erations 23 Using handy features 25 Using auto setting 25 Cutting off the picture temporarily Mute 27 Freezing the image Freeze 27 Using the menus 28 How to use the menus 28 The image adjustment menu 29 The display setting menu 30 The default setting menu 31 Displaying Information Status display 32 Maintenance About lamp 33 Lamp replacement 33 Lens and main unit cleaning 35 Others Trouble indicati...

Страница 8: ...the projector s horizontal tilt p 24 9 Rear panel Connects external devices p 17 10 Focusing lever Adjusts screen focus p 24 11 Foot adjuster Adjusts the vertical projection angle p 24 12 Lamp cover Remove to replace lamp p 34 1 Remote control 2 R6 SIZE AA batteries for remote control 2 3 Owner s Manual 4 Video cable 5 S Video cable 6 Power cord See note Note The shape and number of supplied power...

Страница 9: ...I terminal complies with the DVI 1 0 Specifications Please note that the operations for the functions not covered in these specifications are not guaranteed Because this is an evolving technology it is possible that some devices may not operate properly with the projector This supports HDCP High bandwidth Digital Content Protection Parts on the rear panel Names of each part on the control panel an...

Страница 10: ... sizes are approximate values for full size picture with no keystone adjustment Placement Styles As shown in the figures below this device can be placed in 4 different styles The factory setting is floor mounted front projection Set the Projection mode in the default setting menu p 31 in accordance with your needs Placement Floor mounted front projection WARNING Always obey the instructions listed...

Страница 11: ...are occasions noise on the screen If such is a case decrease your computer s refresh rate or the resolution It is also recommended to use a DVI cable in 2 m or less in length Connection Computer for control VCR etc Video recorder DVD player etc To RS 232C terminal Control cable To video output Video cable supplied To S Video output S Video cable supplied RGB component video cable not supplied To Y...

Страница 12: ... turned on is projected Moving pictures generated with the DVD software for computers may appear unnatural if it is projected with this projector but it is not a malfunction English French German Italian Spanish Portuguese Russian Swedish Turkish Japanese Chinese simplified Chinese traditional Korean Notes The start up screen will disappear after a moment You can dismiss the start up screen before...

Страница 13: ... foot adjuster q Lift up the front of the projector to the desired angle then press the foot adjuster release button The foot adjuster extends Release the button to lock the position w To adjust the horizontal angle use the tilt adjuster To stow the foot adjuster hold up the projector while pressing the foot adjuster release button then slowly lower the projector 6 Adjusting the screen size and fo...

Страница 14: ...roadcast or broadcast on cable except for the purpose of your private viewing and listening it may infringe the copyright protected by the copyright laws Remote Control Remote Control Manual adjustments and settings The menu items of the Set up menu vary depending on the input type as shown in the table below Use the buttons to adjust the items in the table below then press the RETURN button when ...

Страница 15: ...s set to Japanese It is set to US for other languages You can call up on screen menus and conduct a number of adjustments and settings using the operation buttons p 16 on the control panel main unit side and remote control How to use the menus The menu shown below is for operation instructions purposes and might differ from the actual display Using the menus Note Menu adjustments and settings are ...

Страница 16: ... set to Auto When you turn off the projector even if Power on is set to Auto you must press the ON STANDBY button to turn the power off The display setting menu Use this menu to set screen display related items Description Screen size Language Background Icon Start up screen Item Full 4 3 Zoom Full This mode is best for squeeze signal video images 4 3 This mode is best for 4 3 signal video images ...

Страница 17: ...lace it with a new one WARNING If the projector is mounted on a ceiling request a lamp replacement from your projector dealership When replacing always use lamp TLPLMT20 sold separately CAUTION If you have been using the projector the lamp will be very hot and may cause burn injuries Wait for the lamp to cool for longer than 1 hour before replacing it If the lamp should break please handle with ca...

Страница 18: ...oosen the 1 screw then pull up to the direc tion of the arrow with your fingers as shown to remove the lamp cover Use care to avoid any damage to nails and or tip of your finger s If you have any difficulty in removal you can use a screwdriver or any other smaller tool for your convenience 4 Pull out the lamp Loosen the 2 screws holding the lamp in place and pull up the handle to remove the lamp 5...

Страница 19: ...ing at the projector s infrared remote sensor The indicator lights inform you of internal abnormalities No power Problem with projector Unplug the power cord and contact your dealer The lamp cover is not properly attached Unplug the power cord and reattach the lamp cover p 34 Lamp went out during use or won t come on Lamp temperature is high so that it is difficult to turn on the lifetime of the l...

Страница 20: ...8 000 148 500 108 000 135 000 157 500 118 094 Note Signals which resolution exceeds the native resolution 1024 576 pixels will be compressed For this reason some information may be lost or image quality may be affected Specifications List of general specifications Item Specification Consumption Power 300 W Weight 2 8 kg External Dimensions 298 101 4 275 4 mm W H D including protruding parts Cabine...

Страница 21: ...GND G 8 GND B 9 N C 10 GND 11 GND 12 N C 13 Horizontal sync signal 14 Vertical sync signal 15 N C List of supported signals DVI signals This projector supports the following DVI signals Note however that depending on the computer model the screen may show flicker or streaking Please adjust the projector if this happens Resolution 640 x 480 800 x 600 832 x 624 1024 x 768 1152 x 864 1280 x 960 1280 ...

Страница 22: ...ector before sending the next command Main Commands Item Command Computer input select IN1 DVI input select IN2 Video input select IN3 S video input select IN4 YPB CBPR CR input select IN5 Item Command Power on PON Power off PSD Icon display on MO0 Icon display off MO1 Auto setting RGB input PAT Status display on DON Status display off DOF Note Contact your dealer for control cable and other comma...

Страница 23: ......

Отзывы: