background image

CTX28 Installation

Installing the CTX28 Cabinet

1-8

Strata CTX28 I&M    3/05

PCB Installation

Overview Instructions

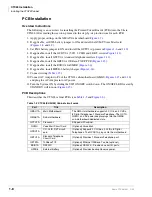
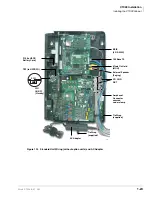
The following is an overview for installing the Printed Circuit Boards (PCBs) into the Strata 
CTX28. After reading this section, proceed to the step-by-step instructions for each PCB.

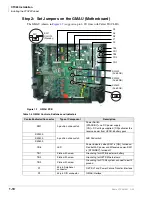
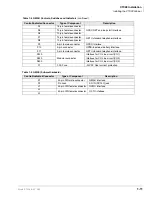
1. Apply proper settings on the GMAU1A (motherboard 

Figure 1-7

).

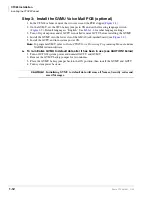
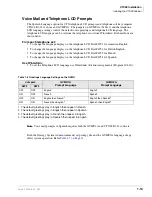
2. If applicable, set SW6 battery jumper to ON and install the GVMU Voice Mail card

(

Figures 1-8

 and 

1-9

).

3. Set P601 battery jumper to ON and install the GCTU1A (processor 

Figures 1-6

 and 

1-10

). 

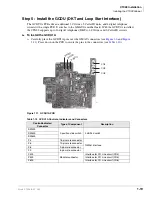
4. If applicable, install the GCDU1A (3 CO, 3 CLID and 8 DKT circuits 

Figure 1-11

). 

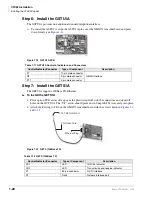
5. If applicable, install GSTU1A (standard telephone interface 

Figure 1-12

). 

6. If applicable, install the GETS1A 100Base-TX I/F PCB (

Figure 1-13

). 

7. If applicable, install the BSIS1A for SMDR (

Figure 1-6

).

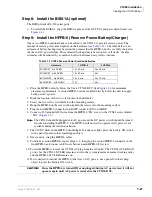
8. If applicable, install HPFB-6 battery/charger (

Figure 1-14

).

9. Connect wiring (

Table 1-15

).

10.Connect AC Adaptor to P2 of the CTX28 sub-motherboard (GMAS, 

Figures 1-15

 an

1-16

and plug the AC Adaptor into AC power.

11. Turn the System ON by sliding the SW1 ON/OFF switch down. The ON/OFF LED located by 

STANDBY will turn on (

Figure 1-15

).

PCB Descriptions

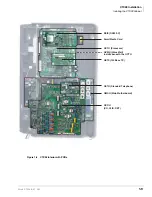
This describes the CTX28 cabinet PCBs (see 

Table 1-3

 and 

Figure 1-6

.)

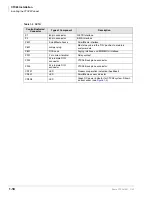
Table 1-3  CTX28 (CHSU28) Cabinet circuit cards 

Part

Title

Description

GMAU1A

Main Motherboard

The GMAU motherboard supports 3 CO lines, 3 CLIDs, 
8 Digital Telephones, 1 Standard Telephone. The GCTU, 
GVMU, and AC power adaptor plugs into the GMAS 
sub-motherboard dedicated slots. 

GMAS1A

Sub-motherboard

GCTU1A

Processor

Shipped with cabinet.

GVMU

Voice Mail Circuit Card

(Optional) Voice Mail. 

GCDU1A

CO, CLID, DKT circuit 
card

(Optional) Supports 3 CO lines, 3 CLIDs, 8 Digital 
Telephones. The GCDU1A plugs onto the motherboard.

GSTU1A

Standard Telephone 
Circuit Card

(Optional) Provides 1 Standard Telephone port.

GETS1A

100BaseT I/F

(Optional) Ethernet 100Base T cable.(optional) 

BSIS1A

RS232C

(Optional) RS232-C. Provides 4 serial I/O ports. 

HPFB6

External Battery

(Optional) Provides backup Reserve power.

Содержание Strata CTX Series

Страница 1: ...726 Digital Solutions Division March 2005 Strata CTX28 R2 22 Installation and Maintenance Manual Cover Digital Business Telephone Systems ...

Страница 2: ...Ringer equivalence number 0 3B The ringer equivalence number REN is useful to determine the quantity of devices which you may connect to your telephone line and still have all of those devices ring when your number is called In most areas but not all the sum of the RENs of all devices connected to one line should not exceed five 5 0B To be certain of the number of devices you may connect to your l...

Страница 3: ...THE WARRANTY OF YEAR 2000 COMPLIANCE AND THE IMPLIED WARRANTIES OF MERCHANTABILITY AND FITNESS FOR A PARTICULAR PURPOSE THE ENTIRE RISK AS TO THE QUALITY AND PERFORMANCE OF THE SOFTWARE IS WITH YOU NEITHER TAIS NOR ITS SUPPLIERS WARRANT THAT THE FUNCTIONS CONTAINED IN THE SOFTWARE WILL MEET YOUR REQUIREMENTS OR THAT THE OPERATION OF THE SOFTWARE WILL BE UNINTERRUPTED OR ERROR FREE HOWEVER TAIS WAR...

Страница 4: ... through one of its authorized dealers within the warranty period and no later than thirty 30 days after such malfunction whichever first occurs Under no circumstances will the retail customer or any user or dealer or other person be entitled to any direct special indirect consequential or exemplary damages for breach of contract tort or otherwise Under no circumstances will any such person be ent...

Страница 5: ...d 1 10 Step 3 Install the GVMU Voice Mail PCB optional 1 12 Voice Mail and Telephone LCD Prompts 1 13 Step 4 Install the GCTU Processor 1 17 Step 5 Install the GCDU DKT and Loop Start Interface 1 19 Step 6 Install the GSTU1A 1 20 Step 7 Install the GETS1A 1 20 Step 8 Install the BSIS1A optional 1 21 Step 9 Install the HPFB 6 Reserve Power Battery Charger 1 21 Step 10 Install Wiring 1 22 Digital Te...

Страница 6: ...This page is intentionally left blank ...

Страница 7: ...inst the packing list and inspect all equipment for damage If equipment is missing or damaged contact your supplier immediately 3 Be sure to retain original packaging materials for re use when storing or transporting system hardware Packaging and Storage 87 21 When handling installing removing examining PCBs do not touch the back soldered side or edge connector Always hold the PCB by its edges Whe...

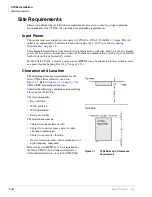
Страница 8: ... Strata CTX28 a reserve power source HPFB 6 may be connected to the system to serve as a power failure backup See Step 9 on page 1 21 Clearance and Location The minimum clearance requirements for the Strata CTX28 Base cabinet is shown in Figure 1 1 Refer to Figure 1 5 on page 1 7 for CTX28 KSU mounting instructions Consider the following conditions when selecting a location for the KSU s The locat...

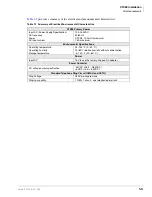
Страница 9: ...0 240VAC 50 60 Hz CTX28 100 watts maximum 1 5A maximum Environmental Specifications Operating temperature Operating humidity Storage temperature 32 104 F 0 40 C 20 80 relative humidity without condensation 4 140 F 20 60 C Power Input DC 15V to use the factory shipped AC adapter Power Converter DC voltage output specification 24VDC 26 3 28 3VDC 5VDC 4 5 5 5VDC Standard Telephone Ring Circuit GMAU a...

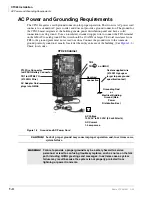
Страница 10: ...located at the utility entrance of the building See Figure 1 2 Check local codes Figure 1 2 Ground and AC Power Cord 87 21 Lack of proper ground may cause improper operation and in extreme cases system failure 51 1 Failure to provide a proper ground may be a safety hazard to service personnel or lead to confusing trouble symptoms such as noise on the talk path including GVMU greetings and messages...

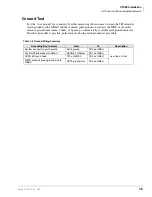
Страница 11: ...nce ground maximum 1 ohm or by using a commercially available earth ground indicator If neither procedure is possible perform the following earth ground test procedure Table 1 2 Ground Wiring Summary Grounding Requirement From To Description System connects to earth ground Earth ground TB3 on GMAU Less than 1 ohm FG of HPFB 6 connect to GMAU HPFB 6 FG Screw TB1 on GMAU HPFB 6 Ground Feed TB1 on GM...

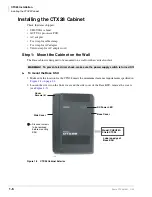
Страница 12: ...l or other vertical surface To mount the Base KSU 1 Make sure the location for the CTX28 meets the minimum clearance requirements specified in Figure 1 1 on page 1 2 2 Loosen the screws on the front cover and the side cover of the Base KSU remove the covers see Figure 1 3 Figure 1 3 CTX28 Cabinet Exterior 51 1 To prevent electrical shock make sure the power supply switch is turned Off Base Cover S...

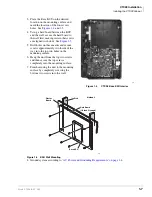
Страница 13: ... 5 5 Drill holes on these marks and secure screws approximately two thirds of the way into the top two holes on the mounting surface 6 Hang the unit from the top two screws and then secure the top screws completely into the mounting surface 7 Finish securing the unit to the mounting surface by completely screwing the bottom two screws into the wall Figure 1 5 KSU Wall Mounting 8 Ground system acco...

Страница 14: ... 10 Connect AC Adaptor to P2 of the CTX28 sub motherboard GMAS Figures 1 15 and 1 16 and plug the AC Adaptor into AC power 11 Turn the System ON by sliding the SW1 ON OFF switch down The ON OFF LED located by STANDBY will turn on Figure 1 15 PCB Descriptions This describes the CTX28 cabinet PCBs see Table 1 3 and Figure 1 6 Table 1 3 CTX28 CHSU28 Cabinet circuit cards Part Title Description GMAU1A...

Страница 15: ... Cabinet Strata CTX28 I M 3 05 1 9 Figure 1 6 CTX28 Interior with PCBs 7108 SmartMedia Card GCTU Processor GVMU Voice Mail installs beneath the GCTU BSIS RS232 C GETS 100Base TX GSTU Standard Telephone GMAU Main Motherboard GCDU CO CLID DKT ...

Страница 16: ...the reserve power from HPFB 6 battery pack SW400 2 position slide switch 3dB Pad switch SW500 SW600 CD6 LED Power indicator when SW1 is ON turned on Red both AC power and 3Reserve power SW1 is STANDBY turned off TB1 Plate with screw Grounding for HPFB 6 external battery TB2 Plate with screw Grounding for GETS Ethernet card TB3 Plate with screw Grounding for CTX28 system connect to earth ground P1 ...

Страница 17: ...onnector GSTU standard telephone interface P400 Modular connector Interface for CO Line circuit CO1 P500 Interface for CO Line circuit CO2 P600 Interface for CO Line circuit CO3 F1 2 0A Fuse 24VDC Over current protection Table 1 5 GMAS Sub motherboard Control Indicator Connector Type of Component Description P1 44 pin DIN male connector GMAU interface P2 Pin Jack DC IN DC15V jack J1 44 pin DIN fem...

Страница 18: ...g the GVMU 4 Install the GVMU into the lower slot of the GMAS sub motherboard see Figure 1 8 5 Install the GCTU and turn system power ON 1RWH To program GVMU refer to Strata CTX28 Voice Processing Programming Manual and use XADM4 Admin software To re initialize GVMU to default data after it has been in use see CAUTION below 1 Turn off CTX28 system power and uninstall GCTU and GVMU 2 Remove the GVM...

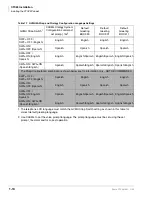
Страница 19: ...Dial 4953 for French To change the language display on the telephone LCD Dial 4954 for Spanish Use WinAdmin To set the Telephone LCD language use WinAdmin Station Assignments Program 204 20 1RWH Voice mail prompts in Spanish requires both the GVMU2A and CTX28 R2 22 software Both the Stratagy System Admin command set prompt_file and the GVMU2A language straps effect system operation Refer Table 1 7...

Страница 20: ...90 Default Greeting BOX 991 Default Greeting BOX 411 SW2 OFF SW3 OFF English English English English English SW2 ON SW3 OFF Spanish Spanish Spanish Spanish Spanish SW2 OFF SW3 ON English Spanish English English Spanish English Spanish English Spanish SW2 ON SW3 ON Spanish English Spanish Spanish English Spanish English Spanish English The Strap Configuration combinations shown below are for inform...

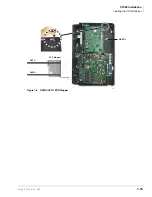
Страница 21: ...CTX28 Installation Installing the CTX28 Cabinet Strata CTX28 I M 3 05 1 15 Figure 1 8 GVMU GCTU PCB Stopper 7162 GVMU GCTU GVMU PCB Stopper 7252 ...

Страница 22: ...ng OFF Shut Down ON ON ON ON OFF Back Up Restore ON ON ON ON ON No 1 8V input Voltage in GVMU ON OFF OFF ON ON Not mounted defective Light flickers and switches from the LED to LED from Ch1 Ch4 Status LED The initialize sequence operates each time the CTX28 power is cycled off on or the CTX28 processor is reset or initialized GVMU program data remains saved However if the GVMU battery jumper is re...

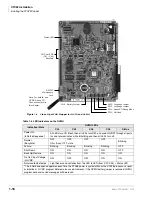
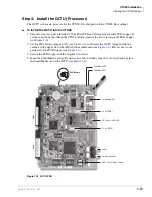
Страница 23: ...ure 1 8 2 Set the P601 battery jumper to ON see Figure 1 10 and insert the GCTU shipped with the cabinet in the upper slot of the GMAS sub motherboard see Figure 1 6 Place it next to the guide rail of the PCB stopper see Figure 1 8 3 Secure the PCB stopper with the original two screws 4 Insert the SmartMedia card gold contacts face left notched corner faces forward and up into the SmartMedia slot ...

Страница 24: ...P601 Jumper plug Must always be in the ON position to maintain customer data P801 RCA Jack Paging interface and BGM MOH interface P901 2 pin screw terminal Relay contact P902 44 pin male DIN connector CTX28 Back plane connector P903 44 pin male DIN connector CTX28 Back plane connector CD101 LED Processor operation indication heartbeat CD501 LED SmartMedia access indicator CD908 LED Green DC power ...

Страница 25: ... place the GCDU1A pins over the GMAU connectors see Figure 1 6 and Figure 1 11 Press down on the PCB to secure the pins to the connectors see Table 1 10 Figure 1 11 GCDU1A PCB Table 1 10 GCDU1A Controls Indicators and Connectors Control Indicator Connector Type of Component Description SW400 2 position slide switch 3dB Pad switch SW500 SW600 P4 16 pin male connector GMAU interface P5 12 pin male c...

Страница 26: ...les on the GCTU1A The UP arrow should point down Snap GETS1A securely into place 2 Attach the FG ring to TB2 on the GMAU1A motherboard with the screw shown in Figures 1 2 and 1 13 Figure 1 13 GETS 100Base TX Table 1 11 GSTU1A Controls Indicators and Connectors Control Indicator Connector Type of Component Description P7 12 pin male connector GMAU interface P8 9 pin male connector P11 3 pin male co...

Страница 27: ...o BATT connector P10 on GMAU 6 Connect a 10 ground AWG wire from the HPFB 6 FG screw to the CTX28 screw labeled TB1 Figure 1 2 1RWH The CTX28 should be plugged into AC power and the DC power switch should be turned On when installing the HPFU 6 The HPFU 6 will not start to operate if AC power is not available during the initial installation 7 The 24VDC LED on the HPFB 6 should light If it does not...

Страница 28: ...ular CO line cords LAN cable etc Slide the shorter tie wrap through the holder Then fasten wiring to the unit with the tie wrap that comes with the Base KSU 3 Connect the end of the AC adapter cable to the GMAS PCB as shown in Figures 1 15 and 1 16 4 Connect the other end of the GETS 100Base TX LAN cable to the LAN connected to the CTX WinAdmin PC 5 Plug the AC adapter into a power strip connected...

Страница 29: ...d Unit Wiring without option units and AC Adapter 7158 Amphenol Connector secured under clamp CO CLID DKT BSIS 4 RS 232C Tie Wrap supplied Tie Wrap supplied 100 Base TX Music On Hold MOH External Speaker Paging TB1 to HPFB FG P10 to HPFB Battery Cord AC Adapter SW1 ON OFF Standby ON STANDBY SW1 ...

Страница 30: ...gital telephones including the new DKT3007 SD telephone shown right The DKT3007 SD only works on the CTX28 The DKT3007 SD works just like the DKT3020 SD and DKT3010 SD except that it has seven flexible buttons The CTX28 supports all DKT2000 and DKT3000 series Add on Modules and DSS Consoles CTX28 supports Handset Off hook Call Announce OCA but not Speaker OCA 1 3 4 2 7257 Figure 1 17 DKT3007 SD Te...

Страница 31: ... 1 Pair plus external power2 2 Digital cable runs must not have the following O Cable splits single or double O Cable bridges of any length O High resistance or faulty cable splices DKT3000 series or DKT2000 series models DKT with BVSU or DVSU or BHEU or HHEU CTX28 KSU 1000 303 1000 feet 303 meters Battery Backup 695 204 DKT with BPCI CTX28 KSU 1000 303 Battery Backup 500 151 DKT with BPCI and BHE...

Страница 32: ...hall comply with the requirements for secondary protectors for communication circuits UL 497A Care must be taken to ensure that they are very well grounded to a reliable earth ground Recommended protectors are available in the fast Series 6 line from ONEAC Corp Libertyville Illinois 60048 800 327 8801 Install and test the secondary protectors precisely to the installation instructions of these man...

Страница 33: ...11 36 VT11 DKT 11 12 VR12 37 VT12 DKT 12 13 VR13 38 VT13 DKT 13 14 VR14 39 VT14 DKT 14 15 VR15 40 VT15 DKT 15 16 VR16 41 VT16 DKT 16 17 NC 42 NC 18 PF1R 43 PF1T PFT circuit 19 NC 44 NC 20 NC 45 NC 21 NC 46 NC 22 NC 47 NC 23 CR1 48 CT1 STU 1 24 NC 49 NC 25 CR2 50 CT2 STU 2 Connect a Standard Telephone to PFT pair to provide access to CO Line1 during a power failure 1 2 3 4 5 6 7 8 9 10 11 12 13 14 ...

Страница 34: ...a PPTC or PPTC9 connectors to PC COM port 7407 Strata CTX28 Serial Port Modular Pins GVMU RJ11 Six pin jack TD RD DTR DSR SG CD Data to GVMU Data from GVMU Data Terminal Ready to GVMU Data Set Ready from GVMU CTX Terminal Signal Ground Carrier Detect from GVMU 2 1 4 3 6 5 PC with GVMU XADM Software Remote GCMU PC using XADM software RS 232 Cable Modem CO Line RS 232C GVMU MODEM Modem available Tel...

Страница 35: ... single line telephone device etc Approximately 3000 ft 909 m with 150 ohm device 2 2 See manufacturer s product specifications for exact resistance of device Table 1 17 Loop Limits for DKT3000 series Telephones Telephone Device Power Supply Unit PSU or Battery Backup Maximum line length 24 AWG DKT3000 series or DKT2000 series models DKT with BVSU or DVSU or DKT with BHEU or HHEU PSU 1000 ft 303m ...

Страница 36: ...B6 CO5 CO5 CO5 CO5 CO5 CO5 CO5 CO5 FB5 CO4 CO4 CO4 CO4 CO4 CO4 CO4 CO4 FB4 CO3 CO3 CO3 CO3 CO3 CO3 CO3 CO3 FB3 CO2 CO2 CO2 CO2 CO2 CO2 CO2 CO2 FB2 CO1 CO1 CO1 CO1 CO1 CO1 CO1 CO1 FB1 PDN 200 201 202 203 204 205 206 207 VMID same as PDN DKT9 16 Optional DKT9 DKT10 DKT11 DKT12 DKT13 DKT14 DKT15 DKT16 FB7 CO6 CO6 CO6 CO6 CO6 CO6 CO6 CO6 FB6 CO5 CO5 CO5 CO5 CO5 CO5 CO5 CO5 FB5 CO4 CO4 CO4 CO4 CO4 CO4 ...

Страница 37: ...Telephones no spkr OCA 017 200 207 GMAU1A motherboard 0102 3 CO lines with CLID 028 CO1 CO3 0103 Not used 0104 Standard Telephone 01 02 026 01 208 02 217 01 GMAU1A 02 GSTU1A 0105 4 Voice Mail ports 026 220 223 GVMU1A 0106 Not used 0107 8 Digital Telephones 017 209 216 GCDU1A 0108 3 CO Lines with CLID 028 CO4 CO6 0205 Virtual BIOU 020 Relay Contact Page MOH GCTU1A Slot codes are set during system i...

Страница 38: ...MU FB0 DN 220 221 222 223 FB1 EQUIP 010501 010502 010503 010504 FB2 SLT SLT SLT SLT FB3 Voice Mail Voice Mail Voice Mail Voice Mail FB19 VM ID FB22 VM MW Center Port Table 1 27 Prog 579 Default Data FB04 Output of Class ANI and DNIS 1 Enable FB05 Calling Number Digits Sent to VM 10 Same as CTX100 Do NOT change for GVMU FB16 VMDN 220 FB19 SMDI ANI CLID Digit Length 10 Same as CTX100 Do NOT change f...

Страница 39: ...T ORDER 6 5 4 3 2 1 Table 1 31 Prog 310 Default Data Trunk Assignment DIT FB0 Trunk Number 1 2 3 4 5 6 FB0 EQUIP 010201 010202 010203 010801 010802 010803 FB1 Day 1 Destination No Data No Data No Data No Data No Data No Data FB2 Day 2 Destination No Data No Data No Data No Data No Data No Data FB3 Day 3 Destination No Data No Data No Data No Data No Data No Data FB4 Music on Hold Source Processor ...

Страница 40: ...This is the last page of the document ...

Отзывы: