background image

13

Intr
oduction

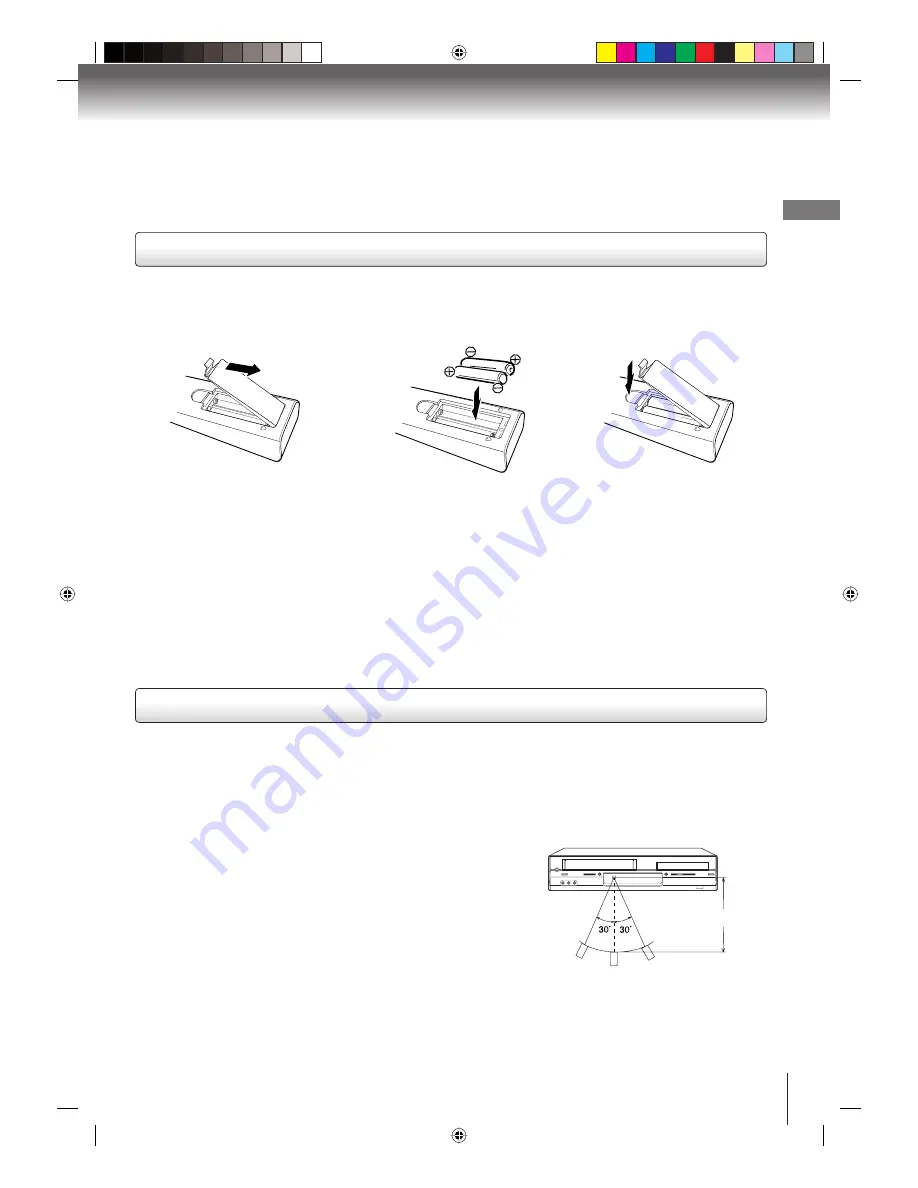
Inserting batteries

Caution:

Never throw batteries into a fire.

Notes:

Be sure to use AAA size batteries.

Dispose of batteries in a designated disposal area.

Batteries should always be disposed of with the environment in mind. Always dispose of batteries in accordance with 

applicable laws and regulations.

If the remote control does not operate correctly, or if the operating range becomes reduced, replace batteries with new 

ones.

When necessary to replace batteries in the remote control, always replace both batteries with new ones. Never mix 

battery types or use new and used batteries in combination.

Always remove batteries from remote control if they are dead or if the remote control is not to be used for an extended 

period of time. This will prevent battery acid from leaking into the battery compartment.

Remote control basics

Press 

POWER

 to turn the DVD/VCR on or off.

Select your desired operating mode (DVD or VCR) using 

VCR DVD

.

(DVD or VCR indicator on the front panel will show you which mode is selected.)

Press 

CH +

 or 

CH –

 to move through the channels one channel at a time.

The 

/

/

/

 are also used to navigate on-screen menu system.

You can directly access specific channels using 

Direct channel selection buttons (0–9)

.

Each press of  

VCR DVD

 on the remote control, switches the screen between the VCR screen (VCR mode) and the 

DVD screen (DVD mode).

Operation

Aim the remote control at the remote sensor and press control buttons to 

operate.

Operate the remote control within 30° angle on either side of the remote 

sensor, up to a distance of approx. 7 meters.

1

Open the battery 

compartment cover in the 

direction of the arrow.

2

Install two “AAA” batteries 

(supplied), paying attention 

to the polarity diagram in the 

battery compartment.

3

Replace the compartment 

cover.

Approx. 7 meters

2K60121A.indb   13

2K60121A.indb   13

1/12/2007   3:50:04 PM

1/12/2007   3:50:04 PM

Содержание SD-V395KC

Страница 1: ...number Serial number 2 Introduction DVD VIDEO PLAYER VIDEO CASSETTE RECORDER LECTEUR DVD MAGNÉTOSCOPE SD V395KC OWNER S MANUAL MODE D EMPLOI 2007 Toshiba Corporation This device does not tape record copy protected DVD Video Discs Cet appareil ne permet pas d enregistrer sur cassettes des disques DVD protégés contre la copie 22 Playback VCR 28 Recording VCR Other functions VCR 32 Playback DVD Funct...

Страница 2: ...AN THOSE SPECIFIED HEREIN MAY RESULT IN HAZARDOUS RADIATION EXPOSURE TO PREVENT DIRECT EXPOSURETO LASER BEAM DO NOTTRYTO OPENTHE ENCLOSURE VISIBLE LASER RADIATION MAY BE PRESENTWHENTHE ENCLOSURE IS OPENED DO NOT STARE INTO BEAM RISK OF ELECTRIC SHOCK DO NOT OPEN CAUTION CAUTION TO REDUCETHE RISK OF ELECTRIC SHOCK DO NOT REMOVE COVER OR BACK NO USER SERVICEABLE PARTS INSIDE REFER SERVICINGTO QUALIF...

Страница 3: ... or other similar surface This unit should never be placed near or over a radiator or heat source This unit should not be placed in a built in installation such as a bookcase or rack unless proper ventilation is provided and or the manufacturer s instructions have been adhered to 10 POWER SOURCE This unit should be operated only from the type of power source indicated on the rating plate If you ar...

Страница 4: ...nit size of grounding conductors location of antenna discharge unit connection to grounding electrodes and requirements for the grounding electrode EXAMPLE OF ANTENNA GROUNDING AS PER THE NATIONAL ELECTRICAL CODE ANTENNA DISCHARGE UNIT NEC SECTION 810 20 ANTENNA LEAD IN WIRE GROUNDING CONDUCTORS NEC SECTION 810 21 GROUND CLAMPS POWER SERVICE GROUNDING ELECTRODE SYSTEM NEC ART 250 PART H GROUND CLA...

Страница 5: ... may cause sight damage 25 DISC Do not use a cracked deformed or repaired disc These discs are easily broken and may cause serious personal injury and product malfunction 26 NOTE TO CABLE TV SYSTEM INSTALLER This reminder is provided to call the Cable TV system installer s attention to Article 820 40 of the NEC that provides guidelines for proper grounding and in particular specifies that the cabl...

Страница 6: ...the surface of the DVD VCR Notes on moisture condensation Moisture condensation damages the DVD VCR Please read the following carefully Moisture condensation occurs for example when you pour a cold drink into a glass on a warm day Drops of water form on the outside of the glass In the same way moisture may condense on the head drum or the optical pick up lens inside this unit one of the most cruci...

Страница 7: ... note that not all high definition television sets are fully compatible with this product and may cause artifacts to be displayed in the picture In case of 525 progressive scan picture problems it is recommended that the user switch the connection to the STANDARD DEFINITION output If there are questions regarding our TV set compatibility with this model 525p DVD player please contact our customer ...

Страница 8: ...rvice is a trademark of DVD Format Logo Licensing Corporation About this owner s manual This owner s manual explains the basic instructions of this unit Some DVD video discs are produced in a manner that allows specific or limited operation during playback As such the unit may not respond to all operating commands This is not a defect in the unit Refer to instruction notes of discs The following s...

Страница 9: ...rding 29 Other functions VCR Stereo recording and playback 30 Second Audio Program SAP 31 Duplicating a video tape 31 Recording a DVD CD disc 31 Playback DVD Playing a disc 32 Advanced playback 33 Zooming 33 Locating desired scene 33 Marking desired scenes 34 Repeat playback 34 A B Repeat playback 34 Program playback 34 Random playback 35 Changing angles 35 Title selection 35 DVD menu 35 Changing ...

Страница 10: ...ndicator 32 DVD S VIDEO OUT jack 19 DVD AUDIO L R OUT jacks 19 DVD COAXIAL DIGITAL AUDIO OUT jack 20 DVD COMPONENT OUT jacks 19 ANT OUT jack 14 ANT IN jack 14 AUDIO L R VIDEO IN LINE IN1 jacks 31 DVD VCR common AUDIO L R VIDEO OUT jacks 18 AC power cord 5 Cassette loading slot 25 VCR DVD mode selector button 22 STOP button 26 32 PLAY button 26 32 REV button 26 33 FWD button 26 33 Front panel Rear ...

Страница 11: ...ape loaded indicator VCR Play indicator VCR indicator VCR Still indicator DVD disc inserted indicator CD inserted indicator AM PM indicator AM is not displayed Progressive indicator DVD 00 15 25 01 41 39 Title 1 3 Chapter 2 24 1 1 Eng Dolby Digital 1 2 Eng 1 1 ELAPSED TIME ANGLE NO DISC OPERATION TITLE NO TOTAL TIME AUDIO LANGUAGE DVD A KIND OF AUDIO SUBTITLE LANGUAGE VCD 00 08 32 00 51 03 Track 3...

Страница 12: ...DISPLAY button 11 A B RPT button 34 OPEN CLOSE button DVD 32 Direction buttons SET buttons CH buttons POWER button INPUT SELECT button DVD MENU button ENTER button RETURN button STOP button FWD button SLOW button AUDIO button ATR button INDEX button 31 35 22 41 41 26 32 27 26 33 26 33 35 AUDIO SELECT button 30 26 SUBTITLE button 36 33 button SKIP 33 REV button 26 TV VCR button 22 REC OTR button 28...

Страница 13: ...e control basics Press POWER to turn the DVD VCR on or off Select your desired operating mode DVD or VCR using VCR DVD DVD or VCR indicator on the front panel will show you which mode is selected Press CH or CH to move through the channels one channel at a time The are also used to navigate on screen menu system You can directly access specific channels using Direct channel selection buttons 0 9 E...

Страница 14: ...ennas Note If both VHF and UHF antennas have 300 ohm twin lead flat wires use a combiner having two 300 ohm inputs and one 75 ohm output Notes A clear picture will not be obtained by the DVD VCR unless the antenna signal is good Connect the antenna to the DVD VCR properly For better quality recording an indoor antenna or a telescopic antenna is not recommended The use of an outdoor type antenna is...

Страница 15: ...he TV mode TV with 300 ohm UHF and 300 ohm VHF antenna inputs DVD VCR to TV connection After you have connected the antenna to the DVD VCR you must connect the DVD VCR to the TV Below are 3 common methods of connecting your DVD VCR to a TV Find the type of TV you are using and follow the connection diagram This DVD VCR has a single 75 ohm output for connection to a TV If your TV has separate VHF a...

Страница 16: ...annel while watching another 2 VHF UHF IN ANT Converter Descrambler Incoming Cable TV DVD VCR Allows Recording of channels through the converter box scrambled and unscrambled Using the programmable timer to record only the channel selected at the converter box Prevents Recording one channel while watching another Using the DVD VCR tuner to select channels Note To record from converter descrambler ...

Страница 17: ...ing of all channels through the converter box Watching scrambled channels while recording another channel Using the DVD VCR tuner to select channels 6 VHF UHF IN ANT A B DVD VCR Converter Descrambler A B Switch TV Incoming Cable Splitter Allows Prevents Recording of all channels through the converter box Recording a scrambled or unscrambled channel while watching another scrambled or unscrambled c...

Страница 18: ...DVD VCR to a VCR TV VCR combination or video selector the playback picture may be distorted as DVD video discs are copy protected Note This method transports VHS and DVD video signals For enhanced DVD video performance we recommend you to connect the S video or ColorStream component video outputs to your TV monitor also 19 Basic connection Connecting to a TV Connect the DVD VCR to your TV To VIDEO...

Страница 19: ...Use this method for DVD playback when the connected television has S Video input and does not have component video inputs Component video outputs PROGRESSIVE outputs Some TVs or monitors are equipped with component video inputs that are capable of reproducing a progressively scanned video signal Connecting to these inputs allows you to view the highest quality pictures with less flicker INTERLACED...

Страница 20: ...axial cable not supplied To COAXIAL type digital audio input Amplifier equipped with a DTS decoder To COAXIAL type digital audio input 75 Ω coaxial cable not supplied Connecting to an amplifier equipped with a Dolby Digital decoder Dolby Digital Dolby Digital is the surround sound technology used in theaters showing the latest movies and is now available to reproduce this realistic effect in the h...

Страница 21: ... jack of the DVD VCR to the COAXIAL input of a Receiver or Processor Refer to the owner s manual of the connected equipment as well When you connect the DVD VCR to other equipment be sure to turn off the power and unplug all of the equipment from the wall outlet before making any connections The output sound of the DVD VCR has a wide dynamic range Be sure to adjust the receiver s volume to a moder...

Страница 22: ...hannel selector and the TV to CH 3 or 4 playback a prerecorded tape and tune the TV to receive a sharp color picture from the video cassette recorder Refer to your TV owner s manual for details Setting the video channel Setting the language Note If the unit does not operate properly or No key operation by the unit and or the remote control Static electricity etc may affect the player s operation D...

Страница 23: ...k to set itself automatically AUTO CLOCK setting AUTO CLOCK adjustment To set AUTO CLOCK to off The AUTO CLOCK adjustment will be updated at 6 00 AM 12 00 PM and 6 00 PM everyday when the DVD VCR turned off If you use a cable box and you want AUTO CLOCK adjustment to be performed the cable box must be left on The AUTO CLOCK adjustment is not effective when there is a difference of more than 5 minu...

Страница 24: ...er the timer settings will be lost In this case reset the present time If the AUTO CLOCK process did not set the date and time correctly you must set them manually for timer recording and DAYLIGHT SAVING TIME Setting channels automatically TV CABLE selection Preparation Turn ON the TV and select the corresponding video input Press VCR DVD selector to select the VCR mode The VCR mode indicator will...

Страница 25: ... only video cassette tapes marked Loading Push the center of the tape until it is automatically inserted Insert the cassette tape with its labeled side facing up and the erase prevention tab positioned at your left An inverted cassette tape cannot be inserted Erase prevention tab Automatic power ON When you insert a cassette tape the unit power will turn ON automatically Automatic playback When lo...

Страница 26: ...r Long Play 9 X 15 X Press PAUSE STEP during playback To resume normal playback press PLAY or PAUSE STEP During playback press SLOW To resume normal playback press PLAY Slow tracking and vertical lock adjustment If noise bars appear in the picture during slow motion press SET to reduce the noise bars If the still picture jitters excessively press SET to stabilize the still picture Press PAUSE STEP...

Страница 27: ...position The counter display will be reset to 00 00 position e g the beginning of recording 3 Press STOP when playback or recording is completed Press ZERO RETURN The tape will automatically rewind or fast forward to the 00 00 counter position Zero return function This function enables you to locate the beginning of any recording made on the VCR Recording an INDEX mark The Index Search function au...

Страница 28: ...RC 14 36 A W 37 59 AA WW 60 85 AAA ZZZ 86 94 86 94 95 99 A 5 A 1 100 125 100 125 01 5A 5 Press REC OTR will appear on the screen for about 4 seconds and REC will appear on the display window Recording a TV program Recording and viewing the same TV program Recording a TV program Press PAUSE STEP to avoid recording unwanted material Press again to continue the recording will appear on screen for abo...

Страница 29: ...dbys for recording At the same time VCR mode will change to DVD mode automatically You can use DVD even if the VCR is in the timer recording mode If you do not use the DVD turn the power off Notes The timer recording will start at 5 seconds before the preset starting time If the timer symbol does not appear on the display when TIMER REC is pressed the cassette is not inserted 25 If the cassette is...

Страница 30: ...dio will be heard through the speakers Normally set to the Hi Fi stereo position this button can be set to the MONO position if the stereo broadcast or videotape audio is of poor quality The R and L positions allow the audio from the Right or Left Hi Fi channel to be heard over both TV speakers This button has no effect when viewing a MONO videotape or TV program Each time when you press the butto...

Страница 31: ...rded tape Make all connections before turning on the power Duplicating a video tape For duplicating a previously recorded tape from a camcorder follow the camcorder manufacturer s instructions A typical camcorder dubbing hookup is shown above Recording a DVD CD disc You can record disc material in DVD Audio CD etc onto a Video tape with this DVD VCR Duplicating a DVD or CD disc Preparation Turn ON...

Страница 32: ...e on the TV screen during a normal broadcast may appear while playing a DVD video disc It is because due to high resolution pictures on these discs which include a lot of information The amount of noise depends on the disc you use with this unit You should generally reduce the sharpness adjustment on your TV when viewing DVD video discs If a non compatible disc is loaded Incorrect Disc Region Code...

Страница 33: ...n screen indefinitely If you leave the still video image or On screen display image displayed on your TV for an extended period of time you risk permanent damage to your television screen Projection televisions are very susceptible 1 Press ZOOM during playback The center part of the image will be zoomed in Each press of ZOOM will change the ZOOM 1 x 1 3 2 x 1 5 and 3 x 2 0 2 Press to view a differ...

Страница 34: ...tle The unit automatically starts repeat playback after finishing the current title or chapter Video CD Press to select Repeat Press ENTER repeatedly to select Track or All The unit automatically starts repeat playback after finishing the current track If you set the repeat mode during stop mode press PLAY to start Repeat playback Audio CD and MP3 WMA JPEG DivX CD Please see Repeat playback CD 39 ...

Страница 35: ...press DVD MENU 2 Press to select the desired item 3 Press ENTER The menu continues to another screen Repeat steps 2 and 3 to set the item completely Note Depending on the DVD you may not be able to resume playback from the scene point when you press DVD MENU 1 Press AUDIO during playback The current soundtrack language will appear 2 Press AUDIO repeatedly until the desired language is selected The...

Страница 36: ...ess or to select the Off position Notes The QSound setting can also be changed in the function setting 42 The QSound works only when the DVD disc recorded with Dolby Digital is played back When this function works the volume might changed When the voice is distorted turn off QSound Manufactured under license from QSound Labs Inc U S patent Nos 5 105 462 5 208 860 and 5 440 638 and various foreign ...

Страница 37: ...le including two digit or three digit number ex 01 02 or 001 002 Refrain from making too many sub folders CAUTION Some MP3 WMA JPEG DivX CDs cannot be played back depending on the recording conditions The CD R RW that has no music data or non MP3 WMA JPEG DivX files cannot be played back Standard sampling frequency and the bit rate MP3 CD MPEG 1 Audio 32kHz 44 1kHz 48kHz 32kbps 320kbps constant bi...

Страница 38: ...icture CD is not recognized on this unit Notes In case of Audio CD the function of A B Repeat can be used See A B Repeat playback 34 During MP3 WMA JPEG Playback you cannot use JUMP and A B Repeat functions You can use Repeat Track or All Random functions and Program playback for MP3 WMA JPEG DivX CD Playback 39 40 Select Files The file type to make it display in the file browser can be chosen Pre...

Страница 39: ...D DivX CD playback DivX VOD content is protected by DRM Digital Rights Management system This restricts playback of content to specific registered devices If the incorrect DRM file is loaded Authorization Error This player is not authorized to play this video will appear on the screen When you attempt to play DivX VOD the number of plays is limited and the right message will appear on the screen I...

Страница 40: ...iles are added into the program list Folder 1 Folder 2 MP3 1 MP3 2 MP3 3 Edit Mode Program View Add To Program When you finish storing the files you want into the Program list select Edit Mode again and press ENTER to release edit mode CD Program playback CD 4 Press to select Program View then press ENTER Program View shows only the programed files that you have added in step 2 Program View MP3 1 ...

Страница 41: ...e following screen sizes to choose from 4 3 Letter box Select this mode when connecting to a conventional TV When playing back a wide screen DVD disc it displays the wide picture with black bands at the top and bottom of screen 4 3 Pan scan It displays the wide picture on the whole screen with left and right edges automatically cut off 16 9 Wide Select this mode when connecting to a wide screen TV...

Страница 42: ... intervals Night Mode Night Mode enables you to control the dynamic range so as to achieve a suitable sound for your equipment Off It plays back at the recording level on the disc On Loud sound such as explosion is toned down slightly when played back This is suitable when it is connected to a stereo Notes This function works only when the disc recorded with Dolby Digital is played back The level ...

Страница 43: ...with a DivX VOD provider Then press ENTER Note If each setup pages 41 43 has completed the unit can always work under the same condition especially with DVD discs Each setup will be retained in the memory even if you turn the power off Note This temporary cancellation of rating level will be kept until the disc is ejected When the disc is ejected the original rating level will be set again automat...

Страница 44: ...pali 2415 Telugu 3015 Bhutani 1436 Hindi 1819 Norwegian 2425 Thai 3018 Bihari 1218 Hungarian 1831 Oriya 2528 Tibetan 1225 Breton 1228 Icelandic 1929 Panjabi 2611 Tigrinya 3019 Bulgarian 1217 Indonesian 1924 Pashto Pushto 2629 Tonga 3025 Burmese 2335 Interlingua 1911 Persian 1611 Turkish 3028 Byelorussian 1215 Irish 1711 Polish 2622 Turkmen 3021 Cambodian 2123 Italian 1930 Portuguese 2630 Twi 3033 ...

Страница 45: ...ing adjustment beyond range of automatic tracking circuit Try Manual tracking adjustment Video heads are dirty The tape is worn or damaged 26 27 DVD Display is not shown in your language Select proper language in the menu options 41 Playback doesn t start No disc is inserted The disc may be dirty Clean up the disc The unit cannot play DVD ROMs etc 32 7 8 Stopping playback slow motion play repeat p...

Страница 46: ...e and 48 seconds with T 120 Cassette Tape Applicable disc DVD 12 cm 8 cm CD 12 cm 8 cm Frequency range DVD 4 Hz 22 kHz CD 4 Hz 20 kHz S N ratio 85dB DVD Harmonic distortion 0 06 DVD Wow and flutter Less than 0 01 Wrms Operating conditions Temperature 5 C 40 C 41 F 104 F Operating status Horizontal Input Output DVD VCR Video input 1 0 V p p 75 Ω negative sync pin jack x 2 Video output 1 0 V p p 75 ...

Страница 47: ... only if the Player is i purchased as new and unopened fromTCL or fromTCL s authorized distributors dealers or resellers ADR s and ii located operated in Canada 4 Warranties extend only to material defects in materials or workmanship as limited above and do not extend to a Service repairs or replacement made necessary by accident misuse abuse moisture liquids dust dirt neglect accident damage 24 7...

Страница 48: ... the arbitration will be conducted by one arbitrator pursuant to the laws and rules relating to arbitration generally in force in the jurisdiction in which you reside at the time that the Dispute arises To the extent not precluded by law no claim dispute controversy or disagreement of any other person may be joined or combined with any Dispute by you without the prior written consent of TCL Critic...

Страница 49: ...49 Others Memo 2K60121A indb 49 2K60121A indb 49 1 12 2007 3 50 22 PM 1 12 2007 3 50 22 PM ...

Отзывы: