background image

C-9

A

PPENDIX

 C

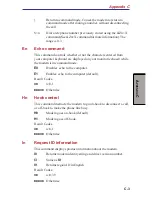
&Gn V.22bis guard tone control

This command determines which guard tone, if any, to transmit while
transmitting in the high band (answer mode). This command is only
used in V.22 and V.22bis mode. This option is not used in North
America and is for international use only.

&G0

Guard tone disabled (default).

&G1

Sets guard tone to 550 Hz.

&G2

Sets guard tone to 1800 Hz.

Result Codes:

OK

n=0,1,2

ERROR

Otherwise

&Kn Local flow control selection

&K0

Disable flow control.

&K3

Enable CTS/RTS flow control (default).

&K4

Enable XON/XOFF flow control.

Result Codes:

OK

n=0,3,4

ERROR

Otherwise

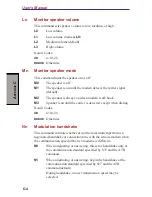
&Pn

Select Pulse Dial Make/Break Ratio (WW)

&P0

Selects 39% - 61% make/break ratio at 10 pulses per second.

&P1

Selects 33% - 67% make/break ratio at 10 pulses per second.

&P2

Selects 33% - 67% make/break ratio at 20 pulses per second.

Result Codes:

OK

n=0,1,2

ERROR

Otherwise

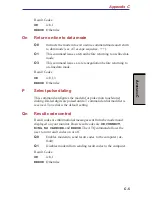
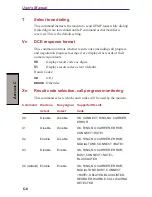
&Tn

Self-test commands

These tests can help to isolate problems if you experience periodic
data loss or random errors.

Appendix C

Содержание Satellite A10 Series

Страница 1: ...TOSHIBA Satellite A10 Series Portable Personal Computer User s Manual ...

Страница 2: ...twork withoutthepermissionofthecopyrightownerisaviolationofcopyright orauthor srightsandissubjecttocivildamagesorcriminalaction Pleasecomplywithcopyrightlawsinmakinganyreproductionfromthis manual Disclaimer This manual has been validated and reviewed for accuracy The instructions and descriptions it contains are accurate for the TOSHIBA Satellite A10 Series Portable Personal Computer at the time o...

Страница 3: ...rning the equipment off and on the user is encouraged to try to correct the interference by one or more of the following measures Reorient or relocate the receiving antenna Increase the separation between the equipment and receiver Connect the equipment into an outlet on a circuit different from that to which the receiver is connected Consult the dealer or an experienced radio TV technician for he...

Страница 4: ...neBoulevard Irvine California92618 1697 Telephone 949 583 3000 EU Declaration of Conformity information TOSHIBA declares that the product PSA10 conforms to the following Standards Supplementary Information The product complies with the requirements of the LowVoltage Directive 73 23 EEC the EMC Directive 89 336 EEC and or the R TTE Directive1999 05 EEC This product is carrying the CE Mark in accord...

Страница 5: ...he following networks It has been tested to and found to conform with the additional require mentsconditionalinEG201121 Germany ATAABAN005 AN006 AN007 AN009 AN010and DE03 04 05 08 09 12 14 17 Greece ATAABAN005 AN006andGR01 02 03 04 Portugal ATAABAN001 005 006 007 011andP03 04 08 10 Spain ATAABAN005 007 012 andES01 Switzerland ATAABAN002 All other countries regions ATAABAN003 004 Specific switch se...

Страница 6: ...e given the opportunity to correct the problem and informed of your right to file a complaint with the FCC In the event repairs are ever needed on your modem they should be performed by TOSHIBA Corporation or an authorized representative of TOSHIBA Corporation Disconnection If you should ever decide to permanently disconnect your modem from its present line please call the telephone company and le...

Страница 7: ...e the modem call your local telephone company andgivethemthefollowinginformation The telephone number of the line to which you will connect the modem The registration number that is located on the device The FCC registration number of the modem will be found on either the device which is to be installed or if already installed on the bottom of the computer outside of the mainsystemlabel TheRingerE...

Страница 8: ...nt malfunctions may give the telecommunications company cause to request the user to disconnect the equipment Users should ensure for their own protection that the electrical ground connec tions of the power utility telephone lines and internal metallic water pipe system if present are connected together This precaution may be particularly important inruralareas CAUTION Users should not attempt to...

Страница 9: ... other country region setting while the modem is attached to the Australian PSTN would result in you modem being operated in a non compliant manner To verify that the country region is correctly set enter the command ATI which displays the currently active setting To set the country region permanently to Australia enter the following command sequence AT TE 1 ATS133 1 AT F AT W AT TE 0 ATZ Failure ...

Страница 10: ...uisance to other Telecom customers SomeparametersrequiredforcompliancewithTelecom sPTCSpecifications are dependent on the equipment PC associated with this modem The associated equipment shall be set to operate within the following limits for compliancewithTelecomSpecifications a There shall be no more than 10 call attempts to the same number within any 30 minute period for any single manual call ...

Страница 11: ...dem does not implement the New Zealand Reverse Dialing standard Numbertobedialed 0123456789 Numbertoprogramintocomputer 0987654321 Note that where DTMF dialing is used the numbers should be entered normally The transmit level from this device is set at a fixed level and because of this there may be circumstances where the performance is less than optimal Before reporting such occurrences as faults...

Страница 12: ...mber of Telepermit labels subject to the general instructions on format size and colour on the attached sheet The Telepermit label must be displayed on the product at all times as proof to purchasers and service personnel that the product is able to be legitimately connected to the Telecom network The Telepermit label may also be shown on the packaging of the product and in the salesliterature asr...

Страница 13: ...ance contact an autho rized service location 2 Use of controls adjustments or the performance of procedures other than those specified may result in hazardous radiation exposure 3 To prevent direct exposure to the laser beam do not try to open the enclosure THIS PRODUCT COMPLIES WITH DHHS RULES 21 CFR CHAPTER 1 SUBCHAPTER J APPLICABLE AT DATE OF MANUFACTURE MANUFACTURED Manufactured by TEAC Corpor...

Страница 14: ...rvice Vertretung Um einen direkten Kontakt mit dem Laserstrahl zu vermeiden darf das Gerät nicht geöffnet werden ADVARSEL Denne mærking er anbragt udvendigt på apparatet og indikerer at apparatet arbejder med laserstråler af klasse 1 hviket betyder at der anvendes laserstrlier af svageste klasse og at man ikke på apparatets yderside kan bilve udsat for utilladellg kraftig stråling APPARATETBORKUNÅ...

Страница 15: ...DER BEDIENUNGSANLEITUNGBESCHRIEBEN KÖNNENGEFÄHRLICHE STRAHLENEXPOSITIONENZURFOLGE HABEN Toshiba DVD ROM drive SD C2612 CD RW DVD ROM drive SD R2412 DVD R RW drive SD R6012 safety instruction CAUTIONS 1 The CD DVD drive employs a laser system To ensure proper use of this product please read this instruction manual carefully and retain for future reference Should the unit ever require maintenance co...

Страница 16: ...thält ein Laser System und ist als LASERSCHUTZKLASSE 1 PRODUKT klassifiziert Für den richtigen Gebrauch dieses Modells lesen Sie bitte die Bedienungsanleitung sorgfältig durch und bewahren diese bitte als Referenz auf Falls Probleme mit diesem Modell auftreten benachrichtigen Sie bitte die nächste autorisierte Service Vertretung Um einen direkten Kontakt mit dem Laserstrahl zu PRODUCT IS CERTIFIED...

Страница 17: ...man kan komme til at udsætte sig for laserstråling OBS Apparaten innehåller laserkomponent som avger laserstråining överstigande gränsen för laserklass 1 VAROITUS Suojakoteloa si saa avata Laite sisältää laserdiodin joka lähetää näkymätöntä silmilie vaarallista lasersäteilyä CAUTION USEOFCONTROLSORADJUST MENTSORPERFORMANCEOFPROCE DURESOTHERTHANTHOSESPECIFIEDIN THEOWNER SMANUALMAYRESULTIN HAZARDOUS...

Страница 18: ...t an autho rized service location 2 Use of controls adjustments or the performance of procedures other than those specified may result in hazardous radiation exposure 3 To prevent direct exposure to the laser beam do not try to open the enclosure THIS PRODUCT COMPLIES WITH DHHS RULES 21 CFR SUBCHAPTER J APPLICABLE AT DATE OF MANU FACTURE MANUFACTURED Hitachi LG Data Storage Inc 26 5 TORANOMON 1 CH...

Страница 19: ...ice Vertretung Um einen direkten Kontakt mit dem Laserstrahl zu vermeiden darf das Gerät nicht geöffnet werden ADVARSEL Denne mærking er anbragt udvendigt på apparatet og indikerer at apparatet arbejder med laserstråler af klasse 1 hviket betyder at der anvendes laserstrlier af svageste klasse og at man ikke på apparatets yderside kan bilve udsat for utilladellg kraftig stråling APPARATETBORKUNÅBN...

Страница 20: ...TUNGBESCHRIEBEN KÖNNENGEFÄHRLICHE STRAHLENEXPOSITIONENZURFOLGE HABEN Panasonic CD RW DVD ROM drive UJDA 740 750 safety instruction CAUTIONS 1 TheCD RW DVD ROMdriveemploysalasersystem To ensure proper use of this product please read this instruction manual carefully and retain for future reference Should the unit ever require maintenance contact an authorized service location 2 Use of controls adju...

Страница 21: ...KLASSE 1 PRODUKT klassifiziert Für den richtigen Gebrauch dieses Modells lesen Sie bitte die Bedienungsanleitung sorgfältig durch und bewahren diese bitte als Referenz auf Falls Probleme mit diesem Modell auftreten benachrichtigen Sie bitte die nächste autorisierte Service Vertretung Um einen direkten Kontakt mit dem Laserstrahl zu vermeiden darf das Gerät nicht geöffnet werden Location of the req...

Страница 22: ...ætte sig for laserstråling OBS Apparaten innehåller laserkomponent som avger laserstråining överstigande gränsen för laserklass 1 VAROITUS Suojakoteloa si saa avata Laite sisältää laserdiodin joka lähetää näkymätöntä silmilie vaarallista lasersäteilyä CAUTION USEOFCONTROLSORADJUST MENTSORPERFORMANCEOFPROCE DURESOTHERTHANTHOSESPECIFIEDIN THEOWNER SMANUALMAYRESULTIN HAZARDOUSRADIATIONEXPOSURE VORSIC...

Страница 23: ...ecautions Stressinjury xxxv Heat injury xxxv Pressure or impact damage xxxv CPU performance disclaimer xxxvi PC card overheating xxxvi LCDDisplay xxxvi Chapter 1 Introduction Equipmentchecklist 1 1 Hardware 1 1 Software 1 1 Documentation 1 2 Features 1 2 Processor 1 2 Memory 1 3 Power 1 3 Disks 1 3 Display 1 5 Keyboard 1 5 Pointingdevice 1 6 Ports 1 6 Slots 1 6 Multimedia 1 6 ...

Страница 24: ... media drive 2 11 CD ROMdrive 2 11 DVD ROMdrive 2 11 CD RW DVD ROMdrive 2 12 DVD R RWdrive 2 13 Universal AC adaptor 2 14 Chapter 3 Getting Started Setting up your work space 3 1 Generalconditions 3 2 Placement of the computer 3 2 Seating and posture 3 3 Lighting 3 4 Work habits 3 4 Connecting the universal AC adaptor 3 5 Opening the display 3 6 Turning on the power 3 6 Starting up for the first t...

Страница 25: ...ting 4 8 Writing CD DVDs on DVD R RW drive 4 9 Importantmessage 4 9 Disclaimer 4 9 Read writefunctionchart 4 11 Beforewritingorrewriting 4 13 When writing or rewriting 4 13 Drag nDropCD DVD 4 14 DataVerification 4 14 Media care 4 15 CD DVDs 4 15 Diskettes 4 15 Modem 4 16 Regionselection 4 16 Propertiesmenu 4 17 Connecting 4 18 Disconnecting 4 19 Wirelesscommunications 4 19 Wireless LAN 4 19 Securi...

Страница 26: ...p Modes Power conditions 6 1 Power indicators 6 2 Battery indicators 6 2 DC IN indicator 6 3 Powerindicator 6 3 Batterytypes 6 3 Battery pack 6 4 Real Time Clock battery 6 4 Care and use of the battery pack 6 5 Safetyprecautions 6 5 Chargingthebatteries 6 8 Monitoring battery capacity 6 10 Maximizing battery operating time 6 10 Retainingdatawithpower off 6 11 Extending battery life 6 11 Replacing ...

Страница 27: ...ymodule 8 4 Removingmemorymodule 8 6 Battery pack 8 7 Universal AC adaptor 8 7 USB FDD kit 8 7 External monitor 8 8 TV 8 8 Changingtheresolution 8 9 Security lock 8 11 Chapter 9 Troubleshooting Problemsolvingprocess 9 1 Preliminary checklist 9 1 Analyzing the problem 9 2 Hardware and system checklist 9 3 System start up 9 3 Self test 9 4 Power 9 4 Password 9 7 Keyboard 9 7 LCDpanel 9 10 Harddiskdr...

Страница 28: ... LAN 9 24 Wireless LAN 9 25 Real Time Clock 9 25 TOSHIBAsupport 9 26 Before you call 9 26 Where to write 9 26 Appendixes Appendix A Specifications A 1 Appendix B Display Controller and Modes B 1 Appendix C ATCommands C 1 Appendix D S registers D 1 Appendix E V 90 E 1 Appendix F Internal Modem Guide F 1 Appendix G WirelessLAN G 1 Appendix H AC Power Cord and Connectors H 1 ...

Страница 29: ...xxix Appendix I PartsNumbers I 1 Glossary Index ...

Страница 30: ...xxx ...

Страница 31: ... to learn how this manual is organized then become acquainted with this manual by browsing through its pages Be sure to look over the Special features section of the Introduction to learn about features that are uncommon or unique to the computers and carefully read HW Setup and Passwords Manual contents This manual offers important information about your computer including solutions to the most c...

Страница 32: ...ware available Chapter 9 Troubleshooting suggests courses of action if the computer doesn t seem to be working properly The Appendixes provide technical information about your computer The Glossary defines general computer terminology and includes a list of acronyms used in the text The Index quickly directs you to the information contained in this manual Conventions This manual uses the following...

Страница 33: ...hird ABC When procedures require an action such as clicking an icon or entering text the icon s name or the text you are to type in is represented in the type face you see to the left Display ABC Names of windows or icons or text generated by the computer that appears on its display screen is presented in the type face you see to the left Messages Messages are used in this manual to bring importan...

Страница 34: ...xxxiv ...

Страница 35: ...ith the bottom of the computer If the computer is used for long periods its surface can become very warm While the temperature will not feel hot to the touch if you maintain physical contact with the computer for a long time if you rest the computer on your lap for example your skin might suffer low heat injury If the computer has been used for a long time avoid direct contact with the metal plate...

Страница 36: ...nfiguration Under some conditions your computer product may automatically shut down This is a normal protective feature designed to reduce the risk of lost data or damage to the product when used outside recommended conditions To avoid risk of lost data always make back up copies of data by periodically storing it on an external storage medium For optimum performance use your computer product only...

Страница 37: ...re 1 1 Software 1 1 Documentation 1 2 Features 1 2 Processor 1 2 Memory 1 3 Power 1 3 Disks 1 3 Display 1 5 Keyboard 1 5 Pointingdevice 1 6 Ports 1 6 Slots 1 6 Multimedia 1 6 Communications 1 7 Security 1 7 Software 1 7 Special features 1 7 Utilities 1 9 Options 1 11 ...

Страница 38: ...I NTRODUCTION ...

Страница 39: ...he box and packing materials for future use Hardware Check to make sure you have all the following items SatelliteA10SeriesPortablePersonalComputer Universal AC adaptor and power cord USBdiskettedrive Providedwithsomemodels Modular cable Software The following software is preinstalled Microsoft Windows XP Home Edition Professional Modemdriver Display Drivers for Windows TOSHIBAUtilities Wireless L...

Страница 40: ...usage andhighreliability Thiscomputer incorporates the following features and benefits Processor Built in The computer is equipped with an Intel processor Mobile Intel Celeron processor whichincorporatesa256KBlevel2cachememory 1 80GHzMobileIntel Celeron processor1 80GHz 2 00GHzMobileIntel Celeron processor2 00GHz 2 20GHzMobileIntel Celeron processor2 20GHz Mobile Intel Pentium 4 M processor whichi...

Страница 41: ...e low It comes with a detachable power cord Because it is universal it can receive a range of AC voltage from 100 to 240 volts however the output current varies among different models Using the wrong model can damage your computer See the universal AC adaptor section in Chapter 2 The Grand Tour Disks Harddiskdrive Available in four sizes 18 63GB 20 0billionbytes 27 94GB 30 0billionbytes 37 26GB 40...

Страница 42: ... Text PhotoCD single multi session CD ROMMode1 Mode2 CD ROMXAMode2 Form1 Form2 EnhancedCD CD EXTRA CD G AudioCDonly Addressing Method 2 CD RW DVD ROM Somemodelsareequippedwithafull size CD RW DVD drive ROM drive module that lets you run CD DVDs without using an adaptor It reads DVD ROMs at maximum 8 speed andCD ROMsatmaximum24speed ItwritesCD Ratup to 24 speed and CD RW at up to 10 speed For readi...

Страница 43: ...AMode2 Form1 Form2 EnhancedCD CD EXTRA CD G AudioCDonly Addressing Method 2 Display The computer s LCD panel supports high resolution video graphics The screen can be set at a wide range of viewing angles for maximum comfort and readability Built in 14 1 XGATFTscreenor15 0 XGA SXGA TFTscreen 16 M colors with one of the following resolutions XGA 1024horizontalx768verticalpixels SXGA 1400horizontalx...

Страница 44: ...speeds 40 times faster than the USB 1 1 standard The ports also support USB 1 1 Slots PCcard The PC card slot accommodates one 5 mm Type II card Multimedia Sound system Windows sound system compatible sound system provides internal speakers as well as jacks for an external microphone and headphone TVout Some models are equipped with TV out port This jack lets you transfer video and sound data to e...

Страница 45: ...N systems based on Direct Sequence Spread Spectrum OrthogonalFrequencyDivisionMultiplexingradio technologythatcomplieswiththe IEEE802 11Standard Revision A or B and Turbo Mode Revision A supports data transfer rate up to 54Mbit s Revision B supports data transfer rate up to 11Mbit s Turbo Mode supports data transfer rate up to 108Mbit s Security Security lock slot Connects an optional security loc...

Страница 46: ...n Standby Hibernation standby mode or Hibernation mode when there is no input or hardware access for a time specified You can specify the time and select either System Standby or System Hibernate in the System standby and System hibernate item of the Power Save Mode window in TOSHIBA Power Saver Keypad overlay A ten key pad is integrated into the keyboard Refer to the Keypad overlay section in Cha...

Страница 47: ...y activates cooling procedures Refer to the Heat dispersal section in Chapter 4 Operating Basics for details on setting the options for cooling methods Hibernation This feature lets you turn off the power without exiting from your software The contents of main memory is saved to the hard disk when you turn on the power again you can continue working right where you left off Refer to the Turning of...

Страница 48: ...int to AllPrograms pointtoInterVideoWinDVD4 thenclick InterVideoWinDVD4 ConfigFree ConfigFree is a suite of utilities to allow easy control of communication device and network connections ConfigFree also allows you to find communication problems and create profiles for easy switching between location and communication networks You can boot ConfigFree from the menu bar as follows Start AllPrograms ...

Страница 49: ...ditional universal AC adaptor for each site so you will not have to carry the adaptor with you Battery charger The battery charger lets you charge extra batteries outside the computer USBFDDKit A 3 1 2 diskette drive accommodates 1 44 megabyte or 720 kilobyte diskette It connects to a USB port You cannot format 720 kilobyte diskettes on Windows XP but you can use previously formatted disks Wireles...

Страница 50: ...1 12 User s Manual I NTRODUCTION ...

Страница 51: ...ide 2 2 Right side 2 3 Back side 2 4 Underside 2 6 Front with the display open 2 7 Systemindicators 2 8 Keyboardindicators 2 9 USB diskette drive 2 10 Fixed optical media drive 2 11 CD ROMdrive 2 11 DVD ROMdrive 2 11 CD RW DVD ROMdrive 2 12 DVD R RWdrive 2 13 Universal AC adaptor 2 14 ...

Страница 52: ...T HE G RAND T OUR ...

Страница 53: ...n Figure 2 1 Front of the computer with display closed Volume control Use this dial to adjust the volume of the stereo speakers or the stereo headphones System LEDs let you monitor the status of various computer indicators functions Details are given in the Indicators section Display latch This latch secures the LCD panel in its closed position Slide the latch to open the display DISPLAY LATCH WIR...

Страница 54: ... indicator glows orange when Wireless LAN function communication is on Wireless LAN model or Wireless LAN ready model Indicator only Left side Figure 2 2 shows the computer s left side Figure 2 2 The left side of the computer Coolingvents These vents provide an outlet for air pulled through the computer by the fan CAUTION Be careful not to block the cooling vents Also be careful to keep foreign ob...

Страница 55: ...can damage the computer s circuitry Right side Figure 2 3 shows the computer s right side Figure 2 3 The right side of the computer Fixed Optical See Chapter 4 Operating Basics for information on using Media Drive the drive and caring for CDs and DVDs CD ROMdrive Somemodelsareequippedwithafull sizeCD ROMdrive module that lets you run CD without using an adaptor DVD ROMdrive Somemodelsareequippedwi...

Страница 56: ...m the telephone jack 2 Do not connect the modem to a digital telephone line A digital line will damage the modem Back side Figure 2 4 shows the computer s back panel Some models are not equipped with a Parallel Port or a TV Out Port Figure 2 4 The back side of the computer Security lock A security cable attaches to this slot The optional security cable anchors your computer to a desk or other larg...

Страница 57: ...nsfer speed 40 times faster than the USB 1 1 standard The ports also support USB 1 1 CAUTION Keep foreign objects out of the USB connectors A pin or similar object can damage the computer s circuitry NOTE Operation of all functions of all USB devices has not been confirmed Some functions might not execute properly LAN jack This jack lets you connect to a LAN The adaptor has built in support for Et...

Страница 58: ...ysafetylock Switch this safety lock to make the battery release latch slidefreelyorlocked Fordetailedinformation referto Chapter 6 Power and Power Up Modes Battery pack The battery pack powers the computer when the universal AC adaptor is not connected For detailed information on the battery pack refer to Chapter 6 Power and Power Up Modes Memory module This cover protects two memory module socket...

Страница 59: ...inge holds the display screen at easy to view angles Displayscreen The LCD displays high contrast text and graphics The computer sLCDconsistsofupto1024x768pixelsor1400 x1050pixels RefertoAppendixB When the computer operates on the universal AC adaptor the display screen s image will be somewhat brighter than when it operates on battery power The lower brightness level is intended to save battery p...

Страница 60: ...em indicators DCIN15V POWER BATTERY BUILT IN CD ROMDRIVE HDD Figure 2 7 System indicators DC IN 15V The DC IN indicator glows green when DC power is supplied from the AC power adaptor If the adaptor s output voltage is abnormal or if the power supply malfunc tions this indicator flashes orange Power The Power indicator glows green when the computer is on If you select Standby from Shut Down Window...

Страница 61: ... overlay indicators and the CapsLockindicator When the F10 key indicator glows the keypad overlay lets you control the cursor When the F11 key indicator glows the keypad overlay lets you enter numbers Figure 2 8 Keypad overlay indicators When the CapsLock indicator glows the keyboard is in all caps mode Figure 2 9 CapsLock indicator CapsLock This indicator glows green when the alphabet keys are lo...

Страница 62: ...4 megabyte or 720 kilobyte diskettes It connects to the USB port Figure 2 10 USB diskette drive Disk In Use This indicator lights when the diskette is being accessed Indicator Disketteslot Insert a diskette in this slot Ejectbutton When a diskette is fully seated in the drive the eject button pops out To remove a diskette push in the eject button and the diskette pops out partially for removal CAU...

Страница 63: ...This drive supports the following formats CD DA CD Text PhotoCDTM single multi session CD ROMMode1 Mode2 CD ROMXAMode2 Form1 Form2 EnhancedCD CD EXTRA CD G AudioCDonly Addressing Method 2 DVD ROM drive Somemodelsareequippedwithafull size DVD ROMdrivemodulethatletsyou runeither12cm 4 72 or8cm 3 15 CDsor12cm 4 72 DVDswithoutusingan adaptor ItrunsDVD ROMsatmaximum8speedandCD ROMsatmaximum24 speed The...

Страница 64: ...na CD RW DVD ROM drive Somemodelsareequippedwithafull size CD RW DVD ROMdrivemodulethat letsyourunCD DVDswithoutusinganadaptor ItreadsDVD ROMsatmaximum8 speed and CD ROMs at maximum 24 speed It writes CD R at up to 24 speed and CD RW at up to 10 speed For reading this drive supports the same formats as the DVD ROMdrive DVD ROM DVD Video CD DA CD Text Photo CDTM single multi session CD ROMMode1 Mod...

Страница 65: ...dsDVD ROMsatmaximum 8speedandCD ROMsatmaximum24speed ItwritesCD Ratupto16speed CD RW at up to 10 speed DVD R and DVD RW at single speed This drive supports thesameformatsastheDVD ROMdrive DVD ROM DVD Video CD DA CD Text Photo CD TM single multi session CD ROMMode1 Mode2 CD ROMXAMode2 Form1 Form2 EnhancedCD CD EXTRA CD G AudioCDonly Addressing Method 2 DVD R RW drives and media are manufactured acc...

Страница 66: ...any voltage from 100 to 240 volts and to a frequency of either 50 or 60 hertz enabling you to use the computer in almost any country region To recharge the battery simply connect the universal AC adaptor to a power source and the computer See Chapter 6 Power and Power Up Modes for details Figure 2 11 The universal AC adaptor CAUTION Use only the universal AC adaptor that came with the computer or ...

Страница 67: ...3 3 Lighting 3 4 Work habits 3 4 Connecting the universal AC adaptor 3 5 Opening the display 3 6 Turning on the power 3 6 Starting up for the first time 3 7 Turning off the power 3 7 Shut Down mode Boot mode 3 7 Hibernationmode 3 8 Standbymode 3 10 Restarting the computer 3 12 Restoring the preinstalled software from the ProductRecoveryCD ROM 3 12 ...

Страница 68: ...G ETTING S TARTED ...

Страница 69: ...urning off the power Restarting the computer Restoring the preinstalled software from the Product Recovery CD ROM NOTE All users should be sure to read the section Starting up for the first time Setting up your work space Establishing a comfortable work site is important for you and your computer A poor work environment or stressful work habits can result in discomfort or serious injury from repet...

Страница 70: ...uding data storage media can be damaged by magnets Do not place the computer near magnetic objects or bring magnetic objects close to the computer Be careful of objects such as stereo speakers that produce strong magnetic fields during operation Also be careful with metal objects such as bracelets which can be inadvertently magnetized Do not operate the computer in close proximity to a mobile phon...

Страница 71: ...lightly below the level of your elbow You should be able to type comfortably with your shoulders relaxed Your knees should be slightly higher than your hips If necessary use a foot rest to raise the level of your knees to ease pressure on the back of your thighs Adjust the back of your chair so it supports the lower curve of your spine Sit straight so that your knees hips and elbows form approxima...

Страница 72: ...and improve your efficiency Sit in a relaxed posture Good positioning of your chair and equipment as described earlier can reduce tension in your shoulders or neck and ease back strain Vary your posture frequently Occasionally stand up and stretch or exercise briefly Exercise and stretch your wrists and hands a number of times during the day Frequently look away from the computer and focus your ey...

Страница 73: ...pack refer to Chapter 6 Power and Power Up Modes CAUTION Use only the AC adaptor that came with the computer or an equivalent optional adaptor Use of the wrong adaptor could damage your computer TOSHIBA assumes no liability for any damage in such case 1 Connect the power cord to the universal AC adaptor Figure 3 2 Connecting the power cord to the universal AC adaptor 2 Connect the universal AC ada...

Страница 74: ...e for you CAUTION Use reasonable care when opening and closing the display panel Opening it vigorously or slamming it shut could damage the computer Figure 3 4 Opening the display Turning on the power This section describes how to turn on the power NOTE After you turn on the power for the first time do not turn it off until you have set up the operating system Refer to the section Starting up for ...

Страница 75: ...Be sure to read the License Agreement carefully Turning off the power The power can be turned off in one of the following modes Shut down Boot Hibernation or Standby mode Shut Down mode Boot mode When you turn off the power in Shut Down mode no data is saved and the computer will boot to the operating system s main screen 1 If you have entered data save it to the hard disk or to a diskette 2 Make ...

Страница 76: ...AC adaptor before the save is completed Wait for the Built in HDD and CD ROM drive indicators to go out 3 Do not install or remove a memory module while the computer is in hibernation mode Data will be lost Benefits of hibernation The hibernation feature provides the following benefits Saves data to the hard disk when the computer automatically shuts down because of a low battery NOTE For the comp...

Страница 77: ...n the Control Panel 2 In Windows XP open Performance and Maintenance and open TOSHIBA Power Saver 3 Select the Hibernate window select the Enable Hibernate support check box and click the Apply button 4 Select the Power Save Modes window 5 Double click Power Mode Full Power Normal etc and open the System Power Mode window 6 Enable the desired Hibernation settings for When I press the power button ...

Страница 78: ...by it might not be restored when the computer wakes up from standby To prevent the computer from automatically entering standby mode disable Standby in TOSHIBA Power Saver Open the Standby setting That action however will nullify the computer s Energy Star compliance CAUTIONS 1 Before entering Standby mode be sure to save your data 2 Do not install or remove a memory module while the computer is i...

Страница 79: ...n TOSHIBA Power Saver 3 Press the power button This feature must be enabled Refer to the System Power Mode item in Power Saver Utility described in the Control Panel Open Performance and Maintenance and open TOSHIBA Power Saver When you turn the power back on you can continue where you left when you shut down the computer NOTES 1 When the computer is shut down in standby mode the power indicator f...

Страница 80: ... seconds then turn the power on again by pressing the power button Restoring the preinstalled software from the Product Recovery CD ROM If preinstalled files are damaged use the Product Recovery CD ROM to restore them To restore the operating system and all preinstalled software follow the steps below CAUTION When you reinstall the Windows operating system the hard disk will be reformatted and all...

Страница 81: ... 8 Writing CD DVDs on DVD R RW drive 4 9 Importantmessage 4 9 Disclaimer 4 9 Read writefunctionchart 4 11 Beforewritingorrewriting 4 13 When writing or rewriting 4 13 Drag nDropCD DVD 4 14 DataVerification 4 14 Media care 4 15 CD DVDs 4 15 Diskettes 4 15 Modem 4 16 Regionselection 4 16 Propertiesmenu 4 17 Connecting 4 18 Disconnecting 4 19 Wirelesscommunications 4 19 Wireless LAN 4 19 Security 4 2...

Страница 82: ...O PERATING B ASICS Moving the computer 4 23 Heat dispersal 4 24 ...

Страница 83: ...d To use the Touch Pad simply touch and move your finger tip across it in the direction you want the on screen pointer to go Figure 4 1 Touch Pad and Touch Pad control buttons Two buttons below the keyboard are used like the buttons on a mouse pointer Press the left button to select a menu item or to manipulate text or graphics desig nated by the pointer Press the right button to display a menu or...

Страница 84: ...2 GrandTour formore information Connecting 3 1 2 diskette drive To connect the drive plug the diskette drive connector into a USB port Refer to Figure4 2 CAUTION Make sure the connector is back side up and properly aligned with the socket Do not try to force the connection doing so can damage the connecting pins Figure 4 2 Connecting the USB diskette drive NOTE If you connect the diskette drive af...

Страница 85: ... Safety Remove Hardware icon on the Task Bar 3 ClickDiskettedrive 4 Pull the diskette drive connector out of the USB port Using optical media drives Thefull sizedriveprovideshigh performanceexecutionofCD DVD ROM based programs Youcanruneither12cm 4 72 CD DVDsor8cm 3 15 CDwithoutan adaptor An ATAPI interface controller is used for CD DVD ROM operation When the computer is accessing a CD DVD an indi...

Страница 86: ...lightly Figure 4 3 Pressing the DVD ROM eject button b Pressing the eject button will not open the drawer when the DVD ROM drive s power is off If the power is off you can open the drawer by inserting a slender object about 15 mm such as a straightened paper clip into the eject hole just to the left of the eject button 15mm Diameter 1 0mm Figure 4 4 Manual release with the eject hole EJECT BUTTON ...

Страница 87: ...deup inthedrawer Figure 4 6 Inserting a CD DVD NOTE When the drawer is fully opened the edge of the computer will extend slightly over the CD DVD tray Therefore you will need to turn the CD DVD at an angle when you place it in the tray After seating the CD DVD however make sure it lies flat as shown in figure 4 6 Using optical media drives ...

Страница 88: ...ntil it locks into place CAUTION If the CD DVD is not seated properly when the drawer is closed the CD DVD might be damaged Also the drawer might not open fully when you press the eject button Figure 4 7 Closing the CD DVD drawer Removing discs To remove the CD DVD follow the steps below and refer to figure 4 8 CAUTION Do not press the eject button while the computer is accessing the Fixed DVD ROM...

Страница 89: ... the drawer so you can grasp it Hold the CD DVD gently and lift it out Figure 4 8 Removing a CD DVD 3 Push the center of the drawer to close it Press gently until it locks into place Writing CDs on CD RW DVD ROM drive Depending on the type of drive installed you may be able to write CDs The CD RW DVD ROMdriveletsyouwrite aswellasreadCD ROMs Observe the precautions in this section to ensure the bes...

Страница 90: ...ftware programs except the writing software Do not run software such as a screen saver which can put a heavy load on the CPU Operate the computer at full power Do not use power saving features Do not write while virus check software is running Wait for it to finish then disable virus detection programs including any software that checks files automatically in the background Do not use hard disk ut...

Страница 91: ...irplanes trains or cars Do not use an unstable surface such as a stand Keep mobile phones and other wireless communication devices away from the computer Writing CD DVDs on DVD R RW drive YoucanusetheDVD R RWdrivetowritedatatoeitherCD R RWorDVD R RW discs The following applications for writing are supplied on CD ROM Drag n Drop CD licensed by Easy Systems Japan Ltd and DigiOn Inc Important message...

Страница 92: ...e caused by the change or loss of the recorded contents Damage that may be caused by using third party equipment or software Given the technological limitations of current optical disc writing drives you may experience unexpected writing or rewriting errors due to disc quality or problems with hardware devices Also it is a good idea to make two or more copies of important data in case of undesired...

Страница 93: ... RW DVD RAM DVD R DVD RW Read Write Drag n Drop CD 1 No No No No No No No Yes Yes Yes Yes Yes Yes Yes Yes Yes Yes Yes Yes Yes No 1 Software supplied with the product can be used for writing to a disc Writing CD DVDs on DVD R RW drive O PERATING B ASICS 4 11 ...

Страница 94: ... rewriting errors may occur Be careful to check the disc for dirt or damage before you use it The actual number of rewrites to CD RW or DVD RW is affected by the quality of the disc and the way it is used There are two types of DVD discs authoring and general use discs Do not use authoring discs Only general use discs can be written to by a computer drive Other DVD ROM drives for computers or othe...

Страница 95: ...checks files automatically in the background Do not use hard disk utilities including those intended to enhance HDD access speed They may cause unstable operation and data damage Write from the computer s HDD to the CD DVD Do not try to write from shared devices such as a LAN server or any other network device WritingwithsoftwareotherthanDrag nDropCD DVDisnotrecommended When writing or rewriting P...

Страница 96: ...ll not playcorrectly YoucannotbackupaCD ROMor CD R RWtoDVD R RWusingtheDISC BackupfunctionofDrag nDropCD DVD YoucannotbackupDVD ROM DVD VideoorDVD R RWtoCD R RW usingtheDISCBackupfunctionofDrag nDropCD DVD Drag nDropCD DVDcannotrecordinpacketformat You might not be able to use the DISC backup function of Drag n Drop CD DVD to back up a DVD R RW disc that was made with other software on adifferentD...

Страница 97: ...D DVDs 6 If your CD DVDs become dusty or dirty wipe them with a clean dry cloth Wipe from the center out do not wipe in a circular direction around the CD DVD If necessary use a cloth dampened in water or a neutral cleaner Do not usebenzine thinnerorsimilarcleaner Diskettes 1 Store your diskettes in the container they came in to protect them and keep them clean If a diskette is dirty do not use cl...

Страница 98: ...to a digital telephone line A digital line will damage the modem Region selection Telecommunication regulations vary from one region to another so you will need to make sure the internal modem s settings are correct for the region in which it will be used To select a region follow the steps below 1 Click start point to All Programs point to TOSHIBA Internal Modem and click Region Select Utility NO...

Страница 99: ...on 4 Select a region from the region menu or a telephony location from the sub menu When you click a region it becomes the modem s region selection and the New Location for telephony will be set automatically When you select a telephony location the corresponding region is automati cally selected and it becomes the modem s current region setting Properties menu Click the icon with the secondary mo...

Страница 100: ...n code do not match A warning dialog box is displayed if current settings for region code and telephony location are incorrect Modem Selection If the computer cannot recognize the internal modem a dialog box is displayed Select the COM port for your modem to use Dialing Properties Select this item to display the dialing properties CAUTION If you are using the computer in Japan the Telecommunica ti...

Страница 101: ...ng To disconnect the internal modem cable follow the steps below 1 Pinch the lever on the connector in the telephone jack and pull out the connector 2 Disconnect the cable from the computer in the same manner Wireless communications The computer s wireless communication function supports both wireless LAN Wireless LAN The wireless LAN is compatible with other LAN systems based on Direct Sequence S...

Страница 102: ... data encryption based on 256bit encryption algorithm Revision A B combo type Wake up on LAN does not function on a wireless LAN Security 1 Be sure to enable WEP encryption function Otherwise your computer will allow the illegal access by outsider through wireless LAN to cause illegal intrusion eavesdropping and loss or destruction of stored data TOSHIBA strongly recommend the customer to enable t...

Страница 103: ... Panel System Hardware Device Manager Network adapters TOSHIBA Wireless LAN Mini PCI Card and enable LAN The computer has built in support for Ethernet LAN 10 megabits per second 10BASE T andFastEthernetLAN 100megabitspersecond 100BASE Tx This section describes how to connect disconnect to a LAN CAUTIONS 1 Do not install or remove an optional memory module while Wake up on LAN is enabled 2 Do not ...

Страница 104: ...n connect with either a CAT5 or a CAT3 To connect the LAN cable follow the steps below 1 Turn off the power to the computer and to all external devices connected to the computer 2 Plug one end of the cable into the LAN jack Press gently until you hear the latchclickintoplace Figure 4 12 Connecting the LAN cable 3 Plug the other end of the cable into a LAN hub connector Check with your LAN administ...

Страница 105: ...pray a small amount of cleaner on a soft clean cloth and wipe the screen gently with the cloth CAUTION Never spray cleaner directly onto the computer or let liquid run into any part of it Never use harsh or caustic chemical products to clean the computer Remove the dust from the cooling vents on the Left side of the computer regularly with vacuum cleaner See Chapter 2 Grand Tour Left side Moving t...

Страница 106: ... speed first then if necessary turning on the fan Use the Cooling Method item of the Power Save Mode window in TOSHIBA Power Saver Maximum Turn on the fan first then if necessary lower the CPU Performance processing speed Performance Use a combination of the fan and lowering the CPU processing speed Battery optimized Lower the CPU processing speed first then if necessary turn on the fan When the C...

Страница 107: ...combinations 5 2 Emulating keys on enhanced keyboard 5 2 Hot keys 5 4 Fn Sticky key 5 7 Windows special keys 5 7 Keypad overlay 5 7 Turningontheoverlays 5 7 Temporarilyusingnormalkeyboard overlayon 5 8 Temporarilyusingoverlay overlayoff 5 9 Temporarilychangingmodes 5 9 Generating ASCII characters 5 9 ...

Страница 108: ...T HE K EYBOARD ...

Страница 109: ...nctua tion marks and special symbols that appear on the screen There are some differences however between using a typewriter and using a computer keyboard Letters and numbers produced in computer text vary in width Spaces which are created by a space character may also vary depending on line justifica tion and other factors The lowercase l el and the number 1 one are not interchangeable on compute...

Страница 110: ...g Soft keys Fn key combinations The Fn function is unique to TOSHIBA computers and is used in combination with other keys to form soft keys Soft keys are key combinations that enable disable or configure specific features NOTE Some software may disable or interfere with soft key operations Soft key settings are not restored by the Standby feature Emulating keys on enhanced keyboard Esc 3 Home PgUp...

Страница 111: ...ou to use keys that the keyboard does not have Pressing the Fn key and one of the following keys simulates the enhanced keyboard sfunctions Press Fn F10 or Fn F11 to access the integrated keypad When activated the keys with gray markings on the bottom edge become numeric keypad keys Fn F11 or cursor control keys Fn F10 Refer to the Keypad overlay section in this chapter for more information on how...

Страница 112: ...settings press any key or press the Touch Pad If a screensaver password is registered a dialog box will appear Enter the screensaver password and click OK If no password is set the screen will be restored when you press any key or press theTouch Pad Power save mode Pressing Fn F2 changes the power save mode If you press Fn F2 in a Windows environment the Power Save Mode is displayed in a dialog bo...

Страница 113: ...ress Fn F5 to change the active display device When you press these hot keys a dialog box appears Only selectable devices will be dis played Hold down Fn and press F5 again to change the device When you release Fn and F5 the selected device will change If you hold down these hot keys for five seconds the selection will return to LCD LCD Display Brightness Pressing Fn F6 decreases the display brigh...

Страница 114: ...pop up icon You can also change this setting through the Monitor brightness item of the Power Save Mode window in Power Saver NOTE Display clarity increases with the brightness level Wireless setting Fn F8 hotkeys are not used Touch Pad Pressing Fn F9 in a windows environment enables or disables the Touch Pad function When you press these hot keys the current setting will change and be displayed a...

Страница 115: ... This key has the same function as the secondary mouse button Keypad overlay Your computer s keyboard does not have an independent numeric keypad but its numeric keypad overlay functions like one The keys in the center of the keyboard with gray letters make up the numeric keypad overlay The overlay provides the same functions as the numeric keypad onthe101 102 keyenhancedkeyboardinfigure5 2 Turnin...

Страница 116: ...n off the overlay Figure 5 2 The numeric keypad overlay Temporarily using normal keyboard overlay on While using the overlay you can temporarily access the normal keyboard without turning off the overlay 1 Hold Fn and press any other key All keys will operate as if the overlay were off 2 Type upper case characters by holding Fn Shift and pressing a character key 3 Release Fn to continue using the ...

Страница 117: ... modes If the computer is in Numeric mode you can switch temporarily to Arrow mode by pressing a shift key If the computer is in Arrow mode you can switch temporarily to Numeric mode by pressing a shift key Generating ASCII characters Not all ASCII characters can be generated using normal keyboard operation But you can generate these characters using their ASCII codes With the overlay on 1 Hold do...

Страница 118: ...User s Manual 5 10 T HE K EYBOARD ...

Страница 119: ... use of the battery pack 6 5 Safetyprecautions 6 5 Chargingthebatteries 6 8 Monitoring battery capacity 6 10 Maximizing battery operating time 6 10 Retainingdatawithpower off 6 11 Extending battery life 6 11 Replacing the battery pack 6 12 Removing the battery pack 6 12 Installing the battery pack 6 13 Starting the computer by password 6 15 Power up modes 6 15 Windows utilities 6 15 Hot keys 6 15 ...

Страница 120: ...P OWER AND P OWER U P M ODES ...

Страница 121: ...tery charge status are affected by the power conditions whether a universal AC adaptor is connected whether a battery is installed and what the charge level is for the battery Table 6 1 Power conditions Power on Power off no operation universal Battery Operates LED Battery green ACadaptor fully LED Battery green DCIN green connected charged DCIN green Battery Operates Quickcharge partially Quickch...

Страница 122: ...installed DC IN off Power indicators As shown in the above table the Battery DC IN and Power indicators on the system indicator alert you to the computer s operating capability and battery charge status Battery indicators Check the Battery indicator to determine the status of the battery pack The following indicator lights indicate the battery status Flashing orange The battery charge is low The u...

Страница 123: ... Indicates a problem with the power supply Plug the universal AC adaptor into another outlet If it still does not operate properly see your dealer No light Under any other conditions the indicator does not light Power indicator Check the Power indicator to determine the power status Green Indicates power is being supplied to the computer and the computer is turned on Blinkingorange Indicates power...

Страница 124: ...ter is powered off in Standby mode and the univer sal AC adaptor is not connected the battery pack supplies power to maintain data and program in memory If the battery pack is completely discharged Standby mode does not function and the computer loses all data in memory To ensure that the battery pack maintains its maximum capacity operate the computer on battery power at least once a month until ...

Страница 125: ...cause death serious injury or property damage Carefully observe the following advisories Danger Indicates an imminently hazardous situation which could result in death or serious injury if you do not follow instructions Warning Indicates a potentially hazardous situation which could result in death or serious injury if you do not follow instructions Caution Indicates a potentially hazardous situat...

Страница 126: ... explode or leak caustic liquid and cause death or serious injury It could also fail or malfunction causing data loss 8 Never expose the battery pack to abnormal shock vibration or pressure The battery pack s internal protective device will fail causing it to overheat explode ignite or leak caustic liquids possibly resulting in death or serious injury 9 Never let a battery pack become wet A wet ba...

Страница 127: ...y battery packs recommended by TOSHIBA as replacements 4 Always make sure the battery pack is installed correctly and securely Otherwise a battery pack could fall out and possibly cause injury 5 Charge the battery pack only in an ambient temperature between 5 and 35 degrees Celsius Otherwise the electrolyte solution might leak battery pack performance might deteriorate and the battery life might b...

Страница 128: ...omes low the Battery indicator flashes orange indicating that only a few minutes of battery power remain If you continue to use the computer while the Battery indicator flashes the computer enables Hibernation mode so you don t lose data and automatically turns off NOTE The computer enters Hibernate mode only if Hibernation is enabled in two places in TOSHIBA Power Saver the Hibernate window and t...

Страница 129: ...he battery is nearly completely discharged Leave the universal AC adaptor connected for a few minutes and the battery should begin charging The Battery indicator may show a rapid decrease in battery operating time when you try to charge a battery under the following conditions The battery has not been used for a long time The battery has completely discharged and been left in the computer for a lo...

Страница 130: ...r battery will not operate for as long as a new battery even when both are fully charged In this case Power Save Modes window in TOSHIBA Power Saver will indicate a 100 charge for both the old and new battery but the displayed estimated time remaining will be shorter for the older battery Maximizing battery operating time A battery s usefulness depends on how long it can supply power on a single c...

Страница 131: ...ged batteries the batteries retain dataforthefollowingapproximatetimeperiods Battery pack 3600mAh about 3 0 days Standby mode about 25 days Boot mode 4400mAh about 3 6 days Standby mode about 30 days Boot mode RTCbattery 1 month Extending battery life Tomaximizethelifeofyourbatterypack At least once a month disconnect the computer from a power source and operate it on battery power until the batte...

Страница 132: ...universal AC adaptor Store spare battery packs in a cool dry place out of direct sunlight Replacing the battery pack When the battery pack reaches the end of its operating life you will need to install a new one The life of the battery pack is generally about 500 recharges If the Battery indicator flashes orange shortly after fully recharging the battery the battery pack needs to be replaced You m...

Страница 133: ...er indicator is off 3 Remove all cables connected to the computer 4 Turn the computer upside down 5 Slide the battery release latch to free the battery pack for removal after switching the battery safety lock into unlock position direction opposite to the battery then slide out the battery pack Figure 6 1 Releasing the battery pack CAUTION For environmental reasons do not throw away a spent batter...

Страница 134: ...ecom mended by TOSHIBA as replacements 2 Do not touch the latch while holding the computer Or you may get injured by the dropped battery by unintentional release of the latch 1 Turn the computer s power off 2 Disconnect all cables connected to the computer 3 Insert the battery pack 4 Secure the battery pack lock Switch the battery safety lock into lock position direction toward the battery Figure ...

Страница 135: ...his case you must turn the computer back on to retry password entry Power up modes The computer has the following power up modes Boot Computer shuts down without saving data Always save your work before you turn the computer off in boot mode Hibernation Data in memory is saved to the hard disk Standby Data is maintained in the computer s main memory NOTE Refer also to the sections Turning on the p...

Страница 136: ...nel power turns on in Standby or Hibernation mode but not in boot mode NOTE If the panel power off function is enabled and you use Shut down Windows do not close the display until the shut down function is completed System Auto Off This feature turns the system off automatically if it is not used for a set duration The system shuts down in Standby mode or Hibernation mode in Windows ...

Страница 137: ...HW S ETUP Chapter 7 HW Setup and Passwords HW Setup 7 1 Accessing HW Setup 7 1 HW Setup window 7 1 Supervisorpassword 7 10 ...

Страница 138: ...HW S ETUP ...

Страница 139: ...o log on to the computer Some models are not equipped with Parallel Printer tab and or CPU tab Accessing HW Setup To run HW Setup click start click Control Panel and select TOSHIBA HW Setup HW Setup window The HW Setup window contains the following tabs General Password Device Config Parallel Printer Display CPU BootPriority Keyboard USB and LAN NOTE Some models are not equipped with Parallel Prin...

Страница 140: ...ault Registered Set the password A dialogue box will appear to let you set the password To enter a user password 1 Select Registered to display the following prompt Enter Password 2 Enter a password of up to 10 characters You cannot use the following characters space The character string you enter is displayed as a string of asterisks For example if you enter a password consisting of four characte...

Страница 141: ...acter string you enter matches the registered password the password option is reset and the display changes to The password was deleted If they do not match the following message appears You must repeat step 1 Incorrect Password NOTE If you enter the password incorrectly three times the screen will display Sorry access denied Powering off your machine then powering it back on again are required to...

Страница 142: ...computer 3 Set a diskette s write protect tab to the write enable position and insert the diskette in the drive NOTE All data on the diskette will be destroyed 4 Turn on the computer s power Password will be displayed on the LCD 5 Enter the password 6 Press the Tab key Insert FD Ready Y N will be displayed on the LCD 7 PressY Remove FD press key will be displayed on the LCD 8 Remove the diskette a...

Страница 143: ...ith some other parallel Bi directional devices Display This tab lets you customize your computer s display settings for either the internal LCDscreenorforanexternalmonitor Power On Display Lets you use the display to be used when the computer is booted This setting is only available on Standard VGA mode and not available on Windows Desktop Auto Selected Selects an external monitor if one is connec...

Страница 144: ...eed Boot Priority Boot Priority Options This option sets the priority for booting the computer Select from the following settings HDD FDD CD ROM LAN The computer looks for bootable files in thefollowingorder HDD diskettedrive CD ROMandLAN Default FDD HDD CD ROM LAN The computer looks for bootable files in thefollowingorder diskettedrive HDD CD ROMand LAN HDD CD ROM LAN FDD The computer looks for b...

Страница 145: ...ant and press Enter NOTES 1 If a supervisor password is set the menu above does not appear when you use the user password to start the computer 2 The selection method above does not change the boot priority settings in HW Setup 3 If you press a key other than one of those above or if the selected device is not installed the system will boot according to the current setting in HW Setup 4 Support of...

Страница 146: ...d HDD the system will not boot from the other HDD It will search the next device in the boot priority for a boot command Network Boot Protocol This feature sets the protocol to remotely boot from the network PXE Sets PXE as the protocol Default RPL Sets RPL as the protocol NOTE The Wake up on LAN function consumes power even when the system is off Leave the universal AC adaptor connected while usi...

Страница 147: ...ion Enabled EnablestheUSB FDDLegacyEmulation Default Disabled DisablestheUSB FDDLegacyEmulation LAN Wake up on LAN This feature lets the computer s power be turned on when it receives a wake up signalfromtheLAN Enabled Enables Wake up on LAN Disabled Disables Wake up on LAN Default CAUTION Do not install or remove an optional memory module while Wake up on LAN is enabled NOTE The Wake up on LAN fu...

Страница 148: ...r password Refer to the readme file of the Supervisor Password Utility for instructions on setting the Supervisor Password The path to the readme file is C Program Files TOSHIBA Windows Utilities SVPWTool In the SVPWTool directory open the readme htm file ...

Страница 149: ... 8 2 Inserting a PC card 8 2 Removing a PC card 8 3 Memory expansion 8 4 Installingmemorymodule 8 4 Removingmemorymodule 8 6 Battery pack 8 7 Universal AC adaptor 8 7 USB FDD kit 8 7 External monitor 8 8 TV 8 8 Changingtheresolution 8 9 Security lock 8 11 ...

Страница 150: ...O PTIONAL D EVICES ...

Страница 151: ...abilities and its versatility This chapter describes connection or installation of the following devices which are availablefromyourTOSHIBAdealer Cards memory PC cards Memoryexpansion Power devices Battery pack Universal AC adaptor Peripheral devices USBFDDkit Externalmonitor TV Other Securitylock ...

Страница 152: ...he greater demands of multimedia data transmission Inserting a PC card The PC card connector is located on the left side of the computer Windows hot install feature lets you install a PC card while the computer s power is on NOTE Do not install a PC card while the computer is in standby or hibernation mode Some cards might not work properly To install a PC card follow the steps below 1 Insert the ...

Страница 153: ... below 1 Click the Safety Remove Hardware icon on the Task Bar 2 ClickPCcard 3 Press the PC card eject button to extend it 4 Press the extended eject button to pop the card out slightly 5 Pinch the PC card and remove it Figure 8 2 Removing the PC card PC cards EJECT BUTTON PC CARD ...

Страница 154: ...e power If the module is installed in slot A there will be a long beep followed by a short beep If the module is in slot B there will be a long beep followed by two short beeps If the memory module is 1 GB or more there will be a long beep followed by four short beeps In the case shut down the power and remove the incompatible module NOTE Use a 0 bit Phillips screwdriver to remove and fasten the s...

Страница 155: ...ors at about a 45 degree angle Press the module carefully to ensure a firm connection CAUTION Do not touch the connectors on the memory module or on the computer Debris on the connectors may cause memory access problems NOTE You can install the main memory module in either slot 7 Push the module down so it lies flat Latches on either side will click into place to secure the module ...

Страница 156: ...Turn the computer upside down and remove the battery and a screw securing thememorymodulecover 3 Slide your fingernail or a thin object under the cover and lift it off 4 Lift one side of the insulator and push the latches to the outside to release the module A spring will force one end of the module up 5 Grasp the module by the sides and pull it out CAUTIONS 1 If you use the computer for a long ti...

Страница 157: ...eplace it with a freshly charged battery See Chapter 6 Power and Power Up Modes Universal AC adaptor If you frequently transport the computer between different sites such as your home and office purchasing a universal AC adaptor for each location will reduce the weight and bulk of your carrying load USB FDD kit The 3 1 2 external diskette drive module can be connected to the USB port For details o...

Страница 158: ... Refer to Chapter 5 The Keyboard for details on using hot keys to change the display setting TV Some models are equipped with TV out port You can connect a television set to the TV out jack on the computer Follow the steps below 1 Turn the computer off 2 Use the TV adaptor cable s S Video plug not supplied to connect the television to the TV out port 3 Turn the television on 4 Turn the computer on...

Страница 159: ...he Video Standard list box though there are lots of selections Changing the resolution to 640x480 for TV If you want to change the resolution into 640x480 because it is difficulty to read character on TV follow the steps below 1 Open Display properties and select the Settings tab 2 SelectAdvanced Figure8 6 Figure 8 6 Display properties 3 Select the Adapter tab then select List all modes ...

Страница 160: ...User s Manual 8 10 O PTIONAL D EVICES Figure 8 7 The Adapter window 4 Select a resolution from the menu Figure 8 8 Resolution menu ...

Страница 161: ...ou to anchor your computer to a desk or other heavy object to help prevent unauthorized removal of the computer Attach one end of a cable to the desk and the other end to the security lock slot on the back side of the computer Figure 8 9 Security lock Security lock ...

Страница 162: ...User s Manual 8 12 O PTIONAL D EVICES ...

Страница 163: ...t 9 4 Power 9 4 Password 9 7 Keyboard 9 7 LCDpanel 9 10 Harddiskdrive 9 11 CD ROMdrive 9 11 DVD ROMdrive 9 13 CD RW DVD ROMdrive 9 14 DVD R RWdrive 9 16 Diskettedrive 9 18 PC card 9 18 Pointingdevice 9 19 USB 9 21 Memoryexpansion 9 21 Sound system 9 22 Monitor 9 22 Modem 9 23 LAN 9 24 Wireless LAN 9 25 Real Time Clock 9 25 TOSHIBAsupport 9 26 Before you call 9 26 Where to write 9 26 ...

Страница 164: ...T ROUBLESHOOTING ...

Страница 165: ...ing PrtSc SysReq The questions and procedures offered in this chapter are meant as a guide they are not definitive problem solving techniques Many problems can be solved simply but a few may require help from your dealer If you find you need to consult your dealer or others be prepared to describe the problem in as much detail as possible Preliminary checklist Consider the simplest solution first ...

Страница 166: ...acters Print a copy of the screen if you have a printer attached Look up the messages in the software and operating system documentation Check that all connecting cables are correctly and firmly attached Loose cables can cause erroneous or intermittent signals Do any indicators light Which ones What color are they Do they stay on or blink Write down what you see Do you hear any beeps How many Are ...

Страница 167: ...tion discusses problems caused by your computer s hardware or attached peripherals Basic problems may occur in the following areas System start up Pointing device Self test USB Power Memoryexpansion Password Sound system Keyboard Monitor LCDpanel Modem Hard disk drive LAN CD ROMdrive WirelessLAN CD RW DVD ROMdrive Realtimeclock RTC DVD ROMdrive DVD R RWdrive Diskette drive PCcard System start up W...

Страница 168: ...haracters appear on the screen and the system does not function normally The screen displays an error message Turn off the computer and check all cable connections as well as PC card and memory module connections If the test fails again contact your dealer Power When the computer is not plugged into an AC outlet the battery pack is the primary power source However your computer has a number of oth...

Страница 169: ...rt or if it starts but shuts down quickly contact your dealer AC power If you have trouble turning on the computer with the universal AC adaptor con nected check the DC IN indicator Refer to Chapter 6 Power and Power Up Modes formoreinformation Problem Procedure UniversalACadaptor Check the connections Make sure the cord doesn t power the is firmly connected to the computer and a computer DC IN po...

Страница 170: ...g power Plug in an appliance gloworange and see if it works If it doesn t try another power source Check whether the battery is hot or cold If the battery is too hot or too cold it will not charge properly Let it reach room temperature Unplug the universalAC adaptor and remove the battery to make sure the terminals are clean If necessary wipe them with a soft dry cloth dipped in alcohol Connect th...

Страница 171: ...ter keys Check that the numeric keypad overlay is not producenumbers selected Press Fn F10 and try typing again Output to screen Make sure the software you are using is not isgarbled remappingthekeyboard Remappinginvolves reassigning the meaning of each key See your software sdocumentation If you are still unable to use the keyboard consult your dealer Key top Follow the figures below to attach En...

Страница 172: ...ess the key top until you hear a click after removing a metal spring from the key top hooking it to projecting parts and aligning the center of the key top Enter Back Space Shift and Space key PRESS FROM THE UPSIDE PROJECTING PART PROJECTING PART SPRING PROJECTING PARTS ...

Страница 173: ...plastic spring is out of place together with a key top 1 Remove the plastic spring from the key top 2 Attach the plastic spring to the key board with its flat face downward after confirming the direction Hardware and system checklist FLAT FACE DOWNWARD ...

Страница 174: ...is not set for an external monitor Markingsappearon They might have come from contact with the the LCD keyboard Touch Pad Try wiping the LCD gently with a clean dry cloth If markings remain use LCD cleaner Be sure to let the LCD dry before closing it Problemsabove Refer to your software s documentation to remainunresolved determine if the software is causing the orotherproblems difficulty occur Co...

Страница 175: ...fragmenter to check the condition of your files and disk Refer to your OS documentation or online HELP for information on running SCANDISKandthedefragmenter As a last resort reformat the hard disk Then reload the operating system and other files If problems persist contact your dealer CD ROM drive For more information refer to Chapter 4 Operating Basics Problem Procedure You cannot access Make sur...

Страница 176: ...dia care section in Chapter 4 for details on cleaning Some CD run Thesoftwareorhardwareconfigurationmay correctly but be causing a problem Make sure the others do not hardwareconfigurationmatchesyoursoftware s needs Check the CD s documentation Check the type of CD you are using The drive supports CD ROM CD DA CD Text PhotoCD single multi session CD ROMMode1 Mode2 CD ROMXAMode2 Form1 Form2 Enhance...

Страница 177: ...up A foreign object in the drawer could block laser light from reading the CD DVD Make sure there is no obstruction Remove any foreign object Check whether the CD DVD is dirty If it is wipe it with a clean cloth dipped in water or a neutral cleaner See the Media care section in Chapter 4 for details on cleaning SomeCD DVDs Thesoftwareorhardwareconfigurationmay run correctly but be causing a proble...

Страница 178: ...sted in the Optical media section in Chapter 2 The Grand Tour If problems persist contact your dealer CD RW DVD ROM drive For more information refer to Chapter 4 Operating Basics Problem Procedure You cannot access Make sure the drive s drawer is securely a CD DVD in the drive closed Press gently until it clicks into place Open the drawer and make sure the CD DVD is properly seated It should lie f...

Страница 179: ...t hardwareconfigurationmatchesyoursoftware s needs Check the CD DVD s documentation Check the type of CD DVD you are using The drivesupports DVD ROM DVD ROM DVD Video CD ROM CD DA CD Text PhotoCD single multi session CD ROMMode1 Mode 2 CD ROM XA Mode 2 Form1 Form2 EnhancedCD CD EXTRA CD G AudioCDonly AddressingMethod2 Check the region code on the DVD It must match that on the CD RW DVD ROM drive R...

Страница 180: ...roblems persist contact your dealer DVD R RW drive For more information refer to Chapter 4 Operating Basics Problem Procedure You cannot access Make sure the drive s drawer is securely a CD DVD in the drive closed Press gently until it clicks into place Open the drawer and make sure the CD DVD is properly seated It should lie flat with the label facingup A foreign object in the drawer could block ...

Страница 181: ...od2 Check the region code on the DVD It must match thatontheCD RW DVD ROMdrive Region codes are listed in the Optical media section in Chapter 2 The Grand Tour Cannot write correctly If you have trouble writing make sure you are observingthefollowingprecautions Use only media recommended by TOSHIBA Do not use the mouse or keyboard during writing Use only the software supplied with the computerforr...

Страница 182: ...er diskette If you can access the the external 3 1 2 diskette the original diskette not the drive is diskettedrive probably causing the problem If problems persist contact your dealer PC card Refer also to Chapter 8 Optional Devices Problem Procedure PC card Reseat the PC card to make sure it is erroroccurs firmlyconnected Make sure the connection between the external device and the card is firm C...

Страница 183: ...hape and try again to move it Double tapping Try changing the double click speed setting in does not work the mouse control utility 1 Open the Control Panel select the Mouse icon and press Enter 2 Click the Buttons tab 3 Set the double click speed as instructed and click OK Themousepointer Try changing the speed setting in the mouse moves too fast or control utility too slow 1 Open the Control Pan...

Страница 184: ... work the mouse control utility 1 Open the Control Panel select the Mouse icon and press Enter 2 Click the Buttons tab 3 Set the double click speed as instructed and click OK Themousepointer Try changing the speed setting in the mouse moves too fast or control utility too slow 1 Open the Control Panel select the Mouse icon and press Enter 2 Click the Pointer Options tab 3 Set the speed as instruct...

Страница 185: ...evices for information on installing memory modules Problem Procedure Beep sounds Make sure the memory module installed in the If slot A two beeps expansion slot is compatible with the computer If slot B three beeps If an incompatible module has been installed If both two and three follow the steps below beeps If the memory 1 TurnoffthePower module is 1GB or 2 Disconnect the universal AC adaptor a...

Страница 186: ... monitor s documentation Problem Procedure Monitor does not Make sure that the external monitor s power turn on switch is on Confirm that the external monitor s power cable is plugged into a working power outlet No display Try adjusting the contrast and brightness controls on the external monitor Press hot keys Fn F5 to change the display priority and make sure it is not set for the internal displ...

Страница 187: ...he settings are correct in your but a connection communicationsapplication can t be made After making a call Make sure the tone or pulse selection in your you can t hear a ring communications application is set correctly You can also use the ATD command Refer to the online help files for Appendix C AT Com mands Communicationis The computer will automatically cut off cut off unexpectedly communicat...

Страница 188: ...r setting in an incoming call your communications application You can also use the ATS0 command Refer to the online help files for Appendix D S registers If problems persist contact your dealer LAN Problem Procedure Cannot access LAN Check for a firm cable connection between the LAN jack and the LAN HUB Wake up on LAN Make sure the universal AC adaptor is con nected The does not work Wake up on LA...

Страница 189: ...ct your LAN administra toror dealer Real Time Clock Problem Procedure Thefollowingmessage The battery for RTC is wearing Set the date and is displayed on the LCD time in BIOS setup with the following steps RTC battery is low or 1 Press F1 key BIOS setup will boot up CMOS checksum is 2 Set the date in System Date inconsistent Press 3 Set the time in System Time F1 key to set 4 Press End key Date Ti...

Страница 190: ...st Before contacting TOSHIBA trythefollowing Review troubleshooting sections in the documentation for software and peripheraldevices If a problem occurs when you are running software applications consult the software documentation for troubleshooting suggestions Call the software company s technical support for assistance Consult the dealer you purchased your computer and or software from They are...

Страница 191: ...mpèreB P 131 92804PuteauxCedex Netherlands TOSHIBAInformationSystems Benelux B V RiviumBoulevard 412909LKCapellea dIJssel Spain TOSHIBAInformationSystems ESPAÑA ParqueEmpresarialSanFernando EdificioEuropa la Planta EscaleraA28830Madrid UnitedKingdom TOSHIBAInformationSystems U K Ltd TOSHIBACourt Weybridge Business Park Addlestone Road Weybridge SurreyKT152UL TheRestofEurope TOSHIBAEurope I E GmbH ...

Страница 192: ...User s Manual T ROUBLESHOOTING 9 28 ...

Страница 193: ...Appendix B Display Controller and Modes B 1 Appendix C AT Commands C 1 Appendix D S registers D 1 Appendix E V 90 E 1 Appendix F Internal Modem Guide F 1 Appendix G Wireless LAN G 1 Appendix H AC Power Cord and Connectors H 1 Appendix I Parts Numbers I 1 ...

Страница 194: ...A PPENDIXES ...

Страница 195: ...elessLAN Weight will vary with other configurations Environmental Requirements Ambient Relative Conditions temperature humidity Operating 5 C 41 F to35 C 95 F 20 to80 Non operating 20 C 4 F to65 C 149 F 10 to95 ThermalGradient 20 C perhourmaximum Wet bulb temperature 26 Cmaximum Conditions Altitude fromsealevel Operating 60to3 000meters Non operating 60to10 000metersmaximum Power Requirements Univ...

Страница 196: ...103 212A Fax ITU T Rec V 17 V 29 V 27ter FormerCCITT V 21ch2 Communication Data transmission and reception speed 300 1200 2400 4800 7200 9600 12000 14400 16800 19200 21600 24000 26400 28800 31200 33600bps DatareceptiononlywithV 90 28000 29333 30666 32000 33333 34666 36000 37333 38666 40000 41333 42666 44000 45333 46666 48000 49333 50666 52000 53333 54666 56000bps Fax 2400 4800 7200 9600 12000 1440...

Страница 197: ...el displays up to 1024horizontaland768verticalpixelsand1400horizontaland1050verticalpixels A high resolution external monitor connected to the computer can display up to 1920horizontaland1440verticalpixelsat16Mcolors The display controller also controls the video mode which uses industry standard rules to govern the screen resolution and the maximum number of colors that can be displayed on screen...

Страница 198: ...haracter LCD CRT Scanning mode matrix colors colors frequency pels Vertical Hz 0 1 VGA 40 x 25 8 x 8 16 of 256K 16 of 256K 70 Text Characters 2 3 VGA 80 x 25 8 x 8 16 of 256K 16 of 256K 70 Text Characters 0 1 VGA 40 x 25 8 x 14 16 of 256K 16 of 256K 70 Text Characters 2 3 VGA 80 x 25 8 x 14 16 of 256K 16 of 256K 70 Text Characters 0 1 VGA 40 x 25 9 x 16 16 of 256K 16 of 256K 70 Text Characters 2 3...

Страница 199: ... 8 x 8 16 of 256K 16 of 256K 70 Grph Pels E VGA 640 x 200 8 x 8 16 of 256K 16 of 256K 70 Grph Pels F VGA 640 x 350 8 x 14 Mono Mono 70 Grph Pels 10 VGA 640 x 350 8 x 14 16 of 256K 16 of 256K 70 Grph Pels 11 VGA 640 x 480 8 x 16 2 of 256K 2 of 256K 60 Grph Pels 12 VGA 640 x 480 8 x 16 16 of 256K 16 of 256K 60 Grph Pels 13 VGA 320 x 200 8 x 8 256 of 256K 256 of 256K 70 Grph Pels ...

Страница 200: ... 640 x 480 256 256K 256 256K 60 75 85 100 800 x 600 256 256K 256 256K 60 75 85 100 1024 x 768 256 256K 256 256K 60 75 85 100 1280 x 1024 256 256K 256 256K 60 Virtual 75 85 100 1400 x 1050 256 256K 256 256K 60 Virtual 75 85 1600 x 1200 256 256K 256 256K 60 Virtual 75 85 1920 x 1440 256 256K 256 256K 60 Virtual ...

Страница 201: ...equency Hz 640 x 480 64K 64K 64K 64K 60 75 85 100 800 x 600 64K 64K 64K 64K 60 75 85 100 1024 x 768 64K 64K 64K 64K 60 75 85 100 1280 x 1024 64K 64K 64K 64K 60 Virtual 75 85 100 1400 x 1050 64K 64K 64K 64K 60 Virtual 75 85 1600 x 1200 64K 64K 64K 64K 60 Virtual 75 85 1920 x 1440 64K 64K 64K 64K 60 Virtual ...

Страница 202: ...frequency Hz 640 x 480 16M 16M 16M 16M 60 75 85 100 800 x 600 16M 16M 16M 16M 60 75 85 100 1024 x 768 16M 16M 16M 16M 60 75 85 100 1280 x 1024 16M 16M 16M 16M 60 Virtual 75 85 100 1400 x 1050 16M 16M 16M 16M 60 Virtual 75 85 1600 x 1200 16M 16M 16M 16M 60 Virtual 75 85 1920 x 1440 16M 16M 16M 16M 60 Virtual ...

Страница 203: ...40 x 480 256 256K 256 256K 60 75 85 100 800 x 600 256 256K 256 256K 60 75 85 100 1024 x 768 256 256K 256 256K 60 75 85 100 1280 x 1024 256 256K 256 256K 60 75 85 100 1400 x 1050 256 256K 256 256K 60 75 85 1600 x 1200 256 256K 256 256K 60 Virtual 75 85 1920 x 1440 256 256K 256 256K 60 Virtual Appendix B ...

Страница 204: ...ors colors frequency Hz 640 x 480 64K 64K 64K 64K 60 75 85 100 800 x 600 64K 64K 64K 64K 60 75 85 100 1024 x 768 64K 64K 64K 64K 60 75 85 100 1280 x 1024 64K 64K 64K 64K 60 75 85 100 1400 x 1050 64K 64K 64K 64K 60 75 85 1600 x 1200 64K 64K 64K 64K 60 Virtual 75 85 1920 x 1440 64K 64K 64K 64K 60 Virtual ...

Страница 205: ...s colors frequency Hz 640 x 480 16M 16M 16M 16M 60 75 85 100 800 x 600 16M 16M 16M 16M 60 75 85 100 1024 x 768 16M 16M 16M 16M 60 75 85 100 1280 x 1024 16M 16M 16M 16M 60 75 85 100 1400 x 1050 16M 16M 16M 16M 60 75 85 1600 x 1200 16M 16M 16M 16M 60 Virtual 75 85 1920 x 1440 16M 16M 16M 16M 60 Virtual ...

Страница 206: ...User s Manual B 10 A PPENDIX B ...

Страница 207: ...epted by the modem are described in this section any entry other than those listed results in an error Escape sequence The escape sequence allows the modem to exit data mode and enter on line command mode While in on line command mode you can communicate directly to your modem using AT commands Once you finish you can return to data mode using the ATO command A pause the length of which is set by ...

Страница 208: ...he ATD command Any digit or symbol 0 9 A B C D may be dialed as touch tone digits Characters such as spaces hyphens and parentheses do not count They are ignored by the modem but you may want to include them to make the number and modifiers easier to read The following may be used as phone number modifiers P Pulsedialing T Touch tone dialing default Pause during dialing Pause for time specified in...

Страница 209: ...hile the modem is in command mode E0 Disables echo to the computer E1 Enables echo to the computer default Result Codes OK n 0 1 ERROR Otherwise Hn Hook control This command instructs the modem to go on hook to disconnect a call or off hook to make the phone line busy H0 Modem goes on hook default H1 Modem goes off hook Result Codes OK n 0 1 ERROR Otherwise In Request ID information This command d...

Страница 210: ...k M3 Speaker is on until the carrier is detected except when dialing Result Codes OK n 0 1 2 3 ERROR Otherwise Nn Modulation handshake This command controls whether or not the local modem performs a negotiated handshake at connection time with the remote modem when the communication speed of the two modems is different N0 When originating or answering this is for handshake only at the communicatio...

Страница 211: ...se dialing This command configures the modem for pulse non touch tone dialing Dialed digits are pulsed until a T command or dial modifier is received Tone dial is the default setting Qn Result code control Result codes are informational messages sent from the modem and displayed on your monitor Basic result codes are OK CONNECT RING NO CARRIER and ERROR The ATQ command allows the user to turn resu...

Страница 212: ...isplays result codes as text default Result Codes OK n 0 1 ERROR Otherwise Xn Result code selection call progress monitoring This command selects which result codes will be used by the modem Command Dial tone Busysignal SupportedResult detect detect Code X0 Disable Disable OK CONNECT RING NO CARRIER ERROR X1 Disable Disable OK RING NO CARRIER ERROR CONNECT RATE X2 Enable Disable OK RING NO CARRIER...

Страница 213: ...es any busy tones it receives Enabled The modem monitors for busy tones Result Codes OK n 0 1 2 3 4 5 ERROR Otherwise Zn Recall stored profile The modem performs a soft reset and restores recalls the configura tion profile according to the parameter supplied If no parameter is specified zero is assumed Either Z0 or Z1 restores the profile Result Codes OK n 0 1 ERROR Otherwise Cn Data Carrier Detec...

Страница 214: ...his should only be used if your communica tion software does not provide DTR to the modem D1 If the DTR signal is not detected while in on line data mode the modem enters command mode issues an OK result code and remains connected D2 If the DTR signal is not detected while in on line data mode the modem disconnects default D3 Reset on the on to off DTR transition Result Codes OK n 0 1 2 3 ERROR Ot...

Страница 215: ...t Codes OK n 0 1 2 ERROR Otherwise Kn Local flow control selection K0 Disableflowcontrol K3 EnableCTS RTSflowcontrol default K4 EnableXON XOFFflowcontrol Result Codes OK n 0 3 4 ERROR Otherwise Pn Select Pulse Dial Make Break Ratio WW P0 Selects 39 61 make break ratio at 10 pulses per second P1 Selects 33 67 make break ratio at 10 pulses per second P2 Selects 33 67 make break ratio at 20 pulses pe...

Страница 216: ... Store current configuration Saves the current active configuration profile including S Regis ters The current configuration comprises a list of storable parameters illustrated in the V command These settings are restored to the active configuration upon receiving a Zn command or at power up Refer to the V command W Stores the current configuration Zn x Store telephone number This command is used ...

Страница 217: ...mpts to connect in V 42 error control mode If this fails it attempts to connect in MNP mode If this fails it connects in buffer mode and continues operation This is also known as V 42 MNP auto reliable mode same as Q5 N4 V 42 or disconnect The modem attempts to connect in V 42 error control mode If this fails the modem disconnects N5 V 42 MNP or buffered same as N3 N7 V 42 MNP or buffered same as ...

Страница 218: ... displays the numbers for which the last call attempted in the past two hours failed The ERROR result code appears in regions that do not require blacklisting Cn Data compression control This command determines the operation of V 42bis and MNP class 5 data compression On line changes do not take effect until a discon nect occurs first C0 V 42bis MNP 5 disabled No data compression C3 V 42bis MNP 5 ...

Страница 219: ...s in your communication software If you choose however you can display and edit the contents of the registers manually when the modem is in command mode If the value is out of the acceptable range then an error is generated This chapter describes the settings for each S register S register values The format for displaying the value of an S register is ATSn where n is the register number After you ...

Страница 220: ...cond interval this register is cleared Range 0 225 Default 0 Units rings S2 AT escape character user defined This register determines the ASCII values used for an escape se quence The default is the character The escape sequence allows the modem to exit data mode and enter command mode when on line Values greater than 127 disable the escape sequence Range 0 255 ASCIIdecimal Default 43 Units ASCII ...

Страница 221: ... back space character an ASCII space character and a second backspace character This means a total of three characters are transmitted each time the modem processes the backspace character Range 0 127 ASCIIdecimal Default 8 backspace Units ASCII S6 Wait before dialing This register sets the length of time in seconds that the modem must wait pause after going off hook before dialing the first digit...

Страница 222: ...is not associated with the W dial modifier Range 1 255 Default 50 Units seconds S8 Comma pause time This register sets the time in seconds that the modem must pause when it encounters a comma in the dial command string In some countries regions S8 will set both wait before dialing and comma pause time Range 0 255 Default 2 Units seconds S11 DTMF dialing speed This register determines the dialing s...

Страница 223: ...37 2 1200 75bps S37 3 300 bps S37 4 reserved S37 5 1200bps S37 6 2400bps S37 7 4800bps S37 8 7200bps S37 9 9600bps S37 10 12000bps S37 11 14400bps S37 12 16800bps S37 13 19200bps S37 14 21600bps S37 15 24000bps S37 16 26400bps S37 17 28800bps S37 18 31200bps S37 19 33600bps Appendix D ...

Страница 224: ...ted NOANSWER 8 No quiet answer CONNECT2400EC 1 10 Connection at 2400 bps CONNECT4800EC 1 11 Connection at 4800 bps CONNECT9600EC 1 12 Connection at 9600 bps CONNECT14400EC 1 13 Connection at 14400 bps CONNECT19200EC 1 14 Connection at 19200 bps CONNECT7200EC 1 24 Connection at 7200 bps CONNECT12000EC 1 25 Connection at 12000 bps CONNECT16800EC 1 86 Connection at 16800 bps CONNECT300EC 1 40 Connect...

Страница 225: ...ult Codes configuration option is enabled EC is replaced by one of the following symbols depending upon the error control method used V 42bis V 42 error control and V 42bis data compression V 42 V 42 error control only MNP 5 MNP class 4 error control and MNP class 5 data compression MNP 4 MNP class 4 error control only NoEC No error control protocol 2 In some countries regions these result codes m...

Страница 226: ...User s Manual D 8 A PPENDIX D ...

Страница 227: ...ry considerably Therefore many users will experience throughput in the range of 28 50Kbps under normal telephone line conditions Upstream data flows at the V 34 rate NOTE V 90 rates can be achieved only when one V 90 capable host modem is connected to another The TOSHIBA Internal modem will select automatically V 34 if the remote modem lacks V 90 capability or if a combination of network and or ph...

Страница 228: ... at 28000 bps 101 CONNECT 29333 EC Connection at 29333 bps 102 CONNECT 30666 EC Connection at 30666 bps 103 CONNECT 33333 EC Connection at 33333 bps 104 CONNECT 34666 EC Connection at 34666 bps 105 CONNECT 37333 EC Connection at 37333 bps 106 CONNECT 38666 EC Connection at 38666 bps 107 CONNECT 41333 EC Connection at 41333 bps 108 CONNECT 42666 EC Connection at 42666 bps 109 CONNECT 45333 EC Conne...

Страница 229: ... the following symbols depending on the error control method used V42bis V 42errorcontrolandV 42bisdatacompression V42 V 42errorcontrolonly NoEC No error control protocol AT Command V90 V 90DialLineRate V90setsthemaximumV 90downstreamthatthemodemattemptsto connect V90 0 V 90disabled V90 1 V 90enabled automaticspeedselection maximummodemspeed default Appendix E ...

Страница 230: ...User s Manual E 4 A PPENDIX E ...

Страница 231: ...m follow the procedures below Installing the modem board and jack To install the modem board and jack follow the steps below 1 Save your data and turn off the computer 2 Disconnect the AC adaptor and other peripheral devices 3 Turn the computer upside down and remove the battery pack 4 Remove one screw securing the cover 5 Slip your fingernail or a narrow object into a notch under the cover and li...

Страница 232: ...puter 2 Disconnect the AC adaptor and any other peripheral device 3 Turn the computer upside down and remove the battery pack 4 Remove one screw securing the modem cover 5 Removethemodemcover 6 Remove two screws and remove the modem board 7 Disconnect the modem cable 8 Secure the modem cover with one screw 9 Install the battery pack Refer to the installation procedures for details ...

Страница 233: ...08 96 72 48 36 24 18 12Mb s TurboMode Radio Characteristics Radio Characteristics of Wireless LAN Cards may vary according to country region where the product was purchased Type of product Wireless communication is often subject to local radio regulations Although Wireless LAN Wireless networking products have been designed for operation in thelicense free2 4GHzand5GHzband localradioregulationsmay...

Страница 234: ...s and solid high density materials Range is also impacted due to obstacles in the signal path of the radio that may either absorb or reflect the radio signal Supported Frequency Sub bands Subject to the radio regulations that apply in the countries regions your Wireless LANCardmaysupportadifferentsetof5GHz 2 4GHzchannels ConsultyourAuthorizedWirelessLANorTOSHIBASalesofficeforinformation about the ...

Страница 235: ...N Cards installed in Wireless clients that operating in a peer to peer mode the card will use the default channel 10 In a Wireless LAN Access Point the Wireless LAN card will use the factory set default channel printed in bold unless the LAN Administrator selected a different channel when configuring the Wireless LAN Access Point device Wireless IEEE 802 11 Channels Sets Revision A Frequency Range...

Страница 236: ...ual A PPENDIX G Wireless Channels Sets Turbo Mode Frequency Range 5150 5850MHz Note ChannelID 42 5210 USonly 1 50 5250 USonly 1 58 5290 USonly 1 152 5760 USonly 1 160 5800 USonly 1 1 AvailableArea US USA CANADA only ...

Страница 237: ...nding on country region s power standards Certificationagencies U S and Canada UL listed and CSA certified No 18 AWG Type SVT or SPT 2 two conductor Europe Austria OVE Italy IMQ Belgium CEBEC The Netherlands KEMA Denmark DEMKO Norway NEMKO Finland SETI Sweden SEMKO France UTE Switzerland SEV Germany VDE UnitedKingdom BSI Australia AS Japan DENANHO InEurope powercordsmustbeVDEtype H05VVH2 Fandtwoco...

Страница 238: ...llowing illustrations show the plug shapes for the U S A and Canada the United Kingdom Australia and Europe USA and Canada United Kingdom Australia Europe BS approved UL approved CSA approved AS approved Approved by the appropriate agency ...

Страница 239: ...A PPENDIX I I 1 Appendix I Parts Numbers The computer configuration and parts numbers printed on a label on the bottom of thecomputer indicatetheCPU LCD memory HDD ODD andcommunication devices ...

Страница 240: ...28 128MB 256M 20G 20 CD ROM CD Celeron 2 00 C2 00 15 TFT XGA 15X 256MB 256M 30G 30 DVD ROM DVD Celeron 2 20 C2 20 15 TFT SXGA 15 256 128MB 384M 40G 40 CD RW DVD ROM RW DV Pentium4 1 8 M P4 1 8 256 256MB 512M 60G 60 DVD R RW DVR Pentium4 1 9 M P4 1 9 512MB 512M Pentium4 2 0 M P4 2 0 512 128MB 640M Pentium4 2 2 M P4 2 2 512 256MB 768M ODD CPU LCD Memory HDD 802 11b WLb 802 11a b combo WLab Communica...

Страница 241: ...t current DDC display data channel DMA directmemoryaccess DOS disk operating system DVD digitalversatiledisc ECP extended capabilities port FDD floppy disk drive FIR fastinfrared HDD hard disk drive IDE integrated drive electronics I O input output IrDA Infrared Data Association IRQ interrupt request KB kilobyte LCD liquid crystal display LED lightemittingdiode LSI large scale integration MS DOS M...

Страница 242: ...lartime relationship As applied to computer communications asynchronous refers to the method of transmitting data that does not require a steady stream of bits to be transmitted at regular time intervals Abbreviationscontinued TFT thin filmtransistor UART universal asynchronous receiver transmitter USB UniversalSerialBus UXGA ultraextendedgraphicsarray VESA VideoElectronicStandards Association VGA...

Страница 243: ...mpo nents called chips which perform a specific function or increase the capabilities of the system boot Short for bootstrap A program that starts or restarts the computer The program reads instructions from a storage device into the computer s memory bps Bits per second Typically used to describe the data transmission speed of a modem buffer The portion of the computer s memorywheredataistemporar...

Страница 244: ...ons and controlling other chips CMOS ComplementaryMetal Oxide Semiconductor An electronic circuit fabricated on a silicon wafer that requires very little power Integrated circuitsimplementedinCMOS technology can be tightly packaged and are highly reliable cold start Starting a computer that is currently off turning on the power COM1 COM2 COM3andCOM4 The names assigned to the serial and communicati...

Страница 245: ...s Per Second Typi cally used to indicate the transmission speed of a printer CPU Central Processing Unit The portion of the computer that interprets and executes instructions CRT Cathode Ray Tube A vacuum tube in which beams projected on a fluorescent screen producing luminous spots An example is the television set cursor A small blinking rectangle or line that indicates the current position on th...

Страница 246: ...ral and tutorial information as well as system functions DOS Disk Operating System See operating system driver A software program generally part of the operating system that controls a specific piece of hardware frequently a peripheral device such as a printer or mouse DVD RAM ADigitalVersatileDisc Random Access Memory is a high capacity high performance disc that lets you store large volumes of d...

Страница 247: ...ce that reads and writes to floppy disks See also diskette Fn esse A TOSHIBA utility that lets you assign functions to hot keys folder An icon in Windows used to store documents or other folders format The process of readying a blank disk for its first use Formatting establishes the structure of the disk that the operating system expects before it writes files or programs onto the disk function ke...

Страница 248: ...ons port capable of using infrared signals to send serial data input The data or instructions you provide to a computer communication device or other peripheral device from the keyboard or external or internal storage devices The data sent or output by the sending computer is input for the receiving computer instruction Statements or commands that specify how to perform a particu lar task interfac...

Страница 249: ...een microprocessor A hardware compo nent contained in a single integrated circuit that carries out instructions Also called the central processing unit CPU one of the main parts of the computer menu characteristics by electrically connect ing two points of a circuit K K TakenfromtheGreekwordkilo meaning 1000 often used as equiva lent to 1024 or 2 raised to the 10th power See also byte and kilobyte...

Страница 250: ... 3 sent through the serial port of internal modem or 4 stored on somemagneticmedia microprocessor mode A method of operation for example the boot mode standby mode or the hibernation mode modem Derivedfrommodulator demodulator a device that converts modulates digital data for transmis sion over telephone lines and then converts modulated data demodu lates to digital format where received monitor A...

Страница 251: ... or a mouse pixel A picture element The smallest dot that can be made on a display or printer Also called a pel plugandplay Acapabilitywith Windows that enables the system to automatically recognize connections of external devices and make the necessary configurations in the computer port The electrical connection through which the computer sends and receives data to and from devices or other comp...

Страница 252: ...op bit One or more bits of a byte that follow the transmitted character or group codes in asynchronous serial communications Radio frequency interference RFI shield interference All computer equipment generates radio frequency signals The FCC regulates the amount of signals a computing device can allow past its shielding A Class A device is sufficient for office use Class B provides a more stringe...

Страница 253: ...g fine display control and excellentscreenlegibility TouchPad Apointingdeviceinte grated into the TOSHIBA computer palmrest TTL Transistor transistor logic A logic circuit design that uses switch ing transistors for gates and storage write protection U Universal Serial Bus This serial interface lets you communicate with several devices connected in a chain to a single port on the computer V VGA Vi...

Страница 254: ...Glossary 14 G LOSSARY Glossary ...

Страница 255: ...hecklist1 1 Equipment setup general conditions 3 2 placement3 2 Ergonomics lighting3 4 seating and posture 3 3 A AC adaptor See Universal AC adaptor ASCIIcharacters5 9 B Battery automatichibernation1 8 charging6 8 extendinglife6 11 indicator2 8 6 2 location2 6 monitoringcapacity6 10 realtimeclock1 3 6 4 safety precautions 6 5 save mode 1 9 types 6 3 Batterycharger1 11 Batterypack1 3 2 6 additional...

Страница 256: ...ernation1 8 3 8 automatic1 8 3 9 setting 3 9 Hot keys 1 8 display brightness decrease 5 5 display brightness increase 5 6 display selection 5 5 hibernation5 5 instant security 5 4 power save mode 5 4 sound mute 5 4 standby 5 5 Touch Pad setting 5 6 HW Setup 1 10 accessing 7 1 boot priority 7 6 CPU7 5 device config 7 4 display7 5 general7 2 keyboard7 8 LAN7 9 parallel printer7 5 USB7 9 window7 1 I ...

Страница 257: ...4 23 N Numeric keypad See Keypad overlay O Overlay See Keypad overlay P Panel power off See Power Password KeyFD7 4 power on 1 8 problems9 7 starting the computer by 6 15 supervisor7 10 user7 2 PCcard1 6 installing removing8 2 8 3 location of slot 2 2 problems9 18 Pointing device See Touch Pad Ports externalmonitor1 6 USB1 6 Power button location 2 7 conditions 6 1 indicators6 2 paneloff1 9 6 16 p...

Страница 258: ...ys emulating enhanced keyboard 5 2 Enter5 3 rightCtrlkey5 3 ScrLock5 3 Sound system 1 6 headphone jack 1 6 2 3 microphonejack1 6 2 2 mute hot keys 5 4 problems9 22 speakers 2 8 volumecontrol2 1 Standby 1 9 automatic1 8 setting3 10 System indicators See indicators T TOSHIBAConsole1 10 TOSHIBAPowerSaver1 9 TOSHIBAsupport9 26 Touch Pad 1 6 buttons 2 8 location2 7 problems9 19 using 4 1 Troubleshootin...

Страница 259: ...Index Index 5 I NDEX WirelessLAN1 7 problems9 25 using4 19 ...

Отзывы: