RemotEye III Quick Installation Guide – 63761-002
5
Upgrading RemotEye III Firmware from Windows via Network
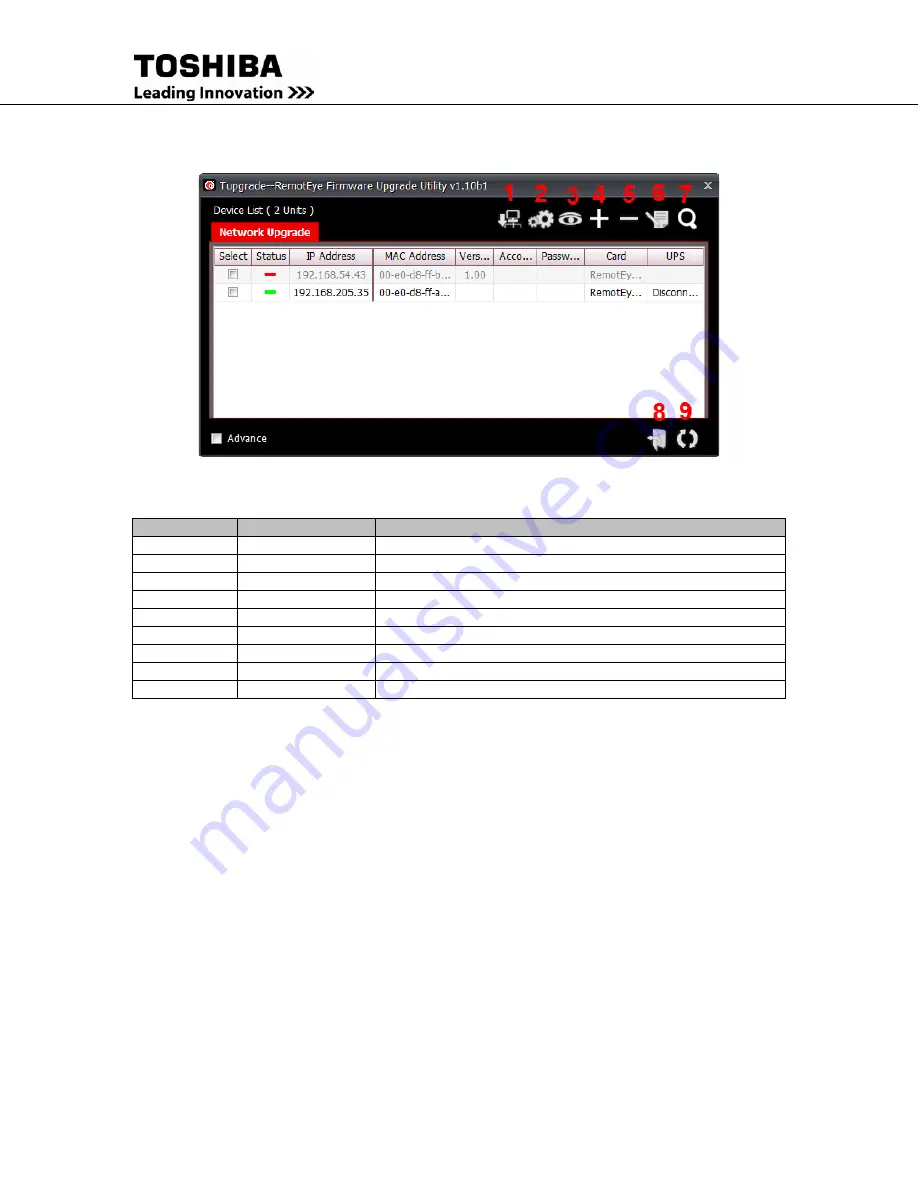
Figure 7: Tugrade, RemotEye Upgrade Utility via Network
Table 1 Tupgrade Toolbar Functions
Toolbar ID
Icon Name
Description/Function
1
Set IP
Manually set found device IP address, subnet mask and gateway
2
Acquire
Get all device parameters. This generates a config file.
3
Browse
Use default browser to open homepage of selected device
4
Add
Pop-up
Add
dialog to add one device
5
Delete
Delete one or more selected devices.
6
Edit
Pop-up Edit dialog to modify a device configuration.
7
Discover
Discover all RemotEye devices on the network.
8
Open file
Open the location (directory) of uploaded file.
9
Upgrade Firmware
Upgrade firmware after unit selected and file uploaded
To perform a firmware upgrade, RemotEye III must be connected to the same network as the workstation
from which the upgrade file is to be sent. In the RemotEye III make sure the
Network Upgrade
Control
is
enabled, under
RemotEye III Control
, and that users have the Admin login string information and
Password.
Here is the way to manually
Upgrade RemotEye Firmware:
1)
Web Interface: Go to
RemotEye III Management
RemotEye III Control
menu then Enable
Network Upgrade Control
.
Note: To enable the Network Upgrade Control user has to change the security level to
administrator by logging in as Administrator.
2) Open the
Tupgrade
application software and click on the
Discover
icon. If no RemotEye devices
auto populate the list, press on the
+
icon and enter the IP, Username, and Password. If it still does
not appear check your network security and your computer firewall.
3)
Select
the check box
right next to the RemotEye that will be updated.
4) Select the
Edit
button and enter the Username and Password.
5) Select the
Open File
button and select the firmware to be uploaded.
6) Select the
Upgrade Firmware
button to start the upgrade process.
7) When the upload is complete, the RemotEye will automatically reboot.


