background image

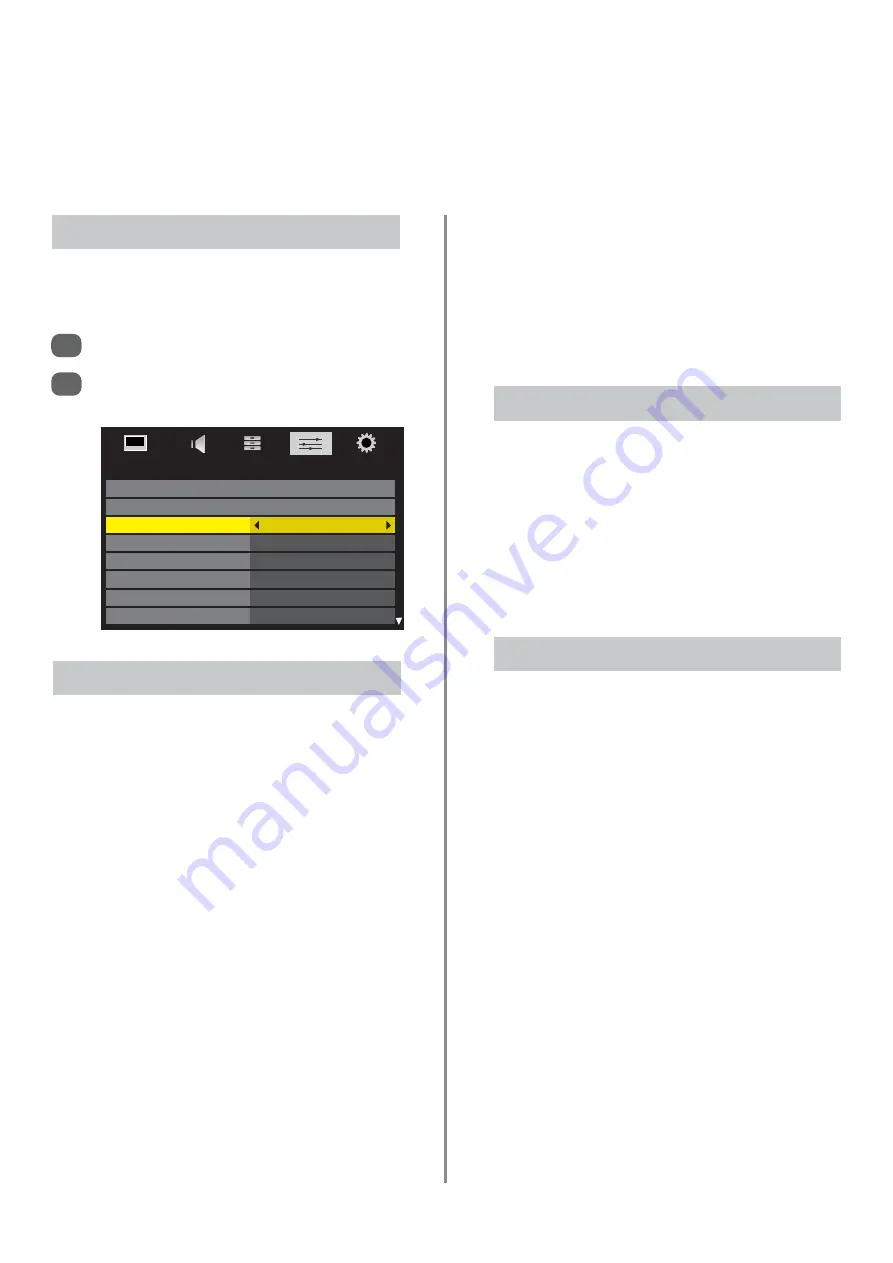
PREFERENCES

REGZA-LINK Setup

Photo Frame Setup

Teletext

Auto

Panel Lock

Off

Auto Format

On

4:3 Stretch

Off

Blue Screen

On

Side Panel

1

Text Information

The 

TEXT

button

:

To view text services press 

TEXT

. Press again to

superimpose the text over a normal broadcast picture and
again to return to normal viewing. Channels cannot be
changed until text is cancelled.

The first text page shown will be the 

initial

page. 

Any text page can be accessed by entering the 3 digit
page number using the numbered buttons, pressing the
coloured buttons or pressing 

P

P

to advance to the next

page and 

Q

to go back to the previous page.

Subtitles are available on page 888.

Sub-pages

If there are sub-pages they will automatically load into
memory without changing the page on screen. A bar with
numbers will appear on the bottom of the screen. 

If a text page with sub-pages is selected, the sub-pages
are displayed in sequence automatically, pressing 

z

or 

x

will move through the sub-pages manually and cancel
the automatic sequence.

52

ATV

text services – selecting modes, 

general information, Auto and LIST modes

This television has a multi-page text memory, which takes a few moments to load. It offers two 

Modes 

of

viewing text – 

Auto

will display 

Fastext

, if available. 

LIST

will store your four favourite pages.

If 

Fastext 

is available four coloured titles will appear at

the base of the screen. 

To access one of the four given subjects, press the
relevant coloured button on the remote control.  

For further information on your particular text system(s),
see the broadcast text index page or, consult your local
Toshiba dealer.

The sub-page being viewed will be highlighted, as the
television loads any additional sub-pages the page
numbers will appear in the bar indicating that they have
loaded.

These sub-pages will remain available to view until
another page is chosen or, in normal TV mode, the
channel is changed.

Navigating Pages Using Auto

The four coloured choices at the bottom of the screen are
numbers – 100, 200, 300 and 400, which have been
programmed into the television’s memory. To view these
pages press the relevant coloured buttons.

To 

change 

these stored pages press the relevant coloured

button and enter the 3 digit number. This number will
change in the top left of the screen and in the coloured
highlight. 

Press 

OK 

to store. 

Whenever OK is pressed all four

page numbers showing at the bottom will be stored
and the previous ones will be lost.

If 

OK

is not pressed the selection will be forgotten when

text is cancelled.

Other pages may be viewed by entering the 3 digit page
number – but DO NOT press 

OK

or these pages will be

stored.

Navigating Pages Using LIST

Select 

Teletext

from the 

PREFERENCES 

menu.

With 

z

or 

x

choose 

Auto

or

LIST

then press

EXIT

.

The text character set will be automatically chosen by the

language setting in the 

SETUP

menu.

Selecting Modes

1

2

Содержание REGZA XV Digital Series

Страница 1: ...XV Digital Series TOSHIBA ...

Страница 2: ...stereo mono or dual language broadcasts 22 Time display ATV only 22 Sound controls volume sound mute 22 Quick menu 22 Sound settings dual bass treble and balance advanced sound settings surround voice enhancement dynamic bass boost external woofer Dolby Volume 23 Sound settings dynamic range control DTV only audio level offset headphone settings audio description 24 Widescreen viewing 25 Picture c...

Страница 3: ...tion input source selection 47 REGZA LINK menus enable REGZA LINK 48 REGZA LINK menus TV auto power auto standby amplifier control speaker preference 49 Input selection and AV connections input selection external input skip input signal selection PC audio 50 Input selection and AV connections HDMI1 Audio HDMI settings lip sync INSTAPORT RGB range digital output 51 TEXT SERVICES ATV text services s...

Страница 4: ...y children push or hit the screen push anything into holes slots or any other openings in the case NEVER guess or take chances with electrical equipment of any kind it is better to be safe than sorry Leave more than 10cm clearance around the television to allow adequate ventilation This will prevent overheating and possible damage to the television Dusty places should also be avoided Damage may oc...

Страница 5: ...g an extremely high level of precision technology however sometimes some parts of the screen may be missing picture elements or have luminous spots This is not a sign of a malfunction Make sure the television is located in a position where it cannot be pushed or hit by objects as pressure will break or damage the screen and that small items cannot be inserted into slots or openings in the case Cle...

Страница 6: ...ng To call up text services in analogue mode and interactive services in digital mode To exit Menus Digital subtitles To select mode To select input from external sources analogue or digital TV Quick menu Stereo bilingual transmissions To switch between ATV analogue TV and DTV digital TV To display on screen menus To display the digital on screen Programme Guide To alter the volume To display on s...

Страница 7: ...del dependant or PC When the external input mode is selected whilst viewing DTV mode the SCART socket will not output video audio signals The SCART output will also be muted in EPG mode Aerial cables Connect the aerial to the socket on the rear of the television If you use a decoder and or a media recorder it is essential that the aerial cable is connected through the decoder and or through the me...

Страница 8: ...using HDMI cables branded with the HDMI logo If several devices are connected the REGZA LINK feature may not operate properly After connecting the equipment use the REGZA LINK menus to setup the desired options The connected equipment must also be set For details see the operation manual for each connected device NOTE The REGZA LINK feature uses CEC Technology as regulated by the HDMI standard Thi...

Страница 9: ...I1 Audio on page 51 Connecting an HDMI device To view the HDMI device video press the Bto select HDMI1 HDMI2 HDMI3 or HDMI4 Model dependant mode Connecting an HDMI Device Connect an HDMI to DVI adaptor cable HDMI type A connector to the HDMI1 terminal and audio cables to the HDMI1 AUDIO socket The recommended HDMI to DVI adaptor cable length is 6 6 ft 2m An HDMI to DVI adaptor cable transfers vide...

Страница 10: ...levision use an HDMI to DVI adaptor cable and an analogue audio cable If connecting a PC with an HDMI terminal use an HDMI cable type A connector A separate analogue audio cable is not necessary See page 9 PLEASE NOTE It is possible that some PCs when connected may not display correctly Some PC models cannot be connected to this television A band may appear at the edges of the screen or parts of t...

Страница 11: ...61kHz 31 500MHz 75 000Hz 37 500kHz 31 500MHz SVGA 800 X 600 56 250Hz 35 156kHz 36 000MHz 60 317Hz 37 879kHz 40 000MHz 72 188Hz 48 077kHz 50 000MHz 75 000Hz 46 875kHz 49 500MHz XGA 1024 X 768 60 004Hz 48 363kHz 65 000MHz 70 069Hz 56 476kHz 75 000MHz 75 029Hz 60 023kHz 78 750MHz WXGA 1280 X 768 59 995Hz 47 396kHz 68 250MHz 59 870Hz 47 776kHz 79 500MHz 74 893Hz 60 289kHz 102 250MHz 1360 X 768 60 015H...

Страница 12: ...ress the Bto select PC mode IMPORTANT NOTE Some PCs when connected they may not display correctly PLEASE NOTE Some PC models cannot be connected to this television An adaptor is not needed for computers with a DOS V compatible mini D sub 15 pin terminal A band may appear at the edges of the screen or parts of the picture may be obscured This is due to scaling of the picture by the set it is not a ...

Страница 13: ...WXGA 1280 X 768 59 995Hz 47 396kHz 68 250MHz 59 870Hz 47 776kHz 79 500MHz 74 893Hz 60 289kHz 102 250MHz 1360 X 768 60 015Hz 47 712kHz 85 500MHz SXGA 1280 X 1024 60 020Hz 63 981kHz 108 000MHz 75 025Hz 79 976kHz 135 000MHz The PC input on this television only accepts signal formats which are compliant with VESA DMT as shown in the table below Some PCs input signals are different from the resolution ...

Страница 14: ...nd e button on the remote control to move up and down through them and OK zord xto select the required choice Follow the on screen instructions The functions of each menu are described in detail throughout the manual Using the Remote Control If the RED LED is unlit check that the mains plug is connected to the power supply and press the i I POWER button on the left side of the television If the pi...

Страница 15: ...ONE C22 2 BBC TWO C28 3 ITV C25 4 CH4 C32 1 2 3 4 5 6 7 Press the ibutton the Quick Setup screen will appear This screen will appear the first time that the television is switched on and each time Reset TV is selected Using e highlight Menu Language then zor xto select Press e to highlight Country and zor xto select The television will now tune the stations for your country Press OK The Location s...

Страница 16: ...ue of the channel will be displayed Scan Type There are two options Full Scan and Quick Scan Quick Scan is a simplified version of Full Scan and takes less time to complete Start Frequency This sets the frequency from which the scan will start End Frequency This sets the frequency at which the scan will stop The valid entry range for frequency items is 113 000 858 000 for C Book Other and 114 000 ...

Страница 17: ...V then press e to select Start Scan press OK to start Auto tuning The television will start to search for all available DTV stations You must allow the television to complete the search When the search is complete the Auto Tuning screen will display the services found Use e or f to move through the list to select a channel then press OK to view Auto Tuning 1 2 Press MENU and use zor xto select SET...

Страница 18: ...n most cases the television will then operate with lower energy consumption There are two options available Home and Store Store is for use when a television is being used for display i e in shops etc Home is recommended for normal home use Auto Channel Update 1 2 Press MENU and use zor xto select SETUP Use e to highlight DTV Settings and press OK 3 Press e to select Auto Channel Update and use zo...

Страница 19: ...press OK Use e to select the channel to be skipped Press xrepeatedly to select Press OK a tick will appear in the box to show that the channel has now been skipped 3 Sorting Channels The channel order may be changed to suit personal preference 1 Press MENU and select the SETUP menu Use e to move down through the list and highlight DTV Settings Press OK 2 Skipping Channels This feature allows the s...

Страница 20: ...d if interference weak signal is experienced See page 54 Station Station identification Use the for eand zor xbuttons to enter up to seven characters Station Position System Skip Signal Class Colour System Channel Search Manual Fine Tuning Use f or e to highlight the position required e g we suggest Pos 0 for a media recorder Select ATV using ATV DTV Press MENU and use zor xto select the SET UP me...

Страница 21: ...tion Skipped channel positions cannot be selected by PP and P Q or by the controls on the television but can still be accessed by the number buttons on the remote control 3 4 5 Use f or e to highlight the channel position to be skipped and press OK to select Press xto select Skip Use f or e to turn Skip on Press OK on the screen indicates a skipped channel position To prevent certain programmes fr...

Страница 22: ... or Dual will appear on the screen each time programme positions are changed disappearing after a few seconds If the broadcast is not in stereo the word Mono will appear For ATV programmes Stereo Press OI II to select Stereo or Mono Bilingual Bilingual transmissions are rare If they are transmitted the word Dual will display Choose the required programme number and if the word Dual appears press O...

Страница 23: ...e or film is being broadcast with a soundtrack in more than one language the DUAL feature allows selection between them 1 2 Select the SOUND menu Use e to highlight Dual then press zor xto choose between Dual 1 or Dual 2 Bass Treble and Balance Press MENU and zor xto select SOUND Press e or f to highlight Bass Treble or Balance and zor xto change the setting 1 2 The Bass Treble and Balance can be ...

Страница 24: ... the Headphone Level only 1 2 3 In the SOUND menu Press e to highlight Headphone Settings then press OK Use e to highlight Speaker Link then zor x to select Off Use e to highlight Headphone Level then press zor xto adjust the volume Audio Description This feature provides a detailed narrative sound track for the visually impaired provided it is being broadcast The function is available through the...

Страница 25: ...ur Depending on the type of broadcast being transmitted programmes can be viewed in a number of formats Wide Super Live Cinema 4 3 Subtitle and 14 9 CINEMA When watching all sides panel format films video tapes this setting will eliminate or reduce the black bars at all sides of the screen by zooming in and selecting the image without distortion Use this setting when watching a widescreen DVD wide...

Страница 26: ...s Use eor f to highlight the required format and OK to select Picture Size Wide 4 3 Super Live Cinema Subtitle 14 9 Native This setting will show the picture without over scan i e WYSIWYG NATIVE This setting will show the picture without over scan i e WYSIWYG This option is only available when watching a PC signal source via HDMI or PC terminal PC NORMAL Dot by Dot is a non scaling display Dependi...

Страница 27: ...URE menu press e to select Picture Mode 1 Picture Mode Most of the picture controls and functions are available in both digital and analogue modes PLEASE NOTE features not available will be greyed out PICTURE Picture Mode Dynamic Reset Backlight 100 Contrast 100 Brightness 0 Colour 0 Tint 0 Sharpness 0 Picture Preferences 2 In the PICTURE menu use e to select Contrast Brightness Colour Tint and Sh...

Страница 28: ...t Picture Mode back to factory settings This feature will not be available until picture settings have been changed Reset In the Advanced Picture Settings menu press e to select 3D Colour Management then use zor xto select On 2 In the Advanced Picture Settings menu press e to select Base Colour Adjustment then press OK 1 The Base Colour Adjustment feature allows the adjustment of individual colour...

Страница 29: ...OK Press OK then zor xto select a point and e or f to adjust the level Press OK to store the adjustment To cancel the adjustment when selecting a point press xto select Cancel and press OK Select Reset then OK to return the adjustments to the factory settings Press zor xto select On Press e to select Backlight Adjustment Pro then press OK The Backlight Adjustment Pro screen will appear Press OK ag...

Страница 30: ... to select MPEG NR Press zor xto select between Low Middle High or Off 3 In the Advanced Picture Settings menu press e to select Resolution then press OK 1 Press e to select Resolution and using zor xselect On Press e to select Level and using zor xadjust the level NOTE Depending on the content this may not work correctly Depending on the equipment connected to the television i e equipment with sp...

Страница 31: ...OTE If Picture Mode is set to AutoView this feature will not be selectable 3 Expert Mode allows the Red Green and Blue colours to be switched on and off and individually adjusted Expert Mode Expert Mode Red On Green On Blue On Colour 0 Tint 0 The Active Vision M100 feature can reduce picture blur and or judder without altering image brightness or adding flicker Active Vision M100 1 In the Advanced...

Страница 32: ...mat irrespective of the television s previous setting In the PREFERENCES menu press e to select Auto Format 1 Press zor xto select On or Off 2 Press EXIT to finish The histogram display will appear to the left of the picture being viewed 2 In the PICTURE menu press e to select Control Visualization then press OK 1 This feature displays the brightness histogram and control curve of each scene Contr...

Страница 33: ...4 3 programmes into a full screen picture 2 1 In the PREFERENCES menu press e to highlight 4 3 stretch Press zor xto select On or Off Blue Screen When Blue Screen is selected the screen will turn blue and the sound will be muted when no signal is received 2 1 In the PREFERENCES menu press e to highlight Blue Screen Press zor xto select On or Off This feature is used to hold a still image on the sc...

Страница 34: ...e timers to record the media recorder will need to be AV link compatible 34 The timers EDIT TIMER 15 49 Fri 10 April Timer Type Reminder Channel 6 ITV2 Date Fri 10 April 2009 Start Time 15 49 End Time 16 49 Repeat Once Subtitle Off 0 9 Edit OK Save RETURN Back APPLICATIONS Media Player EPG Programme Timers On Timer Sleep Timer 00 00 This feature will set the television to go to a specific channel ...

Страница 35: ...n Time 00 00 Repeat Once Input DTV Channel 6 ITV2 Volume 20 Time until Power On 00 00 The Sleep Timer turns the television off after a certain time Setting the Sleep Timer Cancelling the On Timer 1 2 3 4 In the APPLICATIONS menu press e to select Sleep Timer Using the number buttons set the required time For example to switch the television off in one and a half hours enter 01 30 or press zor xto ...

Страница 36: ...ct Next Press e to select Also Details of programmes that have started on other channels will be shown Use zor xto change the display contents To set a reminder for the following programme select Next then press OK The EDIT TIMER screen will appear 2 3 i 1 BBC ONE 10 52 Fri 10 April O English Now City Hospital 10 00 11 00 SD 16 9 News and Factual 8 mins remain Next Houses Behaving Badly 11 00 11 4...

Страница 37: ...e set topics by colour and display programmes according to their topic 13 07 Fri 10 April Fri 10 45 1 BBC ONE BBC News Spot 2 BBC TWO 3 ITV1 Loose Wom ITV Lunchtime Good Bid Good Buy Daily Cooks 4 Channel 4 Where Angels Go Trouble Follo Selling Houses Abroad 5 Five House Neighb Home and Aw I O Love 6 ITV2 Emmerdale The Jeremy Kyle Show The Jeremy Kyle Show 7 BBC THREE This Is BBC THREE 9 BBC FOUR ...

Страница 38: ...number when these have been entered they will need to be confirmed by entering them again The PIN number has now been set If the PIN number has been set a prompt will appear requiring the PIN number to be entered before television settings i e Auto Tuning Reset TV etc can be altered New PIN Confirm PIN Parental Control Parental Setup None DTV Settings Channels Channel Options Subtitle and Audio PI...

Страница 39: ...use zor x to select Normal or Hard of Hearing 4 5 Press e to select Primary Subtitle Language or Secondary Subtitle Language and use zand xto select an option Press the SUBTITLE button to select on or off or choose if more than one of the selected languages are available The Common Interface Slot situated on the side of the television enables the insertion of a CAM Conditional Access Module and ca...

Страница 40: ...ware Use zor xto select On or Off If preferred software upgrades can be searched for manually using Search for New Software Searching for New Software 1 In the Software Upgrade menu press e to select Search for New Software Press OK The television will automatically start searching for a software upgrade the progress bar will move along the line If an upgrade is found the television will automatic...

Страница 41: ...solution 16384 x 16384 Pixels Movie Viewer specifications File Format DivX Maximum video resolution 720 x 480 30 fps Maximum number of files 500 Folder Music Player specifications File Format MP3 Sampling frequency 16kHz 22 05kHz 24kHz 32kHz 44 1kHz 48kHz Bit rate from 8 to 320kbps Maximum number of files 500 Folder PLEASE NOTE Insert the USB device or SD card gently into the television and do not...

Страница 42: ...ets the interval time and repeat when in Single View and Slideshow modes While in Single View or Slideshow mode press QUICK to open the the Quick Menu Press f or e to select Interval Time then use zor xto adjust the setting Press e to select Repeat then zor xto select On or Off 1 2 3 Interval Time and Repeat Settings This view mode allows all the images within a selected folder to be viewed simult...

Страница 43: ...tedly until the point is accessed NOTE If a file is not compatible with Media Player it will automatically be skipped 2 9 10 11 12 3 4 5 6 7 8 Playing Movies USB devices only To display file information i e content number movie title progress time etc press The information will remain on screen for approximately 6 seconds or can be removed by pressing again To view subtitles press SUBTITLE repeate...

Страница 44: ...ically start to play from the beginning Depending on the size of the file it may take a few minutes for playback to begin To pause playback at any point press m ll r To resume play press x Press qor sto fast reverse or fast forward during playback Each time qor sis pressed the playback speed will change To locate a specific point press wl or ly repeatedly until the point is accessed NOTE If a file...

Страница 45: ...ect as in Step 2 and 3 5 For a clock to appear on screen with the photo with Clock highlighted use zor xto select Digital Analogue Digital and Analogue or Off Press e to highlight Position and zor xto choose Left or Right The clock will then move to whichever position has been chosen Press e to highlight Auto Power Off Using zor xto select between 00 30 01 00 02 00 04 00 06 00 12 00 or Off Setting...

Страница 46: ... vertical lines on the screen Sampling Clock Picture Position Connect the PC as shown in the Connecting a PC via RGB PC section and ensure that a picture is showing on the television screen The picture position may now be adjusted to suit personal preference Press Bto select PC then select PC Setting from the SET UP menu 1 Press OK Press f and e to select an option then zor xto adjust the settings...

Страница 47: ...ond selection screen will appear showing all connected REGZA LINK equipment 3 Use f or e to highlight an input source then press OK to select NOTE When the television is switched on it will take a few minutes for the REGZA LINK logo to appear in the list when an HDMI cable is removed it will take a few minutes for the logo to disappear NOTE If the HDMI cable from connected equipment is changed or ...

Страница 48: ...rence feature allows the televisions remote control to adjust the volume or mute the sound of the speakers connected to the television via an AV amplifier Ensure that the connected AV amplifier and REGZA LINK equipment are selected in the input source selection and that the Speaker Preference is set to Amplifier in the REGZA LINK setup menu NOTE When the AV Amplifier is switched on its input sourc...

Страница 49: ...t On or Off 1 2 Speaker Preference This feature allows the audio output preference to be set to the TV speakers or AV amplifier speakers The AV Amplifier option lets the televisions remote control adjust or mute the volume of the audio In the REGZA LINK Setup menu press e to highlight Speaker Preference 1 Press zor xto select TV Speakers or Amplifier 2 PREFERENCES REGZA LINK Setup Photo Frame Setu...

Страница 50: ...to select On Press EXIT The skipped input will now be greyed out on the Input list and will be skipped over when Bis pressed to go through the list 1 2 This feature makes input selection more convenient Press Bto select the external input to be skipped i e B1 B2 or B3C External input skip 1 2 To receive sound from a connected PC plug the audio cable into the back of the television see Connecting a...

Страница 51: ...c Activates an audio video display timing adjustment that allows HDMI devices to automatically synchronise accurately If the HDMI source does not support these features the television may not work properly when they are activated INSTAPORT Reduces the log of switching times when switching HDMI sources RGB Range Adjusts RGB full range signal automatically When Limit is selected the RGB signal s out...

Страница 52: ...ed titles will appear at the base of the screen To access one of the four given subjects press the relevant coloured button on the remote control For further information on your particular text system s see the broadcast text index page or consult your local Toshiba dealer The sub page being viewed will be highlighted as the television loads any additional sub pages the page numbers will appear in...

Страница 53: ...r style formats incorporating pictures and interactive views They offer high quality on screen images with multi colour photographic still images advanced text and graphics and are user friendly These services are free to anyone with a digital television however they are not available for all digital stations and are dependant on the broadcaster DTV Interactive Services Ensure that digital mode ha...

Страница 54: ...Auto to automatically display the best colour system To check that you have the best colour There is a picture but why is there little or no colour Q With the external source playing select Manual Settings from the SETUP menu With f or e choose between Auto PAL SECAM NTSC 4 43 or 3 58 1 2 Questions and Answers 54 Select the ATV Manual Tuning menu Highlight the station and press OK then press xto s...

Страница 55: ...playing DVDs Q A This is a superior connection for connecting to an audio sound system and allows transmission of multichannel sound Why is Digital Audio output for Q A The channel has been locked in Channel Options see Digital Settings section Why is the digital channel locked Q A The Sampling clock may need adjustment Select PC Setting from the SET UP menu highlight Sampling clock and adjust unt...

Страница 56: ...Alternatively select from the GUIDE How are radio channels selected Q A In the UK DTV channel numbers are allocatd by the broadcasters When tuning channels why are the channel numbers not in sequential order Q A Audio Description is a detailed narrative sound track which is only available if being broadcast with the programme being watched What does AD mean Q A Yes all Toshiba Regza LCD television...

Страница 57: ...et Red Solid Green Solid Green Solid Power ON On Timer is set Programme Timer is working OFF Green Solid Green Solid Power ON On Timer is set Programme Timer is NOT set Orange Solid OFF Green Solid Power ON On Timer is NOT set Programme Timer is set Red Solid OFF Green Solid Power ON On Timer is NOT set Programme Timer is working OFF OFF Green Solid Power ON On Timer is NOT set Programme Timer is ...

Страница 58: ...ad Pb mercury Hg and or cadmium Cd defined in the Battery Directive 2006 66 EC then the chemical symbols for lead Pb mercury Hg and or cadmium Cd will appear below the crossed out wheeled dust bin symbol By participating in separate collection of batteries you will help to assure the proper disposal of products and batteries and thus help to prevent potential negative consequences for the environm...

Страница 59: ...ize 37 XV 94cm approx 42 XV 107cm 46 XV 117cm Display 16 9 Sound output at 10 distortion Main 10W 10W Power consumption 37 XV 126W approx 42 XV 144W 46 XV 167W Standby approx 37 XV 0 7W 42 XV 0 7W 46 XV 0 6W Dimensions 37 XV 64cm H 91cm W 27cm D approx 42 XV 71cm H 101cm W 32cm D 46 XV 76cm H 111cm W 32cm D Height dimension includes foot stand Weight approx 37 XV 17kg 42 XV 23kg 46 XV 25kg Headpho...

Отзывы: