background image

English

15

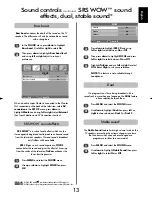
Widescreen viewing 

continued 

Using the special functions to change the size of the displayed image (i.e. changing the height/width ratio) for the purposes of public display or
commercial gain may infringe on copyright laws.

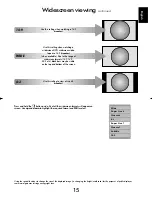
14:9

Use this setting when watching a 14:9

broadcast.

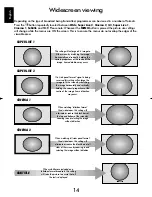
Use this setting when watching a

widescreen DVD, widescreen video

tape or a 16:9 broadcast 

(when available). Due to the range of

widescreen formats (16:9, 14:9, 

20:9 etc.) black bars may be visible

on the top and bottom of the screen.

WIDE

Use this setting to view a true 4:3

broadcast.

4:3

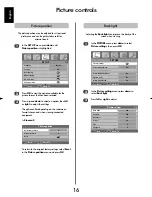
Press and hold the 

{

button and a list of all the widescreen formats will appear on

screen. Use 

up

and 

down

to highlight the required format and 

OK

to select.

Wide

Super Live 2

Cinema 2

4:3

Super Live 1

Cinema 1

Subtitle

14:9

g

Содержание Regza WL68

Страница 1: ...WL68 Owner s manual Manuel de l utilisateur Bedienungsanleitung Manual del usario Manual d uso per l utente Manual do proprietário Gebruikershandleiding TOSHIBA ...

Страница 2: ... 3D FOCUS TruBass 13 Widescreen viewing 14 Picture controls picture position back light 16 Picture controls picture preferences contrast brightness colour tint sharpness black stretch MPEG noise reduction MPEG NR digital noise reduction DNR colour temperature 17 Picture controls colour management base colour adjustment active backlight control cinema mode 18 Picture controls Active Vision M100 aut...

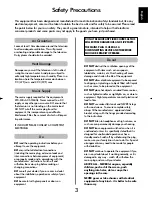
Страница 3: ... about the installation operation or safety of your equipment DO be careful with glass panels or doors on equipment Air Circulation Heat Damage Mains Supply Do DO NOT obstruct the ventilation openings of the equipment with items such as newspapers tablecloths curtains etc Overheating will cause damage and shorten the life of the equipment DO NOT allow electrical equipment to be exposed to dripping...

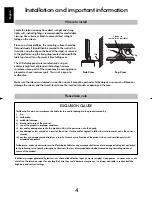
Страница 4: ...on and important information Where to install Please take note EXCLUSION CLAUSE Toshiba shall under no circumstances be liable for loss and or damage to the product caused by i fire ii earthquake iii accidental damage iv intentional misuse of the product v use of the product in improper conditions vi loss and or damage caused to the product whilst in the possession of a third party vii any damage ...

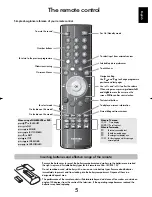
Страница 5: ...ize 8 9 To select a page whilst viewing a normal picture The remote controlUP Remove the back cover to reveal the battery compartment and make sure the batteries are inserted the right way round Suitable battery types for this remote are AAA IEC R03 1 5V Do not combine a used old battery with a new one or mix battery types Remove dead batteries immediately to prevent acid from leaking into the bat...

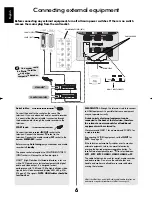
Страница 6: ...6p and 720p signals NOTE HDMI cables should be less than 5m PLEASE NOTE Although this television is able to connect to HDMI equipment it is possible that some equipment may not operate correctly A wide variety of external equipment can be connected to the back of the television therefore the relevant owners manuals for all additional equipment must be referred to We recommend SCART 1 for a decoder...

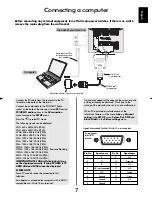
Страница 7: ... Conversion adaptor if required not supplied RGB PC cable not supplied Mini D sub 15 pin connector Connect the PC cable from the computer to the PC terminal on the back of the television Connect the audio cable to the PC HDMI1 Audio socket on the back of the television Select PC from the PC HDMI1 audio options in the AV connection menu located in the SET UP menu Press the Bto select PC mode The fo...

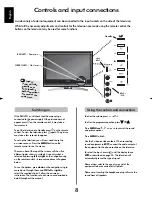
Страница 8: ... throughout the manual A wide variety of external equipment can be connected to the input sockets on the side of the television Whilst all the necessary adjustments and controls for the television are made using the remote control the buttons on the television may be used for some functions To alter the volume press j To alter the programme position press e eFf f Press MENU and S R P or Q to contr...

Страница 9: ...s You must allow the television to complete the search When the search is complete the television will automatically select programme position 1 This may not be a clear picture or the signal may be weak so the station order can be changed using Manual tuning which will appear on the screen Use up or down to move through the list to your preferred position As you do so the other stations will move ...

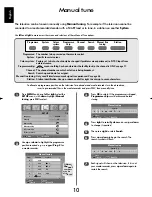
Страница 10: ...lity to skip the channel is ON See page 11 Channel The channel number on which a station is being broadcast Search Search up and down for a signal Manual fine tuning Only used if interference weak signal is experienced See page 26 Station Station identification Use up or down and left or right to enter up to seven characters Station Programme System Colour system Channel Search Programme skip Manu...

Страница 11: ...mes from being viewed the programme position can be skipped The remote control must be removed as the channels will still be available using the number buttons Programmes can then be watched as normal using the controls on the television but the television will not show the skipped programme position Programme skip Select Manual tuning from the SET UP menu 1 2 When your media recorder signal is fo...

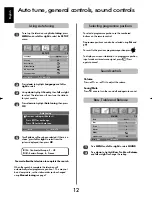
Страница 12: ...anual tuning OK AV connection OK Picture position OK MENU Back EXIT Watch TV Auto tune general controls sound controls Using Auto tuning 1 2 3 4 To set up the television using Auto tuning press MENU and use left or right to select the SET UP menu Volume Press j or j to adjust the volume Sound Mute Press konce to turn the sound off and again to cancel Selecting programme positions Sound controls Pr...

Страница 13: ... up or down to highlight WOW then press OK 3 4 5 Press down to highlight SRS 3D and using left or right select between On or Off Then press down to highlight FOCUS and press left or right to select between On or Off Highlight TruBass and use left or right to select Off Low or High to suit your preference NOTE This feature is not available through headphones 1 2 Press MENU and select the SOUND menu...

Страница 14: ...nlarge a 4 3 image to fit the screen by stretching the image horizontally and vertically holding the correct proportions at the centre of the image Some distortion may occur SUPER LIVE 2 If a side panel format signal is being received this setting will enlarge the image to fit the screen by stretching the image horizontally and vertically holding the correct proportions at the centre of the image ...

Страница 15: ... setting when watching a widescreen DVD widescreen video tape or a 16 9 broadcast when available Due to the range of widescreen formats 16 9 14 9 20 9 etc black bars may be visible on the top and bottom of the screen WIDE Use this setting to view a true 4 3 broadcast 4 3 Press and hold the button and a list of all the widescreen formats will appear on screen Use up and down to highlight the requir...

Страница 16: ...t Reset in the Picture position menu and press OK Picture position The picture position may be adjusted to suit personal preference and can be particularly useful for external inputs In the SET UP menu press down until Picture position is highlighted 1 Press OK to view the options available for the picture format that has been selected Press up and down to select an option then left or right to ad...

Страница 17: ...e definition Black stretch Press left or right to select between Onand Off The effect depends on the broadcast and is most noticeable on dark colours 1 2 Picture settings Black stretch On MPEG NR Low DNR Auto Colour Temperature Normal MENU Back EXIT Watch TV 2 2 In the Picture settings menu press down until Black Stretch is highlighted This television offers the choice of personalising the picture...

Страница 18: ...ustment then press OK 1 The Base colour adjustment feature allows the adjustment of individual colours to suit personal preference This can be useful when using an external source Base colour adjustment When Colour management is selected it allows the Base colour adjustment feature to become available Colour management In the PICTURE menu press down to select Colour management Press left or right ...

Страница 19: ...lect the FUNCTION menu 1 Press down to highlight Auto format then left or right to select On or Off 2 2 1 In the FUNCTION menu press down until Side Panel is highlighted Press left or right to adjust 1 2 Side panel adjustment In the FUNCTION menu press down to highlight Blue screen Press left or right to select On or Off FUNCTION Teletext Auto Panel lock Off Auto format On Blue screen On Side Pane...

Страница 20: ...being displayed when the timer switches on Once the On timer has been set the television can be switched on at any time by pressing i The GREEN On timer indicator will remain on until the set time period as passed when the television will go to the chosen channel This feature can help to avoid missing favourite programmes To cancel the On timer Sleep timer enter zero in each position The televisio...

Страница 21: ...to select PC then select PC Setting from the SET UP menu 1 Press OK Press up and down to select an option then left or right to adjust the settings 2 SET UP Language English Country UK AV connection OK PC Setting OK MENU Back EXIT Watch TV 1 2 PC Settings Horizontal position 0 Horizontal width 5 Vertical position 0 Vertical height 5 Clock phase 0 Sampling clock 0 MENU Back EXIT Watch TV 1 2 PC Set...

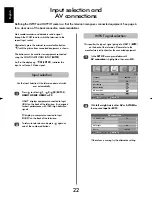
Страница 22: ... Input Selection if the television does not switch over automatically Input selection 1 2 Press Bto select B1 B2 B3C EXT1 3 HDMI1 HDMI2 HDMI3 or PC HDMI displays equipment connected to Input HDMI on the back of the television It is designed for best performance with 1080i high definition signals PC displays a computer connected to Input RGB PC on the back of the television To return to television ...

Страница 23: ... High Definition Multimedia Interface are trademarks or registered trademarks of HDMI Licensing LLC HDMI1 audio AV connection PC HDMI1 audio PC HDMI1 audio Digital EXT2 input AV Woofer Internal MENU Back EXIT Watch TV AV connection PC HDMI1 audio HDMI1 HDMI1 audio Digital EXT2 input AV Woofer Internal MENU Back EXIT Watch TV Highlight PC HDMI1 audio then use right to select the PC option 2 NOTE Se...

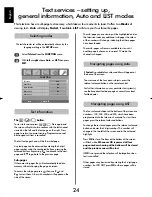
Страница 24: ... broadcast text index page or consult your local Toshiba dealer The sub page you are viewing will be highlighted and as the television loads any additional sub pages the colour of the numbers will change indicating that these pages have been loaded These sub pages will remain available to view until another page is chosen or in normal TV mode the channel is changed Navigating pages using Auto The ...

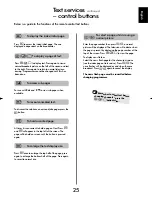
Страница 25: ... 7to view the page To display news flashes Select the news flash page for the chosen text service see the index page of text service Press 8 9 The news flashes will be displayed as and when they are broadcast Press8 9again to cancel the display The news flash page must be cancelled before changing programmes To display the index initial page T At times it is convenient to hold a page of text Press...

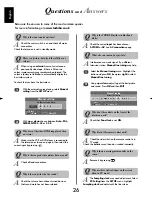
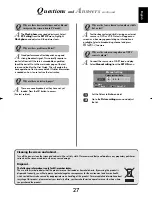
Страница 26: ...olour improvements may sometimes be achieved The colour is factory set to Auto to automatically display the best colour system To check that you have the best colour There is a picture but why is there little or no colour Q With the external source playing select Manual setting from the SET UP menu With up or down choose between Auto PAL SECAM NTSC 4 43 or 3 58 1 2 Questions and Answers Select the...

Страница 27: ...TSC source is played Q Set the Colour to Auto and exit Go to the Picture settings menu and adjust the tint 1 2 Cleaning the screen and cabinet Turn off the power clean the screen and cabinet with a soft dry cloth We recommend that you do not use any proprietary polishes or solvents on the screen or cabinet as this may cause damage Disposal The following information is only for EU member states The...

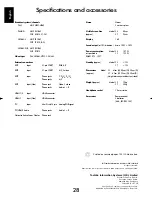
Страница 28: ...prox 37 94cm Display 16 9 Sound output at 10 distortion Main 10W 10W Power consumption Model 32 157W as specified in 37 192W EN60107 1 1997 Standby approx Model 32 1W 37 1W Dimensions Model 32 61cm H 80cm W 30cm D approx 37 69cm H 92cm W 30cm D Height dimension includes foot stand Weight approx Model 32 19kg 37 25kg Headphone socket 3 5mm stereo Accessories Remote control 2 batteries AAA IEC R03 1...

Страница 29: ......

Страница 30: ...S 3D FOCUS et TruBass 41 Grand écran 42 Commandes de l image position de l image rétroéclairage 44 Commandes de l image préférences d image contraste lumière couleur teinte définition étirage du noir réduction du bruit MPEG MPEG NR réduction numérique du bruit DNR température des couleurs 45 Commandes de l image gestion de la couleur réglage des couleurs de base rétroéclairage dynamique mode ciném...

Страница 31: ...rité de votre appareil FAITES ATTENTION aux panneaux ou aux portes en verre de l appareil Ventilation Chaleur excessive Alimentation secteur Conseils N OBSTRUEZ PAS les ouvertures de ventilation de l appareil par exemple par des journaux nappes rideaux etc Une surchauffe endommagera l équipement et réduira sa durée de vie NE LAISSEZ PAS l appareil exposé à des gouttes ou éclaboussures et n y place...

Страница 32: ... sont affichés sur l écran de télévision pendant un certain temps il est vivement conseillé de réduire les réglages de luminosité et de contraste Placez le téléviseur à l abri de la lumière directe du soleil et des éclairages puissants Un éclairage doux et indirect est recommandé pour un meilleur confort de visualisation Utilisez des rideaux ou des stores pour empêcher que la lumière du soleil n é...

Страница 33: ...Menus Cette touche n a aucune fonction sur ce modele Pour couper le son Pour sélectionner une entrée parmi des sources externes Pour sélectionner le mode Cette touche n a aucune fonction sur ce modele Menus à l écran Représentation grand écran Sélection des préférences d affichage Touches numériques Pour revenir au programme précédent Mode marche veille Si vous utilisez un magnétoscope ou lecteur ...

Страница 34: ...éléviseur Si vous utilisez un décodeur et ou un enregistreur média il est nécessaire de raccorder le câble d antenne d abord au décodeur et ou à l enregistreur média puis au téléviseur Câbles péritel Raccordez la prise IN OUT de l enregistreur média au téléviseur Raccordez la prise TV du décodeur au téléviseur Raccordez la prise SAT de l enregistreur média à la prise MEDIA REC du décodeur Avant de...

Страница 35: ...une connexion PC HDMI sur TV HDMI les formats XGA et SXGA ne seront pas affichés REMARQUE Certains types d ordinateurs ne peuvent pas être connectés à ce téléviseur Un adaptateur n est pas nécessaire pour les ordinateurs pourvus d une borne mini D sub à 15 broches compatible DOS V Information de signal pour le connecteur Mini D sub à 15 broches Affectation des broches pour la borne RGB PC N de Nom...

Страница 36: ...ue menu sont décrites en détail dans ce manuel Il est possible de connecter un grand nombre d équipements externes différents aux prises d entrée sur le côté du téléviseur Tous les réglages nécessaires du téléviseur se font par la télécommande Les touches à l avant de l appareil peuvent toutefois être utilisées pour certaines fonctions Pour modifier le volume appuyez sur j Pour modifier la positio...

Страница 37: ...u à son terme Une fois la recherche terminée le téléviseur sélectionnera automatiquement la position de programme 1 Il se peut que l image ne soit pas claire ou bien que le signal soit faible dans ce cas l ordre des chaînes peut être modifié en utilisant la fonction de Recherche manuelle qui apparaîtra sur l écran La liste des chaînes étant indiquée utilisez haut ou bas pour mettre en surbrillance...

Страница 38: ...registreur média mettez le décodeur sous tension insérez une cassette préenregistrée dans l enregistreur média et appuyez sur la touche LECTURE avant de procéder à une recherche manuelle Utilisez gauche et droite pour naviguer sur l écran et sélectionner l une des options relatives à la Recherche manuelle 1 2 3 4 5 6 Programme La touche numérique à enfoncer sur la télécommande Système Spécifique à...

Страница 39: ... chaîne répétez la procédure pour chaque position Les chaînes bloquées ne peuvent pas être sélectionnées à l aide des touches Pfet P eou par les touches du téléviseur mais sont toujours taccessibles par les touches numériques de la télécommande 3 4 5 Utilisez les touches haut ou bas pour mettre en surbrillance la position de programme que vous souhaitez bloquer et appuyez sur OK pour sélectionner ...

Страница 40: ...ionnez le menu RÉGLAGES Vous devez laisser le téléviseur mener la recherche jusqu à son terme A l issue de la recherche le téléviseur repassera automatiquement à la position de programme 1 Si l image n est pas suffisamment nette vous pouvez modifier l ordre des chaînes grâce à la fonction Recherche manuelle voir page 37 B G Europe continentale I R U D K Europe de l Est L France 5 Votre Système ser...

Страница 41: ...z sur OK 3 4 5 2 Appuyez sur bas pour mettre SRS 3D en surbrillance puis sur gauche oudroite pour sélectionner Marche ou Arrêt Appuyez ensuite sur bas pour mettre FOCUS en surbrillance puis sur gauche oudroite pour sélectionner Marche ou Arrêt Mettez TruBass en surbrillance puis utilisez gauche oudroite pour sélectionner Arrêt Faible ou Fort en fonction de vos préférences A NOTER Ces effets ne son...

Страница 42: ...NÉMA1 CINÉMA2 Lors de la réception d un signal à bandes latérales noires ce format étire horizontalement et verticalement l image pour remplir l écran Bien que les proportions correctes soient maintenues au centre de l écran des déformations peuvent se produire ZOOM1 Lorsque vous regardez des films cassettes vidéo en format boîte aux lettres ce réglage éliminera ou réduira les bandes noires en hau...

Страница 43: ...disque numérique vidéo grand écran une cassette vidéo grand écran ou une émission 16 9 lorsqu elles sont disponibles En raison de la gamme de formats grand écran 16 9 14 9 20 9 etc vous verrez peut être apparaître des bandes noires en haut et en bas de l écran PLEIN ÉCRAN Utilisez ce réglage pour voir une émission en format 4 3 véritable 4 3 Appuyez sur la touche et maintenez la enfoncée pour fair...

Страница 44: ...puyez sur la touche bas jusqu à ce que la fonction Position d image soit en surbrillance 1 Appuyez sur OK pour voir les options disponsibles pour le format d image sélectionné Appuyez sur haut et bas pour sélectionner une option puis sur gauche ou droite pour ajuster les réglages Les options varient en fonction du format grand écran choisi et de l equipement éventuellement raccordé En format Zoom2...

Страница 45: ...ots ou composants de l image La fonction Réduction du bruit MPEG permet de réduire cet effet en adoucissant les bords MPEG NR Réduction du bruit Sélectionnez Réduction du bruit MPEG dans le menu Réglage image puis gauche ou droite pour choisir le réglage vous convenant 1 Ce téléviseur vous permet de personnaliser le style de l image Appuyez sur la touche mpour afficher les différents styles dispon...

Страница 46: ...les réglages 2 Dans le menu Réglage image appuyez sur bas pour sélectionner Réglage des couleurs de base puis appuyez sur OK 1 La fonction de Réglage des couleurs de base permet le réglage des couleurs individuelles selon vos préférences Elle peut s avérer utile en cas d utilisation d une source externe Réglage des couleurs de base La sélection de la Gestion de la couleur rend disponible la foncti...

Страница 47: ...pé si aucun signal n est reçu Dans le menu FONCTION appuyez sur bas jusqu à ce que Écran bleu latéral soit mis en surbrillance Appuyez sur gauche ou droite pour sélectionner Marche ou Arrêt 1 2 La fonction de côte de l écran latéral éclaircit ou fonce la bande de chaque côté de l écran en format 4 3 ou 14 9 Ceci permettra d éviter une image rémanente de la bande et peut également rendre plus confo...

Страница 48: ...auche ou droite pour sélectionner le menu MINUTERIE Dans le menu FONCTION sélectionnez Bloc clavier et choisissez Arrêt ou Marche à l aide des touches gauche ou droite Lorsque le Blocage clavier est en marche un rappel apparaîtra à l écran si vous tentez d utiliser les touches du téléviseur Si vous appuyez sur la touche de veille le téléviseur s éteindra et ne pourra être rallumé qu en utilisant l...

Страница 49: ...nt de horloge permet de modifier le nombre d impulsions par balayage ce qui effacera les lignes verticales sur l écran Horloge d échantillonnage Position d image La position de l image peut être ajustée en fonction de vos préférences personelles Appuyez sur Bpour sélectionner PC puis sélectionnez Réglage PC dans le menu des RÉGLAGES 1 Appuyez sur OK Appuyez sur haut et bas pour sélectionner une op...

Страница 50: ...onçue pour fonctionner au mieux avec des signaux haute définition 1080i PC illustre un ordinateur connecté à l entrée RGB PC à l arrière du téléviseur Pour repasser en mode TV appuyez une nouvelle fois sur la touche Bou sur l une des touches numériques Utilisez cette fonction si le téléviseur ne commute pas automatiquement Sélection des entrées 1 Elle spécifie le type de signal allant vers les pri...

Страница 51: ...ce PC HDMI1 Audio et appuyez sur droite pour sélectionner HDMI1 Mettez ensuite en surbrillance HDMI1 Audio et appuyez sur gauche ou droite pour sélectionner Auto Numerique ou Analogique Mettez en surbrillance PC HDMI1 Audio puis appuyez sur droite pour sélectionner l option PC 2 A NOTER La sélection de l option PC met automatiquement HDMI sur numérique Dans le menu RÉGLAGES appuyez sur la touche b...

Страница 52: ...e texte quelconque en tapant le numéro de page à 3 chiffres à l aide des touches numériques en appuyant sur les touches de couleur ou en appuyant sur Pfpour avancer à la page suivante et sur Pe pour revenir à la page précédente Sous pages Les sous pages éventuelles seront automatiquement chargées en mémoire sans changer la page affichée à l écran Pour accéder aux sous pages appuyez sur Xpuis utili...

Страница 53: ...t les pages de blagues Pour révéler du texte caché r Appuyez sur 6 7pour afficher la fonction télétexte Appuyez à nouveau pour afficher l image diffusée sur la gauche de l écran et la page télétexte sur la droite Appuyez encore pour revenir en mode de télévision normal Il n est pas possible de modifier les chaînes avant d être revenu dans ce mode Appuyez sur la touche sune seule fois pour agrandir...

Страница 54: ...assette vidéo de mauvaise qualité il est parfois possible d améliorer la reproduction des couleurs La couleur est réglée en usine sur Auto de façon à ce que le téléviseur affiche automatiquement le meilleur système de couleurs Pour vérifier que le meilleur système de couleurs a été sélectionné Il y a bien une image mais il y a peu ou pas de couleur Q A l aide des touches haut ou bas choisissez Aut...

Страница 55: ...es informations suivantes concernent uniquement les États membres de l Union européene Ce symbole indique que ce produit ne peut pas être traité comme une simple ordure ménagère En s assurant que ce produit est correctement éliminé vous contribuerez à éviter des conséquences potentielles nuisibles pour l environnement et la santé qui pourraient être autrement causées par une évacuation inapproprié...

Страница 56: ...uses Taille visible écran Modèle 32 80 cm approx 37 94 cm Format 16 9 Sortie son distorsion de 10 Principale 10 W 10 W Consommation Modèle 32 157 W conformément à 37 192 W EN60107 1 1997 Vielle approx Modèle 32 1 W 37 1 W Dimensions Modèle 32 61 cm H 80 cm L 30 cm p approx 37 69 cm H 92 cm L 30 cm p La dimension en hauteur inclut le support Poids approx Modèle 32 19 kg 37 25 kg Prise casque 3 5 mm...

Страница 57: ......

Страница 58: ...r Woofer Zweikanalton Aut Lautstärkeanpassung 69 SRS WOW Soundeffekt SRS 3D FOCUS und TruBass 69 Anzeige im Breitbildformat 70 Bildeinstellung Bildposition Hintergrundbeleuchtung 72 Bildeinstellung Bildvoreinstellungen Kontrast Helligkeit Farbe Farbton Schärfe Schwarzwert MPEG Rauschunterdrückung MPEG NR Digitale Rauschunterdrückung DNR Farbtemperatur 73 Bildeinstellung Farbmanagement Farbinstellu...

Страница 59: ...n spezieller Funkentstörfilter integriert ist dessen Funktion anderenfalls beeinträchtigt wäre WENDEN SIE SICH IM ZWEIFELSFALL AN EINEN FACHKUNDIGEN ELEKTRIKER Die Belüftungsschlitze des Geräts dürfen NICHT mit Zeitungen Tischdecken Vorhängen oder ähnlichen Stoffen abgedeckt werden Durch Überhitzung können Schäden verursacht und die Lebensdauer des Gerätes verkürzt werden Elektrische Geräte dürfen...

Страница 60: ...Zeit angezeigt werden ist es empfehlenswert Kontrast und Helligkeit zu verringern Stellen Sie das Fernsehgerät an einem Platz auf der möglichst nicht der direkten Sonneneinstrahlung ausgesetzt ist und sich nicht in der Nähe starker Lichtquellen befindet Um ein optimales Fernseherlebnis zu gewährleisten wird ein Ort mit weichem indirektem Licht empfohlen Ziehen Sie gegebenenfalls die Vorhänge zu od...

Страница 61: ... Keine Funktionsbelegung für dieses Modell Stummschaltun Wahl des Eingangs für externe Quelle Zur Moduswahl Keine Funktionsbelegung für dieses Modell Bildschirmmenüs Anzeige im Breitbildformat Wählbare Bildvoreinstellungen Zifferntasten Umschalten zum vorherigen Programm Ein Standby Bei Verwendung eines TOSHIBA Videorecorders oder DVD Players Drücken Sie mfür PAUSE Drücken Sie wfür AUSWERFEN Drück...

Страница 62: ...rs stets dass alle Kabel entfernt wurden HDMI das HDMI Logo und High Definition Multimedia Interface sind Marken oder eingetragene Marken von HDMI Licensing LLC Antennenkabel Schließen Sie das Antennenkabel an die Antennenbuchse an der Rückseite des Fernsehgerätes an Bei Verwendung eines Decoders und oder eines Medienrecorders ist zu beachten dass das Antennenkabel über den Decoder und oder den Me...

Страница 63: ...treue bzw fehlerfreie Darstellung kann jedoch nicht garantiert werden Bei Verwendung von PC HDMI auf TV HDMI können XGA und SXGA Signale nicht angezeigt werden HINWEIS Einige PC Modelle können nicht an dieses Fernsehgerät angeschlossen werden Für Computer mit einem DOS V kompatiblen 15 poligen Mini D Sub Anschluss wird kein Steckadapter benötigt Signaldaten für 15 poligen Mini D Sub Stecker Pinbel...

Страница 64: ...nleitung ausführlich beschrieben Über die Eingangsbuchsen an der Seite des Fernsehgerätes lassen sich verschiedenste externe Geräte anschließen Obwohl sich alle erforderlichen Anpassungen und Einstellungen an Ihrem Fernsehgerät mit der Fernbedienung vornehmen lassen können Sie einige Funktionen auch direkt über die am Fernseher angebrachten Tasten steuern Drücken Sie die Taste j um die Lautstärke ...

Страница 65: ...isch auf den ersten Programmplatz um Wenn das Bild undeutlich oder das Empfangssignal von dem betreffenden Sender auf diesem Programmplatz zu schwach ist können Sie die Reihenfolge der Sender mit der Funktion Manuelle Sendersuche aus dem Bildschirmmenü ändern und diesem Sender einen hinteren Programmplatz zuweisen Die Senderliste wird jetzt angezeigt Markieren Sie mit Hilfe der obere oder unterer ...

Страница 66: ...hnung die aus bis zu sieben Zeichen bestehen kann Drücken Sie die obere oder untere Taste um den gewünschten Programmplatz zu markieren Empfohlen wird beispielsweise Prog 0 für einen Medienrecorder Drücken Sie die Taste MENU und wählen Sie mit den linken oder rechten Tasten das Menü EINSTELLUNG aus Markieren Sie dann mit Hilfe der unteren Taste die Option Manuelle Sendersuche und drücken Sie zur A...

Страница 67: ...mmposition und drücken Sie zur Auswahl die Taste OK Drücken Sie die rechte Taste um die Option Progr überspr auszuwählen Mit der obere oder der untere Taste wird Progr überspr eingeschaltet Drücken Sie OK Eine gesperrte Programmposition wird auf dem Bildschirm durch das Symbol gekennzeichnet Um bestimmte Programme für die Anzeige zu sperren können Sie die entsprechenden Programmplätze sperren Die ...

Страница 68: ...eren Zur Auswahl verwenden Sie die linke oder rechte Taste Drücken Sie die untere Taste um die Menüoption Land zu markieren Wählen Sie dann mit den linken oder rechten Tasten eine Ländereinstellung aus Drücken Sie die untere Taste um die Funktion Autom Sendersuche zu markieren Drücken Sie jetzt OK Um die Sendereinstellung am Fernsehgerät mit der Funktion Autom Sendersuche vorzunehmen drücken Sie d...

Страница 69: ...Drücken Sie nach oben oder unten bis die Option Aut Lautstärkeanpassung markiert ist Drücken Sie dann die linke oder rechte Taste um ein oder aus einzustellen 3 2 4 5 Drücken Sie nach unten um SRS 3D zu markieren und wählen Sie mit der linken oder rechten Taste die Einstellung ein oder aus Drücken Sie anschließend nach unten um FOCUS zu markieren und wählen Sie mit der linken oder rechten Taste di...

Страница 70: ...e angepasst werden indem es horizontal und vertikal gestreckt wird In der Bildmitte werden dabei die realen Größenverhältnisse beibehalten Es können jedoch gewisse Verzerrungen auftreten SUPER LIVE2 Bei Empfang eines Signals im Seitenwandformat kann das Fernsehbild mit dieser Einstellung vergrößert und an die Bildschirmgröße angepasst werden indem es horizontal und vertikal gestreckt wird In der B...

Страница 71: ...llung für Breitwand DVDs Breitwand Videos oder gegebenenfalls bei Sendungen im 16 9 Format Aufgrund der verschiedenen Breitwandformate 16 9 14 9 20 9 usw werden unter Umständen schwarze Balken am oberen und unteren Rand des Bildschirms angezeigt BREITBILD Verwenden Sie diese Einstellung bei Sendungen die im 4 3 Format ausgestrahlt werden 4 3 Halten Sie die Taste gedrückt um eine Liste mit allen ve...

Страница 72: ... vor Die angezeigten Optionen ändern sich in Abhängigkeit vorn gewählten Breitbildformat sowie bei der Bildanzeige über angeschlossene Geräte Im Modus Kino2 2 3 Wählen Sie das Menü EINSTELLUNG und drücken Sie die untere Taste bis die Einstellung Bildlage markiert ist Um das Gerät auf die werkseitigen Standardeinstellungen zurückzusetzen wählen Sie im Menü Bildlage die Option zurücksetzen und drück...

Страница 73: ...minderung DNR 1 Wählen Sie DNR aus dem Menü Bildeinstellung und nehmen Sie mit den linken bzw rechten Tasten die Einstellung vor Die Unterschiede sind nicht immer wahrnehmbar die besten Ergebnisse erzielen Sie bei niedrigen Einstellungen Bei zu hohen Einstellungen kann sich die Bildqualität verschlechtern Beim Abspielen von DVDs kann es bedingt durch die Komprimierung vorkommen dass einige Wörter ...

Страница 74: ...ie Funktion zum Farbeinstellungen verfügbar schalten Farbmanagement Drücken Sie im Menü BILD mehrmals die Taste nach unten bis die Einstellung Farbmanagement ausgewählt ist Drücken Sie die linke oder rechte Taste um die Einstellung ein oder aus auszuwählen 1 2 Um das Gerät auf die werkseitigenStandardeinstellungen zurückzusetzen wählen Sie die Option Zurücksetzen und drücken Sie dann die Taste OK ...

Страница 75: ...der dunkler eingestellt werden Dadurch wird ein Nachleuchten des Streifenbildes vermieden und ein entspannteres und angenehmeres Fernseherlebnis ermöglicht da Sie das Bild an helle oder dunkle Lichtbedingungen anpassen können Blaues Bild Bei Auswahl der Einstellung Blaues Bild wird bei einem fehlenden Empfangssignal ein blauer Bildschirm angezeigt und der Ton abgeschaltet Drücken Sie im Menü FUNKT...

Страница 76: ... 3 4 Drücken Sie die Taste MENU und dann die linken oder rechten Tasten um das Menü TIMER auszuwählen Wählen Sie aus FUNKTION die Option Bedienfeldsperre und anschließend mit Hilfe der linke oder rechte Taste die Einstellung ein oder aus Bei aktivierter Bedienfeldsperre wird eine entsprechende Erinnerungsmeldung angezeigt sobald eine Taste am Fernseher gedrückt wird Das Fernsehgerät wird durch Drü...

Страница 77: ...n Clock phase auszuwählen Nehmen Sie dann die weitere Einstellung mit der linken oder rechten Taste vor bis die gewünschte Bildqualität erreicht ist 1 2 Mit der Funktion Clock phase kann das PC Signal an die LCD Anzeige angeglichen werden Durch die Einstellung dieser Funktion können störende waagerechte Streifen und Unschärfen im Bild beseitigt werden Taktphase Drücken Sie im Menü EINSTELLUNG die ...

Страница 78: ...C EXT1 3 HDMI1 HDMI2 HDMI3 oder PC auszuwählen Bei Wahl der Einstellung HDMI wird das Signal des Gerätes angezeigt das am HDMI Eingang an der Rückseite des Fernsehgerätes angeschlossen ist Optimale Ergebnisse mit HDMI werden bei hochauflösenden 1080i Videosignalen erzielt PC zeigt das Signal des Computers an der am Eingang RGB PC an der Rückseite des Fernsehgerätes angeschlossen ist Um wieder in d...

Страница 79: ...ausgegeben werden 32 44 1 48 kHz und 16 20 24 Bits sind zulässig Bei Verwendung von PC HDMI auf TV HDMI können XGA und SXGA Signale nicht angezeigt werden 1 Markieren Sie PC HDMI1 Audio und wählen Sie dann mit der rechten Taste die Option PC aus 2 HINWEIS Durch Auswahl der Option PC wird die HDMI Schnittstelle High Definition Multimedia Interface in den digitalen Audiomodus geschaltet Wählen Sie d...

Страница 80: ...te aufzurufen Drücken Sie die Taste erneut um den Bildschirm in zwei Fenster zu teilen Der zuletzt angezeigte TV Kanal wird dabei im linken Fenster und die Textseite im rechten Fenster dargestellt Drücken Sie die Taste erneut um zum normalen Anzeigemodus zurückzukehren Die Programme lassen sich nur bei deaktiviertem Textmodus umschalten Die zuerst angezeigte Seite ist die Startseite Sie können jed...

Страница 81: ...Fernsehbild links und den Text rechts im Bildschirm anzuzeigen Drücken Sie die Taste erneut um zum gewohnten Fernsehmodus zurückzukehren Die Fernsehprogramme lassen sich nur im normalen Bildmodus umschalten So wählen Sie eine Seite aus während das normale Fernsehbild angezeigt wird 8 9 Drücken Sie T um die Indexseite Anfangsseite aufzurufen Welche Seite dabei angezeigt wird ist vom jeweiligen Send...

Страница 82: ...werden Für das Fernsehgerät ist werkseitig die Einstellung auto gewählt so dass automatisch das jeweils optimale Farbsystem gewählt wird So überprüfen Sie ob die optimale Farbanzeige eingestellt ist Es wird zwar ein Bild angezeigt aber warum sind nur wenige oder keine Farben sichtbar F Wählen Sie beim Abspielen der externen Quelle die Option Manuelle Einstellung aus dem Menü EINSTELLUNG Wählen Sie...

Страница 83: ...n Warum sind auf dem Bildschirm im PC Modus senkrechte Streifen sichtbar F A Unter Umständen müssen Sie den Clock phase anpassen um diesen störenden Effekt zu beseitigen Wählen Sie im Menü EINSTELLUNG die Option PC Einstellung markieren Sie die Einstellung Clock phase und passen Sie die Einstellung an bis das Bild wieder deutlich sichtbar ist Warum werden auf dem Bildschirm im PC Modus waagerecht ...

Страница 84: ...htbare Modell 32 80 cm Bildschirmgröße ca 37 94 cm Anzeigeformat 16 9 Tonausgangsleistung Effektiv 10 W 10 W bei 10 Verzerrung Leistungsaufnahme Modell 32 157 W gemäß EN60107 1 1997 37 192 W Standby ca Modell 32 1 W 37 1 W Abmessungen ca Modell 32 61 cm H 80 cm B 30 cm T 37 69 cm H 92 cm B 30 cm T Höhe einschließlich Standfuß Gewicht ca Modell 32 19 kg 37 25 kg Kopfhörerbusche 3 5 mm Stereo Zubehö...

Страница 85: ......

Страница 86: ... WOW SRS 3D FOCUS y TruBass 97 Pantalla panorámica 98 Mandos de la imagen posición de la imagen retroiluminación 100 Mandos de la imagen preferencias de imagen contraste brillo color tono resolución intensificación de los colores oscuros reducción de ruido MPEG MPEG NR reducción del ruido digital DNR temperatura del color 101 Mandos de la imagen gestión de colores ajuste cromático control activo d...

Страница 87: ...o o seguridad de su aparato TENGA cuidado con los paneles o puertas de cristal del aparato Circulación de aire Daños por el calor Alimentación de la red eléctrica Cosas que deben hacerse NO obstruya las aberturas de ventilación del aparato con elementos tales como periódicos manteles cortinas etc El sobrecalentamiento causará daños y acortará la vida del aparato NO permita que los equipos eléctric...

Страница 88: ...os de identificación de canales pantallas de ordenador videojuegos menús en pantalla etc durante el tiempo que sea siempre es aconsejable reducir los ajustes del brillo y del contraste Sitúe la televisión lejos de la luz del sol directa y de las luces fuertes Se recomienda una iluminación suave e indirecta para verla de manera cómoda Utilice cortinas o persianas para evitar que la luz del sol dire...

Страница 89: ...ereofónica bilingüe Para salir de los Menús Sin función en este modelo Para desactivar el sonido Para seleccionar la entrada de fuentes externas Para seleccionar el modo Sin función en este modelo Menús en pantalla Viendo TV en pantalla ancha Preferencias de imagen Botones de números Para volver al programa anterior Para el modo Conectado Espera Al utilizar un VCR o DVD TOSHIBA pulse mpara PAUSA p...

Страница 90: ... comerciales o marcas registradas de HDMI Licensing LLC Cables de antena Conecte la antena al enchufe de la parte posterior de la televisión Si utiliza un descodificador y o una grabadora multimedia es esencial que el cable de la antena se conecte a través del descodificador y o a través de la grabadora multimedia a la televisión Cables SCART Conecte el conector hembra IN OUT de la grabadora multi...

Страница 91: ... posible visualizar una señal SXGA aunque tal vez no correctamente Si se emplea PC HDMI a TVHDMI no es posible visualizar XGA ni SXGA OBSERVACION Ciertos modelos de PC no pueden ser conectados a esta TV No es necesario un adaptador para los ordenadores provistos de un terminal mini D sub 15 pins compatible DOS V Información de señal para el conector Mini D sub 15 pins Asignación de pins para el te...

Страница 92: ...alle en el manual Puede conectarse una gran variedad de equipos externos en los enchufes de entrada que se encuentran en la parte lateral de la televisión Aunque todos los controles y ajustes necesarios de la televisión se realizan utilizando el mando a distancia se pueden utilizar los botones que se encuentran en la televisión para algunas funciones Para modificar el volumen pulse j Para cambiar ...

Страница 93: ...letado la búsqueda la TV seleccionará automáticamente la posición de programa 1 Puede que no sea una imagen clara o que la sintonía sea débil y por esa razón se puede cambiar el orden de cadenas utilizando Sintonización manual que aparecerá en la pantalla Con la lista de estaciones ahora mostrada utilice abajo o arriba para hacer resaltar la estación que quiere mover y pulse derecha La estación se...

Страница 94: ...canal en el que una estación está emitiendo Búsqueda Búsqueda hacia arriba y hacia abajo de una señal Sintoniz manual precisa Sólo se utiliza si existe una señal de interferencia débil Vea la página 110 Cadena Identificación de la estación Utilice los botones arriba o abajo y izquierda o derecha para introducir un máximo de siete caracteres Utilice arriba o abajo para seleccionar la posición de pr...

Страница 95: ...s mandos en la televisión pero sí pueden accederse a través de los botones con número del mando a distancia 3 4 5 Utilice arriba o abajo para resaltar la posición del programa que hay que omitir y pulse OK para seleccionar Pulse derecha para seleccionar Saltar programa Utilice arriba o abajo para activar Saltar programa Pulse OK en la pantalla indica una posición de programa omitida Para evitar qu...

Страница 96: ...itir que el televisor termine la búsqueda Una vez que la búsqueda ha terminado el televisor automáticamente seleccionará la posición de programa 1 Ésta podría no ser una imagen clara y se podrá cambiar el orden de las estaciones utilizando Sintonización manual Vea la página 93 B G Europe Continental I Reino Unido D K Europe Oriental L Francia 5 Su Sistema habrá sido seleccionado si hay una selecci...

Страница 97: ...4 5 Pulse abajo para seleccionar SRS 3D y utilizando izquierda o derecha seleccione entre Encendido o Apagado A continuación pulse abajo para seleccionar FOCUS y pulse izquierda o derecha para seleccionar entre Encendido o Apagado Seleccione TruBass y utilice izquierda o derecha para seleccionar Apagado Bajo o Alto según su preferencia NOTA Esta característica no está disponible en los auriculares...

Страница 98: ...maño de la pantalla extendiendo la imagen horizontal y verticalmente manteniendo las proporciones correctas en el centro de la imagen Puede producirse cierta distorsión SUPER LIVE2 Si se está recibiendo una señal en formato de panel lateral esta consigna ampliará la imagen al tamaño de la pantalla extendiendo la imagen horizontal y verticalmente manteniendo las proporciones correctas en el centro ...

Страница 99: ...VD en pantalla ancha una cinta de vídeo en pantalla ancha o una transmisión 16 9 cuando esté disponible Debido a la diversidad de formatos de pantalla ancha 16 9 14 9 20 9 etc se podrán ver barras negras en la parte superior e inferior de la pantalla PANORÁMICO Utilice esta consigna para ver una transmisión 4 3 verdadera 4 3 Pulse y mantenga pulsado el botón y aparecerá en la pantalla una lista de...

Страница 100: ...ara el formato de imagen que se ha seleccionado Pulse arriba y abajo para seleccionar una opción luego izquierda o derecha para ajustar las consignas Las opciones cambiarán dependiendo del formato de pantalla ancha seleccionado y al ver equipos conectados En Cine2 2 3 Para volver a los ajustes de fábrica originales seleccione Reset en el menú Posición imagen y pulse OK En el menú Ajust imag pulse ...

Страница 101: ...ede causar la distorsión o pixelización de algunas de las palabras o elementos de imagen La utilización de la función MPEG Reduc Ruido reduce este efecto suavizando los bordes MPEG NR Reducción de Ruido Seleccione MPEG Reduc Ruido del menú Ajust imag Utilice izquierda o derecha para seleccionar un ajuste según su preferencia 1 Este televisor ofrece la opción de personalizar el estilo de imagen Pul...

Страница 102: ... 1 2 Pulse arriba o abajo para seleccionar una opción luego izquierda o derecha para ajustar las consignas 2 En el menú IMAGEN pulse abajo para seleccionar Ajuste cromático y a continuación pulse OK 1 La función Ajuste cromático permite el ajuste de colores individuales según su preferencia personal Esto puede ser útil cuando se utilice une fuente externa Ajuste cromático Para volver a los ajustes...

Страница 103: ...ral hace más clara u oscura la banda de cada lado de la pantalla en formato 4 3 o 14 9 Esto permitirá evitar una imagen posterior de la banda y puede igualmente hacer que la visualización en condiciones luminosas u oscuras sea más cómoda Pantalla azul Cuando se seleccione Pantalla azul la pantalla se volverá azul y el sonido se desactivará cuando no se reciba ninguna señal En el menú FUNCIÓN pulse...

Страница 104: ...ivación automático después de un cierto tiempo El temporizador 1 2 3 4 Pulse MENU y luego izquierda o derecha para seleccionar el menú TEMPORIZADOR En el menú FUNCIÓN seleccione Bloqueo panel y elija Encendido o Apagado utilizando izquierda o derecha Cuando Bloqueo de panel esté Encendido aparecerá un recordatorio cuando se pulsen los botones de la televisión Si se pulsa el botón standby la televi...

Страница 105: ...ajustar para adecuarse a las preferencias personales Pulse Bpara seleccionar PC luego seleccione Ajuste imagen en PC del menú CONFIGURACIÓN 1 Pulse OK Pulse arriba y abajo para seleccionar una opción luego izquierda o derecha para ajustar las consignas 2 3 En el menú CONFIGURACIÓN pulse abajo hasta que se haya seleccionado Ajuste imagen en PC Pulse OK para seleccionar y a continuación abajo para s...

Страница 106: ... ajustada para una señal de S Vídeo Pulse Bpara seleccionar B1 B2 B3C EXT1 3 HDMI1 HDMI2 HDMI3 o PC HDMI visualiza el equipo conectado a la Entrada HDMI en la parte trasera de la televisión Este está diseñado para un máximo rendimiento con señales de alta definición 1080i El PC muestra un ordenador conectado a la Entrada RGB PC en la parte trasera de la televisión Para volver al modo TV vuelva a p...

Страница 107: ...I1 A continuación resalte HDMI1 audio y con la ayuda de izquierda o derecha seleccione Auto Digital o Analog Si no hay sonido seleccione el ajuste alternativo NOTA HDMI1 es compatible con sonido digital y analógico HDMI2 y HDMI3 sólo con sonido digital Algunos formatos de disco DVD pueden no reproducirse con este televisor 32 44 1 48kHz y 16 20 24 bits son aceptables Si utiliza PC HDMI a TV HDMI n...

Страница 108: ...gado esas páginas Estas subpáginas permanecerán disponibles para ser vistas hasta que se elija otra página o en el modo normal del televisor hasta que se cambie el canal El botón 6 7 Para visualizar servicios de texto pulse 6 7 Pulse de nuevo y la pantalla se dividirá en dos mostrándose a la izquierda el último canal que se hubiera estado viendo y a la derecha la página de texto Pulse de nuevo par...

Страница 109: ...el botón 6 7 Teletexto continuación modo LISTA botones de mando A continuación se da una guía de las funciones de los botones de teletexto del mando a distancia Introduzca el número de la página y luego pulse 8 9 y aparecerá en la pantalla una imagen normal El televisor indicará cuándo está presente la página indicando el número de página en la parte superior de la pantalla Pulse 6 7para ver la pá...

Страница 110: ...ndo P R Compruebe que se ha elegido la entrada has correcta S VIDEO o AV Vea la página de Conexión AV Por qué está la imagen de VCR DVD en blanco y negro P Seleccione el menú Sintonización manual Resalte la estación y pulse OK Utilice derecha para seleccionar Sintoniz manual precisa Utilizando arriba o abajo ajuste para obtener la mejor imagen y el mejor sonido Pulse OK y luego EXIT 1 2 R Cuando s...

Страница 111: ...ible Seleccione una cadena y pulse 6 7para acceder a ella Por qué son visibles los cuatro números en color pero no el texto P R La Fase del reloj puede necesitar un ajuste Seleccione Ajuste imagen en PC a partir del menú CONFIGURACIÓN seleccione Fase del reloj y ajuste hasta que la imagen sea clara Por qué hay rayas horizontales y o imágenes borrosas en la pantalla en modo PC P Limpieza de la pant...

Страница 112: ... IEC R03 1 5V Toshiba Information Systems U K Limited Consumer Products Division European Service Centre Admiralty Way Camberley Surrey GU15 3DT RU La especificación está sujeta a cambio sin previo aviso Hecho por Zushi Illustration Visualisation Bristol Inglaterra Toshiba Information Systems U K Limited Quedan reservados todos los derechos Se prohibe estrictamente la reproducción parcial o total ...

Страница 113: ......

Страница 114: ...lizzazione widescreen 126 Controlli dell immagine posizione dell immagine retroilluminazione 128 Controlli dell immagine preferenze per l immagine contrasto luminosità colore tonalita nitidezza estensione dei neri riduzione del rumore MPEG MPEG NR riduzione digitale del rumore DNR temperatura di colore 129 Controlli dell immagine regolazione del colore regolazione di base dei colori controllo atti...

Страница 115: ...particolare attenzione ai pannelli o agli sportelli di vetro delle apparecchiature Circolazione dell aria Danni da surriscaldamento Rete elettrica di alimentazione Cose da fare NON ostruire le aperture di ventilazione delle apparecchiature con articoli come giornali tovaglie tendaggi ecc Il conseguente surriscaldamento danneggerebbe le apparecchiature e ne ridurrebbe la durata utile d impiego NON ...

Страница 116: ...omputer videogiochi menu su schermo ecc è consigliabile ridurre sempre sia la luminosità che il contrasto Posizionare il televisore lontano dalla luce diretta del sole e da intense fonti luminose per una visione confortevole si raccomanda di usare un illuminazione tenue ed indiretta dell ambiente Impiegare tendaggi o tende alla veneziana per evitare che la luce diretta del sole cada sullo schermo ...

Страница 117: ...ione in questo modello Per escludere l audio Per selezionare l ingresso delle fonti esterne Per selezionare il modo Nessuna funzione in questo modello Menu su schermo Visualizazzione widescreen Preferenze per l immagine Tasti con le cifre Per tornare al programma precedente Per il modo Acceso Stand by Quando viene usato un VCR o un lettore registratore di DVD TOSHIBA premere mper PAUSA premere wpe...

Страница 118: ...erfaccia multimediale ad alta definizione sono marchi o marchi registrati della HDMI Licensing LLC Cavi dell antenna Collegare l antenna alla presa montata sul retro del televisore Se viene usato un ricevitore e o un registratore video DVD è essenziale collegare al televisore il cavo dell antenna attraverso il ricevitore e o il registratore video DVD Cavi SCART Collegare al televisore la presa IN ...

Страница 119: ...te Qualora si utilizzi un PC HDMI con una TV HDMI le risoluzioni XGA e SXGA non verranno visualizzate NOTA BENE Alcuni modelli di PC non possono essere collegati a questo televisore Per i computer con un terminale miniatura D sub a 15 pin compatibile con DOS V non è necessario un adattatore Informazioni sui segnali per il connettore miniatura D sub a 15 pin Assegnazione dei pin del terminale RGB P...

Страница 120: ...escritte dettagliatamente nel corso del manuale Si può collegare un ampia gamma di apparecchi esterni alle prese d ingresso laterali del televisore Sebbene tutte le regolazioni e i controlli necessari per il funzionamento del televisore vengano fatti usando il telecomando per alcune funzioni possono essere usati i pulsanti del televisore Per cambiare il volume premere j Per cambiare la posizione d...

Страница 121: ...e per cui l ordine delle stazioni può essere cambiato usando Sintonizzazione manuale che apparirà sullo schermo Mentre viene ora visualizzata la lista delle stazioni usare giù o su per evidenziare la stazione che si vuole spostare e premere destra La stazione selezionata viene ora spostata a destra dello schermo B G Europa Continentale I Regno Unito D K Europa Orientale L Francia Usare giù o su pe...

Страница 122: ...ia fine manuale Usata solo se ci sono interferenze il segnale è debole Vedere pagina 138 Emittente Identificazione dell emittente Usare i tasti su o giù e sinistrao destra per introdurre un massimo di sette caratteri Usare su o giù per evidenziare la posizione del programma desiderata ad es si suggerisce Prog 0 per un registratore video DVD Premere MENU e selezionare il menu IMPOSTAZIONI usando si...

Страница 123: ...mi deve essere selezionata individualmente Per impostare Salto programma disattivato ripetere la procedura per ciascuna posizione Le posizioni dei programmi saltati non possono essere selezionate tramite Pfe Peo mediante i controlli del televisore ma si può continuare ad accedervi mediante i pulsanti con le cifre del telecomando 3 4 5 Usare su o giù per evidenziare la posizione del programma da sa...

Страница 124: ...leziona automaticamente la posizione del programma 1 Può darsi che l immagine non sia ben chiara per cui si può cambiare l ordine delle stazioni usando Sintonizzazione manuale consultare pagina 121 B G Europa Continentale I Regno Unito D K Europa Orientale L Francia 5 A questo punto dovrebbe essere stato selezionato il proprio Sistema ma se è disponibile una scelta premere sinistra o destra per se...

Страница 125: ...gnali stereo che vengono trasmessi per produrre un migliore suono dagli altoparlanti del televisore Se viene trasmesso l audio monoaurale è disponibile solo la funzione Trubass SRS 3D produce un ricco effetto sonoro FOCUS concentra il suono e produce l effetto di farlo provenire dal centro del televisore mentre TruBass accentua le frequenze basse inferiori Suono stabile La funzione Liv Suono limit...

Страница 126: ...mmagini 4 3 per adattarle allo schermo stirandole orizzontalmente e verticalmente mantenendo però le giuste proporzioni nel centro Può prodursi una certa distorsione SUPER LIVE2 Se viene ricevuto un segnale nel formato con bande laterali questa impostazione fa ingrandire le immagini per adattarle allo schermo stirandole orizzontalmente e verticalmente mantenendo però le giuste proporzioni nel cent...

Страница 127: ...sata quando si guardano programmi generati da DVD o videonastri o trasmissioni ove disponibili nel formato widescreen 16 9 Poiché esiste più di un formato widescreen 16 9 14 9 20 9 ecc si possono vedere ugualmente barre nere nella parte superiore ed inferiore dello schermo AMPIA Usare questa impostazione per vedere le trasmissioni trasmesse effettivamente nel formato 4 3 4 3 Premere e tenere premu...

Страница 128: ... OK Premere giù nel menu Impostazione immagine per selezionare Livello della luminosità Premere sinistra o destra per effettuare la regolazione Nel menu IMMAGINE premere giù per selezionare Impostazione immagine poi premere OK 1 3 2 Regolando la Livello della luminosità si può migliorare la chiarezza di visualizzazione della schermata Retroilluminazione Posizione immagine Posizione orizz 0 Posizio...

Страница 129: ...bordi più regolari MPEG NR Riduzione del rumore Selezionare MPEG NR dal menu Impostazione immagine Usare sinistra o destra per selezionare un parametro di impostazione che meglio soddisfa le proprie esigenze 1 Impostazione immagine SFONDO Acceso MPEG NR Bassa DNR Auto Temperatura colore Normale MENU Preced EXIT Guarda TV 2 2 Questo televisore consente di personalizzare lo stile dell immagine Preme...

Страница 130: ...u o giù per selezionare un opzione poi sinistra o destra per regolare i parametri di impostazione 2 Nel menu IMMAGINE premere giù per selezionare Reglazione di base dei colori poi premere OK 1 La funzione Regolazione di base dei colori consente di regolare gli individuali colori secondo le preferenze personali Ciò può essere utile quando viene usata una fonte esterna Regolazione di base dei colori...

Страница 131: ... di schiarire o scurire la fascia che appare su ciascun lato dello schermo Questo aiuta ad evitare che si produca un immagine residua della fascia e può rendere anche più confortevole la visualizzazione in condizioni ambientali luminose o scure Mute video Se viene selezionato Mute video quando non viene ricevuto alcun segnale lo schermo diventa grigio e l audio è escluso Nel menu FUNZIONE premere ...

Страница 132: ...stato in modo che si accenda o spenga dopo un certo periodo di tempo Timer 1 2 3 4 Premere MENU e sinistra o destra per selezionare il menu TIMER Selezionare Blocco funzioni dal menu FUNZIONE e scegliere Acceso o Spento usando sinistra o destra Se Blocco funzioni è Acceso quando vengono premuti i pulsanti del televisore appare sullo schermo un messaggio di avvertenza Se è premuto il pulsante stand...

Страница 133: ...dell immagine può essere regolata secondo i gusti personali Premere Bper selezionare PC poi selezionare Impostazione PC dal menu IMPOSTAZIONI 1 Premere OK Premere su o giù per selezionare un opzione poi sinistra o destra per regolare i parametri di impostazione 2 3 Nel menu IMPOSTAZIONI premere giù fino a quando viene evidenziato Impostazione PC Premere OK per selezionarle poi giù per evidenziare ...

Страница 134: ...so è impostato per un segnale S Video Selezione dell ingresso e connessioni AV Serve a definire le prese di INGRESSO e di USCITA in modo che il televisore riconosca le apparecchiature collegate Per una chiara rappresentazione delle connessioni posteriori suggerite per il televisore vedere pagina 118 Premere Bper selezionare B1 B2 B3C EXT1 3 HDMI1 HDMI2 HDMI3 oppure PC HDMI visualizza le apparecchi...

Страница 135: ...essione AV premere giù per evidenziare PC HDMI1 audio e selezionare HDMI1 usando destra Evidenziare quindi HDMI1 audio e selezionare Autom Digitale or Analogico usando sinistra o destra 1 2 Evidenziare PC HDMI1 audio poi usare destra per selezionare l opzione PC 2 NOTA Selezionando l opzione PC HDMI viene forzato sull audio digitale Nel menu IMPOSTAZIONI premere giù fino a quando viene evidenziato...

Страница 136: ... Pfo Pe per visualizzarle Su un lato dello schermo appare ora una barra con dei numeri Il numero della sottopagina visualizzata è evidenziato e mentre vengono memorizzate altre sottopagine il colore dei numeri cambia per indicare che sono state memorizzate Queste sottopagine rimangono disponibili sullo schermo fino a quando si sceglie un altra pagina oppure nella modalità normale di uso del televi...

Страница 137: ...uando la pagina è presente mostrando il numero della relativa pagina in cima allo schermo Premere 6 7per visualizzarla Come visualizzare le notizie flash Selezionare la pagina delle notizie flash del servizio di Televideo prescelto vedere la pagina dell indice del servizio di Televideo Premere 8 9 Le notizie flash vengono visualizzate se e quando sono trasmesse Premere nuovamente8 9per cancellare ...

Страница 138: ...erna ad esempio un videonastro di cattiva qualità se nell immagine c è solo poco o punto colore si può ottenere a volte qualche miglioramento Il colore è impostato alla fabbrica su Auto in modo da usare automaticamente il migliore sistema di colore disponibile Come verificare di avere il migliore colore possibile L immagine c è ma perché c è solo poco o punto colore D Mentre è in funzione la fonte...

Страница 139: ...u IMPOSTAZIONI Perché i colori sono sbagliati quando il segnale proviene da una fonte NTSC D Impostare Colore su Autom ed uscire Andare al menu Impostazione immagine e regolare la tonalità 1 2 Impost man Sistema colore Autom EXT2 A V C R OK Memorizz MENU Preced EXIT Guarda TV Pulizia dello schermo e del mobile Spegnere l apparecchio pulire lo schermo e il mobile con un panno morbido ed asciutto Si...

Страница 140: ... Modella 32 1 W 37 1 W Dimensioni Modella 32 61 cm alt 80 cm largh 30 cm prof appross 37 69 cm alt 92 cm largh 30 cm prof La dimensione dell altezza include la base di supporto Peso appross Modella 32 19 kg 37 25 kg Presa delle cuffie 3 5 mm stereo Accessori Telecomando 2 batterie da 1 5 V AAA IEC R03 Toshiba Europe GmbH Sede Secondaria in Italia Centro Direzionale Colleoni Palazzo Perseo Via Para...

Страница 141: ......

Страница 142: ...S e TruBass 153 Visualização em ecrã panorâmico 154 Controlos da imagem posição da imagem retroiluminação 156 Controlos de imagem preferências de imagem contraste brilho cor tonalidade definição realce das cores escuras redução de ruído MPEG MPEG NR redução de ruído digital DNR temperatura da cor 157 Controlos de imagem ajuste da cor base do ajude de cor controlo luz fundo activa modo de cinema 15...

Страница 143: ...a segurança São de natureza geral destinados a ajudar na utilização de todos os produtos electrónicos de consumo e alguns dos pontos podem não se aplicar aos artigos que acabou de adquirir NÃO DEVE obstruir as aberturas de ventilação do equipamento com objectos como jornais toalhas cortinas etc O sobreaquecimento poderá provocar danos e diminuir a vida útil do equipamento NÃO deixe que o equipamen...

Страница 144: ...isualizações do computador jogos de vídeo menus no ecrã etc essas imagens poderão ficar impregnadas sendo sempre aconselhável reduzir tanto o brilho como o contraste Coloque o televisor longe da luz solar directa e de luzes fortes para uma visualização confortável é recomendável uma iluminação suave e indirecta Utilize cortinados ou persianas para evitar que a luz directa do sol incida sobre o ecr...

Страница 145: ...delo Para retirar completamente o som Para seleccionar entradas a partir de fontes externas Para seleccionar o modo Não existe a função neste modelo Menus no ecrã Visualização panorâmico Preferências de imagem Botões numéricos Para regressar ao programa anterior Para modo ON Standby Quando utilizar um videogravador ou DVD TOSHIBA prima mpara colocar em PAUSA prima wpara EJECTAR prima lqpara SALTAR...

Страница 146: ...Interface são marcas comerciais ou marcas comerciais registadas da HDMI Licensing LLC Cabos da antena Ligue a antena ao terminal na parte de trás do televisor Se utilizar um descodificador e ou um gravador de meios é essencial que o cabo da antena seja ligado ao televisor através do descodificador e ou através do gravador de meios Cabos SCART Ligue o terminal IN OUT do gravador de meios ao televis...

Страница 147: ...as esta poderá não ser correcta Ao utilizar PC HDMI para TV HDMI as resoluções XGA e SXGA não podem ser utilizadas TENHA EM ATENÇÃO Alguns modelos de PC não podem ser ligados a esta televisão Não é necessário um adaptador para computadores com um terminal mini D sub 15 pinos compatível com DOS V Informação de sinal para o conector mini D sub 15 pinos Atribuição de pinos ao terminal RGB PC Pino N º...

Страница 148: ...se uma grande variedade de equipamento externo aos terminais de entrada localizados na parte lateral do televisor Enquanto que todos os ajustes e controlos necessários para o televisor são efectuados com o comando à distância os botões no televisor apenas podem ser utilizados para algumas funções Para alterar o volume prima j Para alterar a posição do programa prima e eFf f Prima MENU e S R P ou Q...

Страница 149: ...tações pode ser mudada utilizando a função de Sintonização manual que aparecerá no ecrã Com a lista de estações agora apresentadas utilize baixo ou cima para realçar a estação que quer deslocar e prima direita A estação seleccionada será deslocada para o lado direito do ecrã B G Europa Continental I Reino Unido D K Europa Ocidental L França Utilize baixo ou cima para percorrer através da lista até...

Страница 150: ... manual Utilizada apenas se se verificar interferência sinal fraco Ver página 166 Estação Identificação da estação Utilize os botões cima ou baixo e esquerda ou direita para introduzir um máximo de sete caracteres Utilize cima ou baixo para realçar a posição de programa pretendida por exemplo para um gravador de meios sugerimos Prog 0 Prima MENU e utilizando esquerda ou direita seleccione o menu I...

Страница 151: ...istância deve ser retirado porque os canais continuarão a estar disponíveis utilizando os botões numéricos Pode ver os programas da maneira habitual utilizando os controlos no televisor mas o televisor não mostrará a posição do programa que saltou Saltar programas Seleccione Sintonização manual no menu INSTALAÇÃO 1 Prima MENU e repita a partir do Passo 2 ou prima EXIT Cada posição de programa tem ...

Страница 152: ...sinal estéreo mono prima Prima novamente para cancelar Seleccionar posições de programas Utilizar a Sintonização automática 1 2 3 4 Prima baixo para realçar idioma esquerda ou direita para seleccionar Utilizando baixo realce Pais a seguir prima esquerda ou direita para seleccionar A televisão vai agora sintonizar as estações do seu país Prima baixo para realçar Sintonização automática a seguir pri...

Страница 153: ...ita para seleccionar Bilingue 1 ou Bilingue 2 WOW SRS 3D Ligado FOCUS Desligado TruBass Desligado MENU voltar EXIT Ver TV Efeito sonoro SRS WOW SRS WOW é um conjunto de efeitos sonoros que utilizam os sinais estéreo que estão a ser difundidos para produzir um som com mais realce a partir das colunas do televisor Se for emitido som mono apenas a função Trubass estará disponível SRS 3D proporciona u...

Страница 154: ... imagem de 4 3 adaptando a ao tamanho do ecrã alongando a imagem horizontal e verticalmente mantendo as proporções correctas no centro da imagem Poderá haver alguma distorção SUPER LIVE2 Se o sinal a ser recebido é o de formato side panel esta definição aumentará a imagem adaptando a ao tamanho do ecrã ampliando a imagem horizontal e verticalmente mantendo as proporções correctas no centro da imag...

Страница 155: ...er um DVD uma cassete de vídeo em ecrã panorâmico ou uma transmissão em formato 16 9 quando disponível Devido à gama de formatos de ecrãs panorâmicos 16 9 14 9 20 9 etc pode ver algumas barras pretas na parte superior e inferior do ecrã PANORÂMICO Utilize esta definição para ver uma transmissão real em formato 4 3 4 3 Prima e mantenha premido o botão será exibida no ecrã uma lista de todos os form...

Страница 156: ...gem que foi seleccionado Prima cima e baixo para seleccionar uma opção a seguir prima esquerda ou direita para ajustar as definições Estas opções alteram se dependendo do formato de ecrã panorâmico que escolheu e quando está a ver equipmento ligado Em modo Cinema 2 2 3 Para voltar às definições de fábrica originais seleccione Reset no menu do Posição da imagem e prima OK No menu Ajust imag prima b...

Страница 157: ...de elementos da imagem A utilização da função MPEG Reduc Ruído reduz este efeito na medida em que retoca as arestas MPEG NR Redução de ruído Seleccione MPEG Reduc Ruído no menu Ajust imag Utilize esquerda ou direita para seleccionar uma definição adequada à sua preferência 1 Esta televisão permite lhe personalizar o estilo da imagem Prima mpara visualizar os diferentes estilos disponíveis Os Modos...

Страница 158: ...EM prima baixo para seleccionar Ajuste da Cor Prima esquerda ou direita para seleccionar Ligado ou Desligado 1 2 Prima cima e baixo para seleccionar uma opção a seguir prima esquerda ou direita para ajustar as definições 2 No menu IMAGEM prima baixo para seleccionar Base do Ajude de Cor e em seguida prima OK 1 A função Base do Ajude de Cor permite o ajuste individual das cores por forma a adaptare...

Страница 159: ...U voltar EXIT Ver TV A função Painel Lateral ilumina ou escurece a faixa de cada lado do ecrã no formato 4 3 ou 14 9 Isto ajuda a evitar imagens remanescentes e torna mais confortável ver televisão em condições de claridade ou escuridão Ecrã azul Quando se selecciona Ecrã azul o ecrã fica cinzento e o som desliga se quando não se estiver a receber um sinal No menu FUNÇÃO prima baixo para realçar E...

Страница 160: ...mporizador 1 2 3 4 Prima MENU e esquerda ou direita para seleccionar o menu TEMPORIZADOR No FUNÇÃO seleccione Bloqueio Painel e escolha Ligado ou Desligado utilizando esquerda ou direita Quando Bloqueio Painel está activado sempre que um dos botões no televisor for premido aparecerá um lembrete Se se premir o botão de standby o televisor desliga se e só pode ser retirado do modo de standby por mei...

Страница 161: ... pessoais Prima Bseleccionar PC a seguir seleccione Configuração PC no menu INSTALAÇÃO 1 Prima OK Prima cima e baixo para seleccionar uma opção a seguir prima esquerda ou direita para ajustar as definições 2 3 1 2 Para voltar às definições de fábrica originais Reset No menu INSTALAÇÃO prima baixo até Configuração PC ficar realçado Prima OK para seleccionar em seguida baixo para realçar Reset Prima...

Страница 162: ...o detalhada das recomendações para as ligações traseiras Utilize a Selecção de Entrada se a televisão não fizer a transição automaticamente Selecção de entrada 1 Especifica o tipo de sinal que vai para as SCART 2 EXT2 na parte de trás da televisão Consulte as instruções do fabricante quanto ao equipamento ligado No menu INSTALAÇÃO prima baixo até Conexão AV ficar realçado depois prima OK Com esque...

Страница 163: ...mitir nesta TV 32 44 1 48kHz e 16 20 24 bits são aceitáveis Ao utilizar PC HDMI para TV HDMI as resoluções XGA e SXGA não podem ser utilizadas 1 2 No menu Conexão AV prima baixo para realçar Áudio PC HDMI1 e utilizando direita seleccione HDMI1 A seguir realce HDMI1 audio e utilizando esquerda ou direita seleccione Auto Digital ou Analog Conexão AV Áudio PC HDMI1 PC HDMI1 audio Digital Entrada EXT2...

Страница 164: ... utilize Pfe Pepara as ver Uma barra com números aparecerá na parte lateral do ecrã A sub página que está a ver será realçada e à medida que a televisão carrega quaisquer sub páginas adicionais a cor dos números muda indicando que estas páginas foram carregadas Estas sub páginas permanecerão disponíveis para serem visualizadas até se escolher outra página ou no modo de televisão normal o canal ser...

Страница 165: ...ter uma página de teletexto Prima qe aparecerá qna parte superior esquerda do ecrã A página será mantida no ecrã até se premir novamente o botão Para manter uma página pretendida q Para ver as soluções das páginas de passatempos de perguntas e as respostas a adivinhas prima o botão r Para revelar texto oculto r Para seleccionar uma página enquanto vê uma imagem normal 8 9 Prima suma vez para ampli...

Страница 166: ... Consulte a página de Conexão AV Porque é que a imagem do vídeo DVD aparece a preto e branco P R Quando estiver a utilizar uma fonte externa por exemplo uma cassete de vídeo de má qualidade se existir pouca ou nenhuma cor podem se por vezes conseguir algumas melhorias A cor está predefinida para AUTO para apresentar automaticamente o melhor sistema de cor Para verificar se tem a melhor cor Existe ...

Страница 167: ...eccione Configuração PC no menu INSTALAÇÃO realce Clock phase e ajuste até a imagem ter desaparecido Porque há riscos horizontais e ou imagens desfocadas no ecrã em modo PC P R Foi seleccionado texto enquanto estava a ver uma fonte externa ou seja DVD ou VCR Não aparecerá texto no ecrã ou poderá aparecer uma caixa indicando que não há informação disponível Seleccione um canal emissor e prima 6 7pa...

Страница 168: ...ho de Modelo 32 80 cm ecrã visível 37 94 cm aprox Ecrã 16 9 Potência de saída de som Principais10 W 10 W até 10 de distorção Consumo de energia Modelo 32 157 W conforme especificado na 37 192 W norma EN60107 1 1997 Standby aprox Modelo 32 1 W 37 1 W Dimensões Modelo 32 61 cm A 80 cm L 30 cm D aprox 37 69 cm A 92 cm L 30 cm D A altura inclui o suporte com pés Peso aprox Modelo 32 19 kg 37 25 kg Tom...

Страница 169: ......

Страница 170: ... boost super woofer tweetalig stabiel geluid 181 SRS WOW geluidseffect SRS 3D FOCUS en TruBass 181 Breedbeeld 182 Beeldinstellingen beeldpositie achtergrondlicht 184 Beeldinstellingen voorkeursinstellingen contrast helderheid kleur tint scherpte zwartuitrekken MPEG ruisonderdrukking MPEG NR digitale ruisonderdrukking DNR kleurtemperatuur 185 Beeldinstellingen kleuren management basis kleuren bijst...

Страница 171: ...een met dezelfde waarde worden vervangen en na vervanging dient de stekker weer te worden dichtgeschroefd IN GEVAL VAN TWIJFEL DIENT U DE HULP VAN EEN PROFESSIONELE ELEKTROMONTEUR IN TE ROEPEN Blokkeer de ventilatieopeningen van het apparaat niet met voorwerpen zoals kranten kleedjes gordijnen enz Oververhitting beschadigt het apparaat en leidt tot een kortere levensduur Zorg ervoor dat er geen vl...

Страница 172: ...go s computerdisplays videospelletjes on screen menu s enz gedurende langere tijd op het scherm laat staan is het aan te bevelen om zowel de helderheid als het contrast te verminderen Plaats het toestel op een plek waar u geen last heeft van direct zonlicht of felle verlichting De beste verlichting om TV te kijken is zachte indirecte verlichting Gebruik gordijnen of jaloezieën om ervoor te zorgen ...

Страница 173: ...iverse functies van de toetsen Toetsen teletekst Informatiescherm oproepen Stereo tweetalig Menu s verlaten Geen functie bij dit model Geluid onderbreken Kiezen van externe apparatuur Keuzeschakelaar Geen functie bij dit model On screen menu s Breedbeeld Selecteerbare voorkeursinstellingen Cijfertoetsen Terugkeren naar vorig kanaal Inschakelen Standby Bedientoetsen voor een VCR of DVD speler van T...

Страница 174: ...imedia Interface zijn handelsmerken c q geregistreerde handelsmerken van HDMI Licensing LLC Antennekabels Sluit de antenne aan op de antenne ingang aan de achterzijde van het toestel Als u een decoder en of mediarecorder gebruikt dient de antennekabel via de decoder respectievelijk via de mediarecorder naar de TV te lopen SCARTkabels Sluit de TV aan op de IN OUT aansluiting van de mediarecorder Sl...

Страница 175: ...nsluiting van de PC naar de HDMI aansluiting van de TV kunnen XGA en SXGA niet worden weergegeven ATTENTIE Sommige PC s zijn niet geschikt om op deze TV te worden aangesloten Voor computers met een DOS V compatibele mini D sub 15 pins aansluiting is geen adapter vereist Signaalinformatie voor mini D sub 15 pins stekker Functie pinnen voor RGB PC aansluiting Nr pin signaal Nr pin signaal 1 R 9 NA 2...

Страница 176: ...enu worden in deze gebruiksaanwijzing nader beschreven De ingangen aan de zijkant van de TV zijn geschikt voor het aansluiten van een groot aantal externe apparaten Met behulp van de afstandsbediening kunt u alle functies wijzigen en instellen de toetsen op de TV kunnen slechts voor enkele functies worden gebruikt Druk op j indien u het volume wilt wijzigen Druk op e eFf f indien u het programma w...

Страница 177: ...e niet en wacht tot het toestel hiermee klaar is Als de zoekprocedure is beëindigd zal de TV automatisch naar programmapositie 1 gaan Dit kan een zender zijn met een zwak signaal of een slecht beeld Gebruik de functie Handmating zoeken die op het scherm verschijnt om de volgorde van de zenders te wijzigen B G Europees vasteland I GB D K Oost Europa L Frankrijk Gebruik omlaag of omhoog om in de lij...

Страница 178: ...al uitzendt Zoeken Naar boven en beneden zoeken naar een signaal Manuele fijnregeling Uitsluitend voor toepassing bij storingen of zwak signaal Zie pag 194 Zender naam van de zender Gebruik omhoog of omlaag en links of rechts om een naam van maximaal 7 tekens in te voeren Zender Programma Systeem Kleur Systeem Kanaal Zoeken Program skip Manuele fijnregeling Gebruik omhoog of omlaag om de gewenste ...

Страница 179: ...e afstandsbediening moet worden verwijderd omdat de kanalen nog steeds beschikbaar zijn met behulp van de cijfertoetsen U kunt programma s nog zoals gebruikelijk bekijken met behulp van de toetsen op de TV maar de programmapositie die is overgeslagen wordt niet weergegeven Programme skip Kies Handmating zoeken in het menu INSTELLING 1 2 Druk op rechts als het signaal van de mediarecorder is gevond...

Страница 180: ...van de zenders te wijzigen zie pagina 177 B G Europees vasteland I GB D K Oost Europa L Frankrijk 5 Het Systeem wordt automatisch gekozen maar indien er meerdere systemen zijn kunt u met links of rechts het gewenste systeem kiezen en vervolgens op OK drukken Gebruik de cijfertoetsen op de afstandsbediening om een programmapositie te kiezen Programmaposities kunnen ook met behulp van de toetsen Pfe...

Страница 181: ... Aan of Uit te selecteren Druk vervolgens op omlaag om FOCUS op te laten lichten en druk op omhoog of omlaag om Aan of Uit te selecteren Laat TruBass oplichten en gebruik links of rechts om naar wens Uit Laag of Hoog te kiezen OPMERKING Deze functie is niet beschikbaar bij het gebruik van een hoofdtelefoon Druk op MENU en selecteer het menu GELUID Druk op links of rechts totdat WOW oplicht en druk...

Страница 182: ...beslaat door het beeld horizontaal en verticaal uit te rekken waarbij de juiste proporties bewaard blijven in het midden van het beeld Er kan enige vervorming optreden SUPER LIVE2 Als een signaal van het side panel format zijbalken wordt ontvangen wordt bij deze instelling het beeld vergroot zodat het beeld het hele scherm beslaat door het beeld horizontaal en verticaal uit te rekken waarbij de ju...

Страница 183: ...en bij een breedbeeld DVD breedbeeld video of een uitzending in het formaat 16 9 indien van toepassing Vanwege de diverse breedbeeldformaten 16 9 14 9 20 9 etc kunnen er zwarte balken onder en boven aan het scherm zichtbaar zijn BREEDTE Deze instelling is bedoeld voor uitzendingen in het formaat 4 3 4 3 Druk de toets in en houd deze ingedrukt er verschijnt een lijst met alle breedbeeldformaten op ...

Страница 184: ...geven Druk op omhoog en omlaag om een optie te kiezen en vervolgens op links of rechts om de instelling te regelen De opties variëren naar gelang het gekozen breedbeeldformaat en naar gelang de aangesloten apparatuur bij Cinema2 2 3 Kies Reset in het menu Beeld positie en druk op OK om naar de oorspronkelijke fabrieksinstellingen terug te keren Druk op omlaag in het menu Beeldinstellingen tot Acht...

Страница 185: ...or de randen zachter te maken MPEG NR Ruisonderdrukking Kies MPEG NR in het menu Beeldinstellingen Gebruik links of rechts om de door u gewenste instelling te kiezen 1 Beeldinstellingen Zwart uitrekken Aan MPEG NR Laag DNR Auto Kleurtemperatuur Normaal MENU Terug EXIT Kijk TV 2 2 Bij deze TV heeft u de mogelijkheid om het beeld aan uw eigen voorkeur aan te passen Druk op mom de verschillende besch...

Страница 186: ...te maken Cinema instelling Beeldinstellingen vervolg Als u Kleuren Management kiest komt de functie Basis kleuren bijstellen beschikbaar Kleuren management Druk op omlaag in het menu BEELD om Kleuren Management te kiezen Druk op links of rechts om Aan of Uit te selecteren 1 2 Druk op omhoog en omlaag om een optie te kiezen en vervolgens op links en rechts om de instelling te regelen 2 Druk op omla...

Страница 187: ...3 en 14 9 de strook aan iedere zijde van het scherm lichter of donkerder worden gemaakt Dit voorkomt dat er een nabeeld van de stroken ontstaat en kan tevens het kijken in lichte of donkere omgeving aangenamer maken Blauw beeld Indien Blauw beeld wordt geactiveerd wordt het scherm automatisch blauw en valt het geluid weg wanneer er geen signaal wordt ontvangen Druk op omlaag in het FUNCTIE menu to...

Страница 188: ... Slot TV paneel uit het FUNCTIE menu en kies Aan of Uit met behulp van de toetsen links of rechts Als Slot TV paneel Aan staat en u bedient toetsen op de TV verschijnt op het scherm een bericht dat u eraan herinnert dat de toetsen geblokkeerd zijn Als het toestel door middel van de standby toets wordt uitgeschakeld kan het enkel door middel van de standby toets op de afstandsbediening weer worden ...

Страница 189: ... Druk op Bom PC te selectreren en kies vervolgens PC opzet in het menu INSTELLING 1 Druk op OK Druk op omhoog en omlaag om een optie te kiezen en vervolgens op links en rechts om de instelling te regelen 2 3 Druk op omlaag in het menu INSTELLING tot PC Opzet oplicht Druk op OK en vervolgens op omlaag om Reset te laten oplichten Druk op OK 1 2 Naar de oorspronkelijke fabrieksinstellingen terug te k...

Страница 190: ... één van de cijfertoetsen van de afstandsbediening indien u een TV programma wilt bekijken De meeste mediarecorders en decoders zenden een signaal via de scartkabel naar de TV zodat deze automatisch de juiste ingang kiest U kunt dit echter ook doen door zo vaak op de keuzetoets Bvan de afstandsbediening te drukken tot het beeld van het gewenste apparaat wordt weergegeven Deze toets moet worden geb...

Страница 191: ...sloten op PC HDMI1 audio aan de achterkant van de TV zie hiervoor het gedeelte Aansluiten van een computer Gebruik vervolgens de instellingen van HDMI1 audio 1 2 Markeer PC HDMI1 audio en gebruik rechts om de optie PC te selecteren 2 OPMERKING Wanneer u de optie PC selecteert wordt de instelling voor HDMI audio automatisch Digitaal Druk op omlaag in het menu INSTELLING tot AV aansluiting oplicht e...

Страница 192: ...aden zullen de nummers van kleur veranderen om aan te geven dat ze nu oproepbaar zijn Deze subpagina s zullen oproepbaar blijven totdat u een andere pagina oproept of tot u op een andere zender overschakelt waarvoor teletekst uitgeschakeld moet worden De toets 6 7 Druk op de toets 6 7om teletekst op te roepen Druk nogmaals op de toets om het scherm in tweeën te splitsen zodat laatst bekeken zender...

Страница 193: ...nhouds beginpagina op te roepen Welke wordt weergegeven hangt af van de betreffende zender Weergeven van de inhouds beginpagina Druk eenmaal op som de bovenste helft van de pagina te vergroten en druk nogmaals op deze toets om de onderste helft van de pagina te vergroten Druk nog een keer op de toets om de pagina weer op normaal formaat weer te geven Vergroten van de weergave s Gebruik deze toets ...

Страница 194: ... Storingen of een zwak signaal Probeer een andere zender Manuele fijnregeling kan een oplossing zijn Zijn er nog andere oorzaken voor een slecht beeld V A Controleer of de schakelaar aan de zijkant van de afstandsbediening in de stand TV staat Controleer of de batterijen leeg zijn en of ze op de juiste manier zijn geplaatst Waarom functioneert de afstandsbediening niet V A Controleer of het toeste...

Страница 195: ...NSTELLING ga naar Bemonsteringsklok en wijzig de instelling tot de strepen zijn verdwenen Waarom verschijnen er horizontale strepen en of onscherpe beelden op het scherm als het toestel in PC modus staat V A U heeft teletekst opgeroepen terwijl u naar een extern aangesloten apparaat kijkt zoals een DVD speler of videorecorder Daarom verschijnt er geen teletekst op het scherm maar eventueel wel een...

Страница 196: ...ngang 21 pins scart RGB A V EXT2 Ingang 21 pins scart A V S video EXT3 Ingang phono pluggen Y PB CB PR CR phono pluggen A V EXT5 Ingang zijkant phono plug Video S video phono pluggen Audio L R HDMI 1 2 Ingang HDMI stekker HDMI 3 Ingang zijkant HDMI stekker PC Ingang Mini D sub 15 pins Analoog RGB signaal PC HDMI1 audio phono pluggen Audio L R Uitgang naar Actieve Super Woofer phono plug Programmap...

Отзывы: