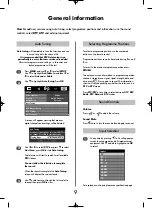
background image

6

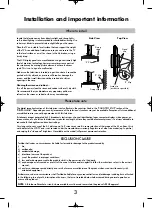
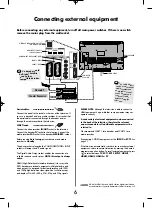
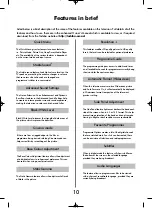
Connecting external equipment

Before connecting any external equipment, turn off all main power switches. If there is no switch
remove the mains plug from the wall socket. 

PLEASE NOTE:

Although this television is able to connect to

HDMI equipment it is possible that some equipment may not
operate correctly.

A wide variety of external equipment can be connected
to the back of the television, therefore the relevant
owners manuals for 

all

additional equipment 

must

be

referred to. 

We recommend 

SCART 1

for a decoder and 

SCART 2

for a

media recorder. 

If connecting S-VIDEO equipment, set the 

INPUT

for 

EXT2

See

page 31.

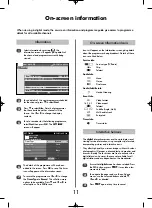
If the television automatically switches over to monitor external
equipment, return to normal television by pressing the desired
programme position button. To recall external equipment, press

B

to select between 

TV

EXT1

EXT2

EXT3C

HDMI1

,

HDMI2

HDMI3

HDMI4

or 

PC

.

Aerial cables:

Connect the aerial to the socket on the rear of the television. If
you use a decoder* and/or a media recorder it is essential that
the aerial cable is connected through the decoder and/or
through the media recorder to the television. 

SCART leads:

Connect the video recorder 

IN/OUT

socket to the television.

Connect the decoder 

TV

socket to the television. Connect the

media recorder 

SAT

socket to the decoder 

MEDIA REC. 

socket.

Before running 

Auto tuning

put your decoder and media

recorder to

Standby

.

The phono sockets alongside the COMPONENT VIDEO INPUT
sockets will accept L and R audio signals.

The Digital Audio Output socket enables the connection of a
suitable surround sound system. 

NOTE: this output is always

active.

HDMI (High-Definition Multimedia Interface) is for use with a
DVD, decoder or electrical equipment with digital audio and
video output. It is designed for best performance with 1080i
and 1080p high-definition video signals but will also accept
and display VGA, 480i, 480p, 576i, 576p and 720p signals.
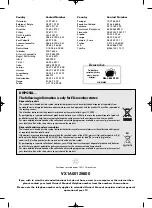
Media Recorder

Decoder*

CABLE HOLDER

FIXING STRAP

HDMI INPUT SOCKETS

(model dependant)

SCART 2 (EXT2)

COMPONENT VIDEO INPUT (EXT3)

SCART 1 (EXT1)

OPTICAL DIGITAL AUDIO OUTPUT

(DTV MODE ONLY)

FOR HOTEL
USE ONLY

*

a decoder could

be Digital Satellite

or any other

compatible decoder

.

The cable holders

can be used for aerial,

media recorder and

audio cables. Do not

use as handles and

remove all cables

before moving the

television.

HDMI, the HDMI logo and High-Definition Multimedia Interface
are trademarks or registered trademarks of HDMI Licensing, LLC.

Q

p

g

Содержание REGZA AV Digital Series

Страница 1: ...n you can do so by visiting www toshiba om net TOSHIBA Toshiba estimates that the initiative of making the extended functions available online rather than in this book will save over 20 000 trees per year 1 5 Million kg CO2 If you wish to view the extended functions but do not have access to a computer or the internet then please contact your local Owner s Manual Helpline number Contact details ar...

Страница 2: ...y children push or hit the screen push anything into holes slots or any other openings in the case NEVER guess or take chances with electrical equipment of any kind it is better to be safe than sorry Leave more than 10cm clearance around the television to allow adequate ventilation This will prevent overheating and possible damage to the television Dusty places should also be avoided Damage may oc...

Страница 3: ...result of the owner s failure and or neglect to follow the instructions set out in the owner s manual viii any loss or damage caused directly as a result of misuse or malfunction of the product when used simultaneously with associated equipment Furthermore under no circumstances shall Toshiba be liable for any consequential loss and or damage including but not limited to the following loss of prof...

Страница 4: ...ll switchover at www digitaluk co uk When the TV switchover happens in your area there are at least two occasions when you will need to re tune your TV in order to continue receiving your existing TV channels and also to pick up new ones Digital UK the body leading the digital TV switchover will advise you when you need to re tune during the switchover If you choose to connect your TV to satellite...

Страница 5: ...batteries may need replacing Inserting batteries and effective range of the remote Simple at a glance reference of your remote control EXIT QUICK AD ATV DTV GUIDE MENU RETURN CT 90326 To change programme positions and text pages To exit Menus Quick menu To return to the previous programme Analogue time display To select input from external sources analogue or digital TV To switch between ATV analo...

Страница 6: ...n SCART leads Connect the video recorder IN OUT socket to the television Connect the decoder TV socket to the television Connect the media recorder SAT socket to the decoder MEDIA REC socket Before running Auto tuning put your decoder and media recorder to Standby The phono sockets alongside the COMPONENT VIDEO INPUT sockets will accept L and R audio signals The Digital Audio Output socket enables...

Страница 7: ...ction of control functions i e Select Watch Back Watch TV NOTE The same menu is displayed in DTV Digital TV and ATV Analogue TV modes however where some items are not available in a mode they will appear greyed out To use the options press the f and e button on the remote control to move up and down through them and OK zord xto select the required choice Follow the on screen instructions The funct...

Страница 8: ...ntry and zor xto select The television will now tune the stations for your country Press OK The Location screen will appear press zor xto select between Home or Store for normal home use select Home then press OK The Ant Cable In screen will appear press zor xto select between Antenna or Cable then press OK The Auto Tuning start up screen will appear with the option to select between DTV and ATV D...

Страница 9: ...ss MENU and use zor xto select SETUP Use e to highlight Ant Cable In and then zor xto select Antenna or Cable Use e to highlight Auto Tuning Press OK A screen will appear warning that previous digital channels and settings will be deleted 2 3 Auto tuning will completely re tune the television and can be used to up date the channel list It is recommended that DTV Auto tuning is run periodically to ...

Страница 10: ...ith a choice of soundtrack language provided they are currently being broadcast Audio Languages Programme Options creates a list of the digital channels that are watched most Four lists can be created these can be a mixture of television and radio programmes Favourite Programmes When in digital mode this feature will show subtitles on the bottom of the screen in the selected language provided they...

Страница 11: ...btitle info Hard of Hearing Event Info SD Video format 16 9 4 3 Video aspect Teletext Subtitle Single Multi Multi audio track Encrypted Timer Info Timer status The details of the programme will have been added to the screen Press OK to save The timer icon will appear on the information screen To record the programme use zor xto change the Timer Type to Record This will allow more options to be ava...

Страница 12: ...ted by the broadcaster Why when digital subtitles have been selected are they not showing on screen Q 12 Below are the answers to some of the most common queries For more information go to http toshiba om net A Check the television is not in standby mode Check the mains plug and all mains connections Why is there no sound or picture Q A Make sure the media player is connected to the television as ...

Страница 13: ...MI1 2 3 Input HDMI Audio LIP SYNC Deep Colour supported HDMI4 Input Side HDMI Audio LIP SYNC Deep Colour supported PC Input Mini D sub 15 pin Analog RGB signal PC HDMI1 Audio 3 5mm mini jack Audio Digital Audio Output S PDIF Optical USB Port Interface version USB2 0 USB class Mass storage PTP Stereo Nicam 2 carrier system Visible Screen Size Model 32 A RV 80cm approx 37 A RV 94cm 42 A RV 107cm Dis...

Страница 14: ... Integrated batteries and accumulators can be disposed of with the product They will be separated at the recyling centres The black bar indicates that the product was placed on the market after August 13 2005 By participating in separate collection of products and batteries you will help to assure the proper disposal of products and batteries and thus help to prevent potential negative consequence...

Отзывы: