


– 64 –
127-EN
128-EN
9
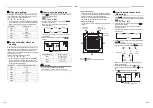
Test run
Before test run
• Before turning on the power supply, carry out the
following procedure.
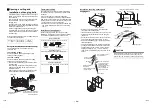
1) By using 500 V-megger, check that resistance
of 1 M
or more exists between the terminal
block 1 to 3 and the earth (grounding work).
If resistance of less than 1 M
is detected, do
not run the unit.
2) Check the valve of the outdoor unit being
opened fully.
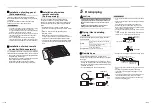
• To protect the compressor at activation time, leave
power-ON for 12 hours or more before operating.
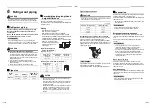
Execute a test run
Operate the unit with the wired remote controller as
usual.
For the procedure of the operation, refer to the
attached Owner’s Manual.
A forced test run can be executed in the following
procedure even if the operation stops by thermostat-
OFF.
In order to prevent a serial operation, the forced test
run is released after 60 minutes have passed and
returns to the usual operation.
CAUTION
CAUTION
Do not use the forced test run for cases other than the
test run because it applies an excessive load to the
devices.
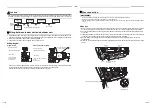
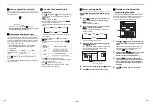
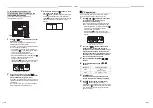
Wired remote controller
1
Push
button for 4 seconds or more.
[TEST] is displayed on the display part and
the selection of mode in the test mode is
permitted.
2
Push
button.
3
Select the operation mode with
button, [
Cool] or [
Heat].
• Do not run the air conditioner in a mode other
than [
Cool] or [
Heat].
• The temperature controlling function does not
work during test run.
• The detection of trouble is performed as usual.
4
After the test run, push
button to
stop a test run.
(Display part is same as procedure
1
.)
5
Push
button to cancel (release from) the
test run mode.
([TEST] disappears on the display and the status
returns to a normal.)
2, 4
3
1,5
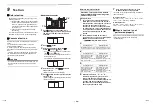
Wireless remote controller
RBC-AX41U(W)-E
1
Turn on the power of the air conditioner.
When power is turned on for the first time
after installation, it takes approx. 5 minutes
until the remote controller becomes
available. In the case of subsequent power-
on, it takes approx. 1 minute until the remote
controller becomes available. Execute a test
run after the predetermined time has
passed.
2
Push “ON/OFF” button on the remote
controller, select [ Cool] or [
Heat] with
“MODE” button, and then select
[
HIGH] with “FAN” button.
3
4
5
6
Repeat procedures
4
5
4
5
.
Indicators “Operation” (green), “Timer”
(green), and “Ready” (orange) in the
wireless receiver section flash in approx. 10
seconds, and the air conditioner starts
operation. If any of these indicators does not
flash, repeat procedures
2
to
5
.
7
Upon completion of the test run, push
“ON/OFF” button to stop operation.
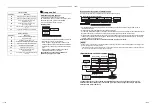
<Overview of test run operations using the wireless
remote controller>
▼
Cooling test run:
ON/OFF
17°C
18°C
17°C
18°C
17°C
18°C
17°C
(test run)
ON/OFF
▼
Heating test run:
ON/OFF
30°C
29°C
30°C
29°C
30°C
29°C
30°C
(test run)
ON/OFF
When a test run is not
performed properly
When a test run is not performed properly, refer to the
check code and the part to be checked on
“Troubleshooting”.
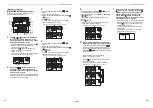
Precaution: Test run method in wireless
remote controller differs according to the
models of indoor units.
Cooling test run
Heating test run
Set the temperature to 17°C
with the temp. setup buttons.
Set the temperature to 30°C
with the temp. setup buttons.
Cooling test run
Heating test run
After confirming a signal
receiving sound “beep”
immediately set the
temperature to 18°C with the
temp. setup buttons.
After confirming a signal
receiving sound “beep”
immediately set the
temperature to 29°C with the
temp. setup buttons.
Cooling test run
Heating test run
After confirming a signal
receiving sound “beep”
immediately set the
temperature to 17°C with the
temp. setup buttons.
After confirming a signal
receiving sound “beep”
immediately set the
temperature to 30°C with the
temp. setup buttons.