


– 60 –
How to cancel louver lock
Set the wind direction to “
0000
” of the louver lock setup
procedure above.
• When the setting is canceled,
goes out.
Other operations are the same as those in “How
to set up louver lock (No swing)”.
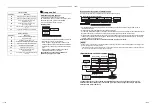
Remote controller sensor
The temperature sensor of the indoor unit senses room
temperature usually. Set the remote controller sensor
to sense the temperature around the remote controller.
Select items following the basic operation procedure
(
1
2
3
4
5
6
).
• Specify
[32]
for the CODE No. in Procedure
3
.
• Select the following data for the SET DATA in
Procedure
4
.
When
flashes, the remote controller sensor is
defective.
Select the SET DATA [0000] (not used) or replace the
remote controller.
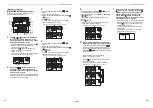
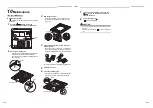
To select horizontal wind
direction
1. Push
and “TEMP.”
buttons for at least four
seconds when the air conditioner is not working.
flashes.
Indicates CODE No.
[01]
.
2. Select an indoor unit to be set by pushing
button (left side of the button).
Indoor unit number changes each time you push the
button.
The fan of the selected unit runs and the louvers
start swinging.
3. Change the CODE No. to
[45]
with “TEMP.”
buttons.
4. Select wind direction setting with “TIME”
buttons.
5. Push
button to check the setting.
The display state changes from flashing to lighting,
and the setting is fixed.
6. Push
button to end the setting.
* When the cold draft position is selected, ceiling
contamination is less reduced.
SET DATA
0000
0001
Remote controller
sensor
Not used
(factory default)
Used
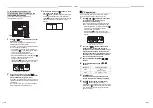
0000
Setting data
Wind
direction SET
DATA
Wind direction setting
0000
Smudge reducing position
(Air direction to reduce ceiling
contamination) [Factory default]
0002
Cold draftless position
(Air direction to control cold air fall)
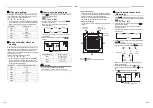
No
display
UNIT No.
1-1
UNIT No.
1-2
UNIT No.
1-3
UNIT No.
1-4
Power saving mode
Performing settings of the power saving
mode
1
Push
button for 4 seconds or more
when the air conditioner is not working.
flashes.
Indicates CODE No.
[C2.]
2
Select an indoor unit to be set by pushing
(left side of the button).
Each time the button is pushed, unit numbers
change as follows:
The fan of the selected unit runs.
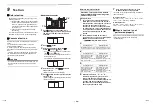
3
Adjust the power save setting by pushing
TIME
buttons.
Each push of the button changes the power level
by 1% within the range from 100% to 50%.
*The factory default is 75%.
4
Determine the setting by pushing
button.
5
Push
button to complete the setting.
Remote controller switch
monitoring function
This function is available to call the service monitor
mode from the remote controller during a test run to
acquire temperatures of sensors of the remote
controller, indoor unit, and outdoor unit.
1
Push
and
buttons simultaneously for
at least 4 seconds to call the service monitor
mode.
The service monitor indicator lights up and the
header indoor unit number is displayed first.
CODE No.
is also displayed.
2
Pushing TEMP.
buttons, select the
number of sensor (CODE No.) to be
monitored. (See the following table.)
3
Pushing
(left side of the button),
select an indoor unit to be monitored. The
sensor temperatures of indoor units and
their outdoor unit in the control group are
displayed.
4
Push
button to return to the normal
display.
UNIT No.
1-1
UNIT No.
1-2
UNIT No.
1-3
UNIT No.
1-4
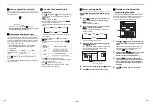
Setting of power level in
power saving mode
1
3
4
2
119-EN
120-EN