


– 96 –
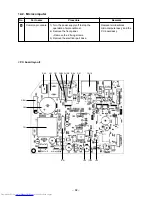
No.
5
Part name
Rear cabinet
Procedure
1) Perform work of item 1. of
1
,
2
and
3
.
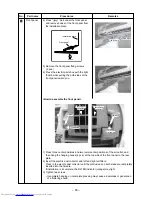
2) Remove fixed screws fixing to the bottom plate.
(ST1TØ4 × 10L 2 pcs.)
3) Remove fixed screws fixing to the heat
exchanger. (ST1TØ4 × 10L 2 pcs.)
4) Remove fixed screw fixing to the valve mounting
plate. (ST1TØ4 × 10L 1 pc.)
Remarks
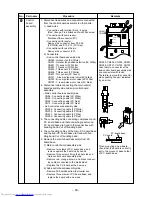
1) Perform work of item 1. of
1
and
2
.
2) Remove the flange nut fixing the fan motor and
the propeller fan.
• Flange nut is loosened by turning clockwise.
(To tighten the flange nut, turn counterclock-
wise.)
3) Remove the propeller fan.
4) Disconnect the connector for fan motor from the
inverter.
5) Remove the fixing screws (3 pcs.) holding by
hands so that the fan motor does not fall.
1) Perform work of item 1. of
1
,
2
,
3
,
4
and
5
.
2) Evacuate refrigerant gas.
3) Remove the partition board.
(ST1TØ4 × 10L 3 pcs.)
4) Remove the sound-insulation material.
5) Remove terminal cover of the compressor, and
disconnect lead wire of the compressor thermo.
and the compressor from the terminal.
6) Remove pipe connected to the compressor with
a burner.
7) Remove the fixing screw of the bottom plate
and heat exchanger. (ST1TØ4 × 10L 1 pc.)
8) Remove the fixing screw of the bottom plate
and valve clamping plate.
(ST1TØ4 × 10L 2 pcs.)
9) Pull upward the refrigeration cycle.
10) Remove nut fixing the compressor to the
bottom plate.
Fan motor
Compressor
6
7
;;
;;
Fan motor
Propeller fan
Flange nut
;
;
Valve
clamping
plate
Compressor
thermo.
Compressor
Partition
board
;;
;;
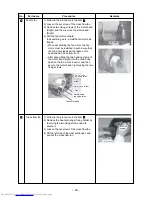
Reactor
1) Perform work of item 1. of
1
, and
3
.
2) Remove lead wires clung in holder on the
partition board.
3) Remove screws fixing the reactor.
(ST1TØ4 × 10L 2 pcs.)
8
Reactor
Содержание RAS-3M23GACV-E
Страница 99: ... 99 MCC 1438 ...
Страница 100: ... 100 MCC 818 ...


