SERVICE MANUAL
AIR CONDITIONER
SPLIT WALL TYPE
RAS-30NKP2B-1 / RAS-30N2A2B
RAS-30NKP-AR-1 / RAS-30N2A-AR
FILE NO. SVM-06017
July 2006
Страница 1: ...SERVICE MANUAL AIR CONDITIONER SPLIT WALL TYPE RAS 30NKP2B 1 RAS 30N2A2B RAS 30NKP AR 1 RAS 30N2A AR FILE NO SVM 06017 July 2006 ...
Страница 2: ...start Function 7 7 Filter Check Lamp 7 8 Self Cleaning function 8 INSTALLATION PROCEDURE 8 1 Safety Cautions 8 2 Installation Diagram of Indoor and Outdoor Units 8 3 Installation 8 4 Indoor Unit 8 5 Outdoor Unit 8 6 How to Set Remote Control Selector Switch 9 TROUBLESHOOTING CHART 9 1 Troubleshooting Procedure 9 2 Basic Check Items 9 3 Primary Judgement 9 4 Self Diagnosis by Remote Control Check C...
Страница 3: ... NO SVM 06017 10 PART REPLACEMENT 10 1 Indoor Unit 10 2 Outdoor Unit 11 EXPLODED VIEWS AND PARTS LIST 11 1 Indoor Unit E Parts Assy 11 2 Indoor Unit 11 3 Outdoor Unit RAS 30N2A2B 11 4 Outdoor Unit RAS 30N2A AR ...
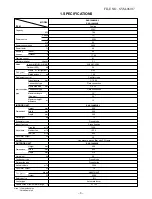
Страница 4: ...mum length m 15 1 One way 25 2 Maximum height m difference INDOOR UNIT RAS 30NKP2B 1 Height mm 298 Dimensions Width mm 998 Depth mm 220 Net weight kg 12 Evaporator type Finned tube Indoor fan type Cross flow fan High fan m3 h 1200 Air volume Medium fan m3 h 1050 Low fan m3 h 900 Fan motor output W 30 Air filter Honeycomb woven filter with PP frame OUTDOOR UNIT RAS 30N2A2B Height mm 690 Dimensions ...
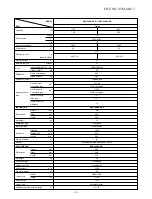
Страница 5: ...ight mm 298 Dimensions Width mm 998 Depth mm 220 Net weight kg 12 Evaporator type Finned tube Indoor fan type Cross flow fan High fan m3 h 1200 Air volume Medium fan m3 h 975 Low fan m3 h 650 Fan motor output W 30 Air filter Honeycomb woven filter with PP frame Height mm 690 Dimensions Width mm 880 Depth mm 310 Condenser type Finned tube Outdoor fan type Propeller fan Airflow volume m3 h 3380 Fan ...
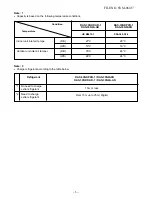
Страница 6: ...2B 1 RAS 30N2A2B 1 No need to charge 15m or less extra refrigerant 2 Need to charge Over 15m up to 25m 40g m extra refrigerant JIS B8615 1 SSA 385 386 Indoor unit inlet air tempe DB 27 C 29 C WB 19 C 19 C Outdoor unit inlet air temper DB 35 C 46 C WB 24 C 24 C Temperature Condition RAS 30NKP2B 1 RAS 30NKP AR 1 RAS 30N2A AR RAS 30N2A2B RAS 30NKP AR 1 RAS 30N2A AR ...
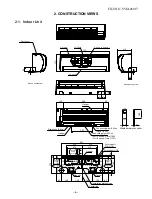
Страница 7: ...anger Drain hose 0 54m Connecting pipe 0 43m Flare 6 35 For stud bolt 8 10 For stud bolt 6 Installation plate outline Center line Minimum distance to ceiling 170 or more Minimum distance to ceiling 170 or more 65 or more Minimum distance to ceiling 6 64 60 60 48 6 218 48 53 Knock out system Front panel Knock out system Heat exchanger Air filter Air inlet Air outlet 275 790 2 1 Indoor Unit 57 18 16...
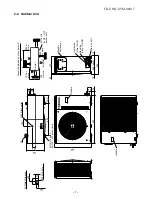
Страница 8: ...r bolt Handle Handle Mounting dimension of anchor bolt 600 100 or more 600 or more 600 or more 100 or more Air outlet Air inlet 4 12x18 for 8 10 anchor bolt Electric Parts cover Liquid side Flare 6 35 Gas side Flare 15 88 Service Port A 600 340 23 68 120 63 8 340 600 27 50 690 880 74 140 88 310 340 pitch 12 12 364 ...
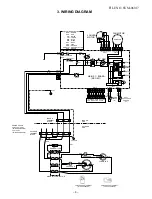
Страница 9: ...01 BLU BLU BLU BLU BLU BLU BLU BLU WHI DC MOTOR CN 07 CN 10 C02 C06 IC02 IC01 IC T01 IC04 C15 BLK WHI GRN YEL RED C01 R01 R09 R21 R22 BLK P04 SG01 DSA VARISTOR T6 3A 250 V DC15V DC0V DC12V DC7V DC0V CN30 CN31 CN27 GREEN GRN YELLOW 3 1 2 i L N 3 1 2 i GRN YEL RED RED BLK RED BLK BLK CHASSIS GRY POWER SUPPLY 220 240V 50Hz SPARK KILLER MAGNETIC CONTACTOR BLK BLK RED A2 A1 52C 1 L1 2 T2 3 L2 4 T2 5 L3...
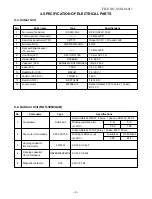
Страница 10: ...S AC 440 V 60µF for compressor 5 Magnetic contactor A35 220 V 60 Hz STF 200 70K No Parts name Type Specifications 1 Fan motor for indoor ICF 340 30 2 DC 310 340V 30W 2 Thermo sensor TA sensor 10 kΩ at 25 C 3 Switchins transformer T01 SWT 77 Output DC 7V 12Va and 12Vb 4 Microcontroller TMP87CM40ANG 6G60 5 Heat exchanger sensor 10 kΩ at 25 C TC sensor 6 Line filter L01 SS11V R07190 19 mH AC 0 7 A 7 ...
Страница 11: ...T Winding resistance Ω C R C S at 25 C Output Rated 42 W 6 poles 1 phase 220 240 V 50 Hz 2 Fan motor for outdoor MMF 230 65I Winding resistance Ω Red Black White Black at 20 C 71 2 139 0 3 Running capacitor 451355L AC 450 V 3 5µF for fan motor 4 Running capacitor RSS44B606U0220S AC 440 V 60µF for compressor 5 Magnetic contactor A35 220 240 V 50 Hz 0 66 1 58 ...
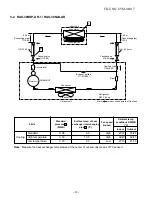
Страница 12: ...RIGERATION CYCLE DIAGRAM 5 1 RAS 30NKP2B 1 RAS 30N2A2B Evaporator Indoor unit Cross flow fan Condenser Propeller fan Outdoor unit Cooling O D 15 88mm O D 6 35mm Cooling Packed valve Gas container connection Reinstall etc 15 88 Packed valve 6 35 0 39m Connecting pipe 15 88 0 49m Connecting pipe 6 35 T P Capillary tube 2 4x500S Refrigerant R 22 1 90kg Mark means check points of Gas Leak Note Measure...
Страница 13: ... 15 Fan speed indoor 50 Hz Standard pressure P MPaG Indoor unit Cross flow fan Condenser Propeller fan Outdoor unit O D 15 88 mm O D 6 35 mm Packed valve 15 88 Packed valve 6 35 T P Refrigerant R22 2 00 kg Evaporator 0 39 m Connecting pipe 15 88 0 49 m Connecting pipe 6 35 Mark means check points of Gas Leak Capillary tube 2 4x800 s Surface temp of heat exchanger interchanging pipe T C Dryer 5 2 R...
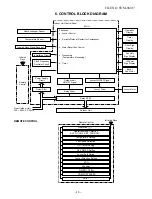
Страница 14: ...ay at Restart for Compressor Motor Revolution Control Processing Timer Louver ON OFF Signal Louver Driver Operation Display Timer Display Filter Sign Display Fan Only Sign Display Indoor Fan Motor Hi Power Sign Display Louver Motor Infrared Rays Remote Control Temperature Processing 6 CONTROL BLOCK DIAGRAM Operation Operation Remote Control Operation Mode Selection AUTO COOL DRY FAN ONLY Temperatu...
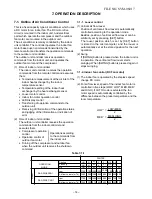
Страница 15: ...tes the indoor fan motor based upon commands transmitted by the remote control and transfers the operation commands to the outdoor unit controller The outdoor unit controller receives operation commands from the indoor unit and operates the outdoor fan motor and the compressor 1 Role of indoor unit controller The indoor unit controller receives the operation commands from the remote control and ex...
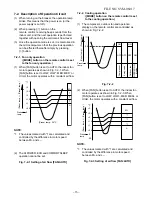
Страница 16: ...s marked with 1 are calculated and controlled by the difference in motor speed between M and L 7 2 2 Cooling operation MODE button on the remote control is set to the cooling operation 1 The compressor outdoor fan and operation display on the remote control are controlled as shown in Fig 7 2 2 Fig 7 2 2 2 When FAN button is set to AUTO the indoor fan motor operates as shown in Fig 7 2 3 When FAN b...
Страница 17: ...tion 1 One of 2 operations Cooling Fan only is selected according to difference between the preset temperature and the room temperature at which the automatic operation has started as shown in Fig 7 2 6 The Fan only operation continues until the room temperature reaches a level at which another mode is selected 2 Temporary Auto When the TEMPORARY button on the indoor unit is pushed the preset temp...
Страница 18: ...ange If the room temperature is higher than the setting temperature by 3 5 C or more the horizontal louver moves to the Hi POWER position automatically Then when the room temperature is C less than the setting temperature the horizontal louver returns automatically FAN speed AUTO If the temperature is higher than the setting temperature by 3 5 C or more the air conditioner operates at maximum airf...
Страница 19: ...o restart function proceed as follows The power supply to the unit must be on the function will not set if the power is off Push the TEMPORARY button located in the center of the front panel continuously for three seconds The unit receives the signal and beeps three times The unit then restarts operating automatically in the event of power supply being accidentally shut down Operation Motions Push...
Страница 20: ... to turn off filter check lamp 1 Press FILTER button on the remote control 2 Push TEMPORARY button on the indoor unit Note If TEMPORARY button is pushed while the filter check lamp is not indicating the indoor unit will start the Automatic Operation Operation Motions Push TEMPORARY button for more The unit is on standby than three seconds The unit starts to operate The orange lamp is on After appr...
Страница 21: ...nction had been cancelled To set AUTO RESTART again please follow item 7 6 1 7 8 2 How to set Self Cleaning function To set the Self Cleaning function proceed as follows Press TEMPORARY button one time or use remote control to turn on air conditioner The OPERATION display will show in orange color When AUTO RESTART is ON or green color When AUTO RESTART is OFF Hold down the TEMPORARY button for mo...
Страница 22: ...of the fan speed L may cause not enough the cooling capacity or heating capacity automatically and fan only mode 2 Comfort sleep mode is appropriate to work with less cooling load and less heating load condition Because of the fan speed L may cause not enough the cooling capacity or heating capacity 7 10 1 Cooling mode The fan speed of indoor unit operates automatically it relates with the compres...
Страница 23: ...stall in a place which cannot bear the weight of the unit Personal injury and property damage can result if the unit falls Before doing the electrical work attach an approved plug to the power supply cord Also make sure the equipment is properly earthed Appliance shall be installed in accordance with national wiring regulations If you detect any damage do not install the unit Contact your TOSHIBA ...
Страница 24: ...mpressor technical process following installation conditions do apply 1 The power connection for the air conditioner has to be done at the main power distribution This distribution has to be of an impedance Normally the required impedance is reached at a 32A fusing point Air conditioner fuse has to be 16A max 2 No other equipment should be connected to this power line 3 For detailed installation a...
Страница 25: ...t together For the rear left and left piping Insert the cushion between the indoor unit and wall and tilt the indoor unit for better operation 600 mm or more Extension drain hose Not available provided by 1 Installation plate 100 mm or more Wall Left Rear left 6 mm thick heat resisting polyethylene foam Loop the connective cable about 100 mm in diameter and 300 350 mm long Do not allow the drain h...
Страница 26: ...quid side 6 35 mm Gas side 15 88 mm Pipe insulating material polyethylene foam 6 mm thick Putty PVC tapes Secure the outdoor unit with fixing bolts and nuts if the unit is likely to be exposed to a strong wind Use 8 mm or 10 mm anchor bolts and nuts Fig 8 3 1 Air outlet Air inlet 600 mm 120 mm 340 mm 64 mm Fixing bolt arrangement of outdoor unit ...
Страница 27: ...plate x 1 Wireless remote control x 1 Battery x 2 Part name Q ty Remote control holder x 1 Sasa Zeolite Vitamin C filter x 2 Bio enzyme Gingko filter x 2 Part No 4 5 6 Part name Q ty Mounting screw 4 x 25 x 8 Pan head wood screw 3 1 x 16 x 2 Part No 7 8 Others Name Owner s manual Installation manual l l ...
Страница 28: ...ON Direct sunlight to the indoor unit s wireless receiver should be avoided The microprocessor in the indoor unit should not be too close to RF noise sources For details see the owner s manual Remote control A place where there are no obstacles such as a curtain that may block the signal from the indoor unit Do not install the remote control in a place exposed to direct sunlight or close to a heat...
Страница 29: ...ry and property damage if the unit falls In case of block brick concrete or similar type walls make 5 mm dia holes in the wall Insert clip anchors for appropriate 7 mounting screws NOTE Secure four corners and lower parts of the installation plate with 6 to 7 mounting screws to install it Installation plate Keep horizontal direction 8 4 3 Electrical work 1 The supply voltage must be the same as th...
Страница 30: ...ting cable with the cord clamp 8 Fix the terminal cover rear plate bushing and air inlet grille on the indoor unit CAUTION Be sure to refer to the wiring system diagram labeled inside the front panel Check local electrical cords and also any specific wiring instructions or limitations Screw Cord clamp Terminal cover Screw Terminal block Earth line Connecting cable Fig 8 4 6 Stripping length of con...
Страница 31: ...e wall After passing the connecting pipe through the pipe hole connect the connecting pipe to the auxillary pipes and wrap the facing tape around them CAUTION Bind the auxiliary pipes two and connecting cable with facing tape tightly In case of leftward piping and rear leftward piping bind the auxiliary pipes two only with facing tape Carefully arrange pipes so that any pipe does not stick out of ...
Страница 32: ...m Drain hose Shield pipe Extension drain hose Wall Drain guide Space for pipes Do not put the drain hose end in the drainage ditch Do not form the drain hose into a wavy shape Do not put the drain hose end into water Do not rise the drain hose 50 mm or more 8 4 6 Indoor unit fixing 1 Pass the pipe through the hole in the wall and hook the indoor unit on the installation plate at the upper hooks 2 ...
Страница 33: ...ng wind like a coast or on a high storey of a building secure the normal fan operation using a duct or a wind shield 3 In particularly windy areas install the unit such as to avoid admission of wind 4 Installation in the following places may result in trouble Do not install the unit in such places A place full of machine oil A saline place such as the coast A place full of sulfide gas A place wher...
Страница 34: ... gauge reading is 101 kPa 76 cmHg 5 Close the low pressure side valve handle of gauge manifold 6 Open fully the valve stem of the packed valves both sides of Gas and Liquid 7 Remove the charging hose from the service port 8 Securely tighten the caps on the packed valves Fig 8 5 6 Service port Valve core Setting pin Packed valve at liquid side Pressure gauge Manifold valve Packed valve at gas side ...
Страница 35: ...ecting the connecting cable to the outdoor unit terminal make a loop as shown installation diagram of indoor and outdoor unit to prevent water coming in the outdoor unit 4 Insulate the unused cords conductors with water coming in the outdoor unit Process them so that they do not touch any electrical or metal parts Fig 8 5 8 CAUTION Wrong wiring connection may cause some electrical parts burn out B...
Страница 36: ...e setting the selector switch 2 Remove the Air inlet grille and Front panel Refer to page 52 10 1 3 Select the terminal of selector switch from A position to B position Fig 8 6 1 2 Set the remote control selector switch with the remote control B is indicated on the liquid crystal display when setting remote control selector switch to B A is not indicated on the display even if the selector switch ...
Страница 37: ...you the Auto Restart has been selected To cancel the Auto Restart follow the steps described in the section Auto Restart Function of the Owner s Manual 8 7 Others 8 7 1 Gas leak test Fig 8 7 1 Check the flare nut connections valve stem cap connections and service port cap connections for gas leak with a leak detector or soap water 8 7 2 Test operation To switch the TEST RUN COOL mode press TEMPORA...
Страница 38: ...inks to indicate that power is turned on If the button is pressed the lamp stops blinking The indoor fan motor speed is automatically controlled in the Dry operation The compressor has a function that it is not turned off for 3 minutes after it is turned on even though the room temperature is in the range that the compressor is turned off 4 The compressor is not turned on and off even though the t...
Страница 39: ...Hz E OPERATION lamp is blinking 5 Hz F OPERATION and TIMER lamps are blinking 5 Hz G OPERATION TIMER and PRE DEF or FAN ONLY for cooling only model lamps are blinking Table 9 3 2 Diagnosis by detective operation The remote control does not work The outdoor fan does not rotate Turn off the power supply once then turn it on Try to operate the remote control The compressor operates The compressor doe...
Страница 40: ...s continuously 5 times per 1 sec 2 Press TIMER 8 button If there is no fault with a code the indoor unit will beep once Pi and the display of the remote control will change as follows Check the unit with all 35 check codes 00 to 22 as shown in Table 9 4 1 Press TIMER 9 button to change the check code backwards If there is a fault the indoor unit will beep for 10 seconds Pi Pi Pi Note the check cod...
Страница 41: ...m errors The lamp on the indoor unit blinks when error is defected The lamp on the indoor unit blinks when error is defected The lamp on the indoor unit blinks when error is defected And it returns to the normal condition when recovering from errors The lamp on the indoor unit blinks when error is defected The lamp on the indoor unit blinks when error is detected 1 Check the indoor thermo sensor T...
Страница 42: ...operly NO NO NO NO NO NO NO NO YES YES YES YES YES YES YES YES Is condenser normal Is indoor fan motor normal Connect connector properly Replace condenser Replace fan motor Is TC sensor resistance value 10 kΩ at 25 C normal 9 5 How To Diagnose Faulty Parts 09 Other cycle error 0C Indoor TA sensor error NO NO YES YES Is CN04 TA sensor connector connected properly Is TA sensor resistance value 10 kΩ...
Страница 43: ...ror NO NO YES YES Is CN05 TC sensor connector connected properly Is TC sensor resistance value 10 kΩ at 25 C normal Indoor P C board is defective Connect CN05 properly Replace TC sensor Replace P C board 42 FILE NO SVM 06017 ...
Страница 44: ... signal transmitted properly Remote control is defective Refer to 9 9 Remote Control Parts R10 C01 DB01 or C02 C03 IC01 are defective Is fuse F01 of indoor control board blown Is voltage DC 12V or 5V indicated on rear of indoor control board normal Microconlroler defective Replace main P C board Is DC 310 340V across C03 Are DC 12V across C27 Turn off breaker once and turn it on again after removi...
Страница 45: ...017 9 6 2 Only indoor fan motor does not operate Primary check 1 Is it possible to detect the power supply voltage 200 240 V between 1 and 2 on the terminal block 2 Does the indoor fan motor operate in cooling operation ...
Страница 46: ...s 2 Remove the cover of the fan motor lead wires 3 Check DC voltage with CN10 connector while the fan motor is rotating NOTE Do not disconnect the connector while the fan motor is rotating Use a thin test rod DC P C board CN10 6 Blue 5 Yellow 4 White 3 Black 2 1 Red Black Yellow Indoor fan starts rotating when power supply is turned on Check output DC voltage of fan motor on P C board Measure volt...
Страница 47: ...sor does not operate Primary check 1 Is the preset temperature higher than the room temperature in cooling operation 2 Is the crossover cable connected properly Inspection procedure Cooling only model FILE NO SVM 06017 ...
Страница 48: ...ng normal Check winding resistor NO Compressor is defective YES Replace compressor Is capacitor for compressor normal NO Capacitor is defective Is it possible to detect AC 200V between 2 and 3 on terminal block Is crossover cable normal YES Is overload relay normal Does compressor start Does compressor stop after a while Is gas quantity normal Check gas pressure Compressor is defective Replace P C...
Страница 49: ... more to restart the unit 2 The outdoor unit stops once it would not operate until the power is turned on again 3 The outdoor unit stops between 10 minutes to 1 hour after starting and a check code is indicated on the remote control Check code 03 1E Refer to Table 9 4 1 Measure gas pressure Gas shortage Pipe clogging Compressor is turned off and on automatically by or thermostat Cooling only Model...
Страница 50: ...ote control is in status which is shortened by time on the reactivation preventive timer and all display lamps go on for approx 3 seconds when a signal is received If time on the reactivation preventive timer is not shortened the high voltage is not applied to electrode of the air purifier for approx 1 hour While the air purifier operates check that the fan speed AUTO is not displayed Because the ...
Страница 51: ...The connector is disconnected CN01 3 The heat exchanger sensor and the P C board are defective Refer to Table 9 8 2 4 The main P C board is defective 1 The temperature of the indoor heat exchanger is extremely low 2 The connector of the heat exchanger sensor short circuited CN01 3 The heat exchanger sensor and the P C board are defective Refer to Table 9 8 2 4 The main P C board is defective 1 The...
Страница 52: ...control is defective Does indoor unit start to operate by automatic restart function Does radio sound is affected by remote control when a signal is transmitted at distance of 5 cm from radio P C board is defective Keep indoor unit away from thyristor fluorescent light Avoid direct sunlight Replace P C board Replace batteries Normal operation Replace remote control The unit does not beep at all OP...
Страница 53: ...k body If you operate the air conditioner in cooling or dry operation without pushing the 3 places the surface of the front panel may be covered with frost and have dewdrops 1 Remove the front panel with the procedure 1 2 Remove the screw fixing the electrical part box 3 Remove the drain guide 4 Remove the connector 5P for the fan motor and the connector 6P for the louver motor from the microcompu...
Страница 54: ...oward you 1 Remove the front panel electrical parts assembly horizontal grille heat exchanger and the cross flow fan with procedure 5 2 Remove the bearing from the bearing base If the housing protrudes from the base bearing put the housing in position and assemble the bearing to the bearing base 1 Remove the front panel electrical parts assembly horizontal grille and the heat exchanger with proced...
Страница 55: ...ctrical parts cover 4 screws 4 x 22L 1 Common procedure 1 Perform the common procedure 1 2 Remove the capacitor band 1 screw 4 x 10L 3 Disconnect the lead wires from the capacitor terminal 1 Perform the common procedure 1 2 Remove the fixing screw 1 screw 4 x 10L 3 Disconnect the lead wires from the capacitor terminal 1 Perform the common procedure 1 2 Remove the fixing screw 2 screws 4 x 10L 3 Di...
Страница 56: ...06017 55 Location Part Location Part No No No No 402 43T60002 TERMINAL BLOCK 3P 405 43T69487 PC BOARD ASSY WRS LED 403 43T50004 SENSOR HEAT EXCHANGER 407 43T62003 CORD CLAMP 404 43T50314 SENSOR THERMOSTAT 411 43T69591 PC BOARD 413 43T63310 SENSOR HOLDER Description Description ...
Страница 57: ...T39016 FIX FOR MOTOR 209 43T03012 HIDE CLAW 226 43T21371 MOTOR FAN 210 43T09345 LOUVER H 227 43T20314 FAN CROSS FLOW 211 43T70301 HOSE ASSY DRAIN RAS 30NKP2B 228 43T22309 ASM M BEARING 211 43T70309 HOSE ASSY DRAIN RAS 30NKP AR 229 43T39015 BASE BEARING 212 43T21367 STEPPING MOTOR 230 43T03344 BACK BODY ASSY 213 43T44310 REFRIGERATION CYCLE ASSEMBLY 231 43T07022 HOLDER PIPE 214 43T47311 PIPE DELIVE...
Страница 58: ... ROOF 28 43T62013 COVER E PARTS 8 43T42005 PLATE VALVE PACKED 29 43T52306 MAGNETIC CONTACTOR 9 43T15001 HANDLE 30 43T55345 MF CAPACITOR 10 43T43019 CONDENSER ASSY 31 43T55321 MF CAPACITOR 3 5uF 450V 11 43T46338 VALVE PACKED 15 88 DIA 32 43T96003 CLIP CABLE 12 43T46308 VALVE PACKED 6 35 DIA 40 43T47317 NUT FLANGE 13 43T47334 BONNET 15 88 DIA 43 43T33002 SPARK KILLER 14 43T47331 BONNET 6 35 DIA 44 4...
Страница 59: ...USHING CORD 7 43T91001 PLATE ROOF 28 43T62013 COVER E PARTS 8 43T42005 PLATE VALVE PACKED 29 43T52305 MAGNETIC CONTACTOR 9 43T15001 HANDLE 30 43T55345 MF CAPACITOR 10 43T43019 CONDENSER ASSY 31 43T55321 MF CAPACITOR 3 5uF 450V 11 43T46338 VALVE PACKED 15 88 DIA 32 43T96003 CLIP CABLE 12 43T46308 VALVE PACKED 6 35 DIA 40 43T47317 NUT FLANGE 13 43T47334 BONNET 15 88 DIA 43 43T33002 SPARK KILLER 14 4...
Страница 60: ... 59 FILE NO SVM 01011 1 TOSHIBA CARRIER THAILAND CO LTD 144 9 MOO 5 BANGKADI INDUSTRIAL PARK TIVANON ROAD TAMBOL BANGKADI AMPHUR MUANG PATHUMTHANI 12000 THAILAND ...