background image

SERVICE MANUAL

November

, 2021

SPLIT TYPE

Outdoor Unit

RAS-05E2AVG-E 

RAS-07E2AVG-E

RAS-10E2AVG-E

RAS-13E2AVG-E

RAS-16E2AVG-E

RAS-18E2AVG-E

Indoor Unit 

RAS-B0

5E

2KVG-E


RAS-B07E2KVG-E

RAS-B10E2KVG-E

RAS-B13E2KVG-E

RAS-B16E2KVG-E

RAS-18E2KVG-E

R32 or R410A

FILE NO. SVM-21112

Содержание RAS-18E2AVG-E

Страница 1: ...T TYPE Outdoor Unit RAS 05E2AVG E RAS 07E2AVG E RAS 10E2AVG E RAS 13E2AVG E RAS 16E2AVG E RAS 18E2AVG E Indoor Unit RAS B05E2KVG E RAS B07E2KVG E RAS B10E2KVG E RAS B13E2KVG E RAS B16E2KVG E RAS 18E2KVG E R32 or R410A FILE NO SVM 21112 ...

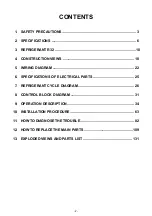
Страница 2: ...EWS 18 5 WIRING DIAGRAM 22 6 SPECIFICATIONS OF ELECTRICAL PARTS 25 7 REFRIGERANT CYCLE DIAGRAM 26 8 CONTROL BLOCK DIAGRAM 31 9 OPERATION DESCRIPTION 34 10 INSTALLATION PROCEDURE 63 11 HOW TO DIAGNOSE THE TROUBLE 82 12 HOW TO REPLACE THE MAIN PARTS 109 13 EXPLODED VIEWS AND PARTS LIST 131 2 ...

Страница 3: ...2 only so that water and or dust does not enter Moreover do not use the existing piping because there are some problems with pressure fittings and possible impurities in existing piping CAUTION TO DISCONNECT THE APPLIANCE FROM THE MAIN POWER SUPPLY This appliance must be connected to the main power supply by a circuit breaker or a switch with a contact separation of at least 3 mm Information inclu...

Страница 4: ... IT MAY RESULT IN THE PIPE BURSTING AND POSSIBLE PER SONNEL INJURIES IN THE EVENT THAT THE REFRIGERANT GAS LEAKS OUT OF THE PIPE DURING THE SERVICE WORK AND THE INSTALLATION WORK IMMEDIATELY LET FRESH AIR INTO THE ROOM IF THE REFRIGERANT GAS IS HEATED SUCH AS BY FIRE GENERATION OF POISONOUS GAS MAY RESULT WARNING Never modify this unit by removing any of the safety guards or bypassing any of the s...

Страница 5: ...e in a wet basement or expose to rain or water Do not install in a place that can increase the vibration of the unit Do not install in a place that can amplify the noise level of the unit or where noise or discharged air might disturb neighbors To avoid personal injury be careful when handling parts with sharp edges Perform the specified installation work to guard against an earthquake If the air ...

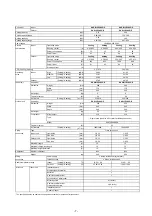
Страница 6: ...unit Unit model RAS 05E2AVG E RAS 07E2AVG E Dimension Height mm 530 530 Width mm 660 660 Depth mm 240 240 Net weight kg 21 21 Compressor Motor output W 450 450 Type Model KSK66D15UDZ3 Fan motor output W 43 Air flow rate Cooling Heating m3 hr 1690 1690 1800 1800 Piping Type Flare connection connection Indoor unit Liquid side mm 6 35 6 35 Gas side mm 9 52 9 52 Outdoor unit Liquid side mm 6 35 6 35 G...

Страница 7: ... unit Unit model RAS 10E2AVG E RAS 13E2AVG E Dimension Height mm 530 530 Width mm 660 660 Depth mm 240 240 Net weight kg 22 22 Compressor Motor output W 550 550 Type Model KSK75D43UEZA Fan motor output W 43 Air flow rate Cooling Heating m3 hr 1800 1800 1980 1980 Piping Type Flare connection connection Indoor unit Liquid side mm 6 35 6 35 Gas side mm 9 52 9 52 Outdoor unit Liquid side mm 6 35 6 35 ...

Страница 8: ...ndoor unit Liquid side mm 6 35 Gas side mm 12 7 Outdoor unit Liquid side mm 6 35 Gas side mm 12 7 Maximum length m 20 Maximum charge less length m 15 Maximum height difference m 12 Refrigerant Name of refrigerant R32 Weight kg 0 68 Wiring Power supply 3 Wires Includes earth Outdoor connection Interconnection 4 Wires Includes earth Usable temperature range Indoor Cooling Heating 21 32 28 Outdoor Co...

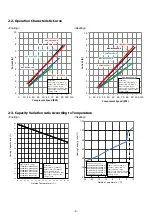
Страница 9: ...0 65 70 75 80 85 90 95 100 105 32 33 34 35 36 37 38 39 40 41 42 43 44 45 46 Cooling Capacity ratio Outside Temperature oC Conditions Indoor DB 27oC WB 19oC Outdoor DB 35oC WB 24oC Indoor Air Flow High Pipe Length 5m For 05 16k Pipe Length 7 5m For 18k Voltage 230V Capacity ratio 100 1 50kW RAS B05E2KVG E 2 00kW RAS B07E2KVG E 2 50kW RAS B10E2KVG E 3 30kW RAS B13E2KVG E 4 20kW RAS B16E2KVG E 5 00kW...

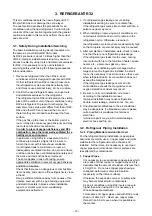
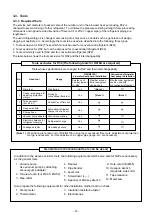
Страница 10: ...rs in places where installation repairs or similar work on air conditioning equipment is performed 3 If a refrigeration gas leakage occurs during installation servicing be sure to ventilate fully If the refrigerant gas comes into contact with fire a poisonous gas may occur 4 When installing or removing an air conditioner do not allow air moisture dust or oil to remain in the refrigeration cycle Ot...

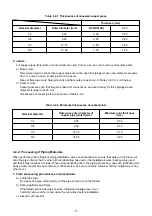
Страница 11: ... of socket joints Nominal diameter 1 4 3 8 1 2 5 8 Reference outer diameter of copper pipe jointed mm 6 35 9 52 12 70 15 88 Minimum joint thickness mm 0 50 0 60 0 70 0 80 3 2 2 Processing of Piping Materials When performing the refrigerant piping installation care should be taken to ensure that water or dust does not enter the pipe interior that no other oil than lubricating oils used in the insta...

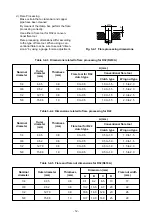
Страница 12: ...pe 0 to 0 5 0 to 0 5 0 to 0 5 0 to 0 5 Conventional flare tool Clutch type Wing nut type 1 0 to 1 5 1 5 to 2 0 1 0 to 1 5 1 5 to 2 0 1 0 to 1 5 2 0 to 2 5 1 0 to 1 5 2 0 to 2 5 Table 3 2 4 Dimensions related to flare processing for R22 Nominal diameter 1 4 3 8 1 2 5 8 Outer diameter mm 6 35 9 52 12 70 15 88 Thickness mm 0 8 0 8 0 8 1 0 A mm Flare tool for R22 clutch type 0 to 0 5 0 to 0 5 0 to 0 5...

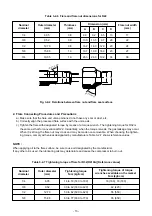
Страница 13: ...ning torque for R32 is the same as that for conventional R22 Incidentally when the torque is weak the gas leakage may occur When it is strong the flare nut may crack and may be made non removable When choosing the tighten ing torque comply with values designated by manufacturers Table 3 2 7 shows reference values NOTE When applying oil to the flare surface be sure to use oil designated by the manu...

Страница 14: ...ifold Charge hose Vacuum pump adapter Electronic balance for refrigerant charging Leakage detector Usage Pipe flaring Flaring by conventional flare tool Connection of flare nut Evacuating refrigerant charge run check etc Vacuum evacuating Refrigerant charge Gas leakage check R32 R410A air water heat pump installation Existence of new equipment for R32 Yes Yes Yes Yes Yes Yes Yes Whether conven tio...

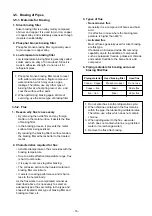
Страница 15: ...ng hose to the cylinder and the connecting port of the electronic balance Indoor unit Outdoor unit Opened Opened Refrigerant cylinder Check valve Opened Open close valve for charging Electronic balance for refrigerant charging Closed Service port 3 4 Recharging of Refrigerant When it is necessary to recharge refrigerant charge the specified amount of new refrigerant according to the following step...

Страница 16: ... of flux coincides with the brazing temperature Due to a wide effective temperature range flux is hard to carbonize It is easy to remove slag after brazing The corrosive action to the treated metal and brazing filler is minimum It excels in coating performance and is harm less to the human body As the flux works in a complicated manner as described above it is necessary to select an adequate type ...

Страница 17: ...meter to the Nitrogen gas cylinder 2 Use a copper pipe to direct the piping mate rial and attach a flow meter to the cylinder 3 Apply a seal onto the clearance between the piping material and inserted copper pipe for Nitrogen in order to prevent backflow of the Nitrogen gas 4 When the Nitrogen gas is flowing be sure to keep the piping end open 5 Adjust the flow rate of Nitrogen gas so that it is l...

Страница 18: ...5 70 57 18 Wireless remote controller Installation plate hanger Connecting pipe 0 35m Flare 9 52mm 55 95 144 147 147 144 40 116 63 17 5 Remote controller holder Drain hose 0 4m 340 Installation plate hanger 128 510 132 192 192 170 170 98 115 170 170 115 102 6 5 6 5 Installation plate hanger Connecting pipe 0 40m Flare 6 35mm Outline of indoor unit Center line Hanger Installation plate outline Hang...

Страница 19: ...5 Remote controller holder 340 144 510 144 192 192 170 170 94 135 170 170 135 94 6 5 6 5 Center line Hanger Hanger Installation plate outline Outline of indoor unit Hanger Air filter Air filter Front panel Grille inlet 57 18 Connecting pipe 0 35m Flare 12 70mm Installation plate hanger Installation plate hanger Connecting pipe 0 35m Flare 6 35mm Drain hose 0 4m 19 ...

Страница 20: ...4 2 Outdoor Unit RAS 05 07 10 13E2AVG E C L C L 280 400 Unit mm 280 300 20 ...

Страница 21: ...nt leg Drain outlet FAN GUARD COVER PV Liquid side Flare 6 35 Ø Flare 12 7 Gas side Service port Ø Ø Ø Ø6 hole 86 Ø6 hole Ø11x14 hole R15 28 A 320 R5 5 36 108 125 50 137 92 5 4 90 600 90 275 290 550 Ø 436 Z R15 50 36 2 320 342 69 Unit mm 340 Installation dimension Air inlet 100 or more Air inlet 600 or more Air outlet 600 or more 100 or more 21 ...

Страница 22: ...1 2 CN11 BLK Main P C Board WP 048 CN32 WHI CN28 WHI F01 6 3A 250V CN10 CN36 WHI LM YEL CN62 BLK CN61 WHI 5 11 DC 5V DC 12V DC 15V t 2 1 t 2 1 1 2 3 4 5 6 7 8 9 10 11 1 3 4 5 6 FM 3 MS 2 1 3 4 5 2 1 F02 1A 250V POWER SUPPLY CIRCUIT WHI GRN YEL P04 BLK RED CN31 4 3 2 1 4 3 2 1 CN21 WHI 5 Wireless 4 CN30 Adapter 5 TCJ TA t 2 1 TC YEL CN63 YEL YELLOW BLK BLACK WHI WHITE COLOR RED RED INDICATION GRN Y...

Страница 23: ... F01 6 3A 250V CN10 CN36 WHI LM YEL CN62 BLK CN61 WHI 5 11 DC 5V DC 12V DC 15V t 2 1 t 2 1 1 2 3 4 5 6 7 8 9 10 11 1 3 4 5 6 FM 3 MS 2 1 3 4 5 2 1 F02 1A 250V POWER SUPPLY CIRCUIT WHI GRN YEL P04 BLK RED CN31 4 3 2 1 4 3 2 1 CN21 WHI 5 Wireless 4 CN30 Adapter 5 TCJ TA t 2 1 TC YEL CN63 YEL YELLOW BLK BLACK WHI WHITE COLOR RED RED INDICATION GRN YEL GREEN YELLOW BLK BLK 1 2 3 L N FUSE 76 C THERMAL ...

Страница 24: ...N62 BLK CN61 WHI 5 11 2 1 t 2 1 1 2 3 4 5 6 7 8 9 10 11 1 3 4 5 6 FM 3 MS 2 1 3 4 5 2 1 F02 1A 250V WHI GRN YEL P04 BLK RED CN31 4 3 2 1 4 3 2 1 CN21 WHI 5 Wireless 4 CN30 Adapter 5 TA t 2 1 TC YEL CN63 YEL YELLOW BLK BLACK WHI WHITE COLOR RED RED INDICATION GRN YEL GREEN YELLOW BLK BLK 1 2 3 L N FUSE 76 C THERMAL POWER SUPPLY CIRCUIT Serial Communication Circuit DC 5V DC 12V DC 15V M 24 ...

Страница 25: ...verter attached 10kΩ at 25 C 7 Discharge temp sensor TD sensor Inverter attached 62kΩ at 20 C 8 Outside air temp sensor TO sensor Inverter attached 9 Heat Exchanger temp sensor TE sensor Inverter attached 10kΩ at 25 C 10 Terminal block 5 poles JXO 5B AC 250V 20A Parts name 10kΩ at 25 C No Type name Specifications 1 Fan Motor for indoor 2 Room temp sensor TA sensor 10kΩ at 25 C 3 Heat exchanger tem...

Страница 26: ...length P Pressure measurement Gauge attaching port Vacuum pump connecting port Pulse Modulating valve at liquid side TD 4 way valve Compressor KSK66D15UDZ3 TS T2 Outdoor heat exchanger Temp measurement Propeller fan OUTDOOR UNIT Muffler Muffler Min 2m Chargeless 15m Strainer Max 15m Split capillary TE RAS B05E2KVG E RAS 05E2AVG E RAS B07E2KVG E RAS 07E2AVG E Strainer 05k and 07k Refrigerant amount...

Страница 27: ...gth P Pressure measurement Gauge attaching port Vacuum pump connecting port Pulse Modulating valve at liquid side TD 4 way valve Compressor KSK75D43UEZA TS T2 Outdoor heat exchanger Temp measurement Propeller fan OUTDOOR UNIT Muffler Muffler TE TC TA Min 2m Chargeless 15m TO Strainer Strainer 10k Refrigerant amount 0 49kg RAS B10E2KVG E RAS 10E2AVG E NOTE The maximum pipe length of this air condit...

Страница 28: ...gth P Pressure measurement Gauge attaching port Vacuum pump connecting port Pulse Modulating valve at liquid side TD 4 way valve Compressor KSK75D43UEZA TS T2 Outdoor heat exchanger Temp measurement Propeller fan OUTDOOR UNIT Muffler Muffler TE TC TA Min 2m Chargeless 15m TO Strainer Strainer 13k Refrigerant amount 0 54kg RAS B13E2KVG E RAS 13E2AVG E NOTE The maximum pipe length of this air condit...

Страница 29: ... 7mm Thickness 0 8mm Pulse Modulating valve at liquid side TD 4 way valve Compressor KSN108D22UFZ TS T2 Outdoor heat exchanger Temp measurement Propeller fan OUTDOOR UNIT Muffler Muffler TC TA Max 20m Min 2m Chargeless 15m TO Strainer RAS B16E2KVG E RAS 16E2AVG E RAS 18E2KVG E RAS 18E2AVG E Strainer NOTE The maximum pipe length of this air conditioner is 20 m When the pipe length exceeds 15m the a...

Страница 30: ...p Model name Standard Indoor Outdoor Compressor RAS pressure fan mode fan mode revolution Indoor Outdoor P MPa T1 C T2 C rps 20 7 6 2 2 to 2 3 36 to 37 1 to 2 High High 55 2 3 to 2 4 39 to 40 0 to 1 High High 70 2 3 to 2 4 38 to 40 0 to 1 High High 78 condition C Tempeature Heat exchanger pipe temp B05E2KVG E B07E2KVG E B10E2KVG E B13E2KVG E 1 0 to 1 1 9 to 11 48 to 49 High High 88 B16E2KVG E 1 0 ...

Страница 31: ...dim Serial Signal Communication Functions M C U Indoor Unit Control Panel Power Supply Remote Control Heat Exchanger Sensor Temperature Sensor Infrared Rays Signal Receiver Infrared Rays Initiallizing Circuit Clock Frequency Oscillator Circuit Louver Motor 36 7KHz Power Supply Circuit Noise Filter Indoor Fan Motor Timer Display Operation Display Louver Driver Louver ON OFF Signal Serial Signal Com...

Страница 32: ...ol IPM over current detect control Outdoor fan control High power factor correction control Inverter output frequency control A D converter function P M V control Discharge temp control 4 way valve control Signal communication to indoor unit P M V Pulse Modulating Valve M C U Micro Controller Unit I P M Intelligent Power Module M C U For INDOOR UNIT 4 way valve P M V Inverter DC AC Inverter DC AC ...

Страница 33: ...elease control IPM over current detect control Outdoor fan control High power factor correction control Inverter output frequency control A D converter function P M V control Discharge temp control 4 way valve control Signal communication to indoor unit P M V Pulse Modulating Valve M C U Micro Controller Unit I P M Intelligent Power Module M C U For INDOOR UNIT 4 way valve P M V Inverter DC AC Inv...

Страница 34: ...of operation command signal Serial signal from outdoor unit controller to indoor unit controller The following signals are sent from the outdoor unit controller The current operation mode The current compressor revolution Outdoor temperature Existence of protective circuit operation For transferring of these signals the indoor unit controller monitors the contents of signals and judges existence o...

Страница 35: ...l 16 Self Cleaning function 17 Remote A or B selection 9 3 Auto Restart Function 9 3 2 How to Set the Auto Restart Function 9 3 1 How to Cancel the Auto Restart Function 9 3 3 Power Failure During Timer Operation 9 4 Remote Controller and Its Fuctions 9 4 1 Parts Name of Remote Controller 9 4 2 Operation of remote control 18 Hi POWER Mode 9 4 3 Name and Functions of Indications on Remote Controlle...

Страница 36: ...ntroller ECO ON timer setup OFF timer setup Hi POWER Indoor unit control Command signal generating function of indoor unit operation Calculation function temperature calculation Activation compensation function of indoor fan Cold draft preventive function Timer function Indoor heat exchanger release control Indoor fan motor Louver motor Outdoor unit Outdoor unit control Frequency control of invert...

Страница 37: ...the operation mode the fan speed is controlled by the previous operation mode 4 DRY operation DRY operation is performed according to the difference between room temperature and the setup temperature as shown below In DRY operation fan speed is controlled in order to prevent lowering of the room temperature and to avoid air flow from blowing directly to persons 1 Detects the room temperature Ta wh...

Страница 38: ...Fig 1 Fig 2 Table 1 Indoor fan air flow rate 2 5 Ta C 2 0 1 5 1 0 0 5 Tsc a b c d e M WC 3 4 5 L W7 Air volume AUTO L L M M H W7 L M 2 WA M H 2 WD Indication Fan speed Fan speed setup COOL ON AUTO MANUAL 3 Fan speed M L x 3 4 L 4 Fan speed M L x 2 4 L 5 Fan speed M L x 1 4 L Linear approximation from M and L Fan speed level Cooling Heating Cooling Heating Cool Heat Dry Fan speed Air flow rate Fan ...

Страница 39: ...50 560 WE UH H 1100 540 1070 510 1150 560 1150 560 WD H M UH 1060 510 1020 450 1120 540 1100 540 WC M H 1010 489 900 425 1070 510 990 485 WB M M 900 425 760 333 950 454 840 387 WA M M 760 333 730 312 800 361 800 361 W9 L 730 312 700 292 750 326 750 326 W8 L L L 700 292 600 230 720 310 660 271 W7 L L 600 230 550 200 640 259 630 252 W6 L L 550 200 500 178 560 205 600 230 W5 UL UL L 500 178 500 178 5...

Страница 40: ...b 0 5 c 1 0 d 1 5 e 2 0 f 2 5 g 5 0 5 5 L W9 M WD 1 2 3 H WE H WE Line approximate H and SUL with Tc SUL W2 Stop 46 46 Tc 34 45 45 33 33 33 21 32 32 20 A 4 A 4 A 4 A 4 A 4 A 4 Fan speed MANUAL in starting Fan speed AUTO in stability Fan speed AUTO in starting L L M M H W8 L M 2 WA M H 2 WE Indication Fan speed Fan speed setup HEAT ON AUTO YES NO MANUAL TC 42 C Min air flow rate control Tc 52 51 42...

Страница 41: ...r operates as shown in the table below 1 Outdoor unit operation command Outdoor fan control Air conditioner OFF Alarm display In cooling operation In heating operation MIN MAX MIN MAX MIN MAX MIN MAX MIN MAX MIN MAX f6 fB f8 fE fA fE f7 f8 f9 f5 fA f7 fB f9 fE f9 fB fE f3 f7 f5 f9 f7 fB fE fE fE f2 f5 f4 f7 f6 f9 fE fE fE f1 f3 f3 f5 f4 f7 fE fE fE f1 f2 f2 f4 f3 f5 fE fF fF OFF fB OFF fE f1 fE Co...

Страница 42: ...g on the load is adjusted According to difference between the setup value of tempera ture and the room temperature the capacity is adjusted by the compressor revolution 1 The difference between set temperature on remote controller Ts and room temperature Ta is calculated 2 According to the temperature difference the correction value of Hz signal which determines the compressor speed is set up 3 4 ...

Страница 43: ...nt of the outdoor unit is detected in the inverter section of the outdoor unit 2 According to the detected outdoor temperature the specified value of the current is selected 3 Whether the current value exceeds the specified value or not is judged 4 If the current value exceeds the specified value this function reduces the compressor speed and controls speed up to the closest one commanded from the...

Страница 44: ...he compressor speed is kept Q zone When temperature of the indoor heat exchanger drops in the range from 48 C to under 55 C the compressor speed is kept Q zone 2 When temperature of the indoor heat exchanger rises to 55 C or higher the compressor speed is reduced P zone 3 When temperature of the indoor heat exchanger does not rise to 52 C or when it drops below to 48 C the capacity control operati...

Страница 45: ...ne More than 90 minutes accumulate heating operation time condition TE 2 C b c a d Returning from defrost operation 1 Stop operation of the compressor for approx 40 seconds 2 Invert ON 4 way valve approx 30 seconds after stop of the compressor 3 The outdoor fan starts rotating at the same time when the compressor starts Defrost operation Defrost operation in A to C zones 1 Stop operation of the co...

Страница 46: ... The angle of the louver is indicated as the louver closes fully is 0 1 Louver position in cooling operation mode COOL HEAT and the louver returns to the stored position when the next operation is performed Cooling Heating memory position The louver position can be arbitrarily set up by pressing FIX button Cooling operation AUTO COOL Swing operation is perfor in range 35 with the Fixed position as...

Страница 47: ...ne a to cHz C zone cHz 0 0 5 1 0 1 5 2 0 2 5 3 0 4 0 5 0 6 0 7 0 8 0 9 0 10 0 11 0 Room temp Set temp 3 5 3 0 2 5 1 5 1 0 TSC 1 0 2 0 5 5 1H 2H 11 10 7 6 5 4 3 2 1 OFF Dry Max 12 11 9 8 10 TA 6 0 6 5 3H 4H 5 0 4 5 4 0 2 0 0 5 0 5 12 9 8 Time Zone Frequency FAN Min Hz Fan speed depend on presetting and can change every speed 1 The control target temperature increase 0 5ºC per hour up to 2ºC startin...

Страница 48: ... control 1 Purpose This function detects error on the refrigerating cycle or error on the com pressor and performs protective control 2 Operation Control of the compressor speed The speed control is performed as described in the left table based upon the discharge temperature Td value 117 C 115 C 106 C 103 C 96 C Control operation Judges as an error and stops the compressor Reduce the compressor s...

Страница 49: ... it is in the range of set tempera ture Discharge temp control 4 When defrost operation is performed the open degree of valve is adjusted accord ing to each setup conditions during preparation for defrost and during defrost operation 4 way valve is inversed 5 To turn off the compressor while the air conditioner stops by control of the thermostat or by remote controller adjust the open degree of va...

Страница 50: ...of the operation performed prior to the reception of the stop code 3 After the Self Cleaning operation has been performed for the specified period the unit stops operating Unit now performing cooling or dry operation Press STOP button Only timer indicator lights and Self Cleaning operation starts Time set now elapses Operation stops function During Self Cleaning operations The louver opens slightl...

Страница 51: ...et or Cancel Self Cleaning function by push the RESET button on air conditioner When setting is changed the sound warning will alarm Beep The setting is changed following below 14 1 2 Self Cleaning function release How to set cancel Self Cleaning function To set cancel the Self Cleaning function proceed as follows 1 Setting diagnosis code 06 on remote controlle See detail of setting diagnosis code...

Страница 52: ... the Remote Control by the tip of the pencil 00 will be shown the air conditioner ON shown on the display Picture 4 Press MODE during pushing CHECK B will show on the display and 00 will disappear and the air conditioner will turn OFF The Remote Control B is memorized Picture Note 1 Repeat above step to reset Remote Control to be A 2 Remote Control A has not A display 3 Default setting of Remote C...

Страница 53: ...ion Button on remote controller is pressed Set temperature is performed for 5 C to 13 C and no cold draft prevention control Intended for cold latitudes and performs objective heating operation 8 C heating operation 8 C Normal operation Fireplace 1 Fireplace 2 Silent Operation description Silent Operation Outdoor Unit Press SILENT 1 SILENT 2 None 8 C Compressaor frequncy rps CDU Fan speed rpm Comp...

Страница 54: ...then release the button 2 Press Rise or Decrease to adjust brightness in 4 levels In the examples of and the lamp illuminates for 5 seconds before going off When the Quiet mode selected from QUIET button The fan of the indoor unit will be restricted the revolving speed at speed UL The compressor speed is controlled as shown in the figure The Quiet mode is canceled by QUIET button is pressed to sel...

Страница 55: ...n is pressed again means cancel comfort sleep mode Heating mode The preset temperature will drop down as show on ECO operation Item No 9 Press the COMFORT SLEEP button to choose the operating hours Repeat pressing to setect thehours 1hr 3hr 5hr or 9 hr If the COMFORT SLEEP button is pressed again means cancel comfort sleep mode SLEEP mode 22 Operation mode select table 2 1 Purpose Choosing the ope...

Страница 56: ...ntenance of the unit Short Timer Setting purifier on the remote control without CHK button and hold 00 will show on display them press SET button to make 00 disappear j Press button to turn the unit OFF k Set the operation mode or plasma air sending the signal to the unit l Use the tip of the pencil to push the m Press button to turn the unit ON n When short timer is activated all setting on the r...

Страница 57: ...nds If the unit is required to operate at this time press RESET button once more or use the remote controller to turn it on When the unit is standby Not operating When the unit is in operation OPERATION RESET Button OPERATION RESET Button 9 3 Auto Restart Function This indoor unit is equipped with an automatic restarting function which allows the unit to restart operating with the set operating co...

Страница 58: ... controller to turn it on When the system is on stand by not operating When the system is operating 9 3 3 Power Failure During Timer Operation When the unit is turned off because of power failure during timer operation the timer operation is canceled In that case set the timer operation again NOTE The Daily Timer is reset while a command signal can be received from the remote controller even if it...

Страница 59: ...nitial condition PRESET TIMER and CLOCK will return to initial condition when user shutdown power supply of Air conditioner 9 4 Remote control 9 4 1 Parts Name of Remote Controller SWING FAN FIX QUIET ECO Hi POWER 8 C 1 4 6 5 2 3 7 9 8 1 Infrared signal emitter 2 Start Stop button 3 Mode select button 4 Temperature button 5 Fan speed button 6 Swing louver button 7 Set louver button 8 8 C Heating O...

Страница 60: ...icated or Note Keep the remote control in accessible transmission to the indoor unit otherwise the time lag of up to 15 minutes will occur The setting will be saved for the next same operation HiPOWER Press Start and stop the operation Press Start and stop the operation Setting the ON Timer Setting the OFF Timer Press Set the desired ON timer Press Set the desired OFF timer Press Set the timer Pre...

Страница 61: ... not activate 10 QUIET OPERATION 12 8 C HEATING OPERATION 8 C 1 Press operation button to change to 8 C set temperature heating operation Note 8 C will operate in Heating mode only If Air conditioner performs in cooling operation including automatic cooling or dry operation it will change to heating operating 2 Press to adjust setting temperature from 5 C to 13 C 13 SILENT OPERATION SILENT OPERATI...

Страница 62: ...r display When the remote controller setting is A there is no indication at this position 10 Comfort sleep Indicates when comfort sleep is activaled Press comfort sleep button to selectter 11 Quiet Indicates when quiet is activated Press quiet button to start and press it again to stop operation 12 Swing Indicates when louver is swing Press swing button to start the swing operation and press it ag...

Страница 63: ...emote control holder Vinyl tape Apply after carrying out a drainage test 2 Wireless remote Saddle Extension drain hose Not available provided by installer Shield pipe Attach to the front panel Air filter Hook Installation plate Hook 65 mm or more 300 mm or more 300 mm or more C mm or more F mm or more E mm or more D mm or more C mm or more For the rear left bottom left and left piping Wall Make su...

Страница 64: ...system outdoor unit refer to the installation manual provided with the model concerned Drain outlet Air inlet Air outlet 500 mm 280 mm 300 mm 97 mm 53 mm RAS 05 07 10 13E2AVG E RAS 16 18E2AVG E Drain outlet Air inlet Air outlet 108 mm 125 mm 320 mm 340 mm 28 mm 86 mm 102 mm 600 mm 90 mm Part code Parts name Q ty A Refrigerant piping Liquid side Ø6 35 mm Gas side Ø9 52 mm RAS B05 07 10 13E2KVG E Ø1...

Страница 65: ...P N RB A701FE Note Filter life depends on the level of impurities in your operating environment Higher levels of impurities may require more frequent cleaning and replacement In all cases we recommend an additional set of filters to improve the purifying and deodorizing performance of your air conditioner Not require to use for RAS 05 07 10 13E2AVG E Not require to use for RAS 18E2KVG E Indoor Uni...

Страница 66: ...ort size have been changed to 1 2 UNF 20 threads per inch When purchasing a charge hose be sure to confirm the port size As pressure is high and gasification speed is fast it is difficult to read the indicated value by means of charging cylinder as air bubbles occur The size of opposite sides of flare nuts have been increased Incidentally a common wrench is used for nominal diameters 1 4 and 3 8 B...

Страница 67: ... When drilling a wall that contains a metal lath wire lath or metal plate be sure to use a pipe hole brim ring sold separately Mounting the installation plate Fig 10 3 3 Fig 10 3 2 A place which provides the spaces around the indoor unit as shown in the diagram A place where there are no obstacles near the air inlet and outlet A place which allows easy installation of the piping to the outdoor uni...

Страница 68: ...lar type walls make 5 mm dia holes in the wall Insert clip anchors for appropriate mounting screws Mounting screw 4mm x 25 s s s s s 6 6 For indoor unit 1 2 3 4 5 6 Securely remove two screws at the front panel Type A Open the air inlet grille upward Type B Open two screw caps Slightly open the lower part of the front panel then pull the upper part of the front panel toward you to remove it as sho...

Страница 69: ...nitial condition PRESET TIMER and CLOCK will return to initial condition when user shutdown power supply of air conditioner 10 3 4 Piping and drain hose installation Piping and Drain Hose Forming Since dewing results in a machine trouble make Fig 10 3 6 sure to insulate both the connecting pipes Use polyethylene foam as insulating material 1 Die cutting front panel slit Cut out the slit on the lef...

Страница 70: ... a making off pin cut them with a pair of nippers or an equivalent tool In case of bottom right or bottom left piping After scribing slits inside of the front panel with a knife or a making off pin cut them with a pair of nippers or an equivalent tool Fig 10 3 11 NOTE If the pipe is bent incorrectly the indoor unit may unstably be set on the wall After passing the connecting pipe through the pipe ...

Страница 71: ...ate Pull the indoor unit toward you to confirm that it is firmly hooked up on the installation plate Fig 10 3 13 For detaching the indoor unit from the installation plate pull the indoor unit toward you while pushing its bottom up at the specified parts Fig 10 3 14 Press unhook 1 Hook here Installation plate Hook 1 2 Push Push 10 3 6 Drainage 1 Run the drain hose sloped downwards NOTE Hole should ...

Страница 72: ...d air do not disturb your neighbors A place which is not exposed to a strong wind A place free of a leakage of combustible gases A place which does not block a passage When the outdoor unit is to be installed in an elevated position be sure to secure its feet The allowable length of the connecting pipe 10 4 2 Precautions about installation in Regions with Snowfall and Cold Temperatures Do not use ...

Страница 73: ... diameter and drain off the water For the position where the drain nipple is installed refer to the installation diagram of the indoor and outdoor units Check that the outdoor unit is horizontal and route the drain hose at a downward sloped angle while ensuring that it is connected tautly Base plate Drain nipple Commercially available drain hose Do not use ordinary garden hose but one can f atten ...

Страница 74: ...auge manifold valve 4 Operate the vacuum pump to start evacuating Perform evacuating for about 15 minutes if the piping length is 20 meters 15 minutes for 20 meters assuming a pump capacity of 27 liters per minute Then confirm that the compound pressure gauge reading is 101 kPa 76 cmHg 5 6 Close the low pressure side valve handle of gauge manifold Open fully the valve stem of the packed valves bot...

Страница 75: ...sed indoors the flare part shall be refabricated 7 Don t operate air conditioner in case no refrigerant in the system 1 Turn off the Air Conditioner system 2 Connect the charge hose from the manifold valve to the service port of the packed valve at gas side 3 Turn on the Air Conditioner system in cooling operation more than 10 minutes 4 Check the operating pressure of the system should be normal v...

Страница 76: ...or unit Valve cover Terminals block Cord clamp Terminal cover Screw Screws Air inlet grille Front panel Model RAS B05E2KVG E RAS B07E2KVG E RAS B10E2KVG E RAS B13E2KVG E RAS B16E2KVG E RAS 18E2KVG E Power source 50Hz 220 240V Single phase Maximum running current 5 0A 5 4A 7 2A 7 4A Circuit breaker rating 15A 15A 15A 15A Power supply cable H07RN F or 60245 IEC66 1 25 mm2 or more Connecting cable 9 ...

Страница 77: ... mm 10 mm 10 mm Earth line Earth line Connecting cable Power supply cable Power Supply Input at Indoor Unit Terminal Block Optional Indoor Unit Outdoor Unit Power supply cable connect to L N Terminal block L N 1 2 3 Earth line Power supply cable Power supply cable Stripping length of the power supply cable N L Earth line 50 mm 10 mm 70 mm 10 mm 1 2 3 60 mm 45 mm 10 mm 10 mm Earth line Connecting c...

Страница 78: ...rks so as to allow a general wiring capacity 7 Wrong wiring connection may cause some electrical part burn out 8 Incorrect or incomplete wiring is carried out it will cause an ignition or smoke 9 This product can be connected to main power supply Connection to fixed wiring A switch which disconnects all poles and has a contact separation at least 3mm must be incorporated in the fixed wiring CAUTIO...

Страница 79: ... 2 Prepare the power source for exclusive use with air conditioner 3 Circuit breaker must be used for the power supply line of this air conditioner 4 Be sure to comply power supply and connecting cable for size and wiring method 5 Every wire must be connected firmly 6 Perform wiring works so as to allow a general wiring capacity 7 Wrong wiring connection may cause some electrical part burn out 8 I...

Страница 80: ...of 2 air conditioner are installed near Remote Control B Setup 1 Press RESET button on the indoor unit to turn the air conditioner ON 2 Point the remote control at the indoor unit 3 Push and hold CHECK button on the Remote Control by the tip of the pencil 00 will be shown on the display Picture 1 4 Press MODE during pushing CHECK B will show on the display and 00 will disappear and the air conditi...

Страница 81: ... it OFF if this function is not required How to turn OFF the Auto Restart Function Press and hold the OPERATION button on the indoor unit for 3 seconds 3 beep sounds but OPERATION lamp does not blink How to turn ON the Auto Restart Function Press and hold the OPERATION button on the indoor unit for 3 seconds 3 beep sounds and OPERATION lamp blink 5 time sec for 5 seconds NOTE In case of ON timer o...

Страница 82: ...the electric shock may be caused in case of touching parts on the P C board by hand The new inverter will be incorporated starting with this unit K The control circuitry has an uninsulated construction No 1 2 3 4 5 Troubleshooting Procedure First Confirmation Primary Judgment Judgment by Flashing LED of Indoor Unit Self Diagnosis by Remote Controller Judgment of Trouble by Every Symptom No 6 7 8 9...

Страница 83: ...er At times such as when the circuit board is to be replaced place the circuit board assembly in a vertical position Laying the board flat on an electrically conductive object such as the top panel of the air conditioner s outdoor unit while a charge is still retained by the electrolytic capacitors of the inverter s main circuit may cause short circuiting between the electrolytic capacitors and se...

Страница 84: ...ge the electrolytic capacitor completely by using soldering iron etc Discharging method 1 Remove the inverter cover plating by opening four mounting claws 2 As shown below connect the discharge resistance approx 100Ω40W or plug of the soldering iron to voltage between terminals of the C07 WARNING ELECTRIC SHOCK is indicated electrolytic capacitor 760µF 400V on P C board and then perform dischargin...

Страница 85: ...erated Increasing of compressor motor speed stops approx 30 seconds after operation started and then compressor motor speed increases again approx 30 seconds after In AUTO mode the operation mode is changed In HEAT mode the compressor motor speed does not increase up to the maxi mum speed or decreases before the temperature arrives at the set temperature Description The OPERATION lamp of the indoo...

Страница 86: ...em B and a part of item E occur concurrently priority is given to the block of item B 3 The check codes can be confirmed on the remote controller for servicing OPERATION Flashing display 1 Hz OPERATION TIMER Flashing display 5 Hz OPERATION Flashing display 5 Hz OPERATION TIMER White Flashing display 5 Hz OPERATION Flashing display 5 Hz Protective circuit operation for indoor P C board Protective c...

Страница 87: ...f there is no fault with a code the indoor unit will beep once Beep and the display of the remote controller will change as follows The TIMER indicator of the indoor unit flashes continuously 5 times per 1 sec Check the unit with all 52 check codes to as shown in Table 11 3 1 Press ON or OFF button to change the check code backward If there is a fault the indoor unit will beep for 10 seconds Beep ...

Страница 88: ...In case of the sensor and its connection is normal check the P C board Operation Flashes when continues error is detected 1 Check the sensor TC and connection 2 In case of the sensor and its connection is normal check the P C board TC sensor The heat exchanger temperature sensor of the indoor unit is out of place disconnection short circuit or migration All OFF Flashes when error is detected 1 Che...

Страница 89: ...ard outdoor unit open 4 The outdoor unit abnormal stop at circuit of signal some time Signal circuit of indoor If the other check codes are found P C board or outdoor concurrently check them together P C board is failure Check protector hardware such in some period as Hi Pressure switch Thermal Relay etc Check refrigerant amount or any possibility case which may caused high temperature or high pre...

Страница 90: ... OFF Flashes after Even if trying to operate again all inverter P C board error error is detected operations stop replace inverter 4 times P C board All OFF Flashes after error is detected 4 times 1 Check sensors TE TS connection In case of sensors and it s connection is normal check the inverter P C board 2 Check 4way valve operation position In case TE TS detected temperature relationship are di...

Страница 91: ...rror count comes 4 or 8 times record error to check code But after re starting operation if no error is detected and air conditioner can operate more than 6 minutes error count is cleared The others Return signal of the outdoor Indoor unit Flashes when 1 Check power supply Rate 10 including unit has been sent when operates error is detected 2 If the air conditioner repeat operates compressor opera...

Страница 92: ... after 1 Check sensors TD exceeded 117o C error is detected 2 Check refrigerant amount 4 times 3 Check P M V by measure the resistance of the coil and confirm its operation sound of initial operation etc 4 Observe any possibility cause which may affect high temperature of compressor Compressor is high current All OFF Flashes after 1 Check installation conditions such as though operation Hz is erro...

Страница 93: ...do unit by using diode Measure voltage at terminal block of the indoor unit between No 2 and No 3 or L2 and S If signal is varied 15 60V continuously replace inverter P C board If signal is not varied replace indoor P C board 4 Check and clean heat exchanger area Indoor and Outdoor unit Instantaneous power failure Some protector hardware of the outdoor unit open circuit of signal Signal circuit of...

Страница 94: ... controller Is voltage DC5V 12V and 15V indicated on rear of indoor control board nor mal Does transmission mark on remote controller flash normally and is its signal transmitted properly Item by symptoms Operation Check Item Considerable principle cause Measures Remote controller is defective Refer to 5 Troubleshooting for remote controller Unit operates normally Replace main P C board Replace fa...

Страница 95: ...ck this condition within 15 seconds after starting unit Start to operate the indoor unit in except heating operation At this time is it possible to detect DC 1V or more between 5 and 3 of motor connector CN36 Is it possible to detect DC 311 340V between 1 and 3 of motor connector CN36 Motor connection condition Is it possible to detect DC 15V between 4 and 3 of motor connector CN36 Is it possible ...

Страница 96: ...nge airflow level to HIGH Is it possible to rotate cross flow fan by hand properly Fan motor operates normally Replace bearing of cross flow fan YES YES YES NO NO NO Does check cross flow fan bearing normal condition Replace indoor fan motor Replace main P C board Does check display on remote show high Change the new PC board Does fan speed change Replace remote Replace motor NO NO NO YES YES YES ...

Страница 97: ...ove the cover of the fan motor lead wires 3 Check DC voltage with CN36 connector while the fan motor is rotating NOTE Do not disconnect the connector while the fan motor is rotating Use a thin test rod Indoor fan starts rotating when power supply is turned on Check output DC voltage of fan motor on P C board Measure voltage between 3 GND BLACK and 5 V line YELLOW of motor connector CN36 while indo...

Страница 98: ...g within 5 cm distance from the radio P C board is failure Replace P C board Is operation possible when the transmitter is moved nearer to the infrared signal receiver of the air conditioner Battery life Replace the batteries Dose the transmission indicator light Is there any beep and operation Normal Remote control is failure Replace remote control Push the button YES There is no beep from the in...

Страница 99: ...econds after starting of the operation Be sure to prepare a diode for judgment Normal time Voltage swings between DC15 and 60V Inverter Assembly check 11 7 1 Abnormal time Voltage does not vary 2 Outdoor unit stops in a little while after operation started Check procedure Select phenomena described below 1 The outdoor unit stops 10 to 20 minutes after operation started and 10 minutes or more are r...

Страница 100: ...nd add gas if pressure is low Is connecter of coil connected to inverter Is coil of the pulse motor valve P M V correctly set Existence of condensation at outlet of P M V If there is condensation at outlet 1 4 inch Ø6 35mm valve side the valve is clogged Are temp sensors of indoor outdoor units correctly set to the holder NOTE The temperature sensors which are used to control pulse motor valve inc...

Страница 101: ... Connect discharge resistance approx 100Ω 40W or soldering iron plug between terminals of the electro lytic capacitor 760µF of C07 with printed WARNING ELECTRIC SHOCK on P C board OK if 760µF DC290 to 400V Remove CN31 while pushing the part indicated by an by an arrow because CN31 is a connector with lock Resistance between phases should be approx 33 7Ω Should be 100MΩ or more Replace outdoor fan ...

Страница 102: ...If fuse was blown be sure to check the electrolytic capacitor and diode block DB01 Connect discharge resistance approx 100Ω 40W or soldering iron plug between terminals of the electro lytic capacitor 760µF of C09 C10 with printed WARNING ELECTRIC SHOCK on P C board OK if 760µF DC280 to 380V Remove CN300 whilepushing the part indicated by an by an arrow because CN300 is a connector with lock Resist...

Страница 103: ...8 How to Check Simply the Main Parts 11 8 1 How to Check the P C Board Indoor Unit 1 Operating precautions 1 When removing the front panel or the P C board be sure to shut off the power supply breaker 2 When removing the P C board hold the edge of the P C board and do not apply force to the parts 3 When connecting or disconnecting the connectors on the P C board hold the whole housing Do not pull ...

Страница 104: ...ON TIMER HI POWER ECO Wireless adapter are lit for 3 seconds and they return to normal 3 seconds later 1 Check whether or not the compressor operates 2 Check whether or not the OPERATION indicator flashes 1 Check whether or not the compressor operates 2 Check whether or not the OPERATION indicator flashes Causes Impulse voltage was applied or the indoor fan motor short circuited 1 2 The terminal b...

Страница 105: ...e k Temperature C TA TC TO TS TCJ TE TD 1 Sensor characteristic table 11 8 2 P C Board Layout TD Discharge temp sensor TA Room temp sensor TC TCJ Heat exchanger temp sensor TO Outdoor temp sensor TS Suction temp sensor TE Outdoor heat exchanger temp sensor 5V GND 12V 105 ...

Страница 106: ...stance value WDF 340 A43 1 Red White White Black Black Red 3 4 Way valve coil at 20 C 4 Pulse Modulating Valve PMV coil Model PQ M10012 000313 5 Outside air temp sensor TO Discharge temp sensor TD Suction temp sensor TS Exchanger temp sensor TE 2 18Ω 33 7 1 7Ω Resistance value Position 2 36Ω Position White Red Black Measure the resistance value of each winding by using the tester Red White Black M...

Страница 107: ...the power supply breaker 2 Discharge all three capacitors completely 3 Check that the normal rectification characteristics are shown in continuity test by the tester 11 8 5 Checking Method for Each Part Case that product is good Pointer swings once and returns slowly When performing test once again under another polarity the pointer should return No Part name Checking procedure Diode check 1 2 Tes...

Страница 108: ...f the outdoor fan motor 4 Motor drive circuit failure of the outdoor P C board 3 How to simply judge whether outdoor fan motor is good or bad NOTE However GND circuit error inside of the motor may be accepted in some cases when the above check is performed When the fan motor does not become normal even if P C board is replaced replace the outdoor fan motor If the resistance value between 1 Red lea...

Страница 109: ... cause the flammable objects to catch fire If keeping the power on is absolutely unavoidable while doing a job such as inspecting the cir cuitry wear rubber gloves to avoid contact with the live parts Electric shocks may be received if the live parts are touched High voltage circuits are contained inside this unit Proceed very carefully when conducting checks since directly touching the parts on t...

Страница 110: ...art cover 3 Disconnect the connectors for the fan motor and louver motor from P C board assembly 4 Remove the earth screw and earth line from evaporator 5 Pull out TC and TCJ sensor from sensor holder of the evaporator 6 Remove the 2 fixing screws that secures the electric parts box assembly unit display assembly and remove the electric parts box assembly Earth screw Earth line Washer TC sensor or...

Страница 111: ...edure item 3 and 4 2 Loosen the set screw of the cross flow fan 3 Remove 2 fixing screws of the motor band 4 Pull the motor band and the fan motor outward To re installation Check the type name of fan motor Keep connector position and arrange fan motor wires follow figure 4 5 Fan motor connector Fan motor wire Hexagon screw driver Vertical louver Cross flow fan Motor band Fan motor Screws 3 5 mm C...

Страница 112: ...pe B Can be remove from body back Louver motor connector P C board To re installation Press the drain pan into the back body Please make sure ribs of drain pan in left and right side must be install to lock position Press the center arm of drain pan to back body Electric part cover Screw Connectors Unit display Screw Louver motor connector Type A For 05 07 10 13k Type B For 16 18k Louver motor con...

Страница 113: ...he vertical louver assembly from the body back Type A For 05 07 10 13k Type B For 16 18k Vertical louver Screw Screw Vertical louver 1 Follow the procedure item 3 2 The drain hose can be removed by removing the screw securing the drain hose and then pulling out the drain hose 3 When removing the drain hose be careful of any sharp edges of steel plate The edges can injuries To re installation To in...

Страница 114: ...ype A Remove 2 fixing screws from bearing base after that remove it by hold press and pry out from the main unit Type B Remove 4 fixing screws from bearing base then remove if from the main unit 4 Lift up the heat exchanger follow the figure Pull out the left hand side until the cross flow fan is released from the shaft of the fan motor and then pull out the lower side of heat exchanger follow the...

Страница 115: ...or cover them pull out the upper side of heater exchange Type B Pull out the right hand side until the locking slot of heat exchanger is released from the hook of the motor cover then pull out the upper side of heat exchanger 11 Heat exchanger Screws Pipe holder Heat exchanger Screw Screws Hins seal eva Type A For 05 07 10 13k Type B For 16 18k Pipe holder Heat exchanger Motor cover Screw Heat exc...

Страница 116: ... exchanger Evaporator hins seal Type A please make sure for fixing screw on motor cover locking with heat exchanger Hook Heat exchanger Motor cover In case of evaporator is assembled with evaporator hins seal Locking slot Type B please make sure that the hook of motor cover must be installed into the locking slot of heat exchanger Type A For 05 07 10 13k Type B For 16 18k Heat exchanger Motor cove...

Страница 117: ...urn the power supply off to stop the operation of air conditioner 2 Remove the front panel Remove the 2 fixing screws 3 Remove the electrical part base Remarks Replace terminal block microcomputer ass y and the P C board ass y Microcomputer 117 ...

Страница 118: ...he power cord and connecting cable attach the cord clamp and wiring cover Put the wiring cover into the front cabinet and insert the claw which has been hooked to the lower part into the square hole and then fix it with screw ST2T 4 x 10L 2 pc 3 Attach the valve cover ST2T 4 x 10L 1 pc Insert the upper part to the front cabinet set the hook claw of the valve cover to square holes at three position...

Страница 119: ...ding to trouble type in some cases NOTE This capacitor is one with mass capacity Therefore it is dangerous that a large spark generates if short circuiting between Requirement As each connector has a lock mecha nism avoid to remove the connector by holding the lead wire but by holding the connector The connector is one with lock so remove it while pushing the part indicated by an arrow Be sure to ...

Страница 120: ...nverter and pinch the lead wires using the closed end splice Fan motor Compressor 1 0 0 Fan motor Propeller fan Flange nut Closed end splice 1 Perform work of item 1 of 1 1 of 2 and ƒ 2 Extract refrigerant gas 3 Remove the partition board ST2T 4 x 10L 3 pcs 4 Remove the sound insulation material 5 Remove the terminal cover of the compressor and disconnect the lead wire of the compressor thermo and...

Страница 121: ...aws of the fan guard in the hole of the front cabinet Push the hooking claws 8 positions by your hand and fix the claws Requirement This completes all the attaching work Check that all the hooking claws are fixed to the specified positions Fan guard Minus screwdriver Hooking claw 6 Pulse Modulating Valve coil 7 1 Detachment 2 Attachment 1 Insert the coil at position which perpendicular with pipe o...

Страница 122: ...a disconnect prevention mechanism as such the lock on their housing must be released before they are disconnected 2 Remove the control board assembly from the spacer Remove the heat sink and control board assembly while keeping them screwed together 3 Remove the two fixing screws used to secure the heat sink and control board assembly 4 Mount the new control board assembly NOTE When mounting the n...

Страница 123: ...om entering inside the indoor unit 2 Attach the upper cabinet ST2TØ4 10L 5 pcs 3 Perform cabling of connecting cable and attach the cord clamp Fix the cord clamp by tightening the screws ST2TØ4 x 14L 3 pcs fitting concave parts of the cord clamp to each connecting cables 4 Attach the valve cover ST2TØ4 x 10L 2 pcs Insert the upper part into the square hole of the side cabinet set hook claws of the...

Страница 124: ...he front cabinet is fitted into the side cabinet left at the front left side so pull up the top of the front cabinet to remove it 2 Attachment 1 Insert the claw on the front left side into the side cabinet left 2 Hook the bottom part of the front right side onto the concave section of the bottom plate Insert the claw of the side cabinet right into the square hole in the front cabinet 3 Return the ...

Страница 125: ...ins according to trouble type in some cases 4 Remove screw ST2TØ4 x 10L 4pcs fixing the terminal part of inverter box to the main body 5 Remove the front cabinet by performing step 1 in 2 and remove the fixing screws ST2TØ4 x 10L for securing the main body and inverter box 6 Remove various lead wires from the holder at upper part of the inverter box 7 Pull the inverter box upward 8 Disconnect conn...

Страница 126: ... When mounting the new control board assembly ensure that the P C board is inserted properly into the P C board support groove NOTE P C board base P C board NOTE NOTE 1 Disconnect the leads and connectors connected to the other parts from the control board assembly 1 Leads 3 leads black white orange connected to terminal block Lead connected to compressor Disconnect the connector 3P Lead connected...

Страница 127: ...bottom plate and heat exchanger 6 Fan motor 1 Perform work of item 1 of 1 and 2 2 Remove the flange nut fixing the fan motor and the propeller Flange nut is loosened by turning clockwise To tighten the flange nut turn counterclockwise 3 Remove the propeller fan 4 Disconnect the connector for fan motor from the inverter 5 Remove the fixing screws 4 pcs holding by hands so that the fan motor does no...

Страница 128: ...e compressor from the terminal 6 Remove pipe connected to the compressor with a burner 7 Remove the fixing screw of the bottom plate and heat exchanger ST2TØ4 10L 1 pc 8 Remove the fixing screw of the bottom plate and valve fixing plate ST2TØ4 10L 1 pc 9 Pull upward the refrigeration cycle 8 Reactor 1 Perform work of item 1 of 2 and 3 2 Remove screws fixing the reactors ST2TØ4 10L 2 pcs Compressor Re...

Страница 129: ... Attachment 1 Insert claws of the fan guard in the holes of the front cabinet Push the hooking claws 9 positions by hands and fix the claws All the attaching works have completed Check that all the hooking claws are fixed to the specif ed positions Minus screwdriver Hooking claw BODY PMV COIL PMV Rotate 180 1 Detachment 1 Perform step 1 in 1 all the steps in 2 and 1 in 5 2 Turn the coil by 180 deg...

Страница 130: ... if the sensors have not been installed in their proper positions TS sensor Suction pipe temperature sensor Attachment Install the senser onto the straight pipe part of the suction pipe Be careful for the lead direction of the sensor TD sensor Discharge pipe temperature sensor Attachment With its leads pointed upward install the sensor onto the vertical straight pipe part of the discharge pipe TO ...

Страница 131: ...AIR FILTER BACK BODY ASSY VERTICAL LOUVER ASSY DRAIN PAN ASSY HORIZONTAL LOUVER DRAIN HOSE DRAIN CAP STEPPING MOTOR MOTOR FAN CROSS FLOW FAN ASSY BASE BEARING BEARING ASSY MOLD MOTOR COVER MOTOR BAND BACK ASSY MOTOR BAND FRONT 237 43125202 REFRIGERANT CYCLE ASSEMBLY FOR RAS B05 07E2KVG E REFRIGERANT CYCLE ASSEMBLY FOR RAS B10 13E2KVG E EVAPORATOR HINS SEAL FOR RAS B05 07E2KVG E HOLDER SENSOR PIPE ...

Страница 132: ... REFRIGERANT CYCLE ASSEMBLY FOR RAS B16E2KVG E HOLDER SENSOR PIPE SHIELD INSTALLATION PLATE PIPE HOLDER TERMINAL COVER ASSY WIRELESS REMOCO WH TG01NE HOLDER REMOTE CONTROL PACKING SLEEVE PACKING CUSHION RIGHT PACKING CUSHION LEFT CAP SCREW COVER AXIS 217 43T39369 FRONT PANEL ASSY GRILLE OF AIR INLET ASSY AIR FILTER BACK BODY ASSY VERTICAL LOUVER ASSY ASM DRAIN PAN HORIZONTAL LOUVER DRAIN HOSE DRAI...

Страница 133: ...08 43T50603 PC BOARD WP 048 FOR RAS B13E2KVG E PC BOARD WP 048 FOR RAS B16E2KVG E PC BOARD WP 048 FOR RAS 18E2KVG E HOUSING WiFi TEMPERATURE SENSOR FOR RAS B05 07 10 13 16E2KVG E 406 43TN9504 TEMPERATURE SENSOR TERMINAL 5P TF SENSOR THERMOSTAT CORD CLAMP PC BOARD ASSY WRS LED PC BOARD WP 048 FOR RAS B05E2KVG E PC BOARD WP 048 FOR RAS B07E2KVG E PC BOARD WP 048 FOR RAS B10E2KVG E Description Descri...

Страница 134: ... 43T91301 35 43T41533 80 43T04458 82 43T04459 BONNET 6 35 DIA BONNET 9 52 DIA VALVE PACKED 6 35 DIA VALVE PACKED 9 52 DIA BODY PMV COIL PMV 4 WAY VALVE 4 WAY VALVE COIL MOTOR FAN LEAD ASSY COMPRESSOR NUT CUSHION RUBBER NUT FLANGE CARTON BOX ASM FBBRD UD CUSHION PKG UPR PE SHEET SOUND INSULATION INSIDE SOUND INSULATION OUTSIDE 35 43T41557 BASE PLATE ASSEMBLY UPPER CABINET ASSEMBLY FRONT CABINET ASS...

Страница 135: ... UPPER CABINET ASSEMBLY FRONT CABINET ASSEMBLY FIXING PLATE VALVE MOTOR BASE CONNECTION PLATE PARTITION ASSEMBLY TERMINAL COVER ASSEMBLY MOTOR BASE FAN GUARD PROPELLER FAN DRAIN NIPPLE PACKED VALVE COVER HOLDER SENSOR CONDENSER ASSEMBLY COMPRESSOR BONNET 6 35 DIA BONNET 9 52 DIA 82 43T04459 VALVE PACKED 6 35 DIA VALVE PACKED 9 52 DIA BODY PMV COIL PMV 4 WAY VALVE 4 WAY VALVE COIL MOTOR FAN LEAD AS...

Страница 136: ...84 43T04416 VALVE PACKED 12 7 DIA BODY PMV COIL PMV 4 WAY VALVE 4 WAY VALVE COIL REACTOR MOTOR FAN LEAD ASSY COMPRESSOR NUT CUSHION RUBBER NUT FLANGE CARTON BOX FIBERBOARD UNDER ASSEMBLY CUSHION PKG UPR PE SHEET INSULATION SOUND INSIDE SOUND INSULATION OS SOUND INSULATION UP 40 43T46540 BASE PLATE ASSEMBLY LEFT CABINET RIGHT CABINET ASSEMBLY UPPER CABINET ASSEMBLY FRONT CABINET ASSEMBLY FIXING PLA...

Страница 137: ...0 43T04397 37 43T47405 BASE PLATE ASSEMBLY LEFT CABINET RIGHT CABINET ASSEMBLY UPPER CABINET ASSEMBLY FRONT CABINET ASSEMBLY FIXING PLATE VALVE MOTOR BASE CONNECTION PLATE GUIDE WIND PARTITION ASSEMBLY MOTOR BASE FAN GUARD PROPELLER FAN DRAIN NIPPLE PACKED VALVE COVER ASSEMBLY HOLDER SENSOR CONDENSER ASSEMBLY COMPRESSOR BONNET 6 35 DIA BONNET 12 7 DIA 82 43T04484 VALVE PACKED 6 35 DIA VALVE PACKED...

Страница 138: ...14 709 43T95304 FUSE TC SENSOR TEMPERATURE SENSOR TEMPERATURE SENSOR TC SENSOR TO SPACER KGES 710 43T63318 702 43TN9515 711 43T63316 712 43T63317 703 43T60392 HEATSINK PC BOARD WP 043 FOR RAS 05E2AVG E PC BOARD WP 043 FOR RAS 07E2AVG E PC BOARD WP 043 FOR RAS 10E2AVG E PC BOARD WP 043 FOR RAS 13E2AVG E TERMINAL 5P 713 43T62401 HOLDER SENSOR HOLDER SENSOR HOLDER SENSOR TUBE Description Description ...

Страница 139: ...703 43T60392 710 43T63318 704 43T60326 711 43T63316 705 43T50412 712 43T63317 706 43T50334 713 43T62401 TC SENSOR TO PC PLATE BASE HOLDER SENSOR HOLDER SENSOR HOLDER SENSOR TUBE 707 43T50352 HEATSINK PC BOARD WP 044 TERMINAL 5P FUSE TC SENSOR TEMPERATURE SENSOR TEMPERATURE SENSOR Description Description 139 ...

Страница 140: ...703 43T60392 710 43T63318 704 43T60326 711 43T63316 705 43T50412 712 43T63317 706 43T50334 713 43T62401 TC SENSOR TO PC PLATE BASE HOLDER SENSOR HOLDER SENSOR HOLDER SENSOR TUBE 707 43T50352 HEATSINK PC BOARD WP 044 TERMINAL 5P FUSE TC SENSOR TEMPERATURE SENSOR TEMPERATURE SENSOR Description Description 140 ...

Страница 141: ...144 9 MOO 5 BANGKADI INDUSTRIAL PARK TIVANON ROAD TAMBOL BANGKADI AMPHUR MUANG PATHUMTHANI 12000 THAILAND ...

Отзывы: