– 10 –
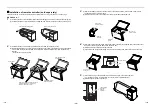
Installation of remote controller (sold separately)
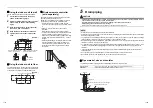
Install the wired remote controller sold separately as follows when mounting it on the main unit and using it.
RBC-ASCU11-
1
(1) Unfasten the two screws fastened inside the air discharge port and remove the port by pushing it up.
(2) Unfasten the three screws illustrated in the diagram and remove the operation box by pushing it up.
2
(1) Unfasten the two screws fixing the Switch Cover mounted on the operation box.
(2) Remove the Switch Cover to turn it 180° and align the square hole in the Switch Cover with the square
hole in the Mounting Bracket of Remote Controller to install the Switch cover onto the Mounting
Bracket.
* Do not fix the screws in this step.
Remove the air discharge port.
Remove the operation box.
Switch Cover
Screws
Align the square hole in the Switch Cover
with the square hole in the Mounting
Bracket of Remote Controller.
Mounting Bracket of
Remote Controller
After installation of the
Switch Cover
3
(1) Insert a flat-blade screwdriver or other tool into the slit (two places) in the bottom of the remote
controller and remove the rear case.
(2) Install the rear case onto the switch cover using two screws unfastened in
2
.
4
(1) Insert the remote controller wiring to the square hole in the rear case and the hole in the switch cover,
and pull out the wiring to the back of the operation box.
(2) Install the remote controller onto the rear case.
(3) Connect the remote controller wiring to wiring procured locally with pressure terminal connectors.
5
(1) Connect the wiring connected in
4
(3) to Terminals A and B in the electric part box.
* For the details, refer to the "7 Electrical connection" in this Installation Manual.
(2) Install the operation box onto the unit.
Rear case of
remote controller
Rear case of
remote controller
Fasten two
screws
Remote
controller
Pull out the wire
to the back
Bushing (Black)
Cover
A B
U
1
U
2
Terminal Board
for wiring of
Remote
Controller
19-EN
20-EN
Содержание MML-UP0071H-E
Страница 30: ...EB99841101 ...

