background image

8

Installation/Set up

Vie

wing • Listening

and Operation

Recor

ding

Setting up

Other

s

Installing a Lens/Connecting to a Video Monitor

Installing a Lens

You can install a CS mount lens on the camera.

Important

When using a lens that weighs 400g or more including a zoom lens, make sure the lens
is supported as well as the camera in order not to cause damage due to overloading.

Connecting to a Video Monitor

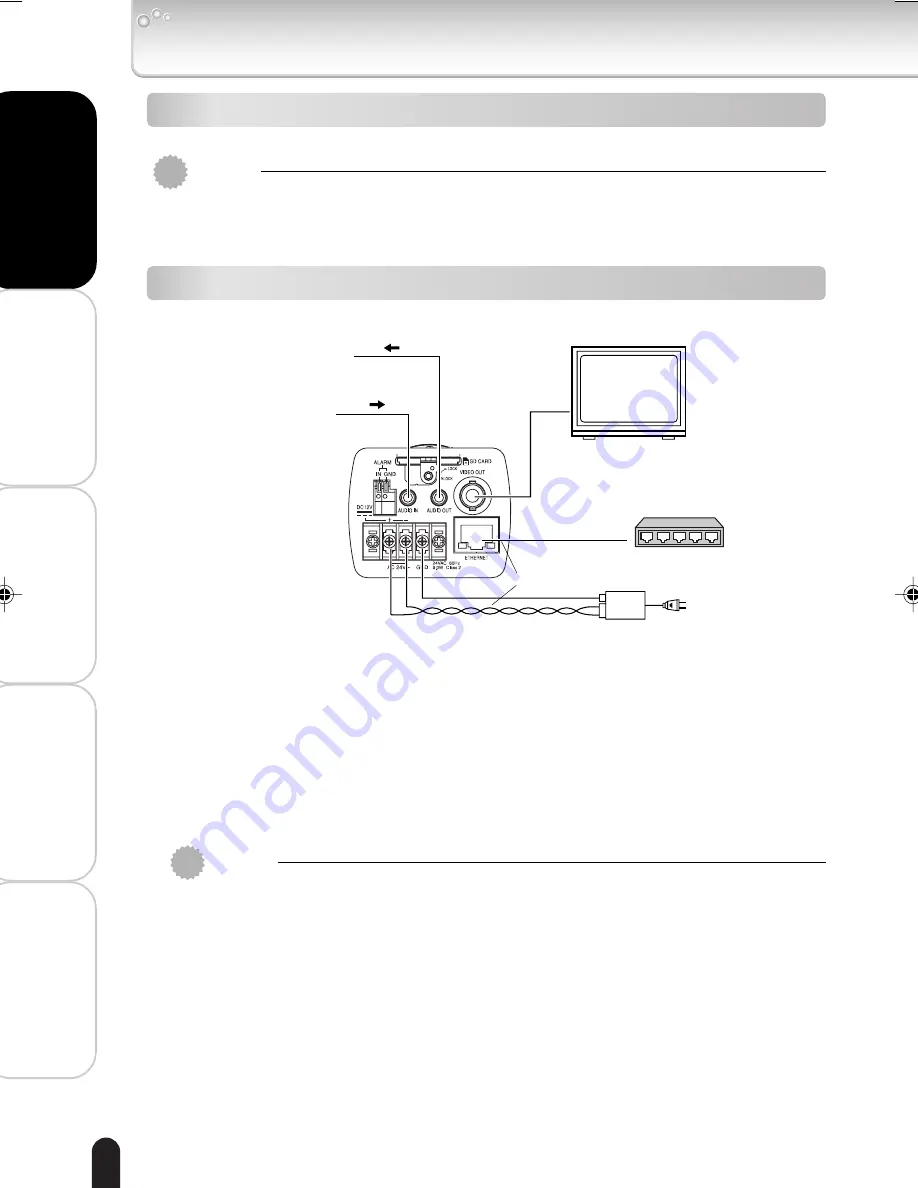
You can view camera images on the video monitor. The camera also supports audio.

Important

Power plugs of connected equipment must be disconnected before installation.

A 75-ohm coaxial cable (3C-2V or 5C-2V) is required for standard connection.

For details of wiring and operation of equipment to be connected, refer to their
operation manuals.

Lenses, coaxial cables for video signals, LAN cable and the power cord are not
supplied with the camera.

Do not connect AC24V and DC12V at the same time. It may cause a malfunction of
the camera or AC adapter.

Use a 4 pair twisted cable for the LAN cable to connect the camera to a PoE
compatible hub.

Use IEEE802.3af-compliant PoE devices.

An AC adapter is not supplied with the network camera. When using an AC adapter,
a 10 watt or greater AC adapter is required.

The camera takes about 30 seconds to start after the power is turned on.

Rear

AC24V
or DC12V

Video Monitor

7


On the power supply, use a PoE compatible hub, or connect
AC24V or DC12V power plug.

7


If power is to be supplied from a PoE compatible hub, etc., switch the  
POWER SELECT switch to PoE. 

7


If an AC24V or DC12V power supply is to be connected, switch the 
POWER SELECT switch to AC24V/DC12V.

Connect a microphone 
to input the audio.

Connect an audio output 
device to output the audio.

PoE (IEEE802.3af) 
compatible hub, etc.

LAN cable

Either 

About Audio Input/Output

Use a microphone with plug-in power operation and a 3.5 mm monaural mini jack for
the AUDIO IN. Use a speaker with a built-in amplifier and a 3.5 mm monaural mini
jack for the AUDIO OUT.

IK-WB02-07-24

2004.10.22, 15:35

8

Содержание IK-WB02A - PoE Network Camera

Страница 1: ...am toshiba com The above URL is subject to change without prior notice If the URL changes refer to the Toshiba website http www cctv toshiba com The Operations Manual for this product is included on the supplied mini CD ROM These Safety Precautions appy to firmware version R 1 01 and later Model A lens is not supplied with the network camera WB02 03 ...

Страница 2: ...twork Video Products 9740 Irvine Boulevard Irvine California 92618 1697 877 696 3822 This equipment has been tested and found to comply with the limits for a Class B digital device pursuant to part 15 of the FCC Rules These limits are designed to provide reasonable protection against harmful interference in a residential installation This equipment generates uses and can radiate radio frequency en...

Страница 3: ...he equipment and receiver Connect the equipment into an outlet on a circuit different from that to which the receiver is connected Consult the dealer or an experienced radio TV technician for help Warning Changes or modifications made to this equipment not expressly approved by Toshiba or parties authorized by Toshiba could void the user s authority to operate the equipment Canadian Information In...

Страница 4: ...marks The term OS is used in the Operations Manual to indicate operating systems compatible with this product Windows 2000 Microsoft Windows 2000 operating system Windows XP Microsoft Windows XP operating system The formal name of Windows is Microsoft Windows Operating System Microsoft and Windows are trademarks or registered trademarks of Microsoft Corporation in the United States and other count...

Страница 5: ...Operations Manual and the software Camera Finder Safety Precautions and Quick Start Guide this document x1 The Quick Guide is at the back of the Safety Precautions WARRANTY x1 IK WB02 IRIS connector x1 EMI core About the POWER SELECT Switch x1 x3 For details on how to use the EMI core refer to How to use EMI core on the mini CD ROM ...

Страница 6: ...for Use 12 Camera Installation Guide 15 Table of Contents For details on settings operations etc refer to the Operations Manual PDF file included on the mini CD ROM Acrobat Reader is required to view the PDF file If you do not have Acrobat Reader download it from the Web site of Adobe Systems Incorporated ...

Страница 7: ...ttachments not recommended by the video product manufacturer as they may cause hazards 7 Water and Moisture Do not use this video product near water for example near a bath tub wash bowl kitchen sink or laundry tub in a wet basement or near a swimming pool and the like 8 Accessories Do not place this video product on an unstable cart stand tripod bracket or table The video product may fall causing...

Страница 8: ...inched by items placed upon or against them paying particular attention to cords at plugs screws and the point where they exit from the product 12 Lightning For added protection for this video product during a lightning storm or when it is left unattended and unused for long periods of time unplug it from the wall outlet and disconnect the power supply and cable system This will prevent damage to ...

Страница 9: ...ontrols that are covered by the instruction manual as an improper adjustment of other controls may result in damage and will often require extensive work by a qualified technician to restore the video product to its normal operation e If the video product has been dropped or the cabinet has been damaged f When the video product exhibits a distinct change in performance this indicates a need for se...

Страница 10: ...c shock to persons The exclamation point within an equilateral triangle is intended to alert the user to the presence of important operating and maintenance servicing instructions in the literature accompanying the appliance WARNING TO REDUCE THE RISK OF FIRE OR ELECTRIC SHOCK DO NOT EXPOSE THIS APPLIANCE TO RAIN OR MOISTURE CAUTION CONNECT 24V AC UL LISTED CLASS 2 POWER SUPPLY FIELD INSTALLATION ...

Страница 11: ...era can be kept dry If the camera gets wet turn off the power and contact your dealer Install the camera Where no video noise appears If cables are wired near electric lighting wires or a TV set noise may appear in images In this event relocate cables or reinstall equipment Check the ambient temperature and humidity Avoid using the camera where the temperature is hotter or colder than specified Ot...

Страница 12: ... or read correctly if an unsupported SD memory card is used with the camera Carefully read the User s guide precautions on use and any other information supplied with a purchased memory card An SD memory card can be used for the loop recording of images The life span number of rewrites possible of an SD memory card is greatly affected by the capacity of the SD memory card The use of a 128MB 256MB ...

Страница 13: ...the camera do not comply with the image file format Exif and the DCF standard If the SD memory card is to be removed to play images use a personal computer to play the images Other devices may not be capable of displaying the images About the AC Adapter An AC adapter is not supplied with this model If you want to use an AC adapter you will need to provide an adapter with DC12V output or AC24V outp...

Страница 14: ...l Copyright Convention and other intellectual property laws and agreements The permission of TOPCO or the licensor must therefore be obtained before the software can be reproduced Note however that the software is partly covered under the GNU General Public License Version 2 hereafter GPL2 You can obtain a copy of GPL2 at http www fsf org copyleft gpl html TOPCO will provide the GPL covered source...

Страница 15: ...15 1 4 20UNC 112 15 Wall 9 5mm 4 6 80 The Installation Guide is for reference only Mounting bracket is not included EIM 0010325 4 26 2000 Camera Installation Guide Installation Example ...

Страница 16: ...TOSHIBA AMERICA INFORMATION SYSTEMS INC Security Network Video Products 9740 Irvine Boulevard Irvine California 92618 1697 Phone Number 877 696 3822 ...

Страница 17: ...ubject to change without prior notice If the URL changes refer to the Toshiba website http www cctv toshiba com This User s Guide applies to the firmware version R1 01 and later NETWORK CAMERA Model IK WB02A Operation Manual To get started read the separate Safety Precautions carefully A lens is not supplied with the network camera WB02 02 ...

Страница 18: ...omputer by Network 13 About the IP Address 13 Structure of Connection 14 Connecting 15 Using the Camera Search Application Camera Finder 16 Changing Administrator Login ID and Password 18 Setting up Access Restriction 20 Configuring the Network Manually 22 Viewing Listening and Operation Viewing and Listening 26 Viewing Images 26 Audio Listening 26 Camera Window Screen 27 Menu that is displayed wh...

Страница 19: ...ing the default settings 58 Rebooting the network camera 58 Updating the Firmware 59 Click Firmware update 59 Importing the Settings Saved on a Personal Computer 59 User Settings 60 Admin Settings 62 Alarm Settings 64 Network Settings 66 Mail Settings 68 FTP Client Settings 70 FTP Server Settings 71 DDNS Settings 72 Recording Settings 73 Audio Settings 74 Updating the Firmware 75 Saving the Settin...

Страница 20: ...4 Installation Set up Viewing Listening and Operation Recording Setting up Others Important Safety Instructions Be sure to read IMPORTANT SAFEGUARDS in the separate Safety Precautions ...

Страница 21: ...m device with the terminal Audio Out Jack Connect an audio output device such as a speaker with a built in amplifier to the audio output jack Audio In Jack Connect a microphone to the audio input jack AC24V DC12V Power Plug Terminal Connect an AC24V or DC12V power plug to the terminal Front Top Rear FOCUS LOCK Focus ring Adjust the back focus of a lens Focus Lock Screw After adjusting the back foc...

Страница 22: ... Use a 7 mm or less tripod screw POWER SELECT switch Select the type of power source input POWER SELECT AC24V DC12V PoE IRIS LEVEL Control iris level for DC type auto iris lens IRIS switch Change switch settings depending on the type of auto iris lens DC EE Select AES for a fixed iris lens BLC switch V PHASE CONTROLLER LL switch IRIS Jack 4P Connect an auto iris lens to the jack Right Left Bottom ...

Страница 23: ...Control Adjusting a Lens Setting Up the Network Camera Environment Connecting the Camera and Personal Computer by Network Using the Camera Search Application Camera Finder Changing Administrator Login ID and Password Setting up Access Restriction Configuring the Network Manually ...

Страница 24: ...12V at the same time It may cause a malfunction of the camera or AC adapter Use a 4 pair twisted cable for the LAN cable to connect the camera to a PoE compatible hub Use IEEE802 3af compliant PoE devices An AC adapter is not supplied with the network camera When using an AC adapter a 10 watt or greater AC adapter is required The camera takes about 30 seconds to start after the power is turned on ...

Страница 25: ...CAMERA2 If two or more cameras within a system have different AC line phases are switched by the video switcher the picture on the monitor TV will fluctuate vertically Connect 24V AC input line of all cameras so that they all share the same phase If you still have vertical fluctuation adjust the V PHASE controller NOTE The camera is synchronized to the power frequency of 60 1 Hz covering a normal ...

Страница 26: ...us lock screw Adjusting the Iris Auto Iris Lens The camera is designed for two types of lens iris lenses without EE Amp DC and with built in EE amp EE VIDEO 1 Connect the iris connector of the auto iris lens to the iris jack 4P on the left side of the camera 2 Set the iris switch on the right side of the camera Default DC For a DC lens adjust the iris level on the right side of the camera to ensur...

Страница 27: ...c shutter mode becomes active 1 60s 1 10 000s for the fixed iris lens according to the light amount on the subject to control the exposure When the iris switch is set to VIDEO or DC the value of shutter comes to 1 60s Back Light Compensation By turning on the back light compensation switch the camera controls the back light automatically to ensure proper exposure in the specified area when using a...

Страница 28: ...personal computer Multiple user s personal computers can monitor images from a single network camera System recommended requirements Windows 2000 XP Internet Explorer Ver 6 0 or later CPU Intel Pentium III 500 MHz or greater Memory at least 256 MB Network camera this product Purchase the required and appropriate number of cameras for the installation location Appropriate connection devices hub rou...

Страница 29: ...P server If your network is using DHCP server keep the setting as Automatically by DHCP Entering an IP Address Manually Enter an IP address manually if you are not using or do not want to use the DHCP server If you use the DHCP server the IP address of the network camera may be modified when necessary Therefore the previous IP address may no longer be valid not allowing you to access to the camera...

Страница 30: ...a hub In the case of not using DHCP server the IP address for the camera is automatically set to 192 168 0 30 in default Therefore set the IP address for your computer to for example set to 192 168 0 50 When directly connecting with a crossover cable or connecting with a hub it should be run in the same network segment When using multiple cameras connect the first camera at IP address 192 168 0 30...

Страница 31: ...computer Start a command prompt and then run ping 192 168 0 30 If the Reply from message appears the connection is correctly established Search for the network camera with the Camera Finder page 16 and then view camera images a Start Camera Finder and click the Search button Confirm that the camera name nwcam02 and the IP address 192 168 0 30 are displayed in the camera list b Click camera name nw...

Страница 32: ...uctions on the screen to install Camera Finder Important The Camera Finder is only supported by Windows 2000 and Windows XP Do not install the application in other operating systems as it may cause damage on your personal computer Using Camera Finder to Search for a Camera From the Start menu point to Programs and TOSHIBA Network Camera and then select Camera Finder Start up Camera Finder and clic...

Страница 33: ...nd then the Camera Window screen appears To close the window without logging in Click Exit button to close Camera Finder Important Toshiba is not responsible for any damages caused by this software The Administrator button in the Camera Finder is invalid for the IK WB02A When connecting to the IK WB02A be sure to click the User button When you log in as Administrator set up access restrictions pag...

Страница 34: ...hrough the Administrator Login To have higher security be sure to change your login ID and the password and don t forget new login ID and password The default login ID is root and the default password is ikwb Click Configuration on the left side of the Camera Window screen The Configuration menu is displayed on the left side of the screen Click Admin on the left side of the screen The Admin Settin...

Страница 35: ... New login ID field and a new password in the New Password field and New Password Confirm field Enter the same password in the New Password field and the New Password Confirm field Click the Change button New login ID and password are stored in the network camera Click the browser The current login operation terminates Afterwards follow the procedures to set up access restrictions page 20 ...

Страница 36: ...er ID and password Click Configuration on the left side of the Camera Window screen The Configuration menu is displayed on the left side of the screen Click User on the left side of the screen The User Setting menu is displayed on the right side of the screen Enter the user name and the password for a new user in the field of User ID and Password respectively in Add a user or change password Enter...

Страница 37: ...ization required section Click the Set button A screen appears asking you to enter a user name and password Enter the Administrator login ID and password in the field of user name and password respectively Click the OK button Close the browser When accessing to the camera next time you are required to enter the user ID and password To log in as User both the user ID and the password are already re...

Страница 38: ...ually Enter an IP address manually if you are not using or do not want to use the DHCP server Log in as Administrator Click Configuration on the left side of the Camera Window screen The Configuration menu is displayed on the left side of the screen Click Network on the left side of the screen The Network Connection setting menu appears on the right side of the screen ...

Страница 39: ...way DNS1 and DNS2 Important If you do not know the subnet mask consult the provider or network system administration support center You do not need to enter the default gateway if the network camera will not be accessed from another network If you do need to enter a default gateway consult the network system administration support center Click the Save button The settings are registered ...

Страница 40: ...24 Installation Set up Viewing Listening and Operation Recording Setting up Others ...

Страница 41: ...Viewing Listening andOperation Viewing and Listening Using Playback Function Playing Alarm Images Playing Recorded Normal Images Viewing Logs Speaking ...

Страница 42: ...to the camera The browser starts up and then the Camera Window screen appears for the network camera To learn about how to log into the network camera with the Camera Finder refer to Using the Camera Search Application Camera Finder page 16 Image on the camera Close the browser to log off disconnect the camera Audio Listening You can output the sound of microphone that is connected to the audio in...

Страница 43: ...on menu page 56 To delete images page 30 Camera s IP address and Add button page 30 Image on the camera Name of camera page 57 Current date and time of camera page 58 To start the camera audio output page 35 To stop the camera audio output page 35 To configure the audio input of the camera page 74 Cannot be operated through the User login Menu that is displayed when right clicking on the image To ...

Страница 44: ...ivered images Selectable settings Level 1 to Level 5 default Level 2 Images has the highest quality in Level 5 When the image size is the same if the image quality is set to high the file size is increased Resolution You can set up the resolution for recorded delivered images Selectable settings 160x120 320x240 640x480 default 320x240 Advanced The following 4 items can be controlled individually B...

Страница 45: ...rea BLC You can set up the target area for back light compensation page 11 Selectable settings 1 to 5 default 1 AE Level The camera adjusts the brightness of the image automatically Adjust the setting to give you the best image for your environment Selectable settings 20 to 20 default 0 The higher the value is the brighter the image looks Fixed image data size If this setting is set to On the came...

Страница 46: ...can add and view images on the other camera Enter the IP address of other camera in the Watching field Click Add An image on the other camera is added on the Camera Window screen Up to 9 images can be displayed on the Camera Window screen To delete the image you added select the image you want to delete Click Delete a Camera 1 2 ...

Страница 47: ...e playback function mode starts and the playback operating buttons the alarm list and the normal list is displayed To play back images of the alarm list or the normal list go to page 32 and page 33 To cancel the playback function mode click the Live playback operating button The playback function mode is switched to the current image mode again About the Playback Operating Buttons Playback operati...

Страница 48: ...lect Date Hour Min or Sec from the pull down menu on the right side of the alarm list Select an alarm list you want to play by pressing the Prev and Next buttons on the right side of the alarm list You can search for the list by date hour minute and second when the Date the Hour the Min and the Sec are selected respectively on Step 2 Click the button on the right side of the alarm list 2 4 Alarm l...

Страница 49: ...mode page 31 Select Date Hour or Min from the pull down menu on the right side of the alarm list Select an normal list you want to play by pressing the Prev and Next buttons on the right side of the normal list You can search for the list by date hour and minute when the Date the Hour and the Min are selected respectively on Step 2 Click the button on the right side of the normal list 2 4 Normal l...

Страница 50: ...nistrator When you log in as User the operation is disabled Click View log on the left side of the Camera Window screen A list screen of logs is displayed For details on displayed logs refer to Display of Logs page 86 NOTE Clicking the Clear button deletes the log data To return to the image screen click Camera Window on the left side of the screen Viewing Logs ...

Страница 51: ...uter is heard from the speaker connected to the camera To cancel the audio output mode click the Audio Out stop button 2 1 NOTE Connect an audio output device such as a speaker with a built in amplifier with the audio out jack of the camera No audio can be output when connecting a speaker without a built in amplifier For a microphone connected to a personal computer refer to the operating instruct...

Страница 52: ...36 Installation Set up Viewing Listening and Operation Recording Setting up Others ...

Страница 53: ...Recording About Recording Images Recording Images on an SD Memory Card Recording Images on FTP Server Recording Images on a Personal Computer ...

Страница 54: ...ecording images configured in Alarm Recording settings page 40 Image data at the time of external alarm detection motion detection Normal Recording images configured in Normal settings page 40 Data of Periodic FTP by Schedule Data of Extern Alarm Detection or Motion Detection Recording data by EXT control Image data recorded by Image Recording JPEG page 51 Video data recorded by Image Recording AV...

Страница 55: ...ngs Insert an SD memory card Insert an SD memory card into the SD card slot page 5 Turn the knob to the LOCK direction until it locks When clicking Complete Format or Quick Format in the Admin Settings for formatting you can delete files in an SD memory card page 63 Click Configuration on the left side of the Camera Window screen The Configuration menu appears on the left side of the screen When y...

Страница 56: ...rding Normal ON To record images depending on the recording intervals and timer association OFF Not to operate normal recording Interval s Configure recording cycle of Normal Recording images Timer Association ON To turn on the timer association OFF To turn off the timer association When Timer Association is set to ON configure the start stop time for recording Overwrite ON To overwrite data in th...

Страница 57: ...cording Data by Schedule Recording Data by External Alarm Detection or Recording Data by EXT Control Record Settings Click Configuration on the left side of the Camera Window screen The Configuration menu appears on the left side of the screen When you do not log in as Administrator the Configuration menu does not appear Perform the operation through the Administrator login Click FTP client on the...

Страница 58: ...th user ID above Port Number Usually enter 21 Important Do not change the port number unless your provider or the network administrator instructs you to do so MODE PORT active mode Select PORT if you are unsure about which mode to choose PASV passive mode When the camera s network environment is protected by Firewall or the like access from outside FTP server may not be possible with PORT active m...

Страница 59: ...here is more than one alarm at a time receiving another alarm s while transferring a file the camera logs out from the server after transferring last image data Connect to FTP Enable Select one of the following recordable images on an FTP server Periodic periodic recording by schedule page 44 Extern Alarm Detection recording by an external alarm detection page 46 Motion Detection recording by moti...

Страница 60: ...er Pattern 1 Records images in a period you configured in Timer Pattern 1 Timer Pattern 2 Records images in a period you configured in Timer Pattern 2 2 Configure timer pattern You may configure both Timer Pattern 1 and Timer Pattern 2 and use them according to your need Possible setting timer range is between 00 am and 11 pm for both Start and Stop 3 Configure Interval s Records 1 image per confi...

Страница 61: ...nuary 1 2004 04 01 01 Keyword yymmdd HHMMSS 00 LV Keyword yyyymmdd HHMMSS N Indicates this is the Periodic FTP by Schedule file Enter user defined keyword in characters Indicates date Year Month Day e g January 1 2004 2004 01 01 Indicates time Hour Minute Second e g 23 59 00 23 59 00 Time is displayed in 24 hour time display If the camera records more than one image at the same period the order is...

Страница 62: ...tion to FTP Enable page 43 1 Configure the numbers of frames you want to record for Pre Recording Possible numbers of frames are as follows Enter a number in the range of 0 through 30 2 Configure the numbers of frames you want to record for Post Recording Enter the number between 0 and 1000 NOTE Numbers of recorded image frame may decrease depending on networking conditions and recording cycle 3 C...

Страница 63: ...04 01 01 Indicates time Hour Minute Second e g 23 59 00 23 59 00 Time is displayed in 24 hour time display If the camera records more than one image at the same period the order is indicated with 3 digit number The bigger the number the newer latest the image Indicates Daylight Saving N Not in Daylight Time D Daylight Summer Time Indicates total number of generated alarm s when the number reaches ...

Страница 64: ...and the keyword 2 field respectively File name will be shown like this e g Pattern1 keyword1 yy mm dd HH MM SS keyword2 JPG Pattern2 keyword1 yyyy mm dd HH MM SS keyword2 JPG NOTE You cannot use these characters Followings are the meaning of each part keyword1 yymmdd yyyymmdd HHMMSS keyword2 Enter user defined keyword in characters Indicates date Year Month Day e g January 1 2004 04 01 01 Indicate...

Страница 65: ...ore setting Interval s 4 Set up Re transfer Trigger You can select the timing to re transfer accumulated images to the FTP server When Network Recovers When the line is restored When EXT Control is opened When the contact of EXT Control is opened 5 Configure Re transfer Interval Configure the interval unit second for re transferring accumulated images Enter a number to configure the interval 6 Con...

Страница 66: ...sfer are still left by the time transferring schedule comes to end the camera will keep continue to transfer the files until it transfers all the files NOTE Depending on the conditions of networking and the FTP server there may be occasions when files will not transfer In this case this camera is able to make backup data on the SD memory card Go to the Network Setting screen and set Image Accumula...

Страница 67: ...amera Window screen The operating menu appears on the screen Click Image Recording The image recording setting screen appears Setting up Recording When saving images as a JPEG file Specify the recording limit Mark one of the items and enter the value in its field Enter the saving interval Click the Save As button Select the destination directory Enter the file name without the extension Mark here ...

Страница 68: ... As button Select the destination directory Enter the file name without the extension Mark here to save images as an AVI file Enter the maximum number of frames recorded in one file Mark Auto or enter the frame rate value in the Frame Rate Click the Start button The recording operation starts To stop the recording right click on the image Click Stop Image Recording in the displayed operating menu ...

Страница 69: ...amera Window screen The operating menu appears on the screen Click Save Current Picture As A screen appears asking you to specify the destination folder and file name Specify the destination folder and file name You can save the data in any place and under any file name you like The still image taken at the moment when clicking Save Current Picture As is saved ...

Страница 70: ...54 Installation Set up Viewing Listening and Operation Recording Setting up Others ...

Страница 71: ...ettings User Settings Admin Settings Alarm Settings Network Settings Mail Settings FTP Client Settings FTP Server Settings DDNS Settings Recording Settings Audio Settings Updating the Firmware Saving the Settings on a Personal Computer ...

Страница 72: ...ator the Configuration menu does not appear Perform the operation through the Administrator login Click an item you want to configure in the Configuration menu on the left side of the screen The setup screen for the clicked item appears on the right side of the display Configure each item To update the settings click the Change button the Save button the Save Settings button or the Set button etc ...

Страница 73: ... of the screen Click System on the left side of the screen The System setting screen appears on the right side of the display Configure each item Changing the camera name 1 Enter the camera name in the Camera Name field default nwcam02 no more than 18 characters 2 Click the Change button The camera name is displayed in association with the images on the camera You can change a camera name and cont...

Страница 74: ...cle from the pull down menu to specify the intervals to adjust time default 24 hours 4 Click the Adjust button Adjusting the date and time 1 Unmark Synchronize with PC s Time 2 Enter the value in Date with numbers and e g 20 9 2004 3 Enter the value in Time with numbers and e g 14 23 32 4 Click the Adjust button When Synchronize with PC s Time is marked you can synchronize the setting with the tim...

Страница 75: ...rmware page 75 Click Firmware update You can save the network camera settings on a personal computer Click Export current configurations For details refer to Saving the Settings on a Personal Computer page 77 When updating the firmware the settings are reset Make sure to save the settings of the camera on your personal computer before starting update operation Importing the Settings Saved on a Per...

Страница 76: ...e of the screen Click User on the left side of the screen The User setting screen appears on the right side of the display Configure each item Displaying the screen asking a user name and password 1 Check ON in User authorization required default OFF 2 Click the Set button When accessing to the camera you are required to enter a user name and password User Settings You can set up access rights ...

Страница 77: ...me password and password confirm for a new user in the field of User ID Password and Confirm respectively in Add a user or change password 2 Click the Set Change button New user ID and password are stored in the network camera Deleting a user name 1 Select the User name you want to delete from the pull down menu 2 Click the Delete button ...

Страница 78: ...e Admin setting screen appears on the right side of the display Configure each item Changing the Administrator ID and password 1 Enter the current login ID and the current password in Current Login ID and Current Password respectively 2 Enter new login ID new password and new password confirm in New Login ID New Password and New Password Confirm respectively 3 Click the Change button You can chang...

Страница 79: ...gging in as User 2 Click the Set button Viewing the level of SD memory card Click the Reload button Formatting an SD memory card Click the Complete Format or Quick Format The SD memory card is formatted used for the camera Complete Format To delete all the data in the card Only the log for the complete format remains Quick Format To delete all the data except logs in the card Restarting the camera...

Страница 80: ... alarm Default OFF Alarm Settings You can configure the external alarm and motion detection If you connect a sensor or other device to the alarm input terminal page 80 an alarm will notify you when the sensor detects anything out of the ordinary For example if you connect a sensor attached to a door an alarm can notify you when the door is opened or closed If you set the function of the Motion Det...

Страница 81: ... Low Generates an alarm upon detection of significant changes in brightness only Default Middle If an alarm is detected frequently when there are no abnormalities reduce the level of sensitivity 3 Click the Save Settings button Setting up EXT Control 1 Select EXT in External Alarm Detect 2 Click the Save Settings button NOTE For record settings at the time of alarm generation refer to Alarm Record...

Страница 82: ...een The Network setting screen appears on the right side of the display Configure each item Configuring the connection 1 To set an IP address manually check Manually To obtain an IP address from the DHCP server check Automatically by DHCP Default Automatically by DHCP 2 When Manually is checked fill in IP Address Subnet Mask Default Gateway DNS1 and DNS2 3 Click the Save button Network Settings Yo...

Страница 83: ... subnet mask consult the provider or relevant network system administration support center You do not need to enter the default gateway if the network camera will not be accessed from another network If you do need to enter a default gateway consult your network system administration support center When you try to reconnect to the network camera be sure to confirm that the entered IP address and H...

Страница 84: ...ht side of the display Configure each item 1 Enter the IP address or the server name of the SMTP in Mail Server SMTP 2 Enter the authorization ID and password of the POP3 server in User ID and Password of POP before SMTP When you are not using the POP3 server check OFF in POP before SMTP default OFF in POP before SMTP Mail Settings You can configure the camera to send an email up to 10 addresses w...

Страница 85: ... when an error occurs in an SD memory card to accumulate images Send notification email by accumulating time Check here to send a notification mail at 30 minute intervals up to the total length of time 240 minutes when starting accumulating image data in an SD memory card 30min 60min 90min 120min 150mim 180min 210min 240min 11 When an error occurs in sending a mail you can set up the re sending op...

Страница 86: ...a Window screen The Configuration menu appears on the left side of the screen Click FTP client on the left side of the screen The FTP client setting screen appears on the right side of the display Configure each item For details refer to Recording Images on FTP Server page 41 FTP Client Settings You can store images on an FTP server ...

Страница 87: ...Enter the user name in User ID default ftproot 2 Enter the password in Password default ftpikwb 3 Enter the directory inside the camera SD memory card in FTP Root Path Example Normal 4 Select the number of maximum connections from the pull down menu in Max connection default 1 5 Click the Save Settings button You can now connect to the specified directory in the camera by using the user name and p...

Страница 88: ...ears on the right side of the display Configure each item 1 Select ON to use the DDNS default OFF 2 Enter the user name in User ID 3 Enter the password in Password 4 Enter the DDNS server name in DDNS Server default www netcam zaantek net Do not change the DDNS server name 5 Click the Save button Clicking here in To sign up DDNS click here displays a web page allowing you to sign up to use a DDNS ...

Страница 89: ...ck Recording on the left side of the screen The Recording setting screen appears on the right side of the display Configure each item For details refer to Recording Images on an SD Memory Card page 39 Recording Settings You can control the settings for image data recording at the time of external alarm detection and motion detection as well as normal recording on an SD memory card inserted to the ...

Страница 90: ...Select one of the followings in Audio Format PCM Normal audio format default ADPCM To reduce data capacity by compression as compared to PCM 2 Select one of the followings in Audio On Off ON To input audio from the network camera OFF Not to input audio from the network camera default Audio Settings You can configure the audio input from the network camera When setting to ON in Sound of the Admin S...

Страница 91: ...res below to update the firmware When updating the firmware all the settings are reset except IP addresses Make sure to back up the settings of the camera before starting update operation page 77 When the update operation is completed import the setting data from your personal computer page 78 Before Starting Download the latest firmware Create a folder where you want to save the latest firmware A...

Страница 92: ...he screen shown in Step 3 Click Upload button on the screen shown in Step 3 Follow the instructions on the screen to update the firmware Restart the camera after the firmware is completely updated Important Please ensure that your camera has the latest firmware update All the operations stop in the camera while the firmware is updated Never turn off the camera while the firmware is updated It caus...

Страница 93: ...ide of the screen The System setting screen appears on the right side of the display Click Export current configurations When a confirmation screen appears for saving a file click Save The Save As screen appears Specify the destination and then save the file The file on settings is saved example of file name ikwb02conf ini Saving the Settings on a Personal Computer You can save the settings of the...

Страница 94: ...rt new configuration screen appears on the right side of the display Click the Browse button A screen appears allowing you to select a file Select the file on settings you saved The name of selected file appears on the screen shown in Step 1 Click Import on the screen shown in Step 1 The settings of the network camera are replaced by the settings you saved Saving the Settings on a Personal Compute...

Страница 95: ...Others Alarm Terminals Index Glossary Display of Logs Before Calling Service Personnel Specifications Appearance Diagram ...

Страница 96: ...riety of sensors to the camera by using alarm terminals See following table for functions of each terminal Alarm Terminals ALARM IN Alarm input terminal GND Name ALARM IN GND Function Alarm Input GND Description Inputs External Alarm signal Connect a sensor or other devices to the camera GND for a signal ...

Страница 97: ...Setting up Others Specifications of Alarm Signals Example Circuit Connection ALARM IN GND Door Sensor Network Camera Name Internal Circuit Signal Condition Alarm Input 3 3V 0V 100ms or more Non Voltage point signal TTL signal inputs To CMOS input 1k Inside the Camera ...

Страница 98: ...rvers Because of this it enables to reduce forwarding data which are needed to renew information of DNS server and reduce overhead of the network If this combines with DHCP Dynamic Host Configuration Protocol it is possible to assign IP address and host name right away as the host on the LAN changes Default gateway 66 Network devices cannot communicate directly with devices in other networks In th...

Страница 99: ...ess in the world IP address can be divided into network ID and host ID and depending on the values of network ID it also can be divided into class A B and C Iris connector 10 Iris level 10 Iris switch 10 J JPEG 51 Joint Photographic Experts Group Standard gauge for compression of colored still image by ITU TS Interna tional Telecommunication Union ex CCITT and ISO International Organization for St...

Страница 100: ... to choose to forward the data by looking at IP address of network device S Saving the settings 77 Screw holes for a tripod stand 5 6 SD memory card 39 Safety Precautions12 Secure Digital memory card New super compact memory card that can record huge volume of multi media data SMTP 68 Simple Mail Transfer Protocol Protocol for sending e mail on the Internet and Intranet Used when exchanging e mail...

Страница 101: ...85 Installation Set up Viewing Listening and Operation Recording Setting up Others V VIDEO OUT 5 Video output 5 W Wall bracket Safety Precautions15 White Balance 11 ...

Страница 102: ...ntrast is changed The saturation is changed The hue is changed The flickerless is set The back light compensation area is changed The AE level is changed The camera name is changed The form of date time display is changed The color of date time display is changed The date time on the camera is changed The daylight saving is set The settings are reset to the default state The firmware on the camera...

Страница 103: ... alarm generation is set The recording at the time of motion detection is set The EXT Control is short circuited opened When an FTP server is down Reconnected When an FTP server is down Started the accumulation When an FTP server is down Ended the accumulation Failed to log in an FTP server No directory to store in an FTP server does not exist Failed to change to FTP binary mode Connected to a mai...

Страница 104: ...dresses of the camera and your PC are wrong Proxy has set to the browser Turn on the power Connect the LAN cable of the camera to a hub or router in the right way Be sure to turn on the power of the hub and router Connect the LAN cable to the PC in the right way Configure the IP address of your PC correctly page 15 Assign the directory where you are going to install the browser Start Camera Finder...

Страница 105: ...t the camera Remember that if you perform reset procedure of the camera all the settings you have made will be deleted and the camera goes back to its default settings Register your broadband router to the network camera as default gateway page 66 Configure port forwarding function static IP masquerade NAPT to your broadband router For details read the user s guide of your broadband router Change ...

Страница 106: ...d Make sure that the power of the network camera is ON Make sure that the LAN cable is connected to a hub or router in the right way Make sure that the LAN cable is connected to a hub or router in the right way Make sure that the power of a hub or router is ON If you change the IP address you cannot keep your settings in the setting screen with your old IP address Search your camera with the appli...

Страница 107: ...Installed the camera in wrong way Set the iris switch properly for your lens Adjust the iris of your lens properly Connect the cable properly Adjust the video monitor properly Brighten the lightings Wait for a little while Sometimes it takes time to display images There are the recommended requirements of PC to view the images of the network camera page 12 Close all applications other than the net...

Страница 108: ...omplete the updating because of network trouble the power has cut off or other reasons Set the monitor color higher than 16bit Wipe off the lens with dried cloth Check the minimum object distance of your lens Adjust the volume of your PC Install commercial microphone page 8 to your network camera You can install only condenser typed monaural microphone Plug type has to be monaural 3 5f Face the mi...

Страница 109: ...a When Image Accumulation is set to ON page 49 unsent recording files are accumulated in an SD memory card of the network camera When the connection is re established all the accumulated recording data is sent to an FTP server Depending on the conditions of your server networking image size and or image quality settings numbers of sent images may become fewer than your expectation Press the reset ...

Страница 110: ...y Function for Supplying Power via a LAN Cable There are two PoE Power Over Ethernet methods the Spare Pair method a power supply method that uses the unused wires and the Signal Pair method a power supply method that uses the signal wires The camera which is on the receiving side supports both methods but there are hubs and other power supply devices that only support one of the methods For detai...

Страница 111: ...45 10Base T 100Base TX TCP IP UDP IP HTTP SMTP DNS FTPc FTPs DHCP POP3 DDNS NTP ARP ICMP RNCP 10 C to 40 C From 30 to 90 no condensation should occur 20 C to 60 C Approx 430g camera only 2 74 W X 1 97 H X 4 56 D inches 63 X 50 X 116mm camera only mini CD ROM 1 Safety Precautions and Quick Start Guide 1 IRIS connector 1 EMI core 3 Model name Power Power consumption Image sensor Image pickup area Ef...

Страница 112: ...96 Installation Set up Viewing Listening and Operation Recording Setting up Others Appearance Diagram POWER SELECT AC24V DC12V PoE Unit mm ...

Страница 113: ... Set up Viewing Listening and Operation Recording Setting up Others TOSHIBA AMERICA INFORMATION SYSTEMS INC Security Network Video Products 9740 Irvine Boulevard Irvine California 92618 1697 Phone Number 877 696 3822 ...

Страница 114: ... drawing If not used an unnecessary radio wave may be emitted How to use EMI core このカメラには3個のEMIコアが同梱されています これらのコアは下図のようにしてお使いください 使用されないと不要な電波が発生し システムに障害が 出る場合があります EMIコアの使いかた Video cable 1 turn Audio cable 1 turn Power cable 3 turns ビデオケーブル は1回通す オーディオケー ブルは1回通す 電源ケーブルは 3回通す WB02 03 ...

Страница 115: ...if the power source type and POWER SELECT switch do not match PoE IEEE802 3af compatible hub etc LAN cable Switch the POWER SELECT switch to PoE POWER SELECT Switch When power is supplied from an AC24V or DC12V power source Switch the POWER SELECT switch to AC24V DC12V Adapter UL listed class 2 power supply AC24V DC12V PoE AC24V DC12V PoE ...

Отзывы: