background image

Advanced Playback

107

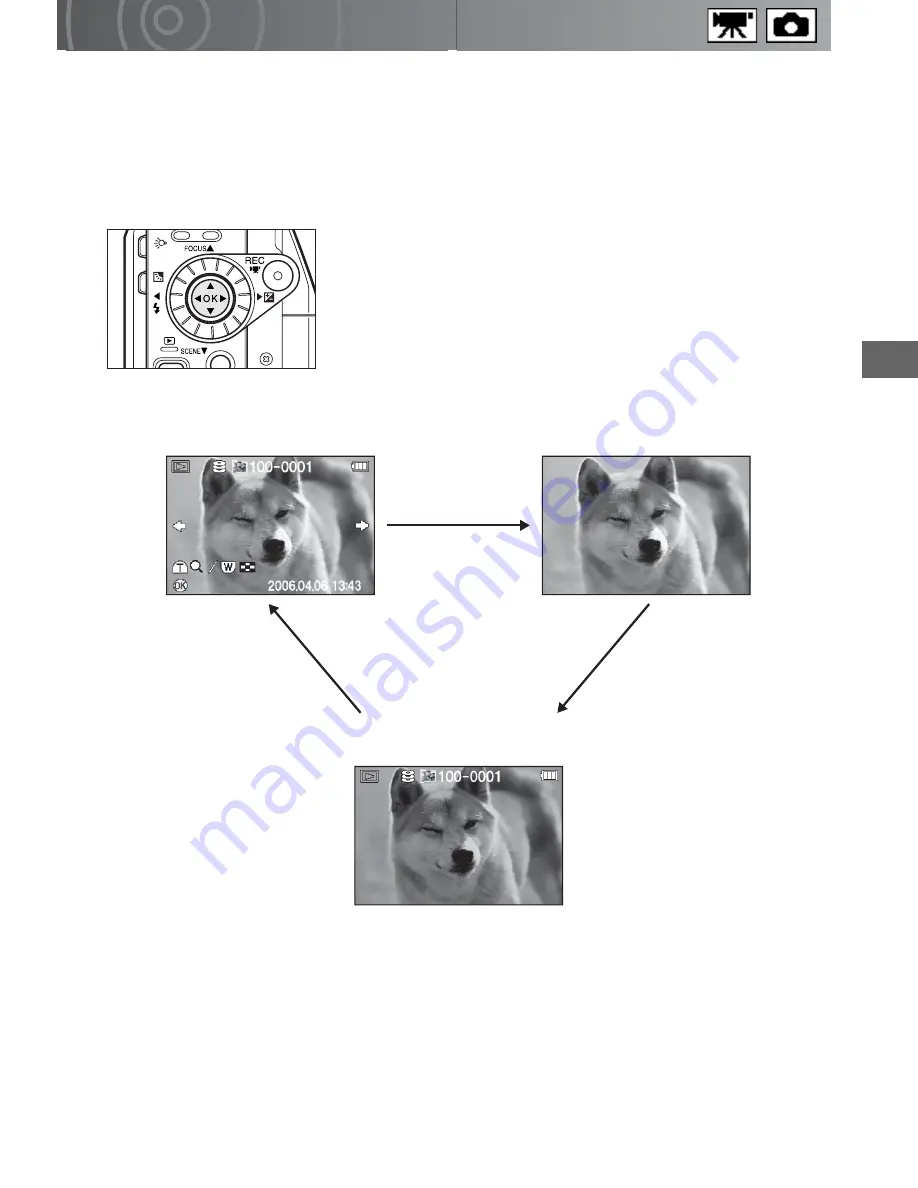
Switching the Playback Display

Use this procedure to change the display mode for playback images.

1

Select playback mode and use the jog dial to select the 
image.

2

Press the OK button.

Each time you press the OK button, the information 
display mode changes as shown below.

<Standard>

Normal playback mode (still image).

<Hidden>

Image information not shown.

<Information display>

Detailed image information displayed.

DISPLAY

IMAGE SIZE 

: 640X480

QUALITY : 

FINE

SHUTTER SPEED : 

1/1000s

APERTURE : 

F3

.

3

EXPOSURE BIAS : 0.0EV
ISO SENSITIVITY : ISO200
FLASH : 

ON

FILE SIZE 

: 380KB

Содержание Gigashot GSC-R30

Страница 1: ...Toshiba HARD DISK CAMERA Owner s Manual GSC R60 GSC R30 Please read the owner s manual before using the R30 R60 camera ...

Страница 2: ...on this product or cords associated with accessories sold with this product will expose you to lead a chemical known to the State of California to cause cancer and birth defects or other reproductive harm Wash hands after handling ...

Страница 3: ... interference by one or more of the following measures Change the direction of the radio or TV antenna Move the equipment or the radio or TV For example if the equipment is to the right of the TV move it to the left of the TV Or move the equipment farther away from the radio or TV Plug the equipment into a different outlet Don t plug your radio or TV into the same circuit as your equipment Ensure ...

Страница 4: ...fore Using Your Camera Accessories Safety Precautions Contents Handling Your Camera and Cradle Handling the AC Adapter Handling the Battery About the Built in Hard Disk Drive About SD Memory Cards Preface ...

Страница 5: ...k of Toshiba Corporation Microsoft and Windows are either registered trademarks or trademarks of Microsoft Corporation in the United States and or other countries Windows is an abbreviated term referring to the Microsoft Windows Operating System Pentium is a registered trademark in the U S and other countries by Intel Corporation or its subsidiaries ACDSee is a trademark of ACD Systems Ltd PowerPr...

Страница 6: ...only the file management information is changed The data may still be present and could be recovered using commercially available data recovery software This could allow for data which was erased to fall into the hands of an unintended party As a prevention it is recommended to physically destroy the built in hard disk drive or SD Memory Card or to transfer rights or dispose of the camera or SD Me...

Страница 7: ...partment 800 268 3404 for Canada Rechargeable battery GSC BT5 AC adapter SQPH20W10P 02 Lens cap Remote control USB cable only with GSC R60 for cradle connection USB cable only with GSC R30 for camera connection AV cable Cradle only with GSC R60 CD ROM Application software 1 Owner s Manual 1 Quick Start Guide Quick Help Guide Safety Precaution Product Registration Card STOP Need Help Power cord Bat...

Страница 8: ...ecautions have the following meanings Graphic symbol definitions Graphic Symbol Meaning Indicates a prohibited action that must not be carried out The actual prohibited action is indicated in the symbol or nearby graphically or described in text Indicates a necessary action that must be carried out The actual necessary action is indicated in the symbol or nearby graphically or described in text ...

Страница 9: ...y occur from handling the damaged case Consult the Toshiba Customer Service Department or Toshiba Customer Support Department Do not allow metallic objects or flammable foreign matter inside the camera This might cause fire or electric shock Do not insert or drop foreign objects in the battery SD card slot terminals or other holes or openings Do not use the camera in areas near water This might ca...

Страница 10: ...this might damage the cables resulting in fire or electric shock Do not place the camera on inclined or unstable surfaces This might cause the camera to fall or tilt over causing injury or malfunction Do not wrap or place the camera in cloth or blankets This might cause heat to build up and deform the case resulting in fire Use the camera in a well ventilated place Do not swing the camera while wa...

Страница 11: ...fire Do not bring metal into contact with the connection points of the AC adapter when its plug is in an outlet This might cause fire or electric shock Do not place blankets over the AC adapter connected with the power source or place the adapter near a heater or on an electric warm carpet This might cause fire or malfunction Observe the following when handling the AC adapter cord Do not damage mo...

Страница 12: ...f the camera if it happens might result in fire Do not use the AC adapter for any use other than with this camera This might cause fire or malfunction Firmly insert the AC adapter plug into a wall outlet Neglecting this might cause fire or electric shock Observe the following when handling the battery Do not disassemble modify Do not heat Do not throw in fire or water Do not hammer step on drop or...

Страница 13: ... remove the battery immediately after the camera has been used for a long time The battery becomes hot during use Touching a hot battery might cause burns Do not insert unusable battery or discharged battery Otherwise the battery may rupture ignite or heat up resulting in fire burns or injury Before storing the battery attach insulating tape to both the plus and electrodes Storing battery as it is...

Страница 14: ...phy Setting the Scene 58 Setting the Flash 60 Setting the Focus 62 Using Exposure Bias 64 Using the Backlight Compensation Function 65 Photography Using the Assist Light 66 Shooting Still Images during Video Recording 67 Using the Conversion Lens or Lens Hood 68 Changing the Recording Menu Settings 69 Creating and Selecting Albums 72 Shooting with the Self timer 75 Continuous Recording 76 Setting ...

Страница 15: ...gs 135 Sound 137 Setting the LEDs 138 Auto Power Off 139 LCD linked Power 140 Video Output 141 LANGUAGE 142 System 143 Using the Hard Disk Drive Protection Function 143 Resetting the System 144 Formatting Drives 145 Displaying the Version Information 146 Connecting to Other Devices Connecting to a TV 148 Connecting to a PC 150 Connecting to a DVD Recorder with DVR 153 Working with Images on Your P...

Страница 16: ...tions or Impacts If the camera is subjected to strong vibrations not only will the camera become damaged there might also be a loss of hard disk drive data Prevent the Hard Disk Camera from Coming into Contact with Sand If the camera comes into contact with sand not only will the camera become damaged it will also no longer be repairable Take special care when using the hard disk camera near seasi...

Страница 17: ... Be Careful of Magnetic Fields Please do not allow items that are easily affected by magnetic fields to come close to the speaker of the camera these include credit and cash cards magnetic passes computer diskettes etc Doing so could result in data loss and render the item unusable Do not allow objects such as magnets or speakers which produce magnetic fields to come close to the camera This might...

Страница 18: ...C adapter while the battery is being used Turn the power OFF first The AC adapter is for indoor use only Do not connect the supplied AC adapter to a device other than this camera The AC adapter may sometimes become warm during use This is normal Buzzing noises may come form inside the camera This is normal Do not use the AC adapter near a radio because it could interfere with the radio If you remo...

Страница 19: ...is is normal and not a malfunction The battery has a limited service life The length of service life varies depending on product use and user settings At normal temperatures 77 F 25 C the battery can be recharged approximately 300 times If you use the battery beyond its service life you may notice that battery life becomes remarkably shorter even if the battery is fully charged If you notice that ...

Страница 20: ...y performance Do not recharge a fully charged battery Getting the Most Out of Your Battery Even when the camera is turned off a very small current continues to flow If you do not intend to use the camera for a long period you should take the battery out of the camera If the battery is left out of the camera for approximately 48 hours the date time and other camera settings may revert to the defaul...

Страница 21: ...rial recording before recording content that is important to you Play back the trial recording to ensure that the video and audio were recorded properly Using the Hard Disk Drive It is recommended that you periodically save the files on the hard disk drive to a PC CD or DVD and format the hard disk drive The hard disk drive is a high precision component and there is always a risk of partial damage...

Страница 22: ...prevent data being written to or read from the card You should always make backup copies of important data SD cards have a limited operating life If you are no longer able to record or erase images on an SD card that has been used for a long period you should purchase a new SD card Take care that young children do not accidentally swallow an SD card as this could cause choking This camera conforms...

Страница 23: ...ting and Removing the Battery Charging Inserting and Removing SD Cards Turning the Camera On and Off Setting the Date and Time Creating Albums Using the LCD Monitor About the Remote Control Quick Reference Guide Preparation ...

Страница 24: ...witch POWER switch Microphone LCD monitor SD card slot Speaker OK button REC button assist light button backlight compensation button Terminal cover DC IN 10V terminal A V OUT terminal Lens Remote control sensor Battery cover Connection terminal Flash Assist light Grip belt Tripod screw socket Front LED ...

Страница 25: ...the OK button should be moved Using the OK Button Camera LEDs Mode LED STATUS LED MEDIA LED Front LED Color Green Red Orange Status Lit Lit Lit Blinking Blinking Lit Lit Blinking At power OFF Charging completed Charging Charging error During shooting Recording mode Hardware fault Preparing to shoot Media access Recording Self timer in use During playback Playback mode Hardware fault Media access I...

Страница 26: ...s In USB mode Media access Cradle Operation Button Status POWER LAN USB LCD monitor closed LCD linked power on LCD linked power off At power OFF Turned on in Playback mode Turned on in LAN mode Turned on in USB mode In Playback Recording mode Power off Switched to LAN mode Switched to USB mode Power off LCD monitor off In LAN mode Power off Switched to USB mode Power off LCD monitor off In USB mod...

Страница 27: ...C REC REC half pressed REC fully pressed REC Zoom lever T direction T Zoom lever W direction W MENU MENU OK OK OK button OK button OK button OK button Jog dial left Jog dial right T button W button REC button REC button OK button MENU button MODE REC button MODE PLAY button button button button button button button ...

Страница 28: ...camera in the direction of the arrow and open the battery cover in the direction of the arrow Battery lock lever 2 Use the battery to push the battery lock lever in the direction of the arrow as you slide the battery in Insert the battery as shown in the figure with the label facing up Insert the battery firmly as far as it will go and check that the battery is secured by the battery lock lever 3 ...

Страница 29: ...re set when you purchased the camera If this occurs specify your preferred settings again When removing the battery take care not to drop the camera or battery If you open the battery cover when an AC adapter is not connected the power will automatically go off 1 Open the battery cover 2 Push the battery lock lever in the direction of the arrow and remove the battery When you push the battery lock...

Страница 30: ...dle Check that the battery is loaded in the camera and that the camera is turned off 1 Connect the components in the sequence to above When battery charging begins the CHARGE LED on the cradle lights orange and the STATUS LED on the camera lights red When charging is completed the CHARGE LED on the cradle turns off and the STATUS LED on the camera turns green Press the RELEASE button on the cradle...

Страница 31: ...eginning immediately If this occurs allow the camera to cool fully before charging MEMO To get the best possible performance from your battery charge it when the ambient temperature is between 50 F 10 C and 86 F 30 C 1 Open the terminal cover on the camera 2 Connect the power cord and AC adapter and then plug the power cord into the mains power socket 3 Plug the DC plug on the AC adapter into the ...

Страница 32: ...that the battery is not charged When loading and removing the battery take care not to touch the battery or camera terminals If the battery and or camera terminals are dirty clean them with a clean dry cloth The available video recording times when a new battery is fully charged are shown below Continuous video recording Conditions Recording a video continuously without using the zoom at a tempera...

Страница 33: ...iaCard format Turn the camera off before inserting or removing an SD card sold separately 1 Insert the SD card into the SD slot ensuring that the card is facing in the right direction as shown below With the notch facing upwards towards the lens push the card firmly all the way into the slot Check that the SD card is pushed fully and securely into the slot To have images you shoot recorded on an S...

Страница 34: ...the POWER Switch Sliding the POWER switch turns the camera on and off MEMO If the camera is not used for a set period of time it automatically turns off to avoid wasting battery power This is called the Auto power off p 139 If you load the battery or connect the AC adapter without correctly shutting down the camera first the camera may not operate correctly If this occurs turn the camera off and o...

Страница 35: ... the OK button to or to select a setting and then use the jog dial to select a value After selecting the desired setting you can also move the OK button to or to set the value 2 Move the OK button to or to select OK and then press the OK button This sets the date and time The first time you use the camera the display switches to the create album screen Use this screen to create your albums See Cre...

Страница 36: ...dd or delete album types without prior notice 1 Use the jog dial to select an album type 2 Press the OK button An album is created and the camera switches to recording mode Album Types The available album types are shown below Icon Name Icon Name Icon Name Icon Name ART MAIL GIFT TRASH DRIVE PARTY TRAVEL MUSIC SPORTS BEACH LANDSCAPE BUSINESS MEMO PC BIRTHDAY WEDDING CEREMONY BABY KIDS FAMILY1 FAMI...

Страница 37: ...ms You can choose the type of album based on the recording date or on the type of shot travel pets etc Drives are where your albums are kept On this camera albums are kept on the hard disk drive and on SD cards Still images Videos Album Album Drive SD card Drive hard disk drive ...

Страница 38: ...he monitor when recording images of yourself 1 In the backward facing position the image on the LCD monitor is reversed left to right like the image in a mirror but the recorded image is the same as the actual subject Viewer position 2 For playback 2 When the LCD monitor is in the viewer position and the camera is in playback mode or the menu is displayed the up down left and right positions on th...

Страница 39: ...isassemble the remote control Do not leave the remote control in hot or humid locations Loading the Battery Use the bundled coin shaped CR2025 lithium battery Slide open the battery cover in the lower section of the rear side of the remote control Insert the battery with the plus symbol facing upwards and then close the battery cover MEMO Replace the battery if the remote control response becomes ...

Страница 40: ...V Video Output p 141 Connecting to a TV p 148 To view a list of recorded images Displaying Images as a List p 99 To shoot a video at night Setting the Scene p 58 To use a higher sensitivity when recording Changing the Sensitivity p 84 To match colors Shooting with Natural Color Tones p 82 To take close up shots Setting the Focus p 62 To shoot using the self timer Shooting with the Self timer p 75 ...

Страница 41: ...otated Still Images p 106 To move images from the hard disk drive to an SD card Copying Images p 115 Moving Images p 117 To print still images Printing Still Images p 166 To save images onto a DVD Recording Images onto DVDs p 170 To enter print information Writing Print Information p 119 Writing Print Information on a PC p 169 To print directly from the camera Printing Directly from the Camera Usi...

Страница 42: ...Before You Shoot Shooting Video Taking Still Images Shooting with the Zoom Playback Erasing Images Erase one Image Shooting Video ...

Страница 43: ...d down and slowly turn your body as you shoot When holding the camera one handed brace your elbow firmly against the side of your body For a more stable grip hold the LCD monitor with your left hand Take care not to block the lens or flash with your fingers Adjusting the Grip Belt You can adjust the grip belt to ensure that you maintain a firm grip on the camera Release the Velcro tape on the grip...

Страница 44: ... compensation and 1 shot Continuous recording DISPLAY Available video recording time Video icon No of available shots Battery level From left Self timer Continuous recording Still image icon Zoom bar Operation guide From left White balance Assist light Focus Scene Flash Backlight compensation Exposure bias From left White balance Assist light Metering mode Drive When an SD card is selected is disp...

Страница 45: ...f the LCD monitor is too bright or too dark adjust the monitor brightness See Changing the LCD Brightness p 96 2 Press the REC button The camera starts shooting the video Press the REC button again to end video recording The front LED lights during video recording To pause while you are shooting a video set REC PAUSE to On See Pausing Video Recording p 95 Pausing Video Recording Using the REC PAUS...

Страница 46: ...ing video recording a countdown begins on the screen 10 minutes before the limit is reached If you just continue shooting the camera automatically stops shooting the video creates a video file and then resumes shooting The size of the created video file will be slightly less than 4GB If you set the LCD monitor in the backward facing position the image is displayed reversed left to right like the i...

Страница 47: ...F REC PAUSE ON During recording During recording While paused REC Ends recording Pauses recording Restarts recording and inserts a chapter OK End recording REC half pressed AF AE lock REC fully pressed Takes a still image OK button Manual focus OK button OK button OK button Sets the exposure Zoom lever T direction Zooms in Zoom lever W direction Zooms out MENU Turns change LCD brightness on off Di...

Страница 48: ...onitor compose the shot If the LCD monitor is too bright or too dark adjust the monitor brightness See Changing the LCD Brightness p 96 3 Press the REC button down halfway and then press it down fully Pressing the button down halfway automatically sets the focus and exposure The ISO sensitivity shutter speed and aperture are displayed at that point Continue to press the button down fully to take t...

Страница 49: ...us is set recompose the shot as desired and press the REC button down fully This camera may have difficulty auto focusing and be unable to focus due to the following conditions Where there are also objects behind or in front of the subject as with an animal behind bars or a person standing in front of a tree Very glossy subjects such as a mirror or car body Objects with little or no reflectivity s...

Страница 50: ...digital zoom magnification Yellow High quality image with minimal loss of image quality Red Subject more enlarged but with slightly lower image quality 1 Set the mode switch to recording mode 2 Use the zoom lever to adjust the zoom setting and compose the shot Then take the picture Sliding the zoom lever towards T zooms in and enlarges distant subjects Sliding it towards W lets you include a wider...

Страница 51: ...al Zooming p 88 During digital zooming the camera focuses on the subject in the center of the LCD monitor regardless of the AF mode setting See Selecting the Focus Area AF Mode p 90 When the camera is turned off or the Auto power off function is activated the zoom setting reverts to wide angle W ...

Страница 52: ...The last image shot appears on the LCD monitor If the LCD monitor is too bright or too dark adjust the monitor brightness See Changing the LCD Brightness p 96 2 Use the jog dial to select the still image you want to play back A grainy image appears initially followed by the normal image Still images shot with the camera rotated are initially played back rotated Playback drive Playback icon Protect...

Страница 53: ...e jog dial to select the video you want to play A grainy image appears initially followed by the normal image The video icon is displayed in the video with film icons also being shown at the top and bottom of the LCD monitor 3 Move the OK button to The selected video is played To stop video playback move the OK button to To pause the video move the OK button to To adjust the speaker volume use the...

Страница 54: ...rame rewind Playback Faster rewinding Jog dial right Next image Fast forward Single frame feed Faster fast forward Playback Zoom lever T direction Displays chapters Volume up Zoom lever W direction Displays thumbnails Volume down One touch Skip Replay This allows you to use skip playback during a video The duration of the skip differs depending on the length of the video 1 While a video is playing...

Страница 55: ...hen the first image is displayed the final image appears Dolby Digital Stereo Creator enables consumers to create stereo DVD Videos with stunning Dolby Digital sound tracks at home The technology when utilized instead of PCM recording also saves recordable disc space allowing for higher video resolution or extended recording time on each DVD DVDs mastered using Dolby Digital Stereo Creator will pl...

Страница 56: ...o select ERASE and press the OK button 3 Select ERASE ONE IMAGE and press the OK button 4 Use the jog dial to select the image to be erased 5 Move the OK button to to select YES and press the OK button The image is erased and the next image appears If you do not want to erase the selected image or if you want to cancel image erasing select NO and press the OK button You cannot erase a protected im...

Страница 57: ...ng with the Self timer Continuous Recording Setting the Video Quality Setting the Still Image Size Shooting with Natural Color Tones White Balance Changing the Sensitivity Shooting with Image Stabilization Wind Noise Reduction Changing the Microphone Sensitivity Digital Zooming Selecting the Metering Mode Selecting the Focus Area AF Mode Changing Image Colors Changing the Image Contrast Changing t...

Страница 58: ...d by Scene Settings Scene Type of shot Setting Flash AUTO All settings are available PORTRAIT For shots where the foreground subject stands out clearly against a blurred background RED EYE REDUCTION SUPPRESSED FLASH LANDSCAPE Distant scenery landscapes etc SUPPRESSED FLASH SPORTS For situations involving fast moving subjects such as sporting events SUPPRESSED FLASH NIGHT SCENE For situations where...

Страница 59: ...anced Photography MEMO You cannot specify scene settings when shooting video The explanations for the different scenes are only intended as a general guide Select the scene setting that works best for you ...

Страница 60: ...ons AUTO RED EYE REDUCTION AUTO The flash fires automatically as required by the shooting conditions When it fires the flash fires twice and the shot is taken when the flash fires the second time Used for shots or people or animals where you want to reduce the red eye effect see Glossary p 198 Works best when the subject is looking directly at the camera and is relatively close AUTO PORTRAIT SKIN ...

Страница 61: ...owever you can use the flash to shoot a still image while video recording is paused when REC PAUSE is enabled See Pausing Video Recording p 95 When the flash is going to fire the flash icon on the screen turns yellow when you press the shutter button down halfway When you select CONTINUOUS RECORDING or AEB the flash setting automatically changes to SUPPRESSED FLASH ...

Страница 62: ... Set the camera to recording mode and move the OK button to A list of focus icons appears 2 Use the jog dial to select the desired focus and press the OK button To cancel the setting press the MENU button or move the OK button to Shooting Range Imposed by Focus Settings Focus Type of shot AUTO FOCUS Zoom W Approx 10 cm to infinity Zoom T Approx 1 2 m to infinity MACRO Zoom W Approx 1 cm to infinit...

Страница 63: ...currently selected focus setting and manual focusing each time you move the OK button to If the current focus setting is manual focus it switches to auto focus If the distance to the subject is 0 1 meters or less with the zoom set to W the distance shown on the screen changes to The distance at which appears differs depending on the zoom setting 1 In the focus settings p 62 select The approximate ...

Страница 64: ... exposure value appear 2 Use the jog dial to set the exposure bias and press the OK button Higher settings brighten the image while smaller values darken the image Subjects for Which Exposure Bias Works positive compensation Printed materials comprising black text on a white page Backlit subjects Very bright situations such as snowfields and very reflective subjects Shots where most of the image c...

Страница 65: ...ight compensation setting reverts to off when you turn the camera off or the Auto power off function is activated MEMO You can set backlight compensation while shooting a video When backlight compensation is set you can still switch to exposure bias by moving the OK button to If you press the button when exposure bias is set both exposure bias and backlight compensation are enabled 1 Set the camer...

Страница 66: ...o power off function is activated MEMO Pressing the button alternately turns the assist light on and off If you set the AF ASSIST LIGHT to ON in the setup menu the assist light can be turned on by half pressing the REC button where there is a dark object 1 Set the camera to recording mode and press the button The assist light on the front of the camera lights and the assist light icon appears on t...

Страница 67: ...l image during video recording If the remaining available video recording time is less than 10 seconds you cannot shoot still images during video recording MEMO While video recording is paused when REC PAUSE is enabled you can press the REC button down halfway to set the focus and exposure and you can use the flash See Pausing Video Recording p 95 During video recording the down halfway position f...

Страница 68: ...d the conversion lens or lens hood will block the light from the flash and prevent the picture from being shot correctly If the conversion lens or lens hood is attached the lens or hood will obstruct the assist light When a conversion lens or lens hood is mounted the remote control may not function correctly When a conversion lens is mounted set image stabilization to OFF When a conversion lens is...

Страница 69: ...the jog dial to select a menu and press the OK button The settings for the selected menu appear 3 Use the jog dial to select the desired setting and press the OK button The selected setting is set and the recording menu reappears To cancel the setting press the MENU button 4 To return to shooting press the MENU button The camera is now ready to shoot RECORDING MENU SELF TIMER CONTINUOUS RECORDING ...

Страница 70: ... setting OK button Selects a menu setting Selects a setting OK button Confirms the selected setting OK button Returns to the previous screen Jog dial right Selects a menu setting Selects a setting Jog dial left Selects a menu setting Selects a setting MENU Returns to recording mode Returns to the menu Mode switch Returns to recording mode Mode switch Returns to playback mode ...

Страница 71: ...rns image stabilization on and off 85 WIND NOISE REDUCTION Turns wind noise reduction on and off 86 MICROPHONE SENSITIVITY Sets the microphone sensitivity 87 DIGITAL ZOOM Turns digital zooming on and off 88 METERING MODE Sets the metering mode used to calculate the exposure 89 AF MODE Sets the area used for setting the focus 90 COLOR Sets the image colors 91 CONTRAST Sets the dark light contrast f...

Страница 72: ...l to select HDD and press the OK button 3 Move the OK button to to select CREATE NEW and press the OK button 4 Use the jog dial to select an album type and press the OK button The newly created album is set as the save location for images and the camera is ready to shoot Album types include ART KIDS etc See Creating Albums p 36 RECORDING MENU DRIVE ALBUM HDD ERASE SELF TIMER SETUP EXIT DRIVE ALBUM...

Страница 73: ... 3 Use the jog dial to select the album you want to change 4 Move the OK button to to select CHANGE ALBUM and press the OK button 5 Use the jog dial to select the album type and press the OK button The changed album is set as the save location for images and the camera is ready to shoot ALBUM SELECTION 101 2006_04_03_101 CHANGE ALBUM CREATE NEW ALBUM SELECTION CHANGE ALBUM CREATE NEW 2006_04_03_10...

Страница 74: ...ave location for images and the camera is ready to shoot 1 From the recording menu use the jog dial to select DRIVE ALBUM and press the OK button 2 Use the jog dial to select SD and press the OK button A message is displayed 3 Use the jog dial to select YES or NO and press the OK button Selecting YES sets the newly created album as the save location for images and the camera is then ready to shoot...

Страница 75: ...d AEB With the self timer the number of continuous recordings taken is 3 See Continuous Recording p 76 You can take as many shots as you like with the same self timer delay until you either change the self timer delay setting or turn the camera off 1 From the recording menu use the jog dial to select SELF TIMER and press the OK button 2 Use the jog dial to select the self timer delay and press the...

Страница 76: ...g menu reappears To cancel the setting press the MENU button 1 SHOT Images are shot one at a time CONTINUOUS RECORDING The camera records images continuously AEB The camera records 3 images with the exposure automatically shifted in each shot 0 0 3 EV 0 3 EV in that order 3 Press the MENU button to exit the recording menu and return to recording mode 4 Compose the shot press the REC button down ha...

Страница 77: ...pace available on the media If there is insufficient available space on the hard disk drive or SD card recording ends before the limit on the number of shots is reached The flash cannot be used in continuous recording The interval between shots varies depending on the recording conditions When the self timer is used the number of continuous recordings taken is 3 ...

Страница 78: ...recording time for videos recorded on to the camera s hard disk drive and SD cards Because the amount of data used varies depending on the subject being recorded the recording durations listed below are approximate and may vary Video quality Hard disk drive SD card 60GB GSC R60 30GB GSC R30 2GB 1GB 512MB 256MB 128MB SHQ Approx 9 Mb sec 13hr30min 6hr40min 27min 13min 6min 3min 1min SHQ WIDE Approx ...

Страница 79: ...s at the top and bottom of the LCD monitor If you shoot a still image with SHQ WIDE HQ WIDE or SP WIDE selected the still image is also shot in the wide size The available recording time actually displayed will vary depending on the image quality and the amount of space available on the drive ...

Страница 80: ...eo quality the still image sizes are as follows 2M 1600 900 pixels 1 2M 1280 720 pixels 0 3M 640 360 pixels Approximate Number of Available Shots for Still Images The table below shows the approximate number of still images that may be stored on to the camera s hard disk drive and SD cards Because the amount of data used varies depending on the size of each image the number of storable images list...

Страница 81: ...ding on the image size and the amount of space available on the drive When the still image size is set to 2M pressing the REC button down halfway widens the area that can be photographed and the screen display changes accordingly When this occurs the center of the image may shift If you release the REC button or press the button down fully to take the picture and then do not use the camera control...

Страница 82: ...ct the white balance and press the OK button If you selected PRESET proceed to Overwriting preset data or Using preset data If you selected another setting the camera reverts to recording mode To cancel the setting press the MENU button AUTO Automatic adjustment SUNLIGHT For recording in sunlight CLOUD For recording under cloudy skies FLUORESCENT LIGHT 1 For recording under daylight fluorescent li...

Страница 83: ...VERWRITE DATA from the menu that appears Then press the OK button A message is displayed 2 Position a white subject a white dish or piece of paper so that it fills the displayed frame and press the OK button A message is displayed and the camera is then ready to shoot 1 Select PRESET and use the jog dial to select USE DATA from the menu that appears Then press the OK button The camera reverts to r...

Страница 84: ...se appearing in your images and may result in duller colors on printed images 1 From the recording menu use the jog dial to select ISO SENSITIVITY and press the OK button 2 Use the jog dial to select the sensitivity and press the OK button The selected sensitivity is set and the recording menu reappears To cancel the setting press the MENU button AUTO 200 Automatically adjusted in the range betwee...

Страница 85: ... in dark locations The Image stabilization function is designed to correct camera shake during video recording and does not function when you are shooting still images 1 From the recording menu use the jog dial to select IMAGE STABILIZATION and press the OK button 2 Use the jog dial to select the setting and press the OK button The selected setting is set and the recording menu reappears To cancel...

Страница 86: ... WIND NOISE REDUCTION and press the OK button 2 Use the jog dial to select the setting and press the OK button Wind noise reduction is set and the recording menu reappears To cancel the setting press the MENU button ON The Wind noise reduction function is used OFF The Wind noise reduction function is not used ISO SENSITIVITY IMAGE STABILIZATION EXIT WIND NOISE REDUCTION MICROPHONE SENSITIVITY ON D...

Страница 87: ...he selected sensitivity is set and the recording menu reappears To cancel the setting press the MENU button STANDARD Sets the normal microphone sensitivity MORE Sets a higher microphone sensitivity Select this setting to record low sounds that are difficult to hear LESS Sets a lower microphone sensitivity Select this setting to reduce ambient noise IMAGE STABILIZATION WIND NOISE REDUCTION EXIT MIC...

Страница 88: ...still images 1 From the recording menu use the jog dial to select DIGITAL ZOOM and press the OK button 2 Use the jog dial to select the magnification and press the OK button The digital zoom is set and the recording menu reappears To cancel the setting press the MENU button 4 The 4 digital zoom is used max 40 together with 10 optical zoom 20 The 20 digital zoom is used max 200 together with 10 opt...

Страница 89: ...menu use the jog dial to select METERING MODE and press the OK button 2 Use the jog dial to select CENTER WEIGHTED or SPOT and press the OK button The selected metering mode is set and the recording menu reappears To cancel the setting press the MENU button CENTER WEIGHTED The camera sets the exposure by metering the entire image but with particular emphasis on the central part of the image SPOT T...

Страница 90: ...use the jog dial to select AF MODE and press the OK button 2 Use the jog dial to select CENTER or MULTI and press the OK button The selected AF mode is set and the recording menu reappears To cancel the setting press the MENU button CENTER The camera sets the focus by measuring the distance to subject in the center of the shot The area used for focusing is always displayed in the center of the LCD...

Страница 91: ...ng menu use the jog dial to select COLOR and press the OK button 2 Use the jog dial to select the colors and press the OK button The selected colors are set and the recording menu reappears To cancel the setting press the MENU button STANDARD Color VIVID Vivid color MONOCHROME Black and white SEPIA Sepia RECORDING MENU METERING MODE AF MODE EXIT COLOR CONTRAST SEPIA SHARPNESS COLOR STANDARD CANCEL...

Страница 92: ...ding menu use the jog dial to select CONTRAST and press the OK button 2 Use the jog dial to select the contrast setting and press the OK button The selected contrast is set and the recording menu reappears To cancel the setting press the MENU button STANDARD Sets the contrast automatically HARD Heightens the contrast SOFT Softens the contrast RECORDING MENU AF MODE COLOR STANDARD CONTRAST SHARPNES...

Страница 93: ...image 1 From the recording menu use the jog dial to select SHARPNESS and press the OK button 2 Use the jog dial to select the sharpness setting and press the OK button The selected sharpness is set and the recording menu reappears To cancel the setting press the MENU button STANDARD Normal edge sharpness HARD Sharper edges SOFT Softer edges RECORDING MENU COLOR CONTRAST SHARPNESS PREVIEW EXIT HARD...

Страница 94: ...s and AEB recording regardless of the preview function setting 1 From the recording menu use the jog dial to select PREVIEW and press the OK button 2 Use the jog dial to select the setting and press the OK button Previewing is set and the recording menu reappears To cancel the setting press the MENU button ON The preview function is used OFF The preview function is not used RECORDING MENU CONTRAST...

Страница 95: ...ect different starting points during video playback See Selecting the Starting Point for Video Playback p 103 1 From the recording menu use the jog dial to select REC PAUSE and press the OK button 2 Use the jog dial to select the setting and press the OK button The REC PAUSE setting is set and the recording menu reappears To cancel the setting press the MENU button ON The REC PAUSE function is ena...

Страница 96: ... the LCD Brightness from the Photography or Playback Menu MEMO You can also set the LCD brightness from the play menu 1 From the recording or play menu use the jog dial to select LCD BRIGHTNESS and press the OK button 2 Use the jog dial to adjust the brightness and press the OK button The LCD brightness is set and the recording menu reappears To cancel the setting press the MENU button RECORDING M...

Страница 97: ... LCD Brightness during Video Recording 1 While recording video press the MENU button The LCD brightness icon appears on the screen 2 Use the jog dial to adjust the brightness and press the OK button The LCD brightness is set STOP STOP ...

Страница 98: ...ng Zoomed Playback Viewing Rotated Still Images Switching the Playback Display Changing Playback Settings Setting up and Running Auto Play Protecting Images Copying Images Moving Images Writing Print Information DPOF Settings Printing Directly from the Camera Using PictBridge Editing Videos Creating Image Lists for Recording to DVD Advanced Playback ...

Страница 99: ... 7 or more images use the jog dial to scroll the screen To view a selected thumbnail image at the normal size slide the zoom lever towards T To Move to Another Album There are 2 ways to do this Use the jog dial to scroll the screen and position the cursor on next album or previous album Then press the OK button Move to another level to display the albums and then select the album to want to play b...

Страница 100: ...W The screen changes to album display Use the jog dial to select the album to want to play back Slide the zoom lever towards T to display the thumbnails for the images in the selected album 3 In the album display slide the zoom lever towards W The screen changes to drive display Use the jog dial to select the drive to want to play back Slide the zoom lever towards T to display the albums on the se...

Страница 101: ...end of the videos in the album in order 1 FILE Plays just the selected video 1 Select playback mode 2 Use the jog dial to select the video you want to play 3 Move the OK button to The video playback icon appears 4 Use the jog dial to select either CONTINUOUS PLAY or 1 FILE and press the OK button OK CANCEL VIDEO PLAYBACK CONTINUOUS PLAY ...

Страница 102: ...ct the video you want to play 3 Move the OK button to Video playback begins 4 In the scene containing the image you want to capture move the OK button to to pause the video Using the jog dial you can use single frame feed or rewind to precisely locate the scene you want to capture as a still image 5 Press the REC button down fully The selected scene is captured as a still image DISPLAY DISPLAY ...

Страница 103: ...k ATTENTION You cannot add chapters after a video has been recorded 1 Select playback mode 2 Use the jog dial to select the video you want to play 3 Slide the zoom lever towards T The chapters are displayed 4 Use the jog dial to select a chapter and press the OK button Video playback begins from the location of the selected chapter DISPLAY PLAY CHAPTER NO PLAYBACK TIME OK CANCEL 100 0001 CHAPTER 1...

Страница 104: ...s T The image is enlarged The pale blue frame displayed in the image shows the currently enlarged area Slide the zoom lever towards W to zoom back out You can move the enlarged area around using and on the OK button Adjust the area by watching the position of the frame on the screen To exit zoomed playback and return to the normal size display press the OK button Slide towards T Slide towards W DI...

Страница 105: ...ever towards T The image is enlarged The pale blue frame displayed in the image shows the currently enlarged area Slide the zoom lever towards W to zoom back out You can move the enlarged area around using and on the OK button Adjust the area by watching the position of the frame on the screen 4 Press the OK button The video is played back at its currently enlarged size When a video is shown enlar...

Страница 106: ...d on a locked SD card Rotated still images are also shown rotated when viewed as thumbnails Rotated images may not appear rotated when viewed on other devices PCs etc 1 Select playback mode and use the jog dial to select the still image you want to rotate 2 Move the OK button to 3 Rotate the still image with the jog dial The image rotates 90 each time you turn the jog dial 4 Press the OK button Th...

Страница 107: ...Press the OK button Each time you press the OK button the information display mode changes as shown below Standard Normal playback mode still image Hidden Image information not shown Information display Detailed image information displayed DISPLAY IMAGE SIZE 640X480 QUALITY FINE SHUTTER SPEED 1 1000s APERTURE F3 3 EXPOSURE BIAS 0 0EV ISO SENSITIVITY ISO200 FLASH ON FILE SIZE 380KB ...

Страница 108: ...U button The play menu appears 2 Use the jog dial to select a menu and press the OK button 3 Specify the desired options in the settings screen Exiting settings returns you to the play menu 4 To exit the play menu press the MENU button The camera reverts to play mode PLAY MENU ERASE AUTO PLAY PROTECT COPY EXIT DVD CREATION LIST PictBridge DPOF LCD BRIGHTNESS EXIT VIDEO EDITING PLAY MENU ...

Страница 109: ...to recording mode Mode switch Returns to playback mode Play Menu Menu item Description Ref ERASE Erases images 129 AUTO PLAY Sets the patterns and types of images played back by Auto play and also runs Auto play 110 PROTECT Applies protection or read only status to images 112 COPY Copies images 115 MOVE Moves images between albums 117 DPOF Selects the images to be printed and sets the number of pr...

Страница 110: ...u screen appears 2 Use the jog dial to select a setting and press the OK button EXECUTE Runs Auto play TARGET IMAGES Selects the types of images shown by Auto play ALBUM Selects the album to be shown by Auto play PLAY INTERVAL Selects the interval used when images change ANIMATION Selects the pattern used when images change PLAY MENU ERASE AUTO PLAY PROTECT COPY EXIT PLAY INTERVAL 1 SEC 3 SEC 5 SE...

Страница 111: ...ecording to DVD p 127 ALBUM CURRENT ALBUM Plays only the currently selected album ALL ALBUMS Plays all the albums PLAY INTERVAL 1 SEC Switches images at 1 second intervals 3 SEC Switches images at 3 second intervals 5 SEC Switches images at 5 second intervals 10 SEC Switches images at 10 second intervals ANIMATION RANDOM Random playback PATTERN 1 Playback using pattern 1 PATTERN 2 Playback using p...

Страница 112: ... image to be protected and press the OK button The icon appears below the protected image To remove the protection press the OK button again To protect multiple images repeat this procedure To move to the previous or next album move the OK button to or respectively 3 Move the OK button to to select OK and press the OK button The images are protected and the play menu reappears If you do not want t...

Страница 113: ... the protection press the OK button again To protect multiple albums repeat this procedure The icon gray is displayed below albums that contain both protected and unprotected images 4 Move the OK button to to select OK and press the OK button The albums are protected and the play menu reappears If you do not want to protect the albums select CANCEL and press the OK button To Protect all the Albums...

Страница 114: ...utton The icon black below the protected image disappears To retain the protection press the OK button again To unprotect multiple images repeat this procedure 3 Move the OK button to to select OK and press the OK button The protection is removed and the play menu reappears To cancel the procedure select CANCEL and press the OK button To Unprotect all the Images in an Album In step 2 move the OK b...

Страница 115: ...elect the image to be copied and press the OK button The icon appears below the image to be copied To stop the image from being copied press the OK button again To copy multiple images repeat this procedure To move to the previous or next album move the OK button to or respectively 4 Move the OK button to to select OK and press the OK button A message appears If you do not want to copy the images ...

Страница 116: ...um move the OK button to to select CREATE NEW and press the OK button Then use the jog dial to select the album type and press the OK button When copying ends the play menu reappears Confirming Images in Enlarged View In step 3 slide the zoom lever towards T Sliding towards W in enlarged view will return to the copy settings screen Copying all Images in an Album In step 3 move the OK button to to ...

Страница 117: ...tton 3 Use the jog dial to select the image to be moved and press the OK button The icon appears below the image to be moved To stop the image from being moved press the OK button again To move multiple images repeat this procedure To move to the previous or next album move the OK button to or respectively 4 Move the OK button to to select OK and press the OK button A message appears If you do not...

Страница 118: ...the images are to be moved and press the OK button To move the images to a new album move the OK button to to select CREATE NEW and press the OK button Then use the jog dial to select the album type and press the OK button When moving ends the play menu reappears Confirming Images in Enlarged View In step 3 slide the zoom lever towards T Sliding towards W in enlarged view will return to the move s...

Страница 119: ...OF Settings 1 From the play menu use the jog dial to select DPOF and press the OK button If the hard disk drive is set as the playback drive a message appears saying ONLY STILL IMAGES ON SD CARDS ARE DPOF TARGET IMAGES Use the jog dial to select TO SD and press the OK button 2 Use the jog dial to select SET and press the OK button 3 Use the jog dial to select the image for which DPOF settings are ...

Страница 120: ... When you have finished setting the number of prints press the OK button 5 Use the jog dial to select OK and press the OK button A file creation confirmation message is displayed 6 Use the jog dial to select YES and press the OK button A date printing confirmation message is displayed 7 Use the jog dial to select YES or NO and press the OK button A printing information DPOF file is created and the...

Страница 121: ...al to select CLEAR ALL and press the OK button A confirmation message is displayed 3 Use the jog dial to select YES and press the OK button A protection setting removal confirmation message is displayed 4 Use the jog dial to select YES or NO and press the OK button YES Clears the DPOF settings and the protection NO Clears the DPOF settings but leaves the protection set The play menu reappears SET ...

Страница 122: ...amera is connected to a printer malfunctions may occur 1 From the play menu use the jog dial to select PictBridge and press the OK button 2 Use the jog dial to select the still image to be printed and then move the OK button to or to set the number of prints To move to the previous or next album move the OK button to or respectively You can set up to 99 prints in all 3 When you have finished setti...

Страница 123: ...ial to change the settings and press the OK button 8 Move the OK button to to select PRINT and press the OK button Printing begins When printing ends the prints setting screen in step 2 reappears If there is no further printing press the MENU button When the DISCONNECT USB CABLE message appears disconnect the USB cable from the camera and printer Confirming Images in Enlarged View In step 2 slide ...

Страница 124: ...al video unchanged make a copy before editing the video See Copying Images p 115 You cannot edit protected videos 1 Display the video to be edited in playback mode 2 Press the MENU button and use the jog dial to select VIDEO EDITING from the play menu Then press the OK button The video editing screen appears 3 Move the OK button to to play the video 4 At the point to be edited move the OK button t...

Страница 125: ...ideo editing screen 7 Use the jog dial to select YES or NO and press the OK button When editing ends the play menu reappears Button Operations during Video Editing Status Button Stopped Playing Paused OK Switches the display Specifies the editing point OK button Plays the video Pauses the video Plays the video OK button Stops the video OK button One touch replay OK button One touch skip Jog dial l...

Страница 126: ...AIL IMAGES is not selected for the video the opening scene of the video automatically becomes the thumbnail screen By specifying a distinctive scene from the video as the thumbnail screen you can make it easier to find a desired video when thumbnails are displayed If you edit a video having a specified thumbnail screen the leading scene after editing is automatically set as the thumbnail screen ev...

Страница 127: ...e playback drive the ONLY IMAGES ON HARD DISK DRIVE ARE DVD CREATION LIST TARGET IMAGES message is displayed Use the jog dial to select TO HDD and press the OK button 2 Use the jog dial to select YES or NO and press the OK button When YES is selected the existing data is loaded Selecting NO clears the existing data and replaces it with the new data If there is no existing data this screen is not d...

Страница 128: ...a DVD if you had erased images set to the DVD creation list create the DVD creation list again See Protecting Images p 112 6 Use the jog dial to select the image to be recorded onto the DVD and press the OK button The icon is displayed below the selected image Repeat this procedure to select the images to be recorded onto the DVD To move to the previous or next album move the OK button to or respe...

Страница 129: ...Erasing Selected Images Erasing Albums Erasing all the Files on a Drive Advanced Deletion ...

Страница 130: ...e OK button 4 Use the jog dial to select the album containing the images you want to delete and then slide the zoom lever towards T 5 Use the jog dial to select an image to be deleted and press the OK button The icon is displayed under the selected image To delete multiple images repeat this procedure To move to the previous or next album move the OK button to or respectively You cannot select pro...

Страница 131: ...ss the OK button An erase confirmation message is displayed 7 Use the jog dial to select YES and press the OK button When erasing ends the menu reappears If you do not want to erase the images select NO and press the OK button Confirming Images in Enlarged View In step 5 slide the zoom lever towards T Sliding towards W in enlarged view will return to the erase screen Erasing all Images in an Album...

Страница 132: ...splayed under the selected album To erase multiple albums repeat this procedure 3 Move the OK button to or to select OK and press the OK button An erase confirmation message appears 4 Use the jog dial to select YES and press the OK button When erasing ends the menu reappears If you do not want to erase the albums select NO and press the OK button If there are any protected images the images other ...

Страница 133: ...he erase menu use the jog dial to select ERASE ALL IMAGES and press the OK button 2 Use the jog dial to select the drive to be erased and press the OK button An erase confirmation message appears 3 Use the jog dial to select YES and press the OK button When erasing ends the menu reappears If you do not want to erase the drive select NO and press the OK button If there are any protected images the ...

Страница 134: ...Changing the Basic Camera Settings Sound Setting the LEDs Auto Power Off LCD linked Power Video Output LANGUAGE System Basic Camera Settings ...

Страница 135: ...U button 2 Use the jog dial to select SETUP and press the OK button 3 Use the jog dial to select a menu and press the OK button The settings for the selected menu are appear 4 Use the jog dial to select the desired setting and press the OK button The selected setting is set and the setup menu reappears 5 To exit the setup menu move the mode switch to the desired mode RECORDING MENU LCD BRIGHTNESS ...

Страница 136: ...s to recording mode Mode switch Returns to playback mode Setup Menu Menu item Description Ref SOUND Sets the startup tone key operation tone and shutter sound 137 LED Specified the front LED settings 138 AUTO POWER OFF Specifies the Auto power off function setting 139 LCD LINKED POWER Specifies whether the camera turns on off when the LCD is opened closed 140 LAN SETTINGS Settings for LAN connecti...

Страница 137: ...tton STARTUP Sets the tone emitted when the camera starts up OPERATION Sets the tone emitted when a button is pressed etc SHUTTER Sets the sound emitted when the shutter is released 3 Use the jog dial to select ON or OFF and press the OK button The selected option is set and the sound settings screen reappears To specify another setting repeat steps 2 and 3 ON A sound is emitted OFF No sound is em...

Страница 138: ...on AF ASSIST LIGHT Sets whether the assist light fires to help focus still photography shots of dark subjects RECORDING LED Sets whether the LED lights during image recording 3 Use the jog dial to select ON or OFF and press the OK button ON The LED lights OFF The LED does not light 4 Press the MENU button to return to the setup menu SETUP SOUND AUTO POWER OFF EXIT LCD LINKED POWER LED CANCEL ON OF...

Страница 139: ...wer off has been activated slide the POWER switch to turn the camera back on 1 From the setup menu use the jog dial to select AUTO POWER OFF and press the OK button 2 Use the jog dial to select the delay time and press the OK button The selected delay is set and the setup menu reappears 5 MIN The camera turns itself off if it is not used for 5 minutes 10 MIN The camera turns itself off if it is no...

Страница 140: ...to select LCD LINKED POWER and press the OK button 2 Use the jog dial to select ON or OFF and press the OK button The selected time is set and the setup menu reappears ON Opening and closing the LCD monitor turns the camera on and off OFF Opening and closing the LCD monitor does not turn the camera on and off SETUP LED AUTO POWER OFF LCD LINKED POWER OFF EXIT LAN SETTINGS VIDEO OUTPUT CANCEL LCD L...

Страница 141: ...jog dial to select VIDEO OUTPUT and press the OK button 2 Use the jog dial to select NTSC or PAL and press the OK button The selected output format is set and the setup menu reappears NTSC NTSC format see Glossary p 198 PAL PAL format see Glossary p 198 SETUP LCD LINKED POWER EXIT LAN SETTINGS DATE AND TIME SETTING LANGUAGE NTSC VIDEO OUTPUT CANCEL VIDEO OUTPUT PAL ...

Страница 142: ... button 2 Use the jog dial to select the language and press the OK button The selected language is set and the setup menu reappears ENGLISH English Japanese FRANÇAIS French DEUTSCH German ESPAÑOL Spanish Chinese Simplified Chinese Traditional SETUP EXIT LAN SETTINGS DATE AND TIME SETTING VIDEO OUTPUT ENGLISH LANGUAGE SYSTEM E CANCEL LANGUAGE ...

Страница 143: ...hicle can trigger the sensor and stop the camera shooting 1 From the setup menu use the jog dial to select SYSTEM and press the OK button The system menu appears 2 Use the jog dial to select HARD DISK PROTECTION and press the OK button 3 Use the jog dial to select ON or OFF and press the OK button The selected option is set and the system menu reappears ON Hard disk drive protection is enabled OFF...

Страница 144: ...ay be created incorrectly and you may not be able to play it back In this event you should erase the video Resetting the System This option returns the camera settings to the values specified at the time of purchase factory default Note that this does not reset the settings for Drive Album the white balance presets the LAN settings or the video output language and date and time settings 1 From the...

Страница 145: ...D card See Protecting Images p 112 A faulty SD card or hard disk drive cannot be formatted correctly Always format an SD card on the camera before using it for the first time You should also format SD cards periodically to remove any fragmented files and maximize the available storage capacity 1 From the setup menu use the jog dial to select SYSTEM and press the OK button The system menu appears 2...

Страница 146: ...s option displays the camera s software version information 4 Use the jog dial to select YES and press the OK button A message is displayed 1 From the setup menu use the jog dial to select SYSTEM and press the OK button The system menu appears 2 Use the jog dial to select VERSION INFORMATION and press the OK button The version information appears Press the MENU button to return to the setup menu Y...

Страница 147: ...Connecting to a TV Connecting to a PC Connecting to a DVD Recorder with DVR Connecting to Other Devices ...

Страница 148: ...ill turned on may disrupt screen display and prevent normal image viewing Select the correct video output for the video device that is connected to the camera See Video Output p 141 LAN USB A V OUT Connecting to a PC Connecting to a TV Phone line A V OUT Connecting to a DVD recorder with DVR Cross cable To the LAN Ethernet port Connecting to a DVD recorder with DVR via a router e g ADSL ADSL modem...

Страница 149: ...uded with the GSC R30 Check that the camera is turned off When connecting the camera to a TV using the cradle connect the AC adapter to the cradle before setting the camera in the cradle p 30 When connecting the camera directly to the TV connect the AC adapter to the camera 1 Plug the bundled AV cable into the A V OUT terminal on the cradle or camera 2 Plug the other end of the AV cable into the A...

Страница 150: ... camera The connection between the camera and the PC is monitored by the Toshiba Device Detector If any other connection monitoring tool is running it may interfere with the correct operation of the Toshiba Device Detector When you connect the camera to the PC shut down any other monitoring tools LAN USB A V OUT Connecting to a PC Connecting to a TV Phone line Connecting to a DVD recorder with DVR...

Страница 151: ...d state As a result data cannot be written to the camera from a computer Some ACDSee functions are also unusable To connect in HIGH SPEED MODE your computer needs to support USB 2 0 Check your computer before connecting the camera 1 Connect the USB terminal on the cradle to the USB port on the PC with the bundled USB cable For GSC R30 The cradle is not included with the GSC R30 Connect the bundled...

Страница 152: ...PC 1 Click the icon in the task tray in the bottom right corner of the PC desktop 2 Follow the disconnection procedure as directed by the on screen messages After completing the procedure disconnect the USB cable from the PC and camera ...

Страница 153: ...r should provide the appropriate LAN cable for the type of connection LAN USB A V OUT Connecting to a PC Connecting to a TV Phone line Connecting to a DVD recorder with DVR Cross cable To the LAN Ethernet port Connecting to a DVD recorder with DVR via a router e g ADSL ADSL modem with internal router To the LAN Ethernet port To the LAN Ethernet port Straight cable To the USB port To the AV ports C...

Страница 154: ... recorder with DVR or the network device port The name of the ports on the DVD recorder with DVR may differ according to the model used If you are connecting the cradle directly to the DVD recorder with DVR with the LAN cable use a crossover type LAN cable If you are connecting via an existing network refer to the instruction manuals for the connected network device 2 Turn on the DVD recorder with...

Страница 155: ...ng the Software Viewing Camera Images on a PC Backing up Camera Data Printing Still Images Resizing Images Copying Still Images from a PC to the Camera Writing Print Information on a PC Recording Images onto DVDs Working with Images on Your PC ...

Страница 156: ...online support http www acdsystems com support index PowerProducer 3 for TOSHIBA This software enables you to edit your photographed images and use them to create DVDs It provides all the functions necessary for writing DVDs including image importing editing menu generation and writing to disc Smart Video Rendering Technology SVRT provides high speed rendering while retaining excellent image quali...

Страница 157: ...crosoft Internet Explorer 5 5 or later For information on installing Microsoft Internet Explorer visit the Microsoft website OS 1 Windows 2000 Professional Windows XP Home Edition or Windows XP Professional CPU 700MHz Pentium III or better 2GHz Pentium 4 or better recommended RAM 128MB or better 256MB or better recommended Hard disk drive capacity ACDSee 7 for Toshiba Min 100MB for installation Po...

Страница 158: ...rmat see Glossary p 198 file The thm file extension indicates that the file is a video thumbnail System files The xml file extension indicates that the file contains information on the connection between the camera and the PC IMPORTANT xml files contain album information Deleting an xml file will cause part of the software to malfunction Do not delete xml files Folder Configuration for Image Backu...

Страница 159: ...ded that you use the AC adapter ACDSee and PowerProducer must be installed at the same time Uninstalling only either one will cause improper functioning 1 Insert the bundled CD ROM into the CD ROM drive on your PC 2 Click the ENGLISH icon If this window does not open double click Setup exe on the CD ROM 3 Click the acdsee7 PowerProducer 3 icon Setup begins Install the software as directed by the o...

Страница 160: ...quire icon in ACDSee The gigashot backup tool can be started up if the Toshiba Device Detector is displayed in the Windows taskbar If the Toshiba Device Detector is not displayed click the Toshiba Device Detector from the Acquire icon in ACDSee IMPORTANT Always play gigashot videos in ACDSee or PowerProducer The videos may not play correctly in other software applications 1 Select USB mode The gig...

Страница 161: ...s a preview of the image selected in the top right of the screen The left side of the window shows the folder view while the right side shows the contents of the folder currently being browsed The icon is displayed for still images and the icon for videos ...

Страница 162: ...e same Data will be backed up in the same order as recorded on the camera A single continuation of data that exceeds a CD s or DVD s capacity cannot be backed up 1 Select USB mode The gigashot backup tool starts up See Connecting to a PC p 150 2 Click Backup data to CD DVD The Create Disc Wizard appears 3 Complete the disc label and then click the Next button Disc writer and Write speed can also b...

Страница 163: ... The folder browsing window opens Specify the folder to be used for saving the data and click the OK button The data in the specified folder will now be synchronized with the data on the camera 4 Select the folder to be copied and click the Next button Each folder on camera Selects all the saved folders on the camera Specified camera folder Selects folders to be copied If you have ticked the Delet...

Страница 164: ...Create a DVD Video using DVD creation list PowerProducer 3 starts up and project loading begins Once loading is completed the Author window opens You can use the Authoring window for tasks such as adding videos and still images changing the menu background image and adding background music 3 Click the button The Final Output window opens 4 Click the button Data writing begins When data writing is ...

Страница 165: ...arts up See Connecting to a PC p 150 2 Click Backup data using Acquire Wizard ACDSee starts up and the Acquire Wizard window opens 3 Click the Next button The window for selecting files opens 4 Select the images to be copied and click the Next button The Output Options window opens 5 Set the options and click the Next button The Copy Files window opens A completion window appears when copying ends...

Страница 166: ...nter Printing Printing with the Camera Connected Directly to the Printer With printers that support PictBridge you can connect the camera directly to the printer to print your images See Printing Directly from the Camera Using PictBridge p 122 1 With your images open in ACDSee select the image to be printed and click Print in the File menu 2 Specify settings such as the paper size and number of pr...

Страница 167: ...zed to select it 2 Click Resize Images in the Tools menu The image resize window opens 3 Check that Size in pixels is selected enter the desired numbers in the Width and Height fields and then click Start Resize Resizing begins Ticking the Preserve original aspect ratio checkbox allows you to resize images without changing its aspect ratio When Percentage of original is selected you can specify th...

Страница 168: ...ing ACDSee ACDSee starts up 3 Select the images you want to copy to the camera and click Copy to Camera in the Create menu 4 Select the image conversion size and click OK Copies all the images at 640 480 pixels regardless of the original image size Copies images as is without resizing The sizes of the resized images vary depending on the source image size Images larger than 640 480 Images are resi...

Страница 169: ...ion settings and your PC Turn on the PC and the camera 1 Select USB mode The gigashot backup tool starts up See Connecting to a PC p 150 2 Click View data using ACDSee ACDSee starts up 3 With your images open in ACDSee select the images you want to write print information for 4 Click DPOF Manager in the Create menu The DPOF Manager window opens 5 Specify the print information number of prints and ...

Страница 170: ...er 3 starts up and the Author window opens You can use this window for tasks such as adding videos and still images changing the menu background image and adding background music Disc Type DVD DVD VR DVD VR Disc Capacity 1 4 GB 4 7 GB 8 5 GB Location NTSC PAL Video Quality HQ high quality SP standard LP long playback EP economy Audio Quality LPCM Dolby Digital 4 Insert a DVD into the drive on the ...

Страница 171: ...aunch PowerProducer and then select Photo Slide Show in the Edit menu To edit a video launch PowerProducer and then select Video clips in the Edit menu For more detailed information on recording and editing DVDs refer to the PowerProducer Help If you selected DVD VR or DVD VR as the Disc Type you cannot select 8 5 GB as the Disc Capacity The original files for still images are also stored on the D...

Страница 172: ...LAN Settings for Connecting to a DVD Recorder with DVR Transferring Videos to a DVD Recorder with DVR Connecting to a DVD Recorder with DVR ...

Страница 173: ...sed Because the password field is blank by default you must enter a password The password can consist of up to 16 half pitch alphanumeric characters PASSWORD Enter the name given as the GROUP PASSWORD for the DVD recorder with DVR To find the GROUP PASSWORD for the DVD recorder with DVR refer to the instruction manual supplied with the DVD recorder with DVR The name for GROUP PASSWORD may differ d...

Страница 174: ... pitch alphanumeric characters GROUP NAME Enter the name given as the GROUP NAME for the DVD recorder with DVR To find the GROUP NAME for the DVD recorder with DVR refer to the instruction manual supplied with the DVD recorder with DVR The name for GROUP NAME may differ depending on the recorder used Because the password field is blank by default you must enter a password The password can consist ...

Страница 175: ... 5 When you have completed all the settings use the jog dial to select OK and press the OK button If the IP CONFIG setting is DHCP this completes the settings If the IP CONFIG setting is MANUAL proceed to step 6 LCD LINKED POWER VIDEO OUTPUT EXIT SETUP LAN SETTINGS LANGUAGE AUTO POWER OFF LAN SETTINGS CAMERA NAME GSC R60 GROUP NAME PASSWORD IP CONFIG DHCP OK CANCEL SELECT CHANGE LAN SETTINGS CAMER...

Страница 176: ...mpleted all the settings use the jog dial to select OK and press the OK button OK CANCEL SELECT CHANGE IP ADDRESS NETMASK ROUTER MAC ADDRESS 192 168 1 20 255 255 255 0 192 168 1 1 00 08 0D 59 D3 3E IP CONFIG OK CANCEL SELECT CHANGE IP ADDRESS NETMASK ROUTER MAC ADDRESS 192 168 1 20 255 255 255 0 192 168 1 1 00 08 0D 59 D3 3E IP CONFIG OK CANCEL SELECT CHANGE IP ADDRESS NETMASK ROUTER MAC ADDRESS 1...

Страница 177: ...pter to the cradle before setting the camera in the cradle p 30 Connect the cradle to a DVD recorder with DVR or network device with a LAN cable sold separately p 153 1 Turn on power to the DVD recorder with DVR Once it becomes possible to record or playback press the cradle s LAN button The camera starts up in LAN mode and the LAN LED on the cradle lights 2 Use the jog dial to select the DVD reco...

Страница 178: ... select HDD or DVD and press the OK button If you selected DVD load a recordable DVD into the DVD recorder with DVR 8 Use the jog dial to select TRANSFER and press the OK button Transferring begins To cancel transferring in progress press the MENU button When transferring ends the LAN screen reappears Press the POWER button on the cradle and turn off the camera LAN 101 0001 SELECT OK SELECT ALL CA...

Страница 179: ...ransfer POWER OFF will be displayed on the camera s LCD monitor Transferred images are saved in the gigashot folder on the DVD recorder with DVR Confirming Images in Enlarged View In step 4 slide the zoom lever towards T Sliding towards W in enlarged view will return to the select images to transfer screen Transferring all Images in an Album In step 4 move the OK button to to select SELECT ALL the...

Страница 180: ...Specifications Troubleshooting Error Messages Glossary Index Appendix ...

Страница 181: ...EV increments Still photography sensitivity Manual ISO100 200 equivalents Auto ISO100 200 equivalents Shutter speeds Videos 1 7 5 to 1 10000 sec Still images 8 to 1 1000 sec combination electronic and mechanical shutter Flash Firing modes Auto fires automatically in low light Red eye reduction fires automatically in low light Forced flash Suppressed flash Effective range Approx 0 5 to 2 5 m teleph...

Страница 182: ...el may not be compatible with features and or specifications that may be added in the future Videos Recording format MPEG 2 PS Recorded pixels 720 480 LP 352 480 Audio Dolby Digital 48kHz 16 bit stereo 192 384kbps Still images Recording format JPEG Exif 2 21 DCF 1 0 compliant Recorded pixels 2M 1600 1200 1 2M 1280 960 or 0 3M 640 480 Operating environment Temperature 41 F 5 C to 104 F 40 C running...

Страница 183: ...e battery correctly Connect the AC adapter 28 30 The battery is out of charge Charge the battery 30 The battery has reached the end of its service life Replace it with a new battery 28 The camera runs out of power too quickly The battery is out of charge Charge the battery 30 The terminals are soiled Wipe the terminals on the battery and in the camera with a clean dry cloth 32 The battery has reac...

Страница 184: ...already an album numbered 999 on the recording destination drive Use another SD card Change the destination drive Erase album no 999 33 74 132 The SD card is not recognized The SD card terminals are soiled Wipe the SD card terminals with a clean dry cloth The SD card is damaged Use another SD card 33 The LCD monitor is difficult to see The LCD monitor brightness setting is wrong Specify an LCD BRI...

Страница 185: ...ive Erase some images Edit some videos Move some images to a different drive or onto a PC or DVD etc 130 124 162 The remote control does not work The remote control battery is not loaded in the correct direction Load the battery correctly 39 The battery in the remote control is flat Fit a new battery 39 You are outside the effective range Use the remote control at a distance of up to around 4 mete...

Страница 186: ...cording destination drive but the SD card is locked Unlock the SD card Use another SD card Change the destination drive 22 33 74 There is no available space on the recording destination drive Use another SD card Change the destination drive Erase some images Edit one or more videos Move some images to a different drive or onto a PC or DVD etc 33 74 130 124 162 The number of images has reached 32 0...

Страница 187: ...cording There is less than 10 seconds of available video recording time left You cannot shoot still images during video recording when there is less than 10 seconds of available video recording time left 67 An image with the file number 9998 or 9999 exists Stop video recording and create a new album before trying to shoot still images 72 Video recording suddenly stopped There is no more space avai...

Страница 188: ...r to the subject to take the shot Set the flash to SUPPRESSED FLASH 60 The subject is in very bright surroundings Set a positive exposure bias setting Set the backlight compensation to ON Use the SPOT metering mode 64 65 89 There is insufficient light Use the NIGHT SCENE scene setting Set the ISO sensitivity to ISO200 still image 58 84 A negative exposure bias setting is set Set the correct exposu...

Страница 189: ...ed on a PC etc Restore the original folder name or file names 158 I can t play back videos The folder name or file name was changed on a PC etc Restore the original folder name or file names 158 You are trying to play a video that was shot on a different camera Play videos that were shot on this camera I can t hear any sound The volume is set too low Raise the volume 53 The thumbnail image suddenl...

Страница 190: ... protection 114 DPOF settings are specified for the image Clear the DPOF settings 121 The SD card is locked Unlock the SD card 22 I can t select a drive as the move destination The total size of the images to be moved exceeds the amount of available space on the drive Reselect the images to be moved Change to another SD card as the destination drive Change the destination drive Erase some images o...

Страница 191: ... using PictBridge The printer does not support PictBridge Check your printer You used the wrong procedure when connecting the USB cable Connect the cable using the correct procedure 122 I can t change the number of prints in the PictBridge settings The total number of prints has already reached 99 The maximum number of prints you can specify is 99 123 I can t edit an video You selected a still ima...

Страница 192: ...an album does not erase the album itself To erase an album use erase selection in the album display to select the album to be erased 132 I can t erase the contents of an album using erase selection There are no images in the album You cannot use erase selection to erase the contents of an album that contains no images 130 Erasing images does not increase the available space on the hard disk drive ...

Страница 193: ...r PC supports a HIGH SPEED MODE connection 151 The SD card is locked Unlock the SD card 22 The total size of the files to be copied exceeds amount of available space Reselect the images to be copied Use a new SD card as the copy destination drive Erase some images on the copy destination drive Edit some videos on the copy destination drive Move some of the images on the copy destination drive to a...

Страница 194: ...ctly 30 The group name or password is incorrect Enter the correct group name and password 173 The IP CONFIG settings are incorrect Set the correct IP CONFIG settings 173 Your DVD recorder with DVR does not support Net Dubbing You can only connect DVD recorders with DVR that support Net Dubbing Check your DVD recorder with DVR I can t copy images to the DVD recorder with DVR There is no available s...

Страница 195: ...00 VIDEOS CANNOT BE EDITED You attempted to edit a videos shot on a different brand of camera DPOF ERROR A DPOF related error occurred LIST FILE ERROR A DVD creation list error occurred CANNOT USE THIS CARD The card used is damaged or incompatible THIS CARD IS NOT FORMATTED The SD card used is not formatted or is formatted using NTFS GROUP NAME OR PASSWORD NOT INPUT A group name or password requir...

Страница 196: ...AN ERROR OCCURRED DISCONNECT USB CABLE An error occurred during USB connection STORING INTERRUPTED The media stopped for a set time during recording and recording was interrupted HARD DISK DRIVE CANNOT BE ACCESSED The camera detected that the camera had been dropped and stopped access to the hard disk drive Message Explanation ...

Страница 197: ...sed for printing to be written directly onto SD cards Files in this format allow prints to be obtained quickly and easily from a DPOF compatible printer or commercial developing and printing service Exif Exchangeable Image File format A full color still image file format for digital still cameras approved by the Japan Electronics and Information Technology Industries Association JEITA Exif is comp...

Страница 198: ...ces to print by connecting directly to a PictBridge compatible printer via a USB cable In addition to allowing settings such as the number of prints to be specified on a digital camera PictBridge can be used for a range of functions Red eye effect An effect in which the pupils of people s eyes appear bright red in shots taken in dark situations using a flash The effect is caused by the light of th...

Страница 199: ...y 84 LAN settings 173 LANGUAGE 142 LCD brightness 96 LCD linked power 34 140 LED 25 26 138 Manual focus 63 Metering mode 89 Microphone sensitivity 87 Move 117 NTSC 141 198 One touch replay 54 One touch skip 54 PAL 141 198 PC connection 150 PictBridge 122 198 Play menu 108 PowerProducer 156 164 170 Preview 94 Protect 112 REC PAUSE 45 95 Recording LED 138 Recording menu 69 Remote control 39 Reset 14...

Страница 200: ...amcorders sold and used for commercial purposes have a limited warranty for all parts and labor which warranty begins on the date of original retail purchase and ends on the date that is ninety 90 days thereafter Owner s Manual and Product Registration Card Read this owner s manual thoroughly before operating this gigashot Digital Camcorder Complete and mail the enclosed product registration card ...

Страница 201: ...hiba com ALL WARRANTIES IMPLIED BY THE LAW OF ANY STATE OF THEU S A INCLUDING THE IMPLIED WARRANTIES OF MERCHANTABILITY AND FITNESS FOR A PARTICULAR PURPOSE ARE EXPRESSLY LIMITED TO THE DURATION OF THE LIMITED WARRANTIES SET FORTH ABOVE WITH THE EXCEPTION OF ANY WARRANTIES IMPLIED BY THE LAW OF ANY STATE OF THE U S A AS HEREBY LIMITED THE FOREGOING WARRANTY IS EXCLUSIVE AND IN LIEU OF ALL OTHER WA...

Страница 202: ...h the date of first rental or thirty 30 days from the date of shipment to the rental firm whichever comes first Limited Warranty for Commercial Units TCL warrants Camcorders that are used for any commercial or business purposes as follows all parts are warranted against material defects in materials or workmanship that result in the Camcorder failing for a period of ninety 90 days after the date o...

Страница 203: ...ERM OF THIS EXPRESS WRITTEN LIMITED WARRANTY TO THE EXTENT NOT PRECLUDED BY LAW THIS WRITTEN WARRANTY SUPERCEDES AND SPECIFICALLY DISCLAIMS ANY OTHER WARRANTY OR REPRESENTATION NOT STATED IN THIS WARRANTY WHETHER MADE BY TCL TOSHIBA CORPORATION THEIR AFFILIATES ADRs AND ASPs AND WHETHER MADE ORALLY OR IN WRITING INCLUDING ANY STATEMENT IN ANY BROCHURE PRESS RELEASE ANNOUNCEMENT ADVERTISEMENT POINT...

Страница 204: ...of TCL Critical Applications The Product you have purchased is not designed for any critical applications Critical applications means life support systems medical applications connections to implanted medical devices commercial transportation nuclear facilities or systems or any other applications where Product failure could lead to injury to persons or loss of life or catastrophic property damage...

Страница 205: ......

Страница 206: ......

Страница 207: ......

Страница 208: ......

Страница 209: ......

Страница 210: ......

Страница 211: ......

Страница 212: ......

Страница 213: ......

Страница 214: ......

Страница 215: ......

Страница 216: ......

Страница 217: ......

Страница 218: ......

Страница 219: ......

Страница 220: ......

Страница 221: ......

Страница 222: ......

Страница 223: ......

Страница 224: ......

Страница 225: ......

Страница 226: ......

Страница 227: ......

Страница 228: ......

Страница 229: ......

Страница 230: ......

Страница 231: ......

Страница 232: ......

Страница 233: ......

Страница 234: ......

Страница 235: ......

Страница 236: ......

Страница 237: ......

Страница 238: ......

Страница 239: ......

Страница 240: ......

Страница 241: ......

Страница 242: ......

Страница 243: ......

Страница 244: ......

Страница 245: ......

Страница 246: ......

Страница 247: ......

Страница 248: ......

Страница 249: ......

Страница 250: ......

Страница 251: ......

Страница 252: ......

Страница 253: ......

Страница 254: ......

Страница 255: ......

Страница 256: ......

Страница 257: ......

Страница 258: ......

Страница 259: ......

Страница 260: ......

Страница 261: ......

Страница 262: ......

Страница 263: ......

Страница 264: ......

Страница 265: ......

Страница 266: ......

Страница 267: ......

Отзывы: