background image


Wi-Fi (IEEE 802.11b) WLAN Adaptor 

User's Manual 

8-3 

TOSHIBA Pocket PC e740

 Version   

1

   Last Saved on 10/05/2002 21:02 

ENGLISH using  Euro_C.dot –– Printed on 10/05/2002 as PDA3_UK 

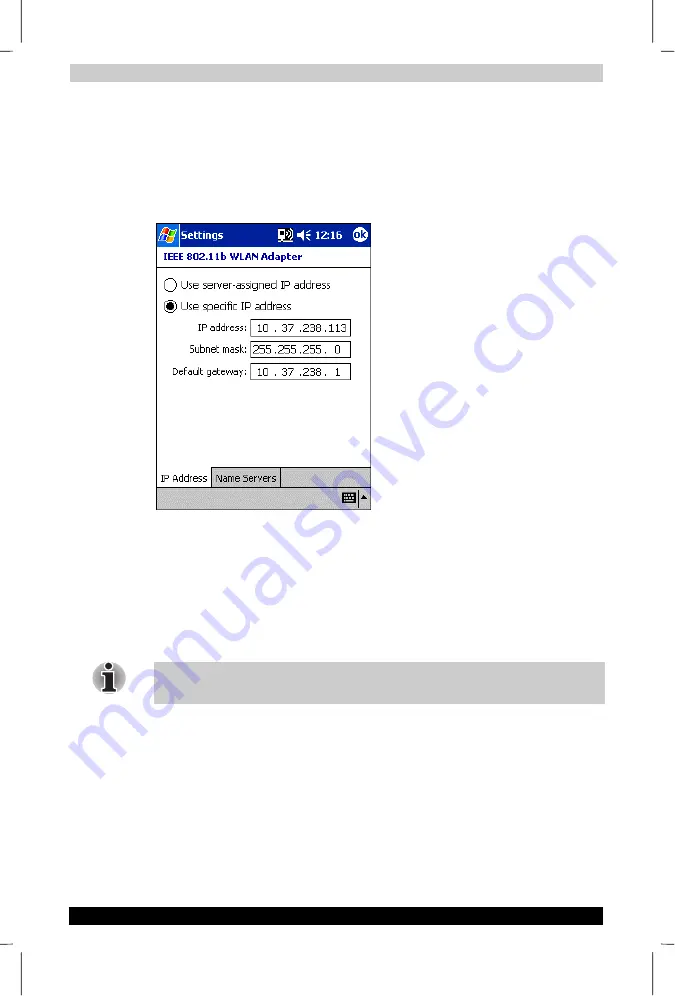
IP Address Page 

Use IP Address Page to view and edit the 

IP address

Subnet mask

 and 

Default gateway

Click Start > Settings > Connections > Network Adaptors >  
“IEEE 802.11b WLAN Adaptor” > Properties > IP Address 


■ 

IP Address: 

IP Address is Internet Protocol Address; a numeric 

address such as 10.37.238.100 that the domain name server 
translates into a domain name. Each node on the IP network should 
have a unique IP address. 

■ 

Subnet mask: 

A number used to identify a subnetwork when multiple 

networks share an IP address. For example 255.255.255.0 

■ 

Default gateway: 

This is a device used to forward IP packets to and 

from a remote destination. 

Please check with your network administrator for these connection 
settings. 


Содержание e740

Страница 1: ...duction TOSHIBA Pocket PC e740 i TOSHIBA Pocket PC e740 Version 1 Last Saved on 10 05 2002 21 02 ENGLISH using Euro_C dot Printed on 10 05 2002 as PDA3_UK Pocket PC e740 User s Manual TOSHIBA Pocket PC e740 ...

Страница 2: ... Toshiba No patent liability is assumed with respect to the use of the information contained herein TOSHIBA Pocket PC e740 User s Manual First edition March 2002 Trademarks Microsoft ActiveSync Outlook Pocket Outlook Windows Windows CE and the Windows logo are either registered trademarks or trademarks of Microsoft Corporation in the United States and or other countries Microsoft products are lice...

Страница 3: ...ure the safe use of your Pocket PC The Safety Instructions contained in this manual have been categorized in accordance with the seriousness of the potential hazards through the use of Signal Words Signal icons for WARNING CAUTION and NOTE will be followed by important safety information that must be carefully reviewed Icon Meaning WARNING Indicates a potentially hazardous situation which could re...

Страница 4: ...EG Ytteligare information Produkten uppfyller kraven enligt lägspänningsdirektiver 73 23 EEC och EMC direktiv 89 336 EEC Limitation of liability Toshiba Corporation is in no way liable for any damage resulting from earthquakes fire actions on the part of a third party other accidents beyond the control of Toshiba Corporation or intentional acts negligence or misuse on the part of the user or any u...

Страница 5: ...les and clips to enter inside the Pocket PC Do not connect the terminals metallic parts with metallic objects Entry of or contact with foreign objects can cause heat generation or ignition If the Pocket PC emits an unusual smell or sound or generates smoke turn the battery switch to the off position immediately and disconnect the AC adaptor from the power outlet Continued use of the Pocket PC unde...

Страница 6: ...earphone sold separately connected to it do not raise the sound volume level too high Raising the sound to high volume levels can impair your hearing ability If the display is broken and the liquid crystal liquid leaks out do not touch it In the event of contact with the skin the liquid crystal can cause a rash on the skin If the liquid crystal should come into contact with the skin or clothing wa...

Страница 7: ...ir can cause fire electric shock or injury Please contact the dealer from whom the Pocket PC was purchased and request repair service CAUTIONS When unplugging the power plug from the outlet disconnect the power cord by grasping the power plug itself Pulling out the power cord by grasping the cable can cause ignition or electric shock due to cable damage When handling the power cord observe the fol...

Страница 8: ...owing it to dry completely When charging the battery the case of the AC adaptor can become warm but this is not abnormal Disconnect the power plug from the outlet when not in use Avoid inadvertently sitting while the Pocket PC is inserted in the back pocket of trousers etc Sitting under these circumstances can cause damage or failure Do not place objects or drop them on top of the Pocket PC When t...

Страница 9: ...nal sold separately SD memory card please be sure to read the relevant instruction manual and ensure that you are aware of correct handling procedures Do not allow the card to be subjected to any severe shock while connected to the unit Such shocks can cause damage or failure Do not carry the unit with the card still connected Carrying the unit with the card connected can cause loss of the card du...

Страница 10: ...a loss from this product caused by disturbances generated by other devices or machines in the nearby surrounding area Therefore Toshiba strongly recommends that the electromagnetic compatibility of this product be suitably tested in all non approved working environments before use In the case of automobiles or aircraft the manufacturer or airline respectively should be asked for permission before ...

Страница 11: ...lying with the FCC class B limits may be attached to this equipment Operation with non compliant peripherals or peripherals not recommended by Toshiba is likely to result in interference to radio and TV reception Shielded cables must be used between the external devices and the computer s USB ports external monitor port PS 2 keyboard port and PS 2 mouse port Changes or modifications made to this e...

Страница 12: ... there is no guarantee that interference will not occur in a particular installation If this equipment does cause harmful interference to radio or television reception which can be determined by turning the equipment off and on the user is encouraged to try to correct the interference by one of the following measures Reorient or relocate the receiving antenna Increase the separation between the eq...

Страница 13: ... 2 12 Connecting to a Computer 2 17 Today Screen 2 19 Programs 2 21 Navigation Bar and Command Bar 2 22 Pop up Menus 2 23 Notifications 2 23 Enter Information on Your Toshiba Pocket PC 2 24 Find and Organize Information 2 33 Customize Your Toshiba Pocket PC 2 34 Chapter 3 Microsoft ActiveSync 3 1 Chapter 4 Microsoft Pocket Outlook 4 1 Calendar Scheduling Appointments and Meetings 4 2 Contacts Trac...

Страница 14: ...annels 6 3 Using Pocket Internet Explorer 6 3 Chapter 7 Getting Connected 7 1 Transfer Items Using Infrared 7 2 Connect to the Internet 7 2 Connect to Work 7 4 End a Connection 7 6 Connect Directly to an E mail Server 7 6 Get Help on Connecting 7 6 Chapter 8 Wi Fi IEEE 802 11b WLAN Adaptor 8 1 Overview 8 1 IP Address Page 8 3 TMU Traffic Monitoring Utility 8 12 Chapter 9 Bluetooth Settings Help 9 ...

Страница 15: ... Presenter 10 2 Opening a Presentation and Using View Modes 10 4 IA Screen Mirror 10 12 Copyright and Contact Information 10 13 Chapter 11 Optional Functions 11 1 Home 11 1 Home Help 11 6 How to Make a Backup 11 10 Carrying Out Restore Operation 11 12 Data Backup Help 11 13 Chapter 12 Additional Information 12 1 Troubleshooting 12 1 Resetting 12 4 Initializing 12 5 Specifications 12 5 Appendix A F...

Страница 16: ... and meetings You are quickly able to tell your manager your available times For more information on scheduling appointments and meetings see Chapter 4 You re meeting your friends tonight for dinner and a movie You download the latest movie information from the Internet to your computer and then synchronize it with your device At dinner you pull out your Toshiba Pocket PC device and review your mo...

Страница 17: ...de to additional information to help you use your Pocket PC For information on See this source Programs on your Pocket PC This User s Manual and device Help To view Help tap and then Help Additional programs that can be installed on the Pocket PC The Toshiba Pocket PC Companion CD Connecting to and synchronizing with a computer The Quick Start Card or ActiveSync Help on your computer To view Help ...

Страница 18: ... and customization of your Toshiba Pocket PC Parts Names and Function Main unit and optional Expansion Pack front view TOSHIBA Pocket PC e740 User s Manual 2 1 Program Buttons 1 2 3 4 from the left Speaker Touch Screen Stereo Headphone Jack Release Button Lock Power Button Cursor Button Navigation Button Guide Pin Cradle Connection Port Recording Button Program Button 5 Stylus Battery Alarm LED Wi...

Страница 19: ...adle Initial Setting of Program Button Program button 1 Calendar Program button 2 Tasks Program button 3 Home Program button 4 Contacts Program button 5 Voice recorder Cradle Connection Port DC IN Socket Expansion Pack optional Battery Switch Cradle Connection Port Wireless Communication Switch Wireless LAN Bluetooth models only USB Port External Monitor Port ...

Страница 20: ...s the unit and the front light on and off Power button When the power is off When the power is on Press and hold it The power turns on The front light alternately turns on off Press it quickly The power turns on The power turns off Toshiba Scroller Stereo Headphone Jack Microphone Stylus SD Card Slot Infrared Port CF II Card slot DC IN Socket Battery Pack Lock Expansion Pack Reset Button CF Releas...

Страница 21: ...top position at any time will lead to loss of data Wireless Communication Switch and LED Off Wireless Communication Switch is turned OFF Orange Wireless Communication Switch is turned ON Battery Alarm LED The alarm lamp indicates the machine condition Flashing orange When the preset alarm time which was set through Calendar or Tasks goes off the lamp flashes Orange Indicates charging of the batter...

Страница 22: ...o perform When you operate the touch screen of the Toshiba Pocket PC e740 use the supplied stylus If the tip of the stylus is damaged do not use it If you operate the touch screen with a damaged stylus or a ballpoint pen the touch screen may be damaged When the stylus is damaged please purchase a new one About the Cursor Button You can move a cursor selection display on the screen by pressing the ...

Страница 23: ...can use two charging methods Turn the unit off before connecting the AC Adapter and Pocket PC Method 1 Connect the supplied AC adapter and the cradle as shown in the figure below and then insert the Toshiba Pocket PC into the cradle Method 2 Connect the supplied AC adapter and the Toshiba Pocket PC as shown in the figure below For charging the battery maintain an ambient temperature from approx 5 ...

Страница 24: ...tach battery from the Pocket PC You cannot turn on the power if the Battery Pack Lock is at the Release position You can change the main battery without data loss because your Toshiba Pocket PC e740 has a rechargeable backup battery But the capacity of the backup battery is small When you change the main battery please attach the new main battery and switch Battery Pack Lock to the Lock position a...

Страница 25: ...t Printed on 10 05 2002 as PDA3_UK How to Use the High Capacity Battery Pack 1 Turn off the power 2 Switch the Battery Pack Lock to release the battery pack 3 Remove battery from the Pocket PC 4 Connect the High Capacity Battery pack to the Pocket PC 5 Switch the Battery Pack Lock to lock the High Capacity Battery pack ...

Страница 26: ...een brightness to power save mode Med Bright or low Bright Also shorten the light turn off time For more information see Customize Your Toshiba Pocket PC in this chapter Use the Toshiba Pocket PC with an ambient temperature between 15 C 59 F and 25 C 77 F This temperature range is the most effective for the battery When you use the Toshiba Pocket PC e740 in high or low temperature environments the...

Страница 27: ...charges even if the device is not being used When the Toshiba Pocket PC is left for a long time the battery of the Toshiba Pocket PC may completely discharge As a precaution it is recommended that you save the Toshiba Pocket PC s memory data to your computer or to a storage card The manufacturer is not responsible for data change or data loss due to battery discharge How to Use the optional Expans...

Страница 28: ...ut the image to the external monitor Other applications cannot output the image to the external monitor USB Port The USB Port allows you to connect a USB keyboard to the Pocket PC Only use a Microsoft Pocket PC compatible keyboard Release Button When being pressed the Release Button releases the Expansion Pack from the Pocket PC e740 Connecting the Expansion Pack to the Pocket PC 1 Plug the Guide ...

Страница 29: ...r object besides the stylus touches the screen during alignment the alignment will be cancelled and you must repeat the procedure 3 Read how to use the stylus Read and understand the stylus operation and then tap NEXT For more information on stylus operation see How to Use the Stylus in this chapter 4 Learn the pop up menu operation Read the on screen explanation and then follow the instructions D...

Страница 30: ...NGLISH using Euro_C dot Printed on 10 05 2002 as PDA3_UK Inserting a CF II Card 1 Turn off the power 2 Remove the dummy card 3 Insert the CF II card confirming the direction of the card Line up the side grooves of the card and the groove edge of the card slot Insert the card smoothly and completely ...

Страница 31: ...nted on 10 05 2002 as PDA3_UK To remove a card 1 Turn off the power 2 Lightly press down the release button with the stylus The button will pop out Press down on the release button again The card will withdraw slightly from the slot 3 Pull the card straight up to remove Use the stylus to release the CF II card Release Button ...

Страница 32: ...on 10 05 2002 21 02 ENGLISH using Euro_C dot Printed on 10 05 2002 as PDA3_UK Inserting an SD Card 1 Turn off the power 2 Remove the dummy card 3 Insert the card with its contact surface metal contact surface facing the back of the Toshiba Pocket PC 4 Press down until it clicks ...

Страница 33: ...g sound is heard The card will pop out slightly from the slot 3 Pull the card straight up to remove it When storage cards are inserted in both the CF and SD card slots one of them may only be accessible depending on the application or the Settings operation typically the first storage card inserted is accessed Typical examples Notes of Pocket Outlook Saving the destination selection of the Options...

Страница 34: ... Before connecting your Toshiba Pocket PC to a computer check the following ActiveSync has been installed on your computer See Chapter 3 The position of connecting port on the computer may differ according to the computer type To Connect Using the Supplied Cradle 1 Connect the USB cradle to your computer as shown in the illustration below 2 Insert the Pocket PC into the cradle ...

Страница 35: ...onnect directly using a connection cable Connect the Pocket PC directly to your computer using an optional USB Client cable When the Pocket PC is connected to another device via a USB Client cable do not plug the AC adapter directly into the Pocket PC as this may lead to interference Instead plug the AC adapter into the port on the USB Client cable connector ...

Страница 36: ...y or after 4 hours of inactivity you ll see the Today screen You can also display it by tapping and then Today On the Today screen you can see at a glance important information for the day Tap to view notification messages Tap to change the volume level or mute all sounds Tap to change date and time Tap to open an item Tap to switch to a program Your day at a glance Tap to view connection status T...

Страница 37: ...only Refer to chapter 9 Turns all sounds on and off Backup battery is low Main batteries are charging Main batteries are low Main batteries are very low Main batteries are full Connection is active Synchronization is beginning or ending Synchronization is occurring Notification that one or more instant messages were received Notification that one or more e mail messages were received If more notif...

Страница 38: ...s on the label Drag the stylus off the label so that the command is not carried out The following table contains a partial list of programs that are on your device Look on the Toshiba Pocket PC Companion CD for additional programs that you can install onto your device Icon Program Description ActiveSync Synchronize information between your Pocket PC and computer Calendar Keep track of your appoint...

Страница 39: ...and bar at the bottom of the screen to perform tasks in programs The command bar includes menu names buttons and the Input Panel button To create a new item in the current program tap New To see the name of a button tap and hold the stylus on the button Drag the stylus off the button so that the command is not carried out Tap to change volume or mute the Pocket PC Tap to quickly select a program y...

Страница 40: ...nd tap the action you want to perform To close the menu without performing an action tap anywhere outside the menu Notifications Your device reminds you in a variety of ways when you have something to do For example if you ve set up an appointment in Calendar a task with a due date in Tasks or an alarm in Clock you ll be notified in any of the following ways A message box appears on the screen A s...

Страница 41: ...message Use Microsoft ActiveSync to synchronize or copy information from your desktop computer to your device For more information on ActiveSync see ActiveSync Help on your computer Entering Text Using the Input Panel Use the input panel to enter information in any program on your device You can either type using the soft keyboard or write using Letter Recognizer Block Recognizer or Transcriber In...

Страница 42: ...d at one time tap Settings Personal tab Input and then the Word Completion tab To type with the soft keyboard 1 Tap the arrow next to the Input Panel button and then Keyboard 2 On the soft keyboard that is displayed tap the keys with your stylus To use Letter Recognizer With Letter Recognizer you can write letters using the stylus just as you would on paper 1 Tap the arrow next to the Input Panel ...

Страница 43: ...ber With Transcriber you can write anywhere on the screen using the stylus just as you would on paper Unlike Letter Recognizer and Block Recognizer you can write a sentence or more of information Then pause and let Transcriber change the written characters to typed characters 1 Tap the arrow next to the Input Panel button and then Transcriber 2 Write anywhere on the screen For specific instruction...

Страница 44: ...s that accept writing may not have the Pen button See the documentation for that program to find out how to switch to writing mode To select writing If you want to edit or format writing you must select it first 1 Tap and hold the stylus next to the text you want to select until the insertion point appears 2 Without lifting drag the stylus across the text you want to select If you accidentally wri...

Страница 45: ...ting to text Tap Tools and then Recognize If you want to convert only certain words select them before tapping Recognize on the Tools menu or tap and hold the selected words and then tap Recognize on the pop up menu If a word is not recognized it is left as writing The writing is turned into text Select the text you want to convert and Tap Recognize on the pop up menu ...

Страница 46: ...lines and draw descenders below the line Write the cross of the t and apostrophes below the top line so that they are not confused with the word above Write periods and commas above the line For better recognition try increasing the zoom level to 300 using the Tools menu Write the letters of a word closely and leave big gaps between words so that the device can easily tell where words begin and en...

Страница 47: ...ngs that do not cross three ruled lines will be treated as writing You may want to change the zoom level so that you can more easily work on or view your drawing Tap Tools and then a zoom level To select a drawing If you want to edit or format a drawing you must select it first Tap and hold the stylus on the drawing until the selection handle appears To select multiple drawings deselect the Pen bu...

Страница 48: ...e recording in a note open the note first In the Inbox program you can add a recording to an e mail message To create a recording 1 Hold your device s microphone near your mouth or other source of sound 2 Press and hold the Recording button on your Pocket PC until you hear a beep 3 While holding down the Recording button make your recording 4 To stop recording release the Recording button Two beep...

Страница 49: ...ssenger use My Text to quickly insert preset or frequently used messages into the text entry area To insert a message tap My Text and tap a message You can add text after inserting a My Text message before sending it To edit a My Text message in the Tools menu tap Edit and then tap My Text Messages Select the message you wish to edit and make desired changes Tap to select a prewritten message ...

Страница 50: ...tart the search To quickly find information that is taking up storage space on your Pocket PC select Larger than 64 KB in Type You can also use the File Explorer to find files on your device and to organize these files into folders On the menu tap Programs and then File Explorer You can move files in File Explorer by tapping and holding the item you want to move and then tapping Cut or Copy and Pa...

Страница 51: ...ted using special installation programs with a xip extension All other programs and data files added to your device after factory installation are stored in RAM random access memory You can install any program created for your device as long as your device has enough memory The most popular place to find software for your device is on the Pocket PC Web site http www microsoft com mobile pocketpc T...

Страница 52: ...the program listed you can either use File Explorer on the device to move the program to the Start Menu folder or use ActiveSync on the computer to create a shortcut to the program and place the shortcut in the Start Menu folder Using File Explorer on the device Tap Programs File Explorer and locate the program tap the folder list labeled My Documents by default and then My Device to see a list of...

Страница 53: ...enter the password even for displaying the Password setting screen In case you forget the password it is necessary to initialize the Pocket PC Please note that when initialization is executed data or settings stored in the Pocket PC are all deleted To Set Front Light You can set the screen brightness for better sight according to a place of use You can also set the time that elapses until the fron...

Страница 54: ... using Euro_C dot Printed on 10 05 2002 as PDA3_UK or set the front light on External power 3 Set the Brightness level 4 When finished tap OK to return to the System tab screen Tap and set the front light brightness level by move the cursor up or down If Power Save is activated the front light turns off ...

Страница 55: ...to the System tab screen Setting Memory You can adjust the data storing memory and the program running memory You can also confirm the free space of a storage card and so on Memory for the Pocket PC is managed automatically To change Memory allocation 1 Tap and then Settings On the System tab tap Memory to display the Memory setting screen 2 Drag the knob widthwise to adjust the memory allocation ...

Страница 56: ...02 21 02 ENGLISH using Euro_C dot Printed on 10 05 2002 as PDA3_UK Setting Microphone Tap and then Settings On the System tab tap Microphone This program is setting AGC Enable or Disable Enable AGC Turn on automatic gain control for Microphone Disable AGC Adopt a fix gain s for Microphone ...

Страница 57: ...ou can also Back up and restore your device data Copy rather than synchronize files between your device and computer Control when synchronization occurs by selecting a synchronization mode For example you can synchronize continually while connected to your computer or only when you choose the synchronize command Select which information types are synchronized and control how much data is synchroni...

Страница 58: ...device from your PC and you re ready to go Once you have set up ActiveSync and completed the first synchronization process you can initiate synchronization from your device To switch to ActiveSync on your device tap and then tap ActiveSync For information about using ActiveSync on your PC start ActiveSync on your PC and then see ActiveSync Help For more information about ActiveSync on your device ...

Страница 59: ... to address e mail messages in Inbox Using ActiveSync you can synchronize information in Microsoft Outlook or Microsoft Exchange on your computer with your device You can also synchronize this information directly with a Microsoft Exchange server Each time you synchronize ActiveSync compares the changes you made on your device and computer or server and updates both computers with the latest infor...

Страница 60: ...lendar to schedule appointments including meetings and other events You can check your appointments in one of several views Agenda Day Week Month and Year and easily switch views by using the View menu You can customize the Calendar display such as changing the first day of the week by tapping Options on the Tools menu Tap to create a new appointment Tap to display or edit the appointment details ...

Страница 61: ...ed to hide the input panel to see all available fields 6 To add notes tap the Notes tab You can enter text draw or create a recording For more information on creating notes see Notes Capturing Thoughts and Ideas later in this chapter 7 When finished tap OK to return to the calendar If you select Remind me in an appointment your device will remind you according to the options set in Settings Person...

Страница 62: ...nchronize Inbox or when you connect to your e mail server Indicate how you want meeting requests sent by tapping Tools and then Options If you send and receive e mail messages through ActiveSync select ActiveSync To schedule a meeting 1 Create an appointment by tapping New 2 In the appointment details hide the input panel and then tap Attendees 3 From the list of e mail addresses you ve entered in...

Страница 63: ...for whether you re at home or on the road Using the device infrared IR port you can quickly share Contacts information with other device users To change the way information is displayed in the list tap Tools and then Options Select the category of contacts you want displayed in the list Tap to create a new contact Tap and hold to display a pop up menu of actions Tap to display or edit the contact ...

Страница 64: ...he contact list Finding a contact There are four ways to find a contact In the contact list enter a contact name in the box under the navigation bar To show all contacts again clear text from the box or tap the button to the right of the box In the contact list tap the category list labeled All Contacts by default and select the type of contact that you want displayed To show all contacts again se...

Страница 65: ...n 10 05 2002 21 02 ENGLISH using Euro_C dot Printed on 10 05 2002 as PDA3_UK Using the Summary Screen When you tap a contact in the contact list a summary screen is displayed To change the contact information tap Edit Tap to change contact information Tap to view notes View contact details ...

Страница 66: ...ing a To Do List Use Tasks to keep track of what you have to do To change the way information is displayed in the list tap Tools and then Options Select the category of tasks you want displayed in the list Tap to create a new task Tap and hold to display a pop up menu of actions Tap to display or edit the task details Indicates high priority Select the sort order of the list ...

Страница 67: ...to a category tap Categories and select a category from the list In the task list you can display tasks by category 5 To add notes tap the Notes tab You can enter text draw or create a recording For more information on creating notes see Notes Capturing Thoughts and Ideas later in this chapter 6 When finished tap OK to return to the task list To quickly create a task with only a subject tap Entry ...

Страница 68: ...0 05 2002 21 02 ENGLISH using Euro_C dot Printed on 10 05 2002 as PDA3_UK Using the Summary Screen When you tap a task in the task list a summary screen is displayed To change the task tap Edit Tap to change task View notes Tap to show and hide additional summary information View task details ...

Страница 69: ...th Notes You can create a written note or a recording You can also include a recording in a note If a note is open when you create the recording it will be included in the note as an icon If the note list is displayed it will be created as a stand alone recording Tap to create a new item Tap to show or hide the Recording toolbar Tap to record Tap and hold to display a pop up menu of actions Tap to...

Страница 70: ...To create a note 1 Tap New 2 Create your note by writing drawing typing and recording For more information about using the input panel writing and drawing on the screen and creating recordings see Chapter 2 Tap to add a recording to the note Tap to show or hide the input panel Tap to write on the screen Tap to return to the note list the note is saved automatically ...

Страница 71: ...veSync Help on the PC During synchronization Messages are copied from the mail folders of Exchange or Outlook on your computer to the ActiveSync folder in Inbox on your device By default you will receive messages from the past three days only the first 100 lines of each message and file attachments of less than 100 KB in size E mail messages in the Outbox folder on your device are transferred to E...

Страница 72: ...ion or e mail server connection In the message list tap and hold the message you want to retrieve On the pop up menu tap Mark for Download The icons in the Inbox message list give you visual indications of message status You specify your downloading preferences when you set up the service or select your synchronization options You can change them at any time Change options for Inbox synchronizatio...

Страница 73: ...il fields in Contacts appear in the Address Book 3 Compose your message To enter preset or frequently used messages tap My Text and select a message 4 Tap Send when you ve finished the message If you are working offline the message is moved to the Outbox folder and will be sent the next time you connect If you are sending an SMS message and want to know if it was received tap Edit Options and sele...

Страница 74: ...synchronize additional folders by designating them for ActiveSync The folders you create and the messages you move will then be mirrored on the server For example if you move two messages from the Inbox folder to a folder named Family and you have designated Family for synchronization the server creates a copy of the Family folder and copies the messages into that folder You can then read the mess...

Страница 75: ...ur device or you can copy documents from your computer to your device Synchronize documents between your computer and your device so that you have the most up to date content in both locations Use Pocket Word to create documents such as letters meeting minutes and trip reports To create a new file tap Programs Pocket Word and then New A blank document appears Or if you ve selected a template for n...

Страница 76: ...ich are displayed on the View menu Each mode has its own toolbar which you can show and hide by tapping the Show Hide Toolbar button on the command bar You can change the zoom magnification by tapping View and then Zoom Then select the percentage you want Select a higher percentage to enter text and a lower one to see more of your document If you re opening a Word document created on a computer se...

Страница 77: ...ee Chapter 2 To format existing text and to edit text first select the text You can select text as you do in a Word document using your stylus instead of the mouse to drag through the text you want to select You can search a document to find text by tapping Edit and then Find Replace Tap and hold to see a pop up menu of actions Tap to change formatting options Tap to show or hide the toolbar Tap t...

Страница 78: ...ow you to write more easily For more information on writing and selecting writing see Chapter 2 If you cross three ruled lines in a single stylus stroke the writing becomes a drawing and can be edited and manipulated as described in the following section Written words are converted to graphics metafiles when a Pocket Word document is converted to a Word document on your computer Tap to highlight s...

Страница 79: ...aries of the drawing Every subsequent stroke within or touching the drawing box becomes part of the drawing For more information on drawing and selecting drawings see Chapter 2 Recording Mode In recording mode embed a recording into your document Recordings are saved as wav files For more information on recording see Chapter 2 For more information on using Pocket Word tap and then Help Tap to sele...

Страница 80: ...t and formatting already provided You can open only one workbook at a time when you open a second workbook you ll be asked to save the first You can save a workbook you create or edit in a variety of formats including Pocket Excel pxl and Excel xls Pocket Excel contains a list of the files stored on your device Tap a file in the list to open it To delete make copies of and send files tap and hold ...

Страница 81: ... rows and columns To hide a hidden row or column select a cell in the row or column you want to hide Then tap Format then Row or Column and then Hide To show a hidden row or column tap Tools then Go To and then type a reference that is in the hidden row or column Then tap Format then Row or Column and then Unhide For more information on using Pocket Excel tap and then Help MSN Messenger MSN Messen...

Страница 82: ...er your contacts will show up on your device without being added again Working with Contacts The MSN Messenger window shows all of your messenger contacts at a glance divided into Online and Not Online categories From this view while connected you can chat send an e mail block the contact from chatting with you or delete contacts from your list using the pop up menu To see others online without be...

Страница 83: ...sage in the text entry area at the bottom of the screen or tap My Text to enter a preset message and tap Send To invite another contact to a multi user chat in the Tools menu tap Invite and tap the contact you want to invite To switch back to the main window without closing a chat tap the Contacts button To revert back to your chat window tap Chats and select the person whom you were chatting with...

Страница 84: ...on 10 05 2002 21 02 ENGLISH using Euro_C dot Printed on 10 05 2002 as PDA3_UK To know if the contact you are chatting with is responding look for the message under the text entry area For more information on using MSN Messenger tap and then Help View status of the chat View full chat ...

Страница 85: ...ndows Media Player for Toshiba Pocket PC tap Programs and then tap Windows Media Use Microsoft Windows Media Player on your computer to copy digital audio and video files to your Toshiba Pocket PC You can play Windows Media and MP3 files on your Toshiba Pocket PC For more information about using Windows Media Player for Toshiba Pocket PC tap and then tap Help Tap to adjust volume Indicates the pro...

Страница 86: ...on each page Annotate the book with highlighting bookmarks notes and drawings Search for text and look up definitions for words The Guidebook contains all the information you ll need to use the software To open the Guidebook tap Help on the Microsoft Reader command bar Or on a book page tap and hold on the book title and then tap Help on the pop up menu To switch to Microsoft Reader tap Programs a...

Страница 87: ...s a list of all books stored on your device or storage card To open the Library On the MSReader command bar tap Library On a book page tap the book title and then tap Library on the popup menu To open a book tap its title in the Library list Tap to navigate to other parts of the reader Tap to specify the books you want to display in the list Tap to select a sort order Tap to open a book Tap to scr...

Страница 88: ...he cover page The first time you open a book you will probably want to go to the first page or to the table of contents if there is one Subsequently whenever you open the book you ll be automatically taken to the last page read In addition to the text each book page includes a page number and book title You can also page through a book by using the Up Down control on your device Drag to select tex...

Страница 89: ...e Bookmarks When you add a bookmark to a book a color coded bookmark icon appears in the right margin You can add multiple bookmarks to a book Then from anywhere in the book tap the bookmark icon to go to the bookmarked page Highlights When you highlight text it appears with a colored background Notes When you attach a note to text you enter the text in a note pad that appears on top of the book p...

Страница 90: ...m the Internet or intranet To switch to Pocket Internet Explorer tap and then Internet Explorer The Mobile Favorites Folder Only items stored in the Mobile Favorites subfolder in the Favorites folder in Internet Explorer on your desktop computer will be synchronized with your device This folder was created automatically when you installed ActiveSync Favorite Links During synchronization the list o...

Страница 91: ...ad To conserve device memory go only one level deep 6 Synchronize your device and computer Mobile favorites that are stored in the Mobile Favorites folder in Internet Explorer are downloaded to your device If you did not specify an update schedule in step 3 you will need to manually download content to keep the information updated on your computer and device Before synchronizing with your device i...

Страница 92: ...rnet Explorer on your device tap the Favorites button to display your list of favorites 3 Tap the AvantGo Channels link 4 Tap the Activate button 5 Follow the directions on the screen You will need to synchronize your device with your computer and then tap the My Channels button to complete the AvantGo setup When synchronization is complete tap the AvantGo Channels link in your list of favorites t...

Страница 93: ...page to your device or connect to the Internet to view the page To browse the Internet 1 Set up a connection to your ISP or corporate network using Connections as described in Chapter 7 2 To connect and start browsing do one of the following Tap the Favorites button and then tap the favorite you want to view Tap View and then Address Bar In the address bar that appears at the top of the screen ent...

Страница 94: ...Explorer The communication software for creating an ISP connection is already installed on your device Your service provider will provide software needed to install other services such as paging and fax services If this is the method you want to use see Connect to an Internet Service Provider later in this chapter Connect to the network at your company or organization where you work Once connected...

Страница 95: ...eceive it Connect to the Internet You can connect to your ISP and use the connection to send and receive e mail messages and view Web or WAP pages You can connect to work in one of two ways Create a modem connection If this is the method you want to use see To create a modem connection to an ISP Use an Ethernet card and a net tap to connect to the network If this is the method you want to use see ...

Страница 96: ...icate with the e mail server For specific instructions see Connect Directly to an E mail Server later in this chapter Visit Web and WAP pages by using Pocket Internet Explorer For more information see Chapter 6 Send and receive instant messages with MSN Messenger For more information see MSN Messenger in Chapter 5 To create an Ethernet connection to an ISP 1 You do not need to create a new connect...

Страница 97: ...nection to a network 1 Get the following information from your network administrator dial up access telephone number user name password domain name and TCP IP settings 2 If your device does not have a built in modem install a modem card 3 Tap and then Settings In the Connections tab tap Connections Under The Internet settings select Internet Settings and tap Modify 4 In the Modem tab tap New 5 Ent...

Страница 98: ...ing the Ethernet card see the owner s manual for the card 4 The first time you insert the card Network Settings will appear automatically so that you can configure the Ethernet card Most networks use DHCP so you should not have to change these settings unless your network administrator instructs you to do so Tap OK If it does not appear or to change settings later tap and then Settings On the Conn...

Страница 99: ...or each e mail service you intend to use first set up and name the e mail service If you use the same service to connect to different mailboxes set up and name each mailbox connection To set up an e mail service In Inbox on your device tap Services and then New Service Follow the directions in the New Service wizard For an explanation of a screen tap and then Help When finished to connect to your ...

Страница 100: ...the adaptor in the Pocket PC you can enjoy the complete mobile and high speed wireless Internet connectivity while in range of a Wi Fi compatible access point Please read this chapter carefully to get familiar with this feature Turning on Wireless LAN 1 To enable the Wireless LAN module turn the Wireless Communication Switch on The default setting is Off Slide the switch to the left to turn the po...

Страница 101: ...ation 1 Click Start Settings Connections Network Adaptors IEEE 802 11b WLAN Adaptor Properties IP Address to set IP address Subnet mask and Default gateway settings if needed 2 Click Start Settings System Wireless LAN Utility to view or adjust other configuration settings such as Mode and SSID etc Tap Apply and OK to save and implement the settings Details of configuration follow ...

Страница 102: ...1b WLAN Adaptor Properties IP Address IP Address IP Address is Internet Protocol Address a numeric address such as 10 37 238 100 that the domain name server translates into a domain name Each node on the IP network should have a unique IP address Subnet mask A number used to identify a subnetwork when multiple networks share an IP address For example 255 255 255 0 Default gateway This is a device ...

Страница 103: ...ol Internet email delivery WINS In Pocket PC Windows Internet Naming Service has two functions one is a Microsoft Net BIO name server that eliminates the broadcasts needed to resolve computer names to IP addresses by providing a cache or database of translations The other one is to set the IP address of the host computer that you already construct the partnership for Network adaptor Active sync pu...

Страница 104: ...e will appear in this field The default value is ANY which will automatically scan and connect the best performance Access Point nearby Channel Indicates the channel currently in use for Access Point or 802 11 Ad Hoc stations TxRate Indicates the current data transmission rate in use BSSID Indicates the current Basic Service Set ID of the Access Point or 802 11 Ad Hoc network been selected You can...

Страница 105: ... Printed on 10 05 2002 as PDA3_UK When the adaptor is disconnected with the Access Point or the 802 11 Ad Hoc network Non associated will appear in the BSSID field Configuration Page Use the Configuration page to set the Mode SSID Channel and Country and to view Link Quality as well Click Start Settings System Wireless LAN Utility Config ...

Страница 106: ...ch has the same SSID Note that the SSID will be case sensitive Under 802 11Ad Hoc mode the SSID must be the same among stations so that the Pocket PC can communicate properly within the Wireless Network Channel In France only channel 10 and 11 are available In USA Canada Europe or Australia you have 11 options channel 1 11 If you cannot connect with the APs or the 802 11 Ad Hoc Network Stations ch...

Страница 107: ...Point or Peer site station is set as 64 bits ASCII in Mode field select 64 bits ASCII to connect with the Access Point or the Peer site station by using the same 5 ASCII characters 128 bits ASCII If WEP of the Access Point or Peer site station is set as 128 bits ASCII in Mode field select 128 bits ASCII to connect with the Access Point or the Peer site station by using the same 13 ASCII characters...

Страница 108: ...exadecimal numbers for use and will have the upper limit of 10 Hexadecimal value of 0 9 and a A f F the 128 bits HEX needs 26 hexadecimal value for use and will have the upper limit of 26 Hexadecimal number from range of 0 9 and a A f F For 64 bits HEX or 128 bits HEX if you enter out of range Characters the Utility will prompt a Warning Message to ask you to enter the correct characters If you di...

Страница 109: ... you are expecting click Rescan button Double click the BSSID field to choose the wireless network you want to connect with Once the wireless network is chosen Scan page will disappear and Link page with current link information will display automatically Network Selection Each Access Point is identified by its BSSID and SSID Double click on the BSSID to choose the Access Point 802 11 Ad Hoc group...

Страница 110: ...Use Info Page to view MAC Address Utility version Driver version and Firmware version Click Start Settings System Wireless LAN Utility Info MAC Address MAC stands for Media Access Control The physical address of a device connected to a network expressed as a 48 bit hexadecimal number This parameter cannot be changed Versions Please verify the versions to ensure optimal functionality ...

Страница 111: ...s updated of current WLAN Module s activity status Icon Specification Wireless Communication Switch off The Wireless Communication Switch on the bottom of the PDA is turned off Clicking on the icon gives you a warning message Please turn on Wireless Communication Switch Click OK to close the Message Box Turn on the switch and you will see the icon turns to or depends on the original setting for th...

Страница 112: ...21 02 ENGLISH using Euro_C dot Printed on 10 05 2002 as PDA3_UK Wireless LAN Power off The WLAN Module is at Power Off Status Clicking on the icon displays you 2 icons On and Off Click On to turn on the Wireless LAN Module and then the icon turns to Click Off to exit without turning on the Wireless LAN Module ...

Страница 113: ... as PDA3_UK Wireless LAN Power on The WLAN Module is at Power On Status Clicking on the icon displays you 2 icons On and Off Click Off to turn off the Wireless LAN Module and then the icon turns to Click On to exit without turning off the Wireless LAN Module To save power the WLAN module can automatically switches power off after a period of inactivity turns to ...

Страница 114: ...p Bluetooth Settings on the command bar below the Today window to display the Bluetooth icon Tap the Bluetooth icon to display the Bluetooth Settings screen User Mode The User Mode can be used to control the information shared when connected to other Bluetooth devices Select the desired User Mode to enable the corresponding settings 1 Tap Settings on the Bluetooth Settings screen and then select C...

Страница 115: ...N Dial up Networking Service This service allows you to use the Dial up Networking connection with connecting through a modem Profiles supported by Toshiba Pocket PC Serial Port Profile V1 1 Dial up Networking Profile V1 1 Bluetooth specification V1 1 Not conforming to V1 0B The connection speed of Bluetooth varies depending on the location and orientation of the Pocket PC the communication range ...

Страница 116: ...ill be able to use the Bluetooth Settings program Enabling Bluetooth on Your Toshiba Pocket PC 1 Enable Bluetooth on the Toshiba Pocket PC by turning on the Wireless Communication Switch The Bluetooth Settings screen will appear The Bluetooth Settings screen will also appear when the power is turned on using one of the program buttons You cannot use more than two Bluetooth devices at a time If Com...

Страница 117: ...stablish a Bluetooth connection Detect other devices remote devices Search for connectable service Select connection service Establish connection Authentication screen is displayed Operation 2 3 4 Operation 5 Operation 9 Operation 10 Operation 6 7 8 After starting the Bluetooth Settings program a Bluetooth icon will appear on the command bar at the bottom of Today screen Tap this icon to launch Bl...

Страница 118: ...lay the Bluetooth Settings screen Tap Remote Device to display the Remote Device List screen with a list of the other devices No device will appear on the remote device list when using this program for the first time or after initializing your Toshiba Pocket PC Once you have used this program to connect to a remote device the information for the previously connected device will be displayed in the...

Страница 119: ...ppear It may take several minutes to complete the remote device search Once the search is completed the remote device list will be updated with the latest remote device information 3 Tap and hold to display the properties of the remote devices in a pull down menu Tapping on the property name of a remote device categorizes device information by the name A ghost is displayed for devices that have be...

Страница 120: ...ce addresses are displayed for devices that did not respond to the remote device name search Connected icon Unconnected icon Ghost icon You can reduce the time to search for remote devices by disabling the device name search function Tap Search Options on the Tools menu and select Disable Device Name Search Device addresses will only be displayed on the remote device list ...

Страница 121: ...on Bluetooth as BDA XX X You can delete all of the ghost devices from the remote device list by tapping Delete Ghost Device on the Tools menu A maximum of 255 devices can be displayed on the remote device list You can differentiate between devices with the same name on the remote device list by checking the device address Tap and hold on the device name and then select Property from the pop up men...

Страница 122: ...nect A pop up menu will appear 5 Tap Service List on the pop up menu to display a list of services for that device No information will appear on the service list when the remote device has not been connected before Once you have used this program to connect to a remote device the service information for the previously connected device will be displayed in the service list Connected icon Serial Por...

Страница 123: ...ady been authenticated or if the Security Mode of both the local and remote devices is set to Security Off the Authentication screen will not appear Proceed to step 9 When the Security Mode of a device is set to On a Bluetooth Passkey is used to allow other devices to connect to that device This passkey comprised of a maximum of 16 alphanumeric characters is entered for both devices Depending on t...

Страница 124: ...2002 21 02 ENGLISH using Euro_C dot Printed on 10 05 2002 as PDA3_UK 8 The same passkey must be entered on the remote device The remote device will be authenticated and the service list will be updated 9 Tap and hold on the name of the service to which you want to connect A pop up menu will appear ...

Страница 125: ...pecific period of time and the Bluetooth connection is terminated Connect to PC via ActiveSync Requirements The PC must be Bluetooth enabled and ActiveSync must have been installed Your Toshiba Pocket PC must also have been synchronized with the PC using a cradle or a cable at least once to establish a partnership to the PC 1 Connect your Toshiba Pocket PC to the computer to which you want to conn...

Страница 126: ...atically If you want to use ActiveSync via USB interface after using Bluetooth Connection please reset the ActiveSync interface to USB Bluetooth as a serial connection To use Bluetooth as a serial connection select COM4 Bluetooth as the modem on your Toshiba Pocket PC Bluetooth Settings Changing the User Mode Check the local device setting and make any necessary changes 1 Tap Start Programs and th...

Страница 127: ... as PDA3_UK 2 Tap the Settings button The Settings menu allows you to make advanced settings for the User Mode and display the local device information 3 Tap Change User Mode You can select Office Mobile Home or Other for the User Mode Selecting a User Mode immediately enables the corresponding settings Tap OK or Cancel to return to the previous screen ...

Страница 128: ...nnect to the local device you can restrict remote access to your device To change the Security Mode setting refer to step 5 of Changing the User Mode If the Security Mode of the local device is On the authentication will be performed when establishing a connection between remote and local devices Tap on the desired User Mode on the Change User Mode screen The settings for the selected User Mode wi...

Страница 129: ...ption to encrypt all data sent and received 2 Tap OK to return to the Change User Mode screen and enable the new User Mode settings Displaying the local device information 1 Tap Local Device Property button from the Settings screen The Local Device Property screen will appear When setting or changing the device name on the Local Device Property screen enter a name that does not exceed 17 character...

Страница 130: ...t time you turn on the power of the Toshiba Pocket PC An error has occurred with Bluetooth either because the power has been turned off or because the device has been disabled Confirm that the card is working properly 1 In such a case please tap OK Tap Remote Devices on the BluetoothSettings screen Remote devices will be searched To disconnect a connection established from local device proceed to ...

Страница 131: ...W to select the different attributes of the devices Connected remote devices are indicated with a Connected icon On the Remote Device List screen tap and hold on the name of the device which you want to disconnect 3 Tap Service List to display a list of services for the device Tap and hold on the name of the service which you want to disconnect A pop up menu will appear ...

Страница 132: ...st Saved on 10 05 2002 21 02 ENGLISH using Euro_C dot Printed on 10 05 2002 as PDA3_UK 4 Tap Disconnect on the pop up menu 5 Once the service is disconnected the Connected icon will change to a Serial Port or Dial up Network icon Tap OK to return to the Remote Device List screen ...

Страница 133: ...iting the Bluetooth Settings Please follow these steps to exit from the Bluetooth Settings turn off the Toshiba Pocket PC and disable the Bluetooth device 1 Tap Tools to display the Tools menu 2 Tap Return to Top of Page to display the Bluetooth Settings screen 3 Tap Exit 4 Turn off the power of your Toshiba Pocket PC 5 Disable the Bluetooth device on your Pocket PC ...

Страница 134: ...grams and then Toshiba Bluetooth Chat Tap Begin Bluetooth Chat from the Tools menu Enter your message and then tap Send Do not tap the message display screen If you do it the next message will be displayed at the location you tapped Exiting Bluetooth Chat Tap End Bluetooth Chat from the Tools menu During chatting do not disconnect Bluetooth connection or turn off the Wireless Communication Switch ...

Страница 135: ... activity status and provide a interface to turn the Bluetooth module on off Icon Specification Wireless Communication Switch off The Wireless Communication Switch on the bottom of the PDA is turned off Clicking on the icon gives you a warning message Please turn on Wireless Communication Switch Click OK to close the Message Box Turn on the switch and you will see the icon turns to or depending on...

Страница 136: ...21 02 ENGLISH using Euro_C dot Printed on 10 05 2002 as PDA3_UK Bluetooth Power off The Bluetooth Module is at Power Off Status Tapping the icon displays you 2 icons On and Off Click On to turn on the Bluetooth Module and then the icon turns to Click Off to exit without turning on the Bluetooth Module ...

Страница 137: ...s PDA3_UK Bluetooth Power on The Bluetooth Module is at Power On Status Tapping the icon displays you 2 icons On and Off Tap Off to turn off the Bluetooth Module and then the icon turns to Click On to exit without turning off the Bluetooth Module To save power the Bluetooth module can automatically switches power off after a period of inactivity turns to ...

Страница 138: ... PC Unable to retrieve local device information due to insufficient memory Check the amount of available memory Solution Increase the amount of available memory and then restart Bluetooth Settings Remote device search failed due to insufficient memory Check the amount of available memory Solution Increase the amount of available memory and then try the remote device search again Unable to retrieve...

Страница 139: ... update the device information with the remote device search Unable to delete remote device due to insufficient memory Check the amount of available memory Cause There is insufficient memory to delete the device Solution Increase the amount of available memory and then try to delete the device again Service list search failed due to insufficient memory Check the amount of available memory Solution...

Страница 140: ... Solution Restart Bluetooth Settings or reset the Toshiba Pocket PC An internal processing error has occurred with the Connectability Mode setting Solution Restart Bluetooth Settings or reset the Toshiba Pocket PC An internal processing error has occurred with the Security Mode setting Solution Restart Bluetooth Settings or reset the Toshiba Pocket PC An internal processing error has occurred with...

Страница 141: ...th abnormal end Cause An error occurred while trying to write on the Bluetooth module Solution Reset the Toshiba Pocket PC Cannot connect because SDBTPIN EXE could not be found Cause The software required to connect could not be found Solution Reinstall the software Enter a PIN of 16 alphanumeric characters Solution Enter a PIN with a maximum of 16 alphanumeric characters ...

Страница 142: ...Presenter and the Toshiba Expansion Pack linked to an LCD projector or a monitor you can create powerful presentations from your Pocket PC IA Screen Mirror This module projects the current contents of your Pocket PC s LCD screen onto an external projector or monitor It can display up to nine different images from your LCD output at the same time on the second display Installing the ATI Presentatio...

Страница 143: ... Note about Updates to the ATI Presentation Pack Your copy of the ATI Presentation Pack contains the latest versions of IA Presenter and IA Screen Mirror For updates please visit the IA Style web site www iastyle com IA Presenter Getting Started After you invoke IA Presenter the screen lists all the converted PowerPoint presentations currently in your My Documents folder A sample presentation file...

Страница 144: ...drag and drop a file from your computer to your mobile device Instead the dimension you specified will be used during each conversion 2 You can set the dimension each time you drag and drop a PowerPoint file from your computer to your mobile device If the Show this option dialog box next time checkbox has not been un checked the IA Presenter Set ActiveSync Conversion Options dialog box will open a...

Страница 145: ...e represented by a number in the Slide Title Bar drop down list The lower thumbnail pane in Normal view provides slide navigation If you want to select multiple slides for further operations use the Slide Sorter view as explained in the next section You can project the currently selected slide to VGA Display by activating the VGA Slide Toggle command on the View Menu or by tapping the VGA Slide Ou...

Страница 146: ... has been hidden using the Hide Slide command on the Edit Menu the slide number will be enclosed in a red box with a line crossing it out Notes Page Notes Page view displays the current slide content in the upper pane with the lower pane displaying the speaker notes that were entered for the original PowerPoint presentation or entered edited in IA Presenter The upper pane operation is the same as ...

Страница 147: ...your slide show If the Auto Rotate option is checked in the Tools Options Display tab the slide will be automatically rotated according to the direction you choose Left or Right Depending on the slide advancement setting specified in the Slide Transition dialog box you can tap to advance the slide or the next animated object use the navigation arrows buttons of your Pocket PC to advance back play ...

Страница 148: ...the most recent Ink stroke or erase all of the Ink strokes VGA Pointer This mode works only when IA Presenter is in VGA Slide Show view After you select the VGA Pointer command your stylus movements on the LCD screen will simulate a laser pen light on the VGA screen during presentations To exit the VGA Pointer mode select Trigger Pen or VGA Zoom from the pop up menu VGA Zoom This mode works only w...

Страница 149: ...so be converted to any of the other pre defined sizes by pressing your stylus on the LCD screen to open the pop up menu again then selecting a different value from the VGA Zoom Size submenu The size of the existing area will then be changed accordingly If you select Drag Select on the submenu you will be able to drag your stylus on the LCD screen and freely define any area for zooming After the de...

Страница 150: ...n will be lost when you exit Blank mode They cannot be retained When IA Presenter is in VGA Zoom mode or VGA Pointer mode the Blank option is not available Clear Last Pen Erases the last individual Ink stroke This command can be applied repeatedly until there are no more Ink strokes in the current slide Clear All Pen Erases all the pen strokes on the current slide Speaker Notes This command displa...

Страница 151: ...se VGA Zoom on the pop up menu to designate an area on a slide during VGA Slide Show view and project that specific area to the VGA screen on top of the already existing projection of the entire slide Use the VGA Zoom Size command to specify an area of predefined size or manually drag your stylus on the LCD screen to specify the desired area of the slide Then use the VGA Zoom Ratio command to choo...

Страница 152: ...ons You can merge the slides of two different presentations into one file The new inserted slides will adopt the Master Slide style of the current file Therefore you should first open the presentation whose Master Slide style you want to adopt to The next thing you should do is select Options from the Tools Menu and open the File tab Tap OK to close the tab and save the settings If you selected To...

Страница 153: ...ation dithering of projected images Getting Started Tap the IA Screen Mirror icon in your Programs group to start the IA Screen Mirror program 1 Use the Layout tab to set up the viewports to which you will project images 2 Use the Switch tab to assign a switching button on your mobile device 3 Use the Refresh tab and VGA tab to customize other parameters as desired 4 Tap OK to project the LCD scre...

Страница 154: ...Mirror are registered trademarks of IA Style Inc and Information In Action is a trademark of IA Style Inc The names of other actual companies products and brand names mentioned herein may be trade names service marks trademarks or registered trademarks of their respective owners This User s Manual and the programs in the ATI Presentation Pack are copyrighted All rights are reserved Reproduction ad...

Страница 155: ...hing an Application From the Home Tap Programs and then Home to display the Home screen You can also launch the Home by pressing the Toshiba Pocket PC Home button Tap the desired tab and then tap the application icon you want to launch The selected application starts up TOSHIBA Pocket PC e740 User s Manual 11 1 For initial setting the respective application icons are registered on three tabs Main ...

Страница 156: ...top Tap the application name you want to activate You can also activate the application from the pop up menu displayed by tapping and holding the application name You can show a pop up menu by tapping and holding any portion other than the application names displayed in the Running tab In this case only the Stop All is selectable You can select the View menu or the Tools menu on the Running tab sc...

Страница 157: ...cel Calculator Programs File Explorer DataBackup Infrared Receive Games Solitaire Moving an Application Icon into Another Tab The moved icon is placed next to the last icon on the tab screen You cannot move an icon into a tab which already contains 18 icons To move using pop up menu Tap and hold the icon you want to move to display the pop up menu Tap Cut on the pop up menu Tap the destination tab...

Страница 158: ... you can find it by tapping Browse To refer to all folders and files tap Browse to show the Browse Dialog screen When the file is selected its name is displayed in the Application file box 3 Enter an icon name in the Application name box which is to be displayed on the Home screen You can enter up to a maximum of 32 characters 4 When finished tap OK to close the Add Application screen and the new ...

Страница 159: ...o return to the Home screen To delete a tab 1 Tap Tools and then Tab Settings 2 Select the tab name to delete and then tap Delete the Delete tab dialog for confirming appears Please note that all the icons contained in the same tab will also be deleted 3 Tap OK on the Delete tab dialog to delete the tab When finished the screen returns to Tab Settings screen 4 Tap OK on the Tab Settings screen to ...

Страница 160: ... want to set and the color of the application name changes Home Help Tapping an icon displayed at Home launches that application In addition to applications it is also possible to register icons for associated files here The Home screen is divided into tabs There are 4 tab types as default and up to 10 types of tab can be registered As for the icons on the tab up to 18 icons per one tab can be reg...

Страница 161: ... tab screen Paste can also be selected from the pop up menu displayed when you tap and hold at a position on the screen other than on icon It is not possible to move icons to tabs already containing 18 icons When an icon is moved it is positioned at the very end of the tab s icons 2 Deleting icons 1 Tap and hold the icon you want to delete A pop up menu appears 2 Tap Drop from the pop up menu to d...

Страница 162: ...nched 5 Tab settings 1 Switching tabs Tap on another tab to switch the tab screen Initially four tabs are registered Running Main Programs and Games 2 Changing tab names 1 Select Tab Settings from the Tools menu The Tab Settings screen appears 2 Tap the Select tab box to select the tab to be changed 3 Tap the Rename button The screen for inputting the new tab name appears 4 Input the new tab name ...

Страница 163: ...he Home screen 5 Setting the background bitmap 1 Select Tab Settings from the Tools menu The Tab Settings screen appears 2 Select the tab whose background you want to set at the Select tab box 3 Tap the Browse button to display the Browse dialog 4 Select and tap the bitmap image to be used as the background The Tab Settings screen reappears 5 Tap OK at the upper right to return to the Home screen ...

Страница 164: ...t Excel Notes etc or an additionally installed program and so on Registry Setting information of Windows or a program Database Database information of Microsoft Pocket Outlook If you update ROM programs using special installation programs with a xip extension do not use the backup data which you made before updating ROM programs When using the DataBackup beware of the remaining battery charge If y...

Страница 165: ...elect and tap Card or Card 2 5 Tap Backup to display the Prompt message screen 6 Tap OK The Proceeding message is displayed during the backup process When the backup is completed a backup finished message appears 7 Tap OK to return to the previous screen If the remaining storage card capacity becomes short during backup the backup process stops Check the storage capacity before starting the backup...

Страница 166: ...memory but not in the backup file they will not be overwritten 1 Insert the storage card which contains backup data into your Toshiba Pocket PC e740 2 Tap Start Programs and then DataBackup to display the DataBackup screen 3 Select Restore from tab then select and tap Card or Card 2 4 Select backup file from restored files list 5 Tap Delete if want to delete backup file 6 Tap Refresh if want to re...

Страница 167: ...e Start menu 2 Once the backup screen appears tap the Backup tab 3 Set a Custom Name if you want 4 Tap Card or Card 2 to work 5 Tap the Backup button 6 A message appears once backing up is completed 7 Tap OK at the upper right to return to the previous screen 3 Restoring the data Use this operation to restore the backup data stored on the storage card into the main unit The data in the backup file...

Страница 168: ...ct DataBackup from Programs in the Start menu 2 Once the backup screen appears tap the Restore tab 3 Tap Card or Card 2 to work 4 Select a backup file from the Restored Files list 5 Tap the Delete button A message screen asking you to confirm that you want to delete the backup file appears 6 Tap the OK button The backup data is deleted from the storage card and the previous screen reappears ...

Страница 169: ...to the Lock position Even if the power button is pressed the power does not turn on The Battery Pack Lock is at the Release position Switch the Battery Pack Lock to the Lock position The battery power is exhausted Charge the battery The power was suddenly cut off Automatic suspend is active Select Settings System Power to set to alter the power shut down time Even if the battery is completely char...

Страница 170: ...ted The screen is dark The front light is off Press and hold the power button until the front light is turned on The screen is hard to see Brightness setting is incorrect Select Settings System Front Light to adjust the screen brightness for better sight Cannot connect to your computer See Help of ActiveSync ActiveSync does not function when your Toshiba Pocket PC is connected to your computer wit...

Страница 171: ... push Reset Switch Symptom Solutions Cannot connect to the network Make sure the Wireless Communication Switch is turned on Check if the SSID is correct note that it is case sensitive Check Link Quality in Configuration Page If the link quality is poor rescan and find another Access Point Check if the operating mode is set properly See Chapter 4 Configuration Page Check if the WEP key is correctly...

Страница 172: ...etwork formed by the working Access Point not to create a new Wireless Network The Pocket PC freezes Reset the Pocket PC Resetting Reset is equal to Restarting of a computer Reset your Pocket PC when a button or tapping the screen does not respond When your Toshiba Pocket PC is reset all data that was not stored during operation will be deleted Stored data will be saved If the function cannot be r...

Страница 173: ... power button 3 When a screen appears release the reset switch When initialization is completed the Welcome screen appears Set up the system according to the screen as in the case of startup procedure Specifications External dimensions Approximate 125 mm 80 mm 16 mm L W H Weight 175g Pocket PC only 189g Pocket PC with Wireless LAN module 181g Pocket PC with Bluetooth module Operating conditions Te...

Страница 174: ...unction compatible equipment is not usable Infrared port Based on 115 2kbps SIR IrDA1 3 Maximum data transmission speed 115 kbps Stereo headphone jack 3 5mm stereo mini plug compatible Cradle connection port 12Mbps USB Client interface 12Mbps USB Host interface VGA Output USB Host Interface 12Mbps USB Host interface Analog RGB output D SUB 15 pin VGA Output 640X480 16bit 60Hz AC adaptor Input powe...

Страница 175: ...to other devices using Bluetooth No you can only connect the IEEE802 11b WLAN Adaptor to other IEEE802 11b equipment B Wireless LAN Connectivity B1 How do I form a wireless network Typically you can form a wireless network by connecting Access Points Different Access Points should have different channels Every devices connected to the network should have the same SSID When you are using Access Poi...

Страница 176: ...rmation B4 What is 802 11 Ad Hoc Network What should I do to form an 802 11 Ad Hoc Network B5 What is the difference between Infrastructure and 802 11 Ad Hoc Network Mode How do I choose B6 Could I use the 802 11 Ad Hoc Mode to access the LAN resources How can I access the LAN resource without an Access Point B7 What should I do if my host computer cannot wirelessly connect with my Pocket PC E1 Wh...

Страница 177: ... Pocket PC with the Access Point Usually to form a Wireless Network you can connect your Access Point to the ADSL Cable Model or LAN Ethernet and then configure the Access Point base on the User Guide for the Ac cess Point to set the proper SSID Channel and WEP security service After that configure the IEEE 802 11b WLAN adaptor Set the same SSID Channel and WEP as the Access Point s 802 11 Ad Hoc ...

Страница 178: ...our Handheld PC or Pocket PC to make the TCP IP settings take effect 5 Make sure the SSID WEP keys and channel for all devices in the network are set the same 6 Make sure the channel been set is in the range of 1 11 C Application C1 What should I do to use the ActiveSync Function through Wireless Network 1 Make sure you have already setup the partnership for your Pocket PC and your host computer t...

Страница 179: ...tes the broadcasts needed to resolve computer names to IP addresses by providing a cache or database of translations The other one is to set the IP address of the host computer that you already construct the partnership for Network adaptor Active sync purpose To set IP address Subnet mask and Gateway click Start Settings Connections Network Adaptors IEEE802 11b WLAN Adaptor Properties IP Address T...

Страница 180: ...s in the Network group D2 Why can t I choose the Channel and Country field in Infra structure Mode For the Infrastructure Mode the Country and Channel are decided by the Access Point You can only join the existing Access Point formed Wireless Network but not create a new Wireless Network That is the reason why you can t set the Channel and Country settings D3 When should I set the IP address Subne...

Страница 181: ...y Advanced to view Advanced page where you can set the WEP security service Please choose the proper WEP Key Mode WEP KeyID and WEP Key value for the Wireless Network The WEP Mode WEP KeyID and WEP Key value must be exactly the same as your Wireless Network s to enable the connection Example of setting the WEP You can choose 1 WEP Mode 64bit KeyID 1 and Key 1234567890 or 2 WEP Mode 128bit KeyID 1 ...

Страница 182: ...Start Settings System Wireless LAN Utility Advanced to get into Advanced Page and tick the Enable Power Saving Mode to enter the Power Saving Mode 1 Turn off the Wireless Communication Switch will cause the disconnection of the Wireless Network please make sure to close all the Wireless Connection before you execute this function 2 Radio Off function will cause the disconnection of the Wire less N...

Отзывы: