background image

English 

81

R

ecording

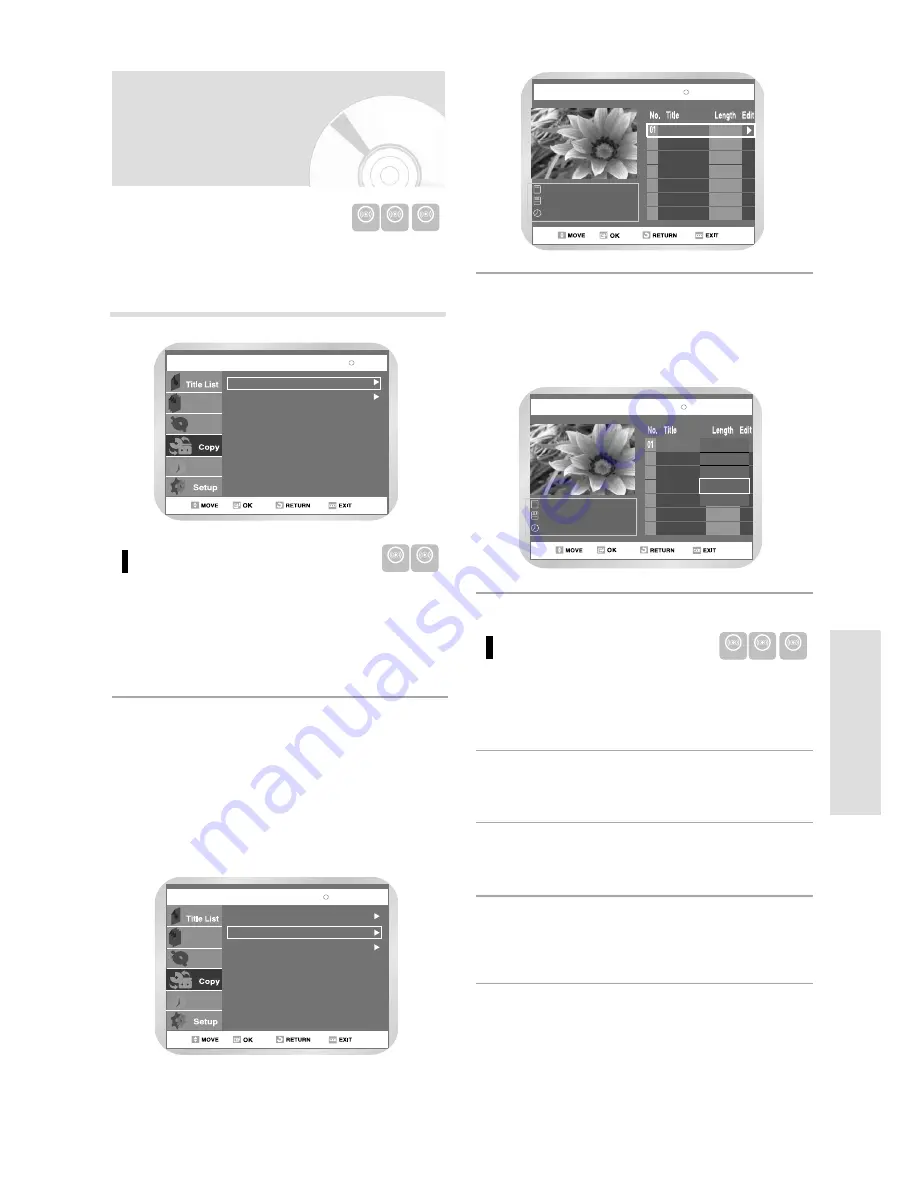
You can copy DVD to VCR or VCR to DVD.
Press MENU button and select Copy.

DVD to VCR

Copy to DVD or VCR

Select DVD --> VCR to copy DVD

to VCR.

• Check the remaining time on the tape.

1

Direct copy DVD to VCR

Insert DVD disc you want to copy.

1

Insert VHS tape.

2

To stop recording press the STOP button.

4

Press VCR copy button on front panel or remote
control.

3

If you want to copy from the
Copylist, choose “Edit Copylist”.

• To copy from “Edit Copylist”, you need to make

a Copylist. To make and select a “New Copylist”
(See pages 91~92).

•  If you want to copy directly, choose “Direct

Copy”.

2

DVD-RAM DVD-RW

DVD-R

DVD-RAM(VR)

Copy

VCR --> DVD

DVD --> VCR

Disc Manager

Programme

Playlist

Select the Copylist, you want to

copy

using the 

buttons and then press 

button.

To copy play list, select “Copy”.

3

Edit Copylist

01/JAN/2004 1

01/JAN/2004 12:00 
1 Scene

01/JAN/2004 12:00

00:00:44

Play

Rename

Edit Scene

Copy

Delete

DVD-RAM(VR)

Edit Copylist

DVD-RAM(VR)

01/JAN/2004 1

01/JAN/2004 12:00 
1 Scene

01/JAN/2004 12:00

00:00:44

DVD-RAM(VR)

DVD-->VCR

Edit Copylist

Direct Copy

New Copylist

Disc Manager

Programme

Playlist

DVD-RAM DVD-RW

VR mode

DVD-RAM DVD-RW

DVD-R

Содержание D-VR3SB

Страница 1: ...D VR3SB 2004 Toshiba Corporation DVD RECORDER VCR Read this booklet first OWNER S MANUAL C PAL DUBBING TO DVD TO VCR ON STANDBY I ...

Страница 2: ...sult your dealer for assis tance However if there is no alternative to cutting off the plug remove the fuse and then safely dispose of the plug Do not connect the plug to a mains socket as there is a risk of shock hazard from the bared flexible cord It is permissible to record television programs film video tapes and other material only in the event that third party copyrights and other rights are...

Страница 3: ...r or sold with the appa ratus When a cart is used use caution when moving the cart apparatus combination to avoid injury from tip over 13 Unplug this apparatus during lightning storms or when unused for long periods of time 14 Refer all servicing to qualified service personnel Servicing is required when the apparatus has been damaged in any way such as power supply cord or plug is damaged liquid h...

Страница 4: ...der while a disc is being played or the disc may be scratched or broken and the recorder s internal parts may be damaged Do not put a flower vase filled with water or any small metal objects on the recorder Be careful not to put your hand into the disc tray Do not place anything other than the disc in the disc tray Exterior interference such as lightning and static elec tricity can affect normal o...

Страница 5: ... discs during operation and is not liable for incidental damages such as profit loss or interruption in business etc pro duced by such conditions Exemptions After a power outage the clock display will flash Set the clock to the correct time It is prohibited law to copy broadcast show broad cast on cable play in public and rent copyrighted material without permission Some DVD video discs are copy p...

Страница 6: ...s recorded and finalised with a Toshiba DVD recorder It may not be able to play some DVD R discs depending on the disc and the condition of the recording DVD R Disc Playback and Recording DVD RW Disc Playback and Recording Recording and playback can be performed on DVD RW discs in both Video and VR Modes Once a DVD RW recorded in VR Mode is finalised you cannot perform additional recording Once a ...

Страница 7: ...y rights owned by Macrovision Corporation and other rights owners Use of this copyright protection technology must be authorized by Macrovision Corporation and is intended for home and other limited viewing uses only unless otherwise authorized by Macrovision Corporation Reverse engineering or disassembly is prohibited It is permissible to record television programs film video tapes and other mate...

Страница 8: ...lifier with analog input jacks 22 Connecting to a an AV amplifier with the digital input jack 22 Connecting External Devices 23 Connecting a extemal devices to the AUX kacks 23 Connecting a Camcorder to the DV IN jack 23 Preparing the Remote Control 24 Seting the Remote Control 24 System Setup System Setup On Screen Menu Navigation 26 Plug Auto Setup 27 Setting the Date and Time 28 Presetting the ...

Страница 9: ...RW VR disc 56 Playing Back a Bookmark 56 Clearing a Bookmark 57 Zooming In 57 Check Remaining Time 58 Using the Disc and Top Menu 58 For DVD VIDEO disc 58 For DVD RAM DVD RW DVD R disc 58 Playing Back an Audio CD CDDA 59 Audio CD CDDA Screen Elements 59 Play Option Mode 60 To change repeat mode 60 To Programme Tracks 61 Photo CD Playback 62 When using a combination MP3 JPEG disc 62 Playing back an...

Страница 10: ...ry 89 Deleting a Section from a Title List Entry 90 Creating a Playlist Entry 91 Editing a Playlist Entry 93 Playing Playlist Entries 93 Renaming Playlist Entries 94 Editing Scene for a Playlist Entry 94 A Playing a Desired Scene 95 B Modifying a Scene Replacing a Scene 95 C Modifying a Scene Changing the Position of a Scene 96 D Adding Scene 96 E Deleting a Scene from the Playlist 97 Copying a Pl...

Страница 11: ...See page 75 XP mode High quality about 1 hour SP mode Standard quality about 2 hours LP mode Low quality about 4 hours EP mode Lower quality about 6 hours Copying digital camcorder content using DV input jack Record digital camcorder images onto DVD RAM DVD RW DVD R discs or Video tape using the DV input jack IEEE 1394 4pin 4pin See page 79 Time Slip and Picture In Picture PIP Use the Time Slip fu...

Страница 12: ... disc type Step 2 Format the disc to start recording This unit can record on the following types of discs If you want to repeatedly record on the same disc or you want to edit the disc after recording select a rewritable DVD RW or DVD RAM type disc If you want to save a recording without any changes choose a non rewritable DVD R Unlike a VCR the recorder automatically starts formatting when an unu...

Страница 13: ... pos sible only with DVDs With a simple and easy edit menu you can operate vari ous edit functions such as delete copy rename lock etc on a recorded title Creating a playlist DVD RAM DVD RW in VR mode With this recorder you can create a new playlist on the same disc and edit it without the change of the original recording To play your DVD on other DVD components finalsing may be necessary First fi...

Страница 14: ...et a Timer recording it or cur rentdeck status is indicated this indicator is light 10 VHS Videotape is loaded DUBBING TO DVD TO VCR ON STANDBY INPUT SELECT I AUX 1 2 5 6 7 8 9 10 11 12 13 14 15 16 17 18 19 20 21 3 4 1 DVD DECK 2 DVD OPEN CLOSE BUTTON 3 VCR DECK 4 VCR EJECT BUTTON 5 ON STANDBY BUTTON 6 INPUT SELECT BUTTON 7 S VIDEO INPUT JACK 8 VIDEO INPUT JACK 9 AUDIO L R INPUT JACK 10 DV IN JACK...

Страница 15: ...AL R R L VIDEO L 1 3 4 5 6 8 2 1 S VIDEO OUT JACK 2 AUDIO OUT L R JACK 3 DIGITAL AUDIO OUT JACK OPTICAL 4 DIGITAL AUDIO OUT JACK COAXIAL 5 AUDIO VIDEO JACK 6 AV1 EURO AV IN OUT SCART EURO 21 SOCKET 7 AV2 DEC EXT SCART EURO 21 SOCKET 8 OUT TO TV CONNECTOR 9 AERIAL IN CONNECTOR 9 7 ...

Страница 16: ...t signal in external input mode Tuner or AV 1 AV 2 or AUX 23 F ADV SKIP Button 24 MARKER Button Use this to bookmark a position while playing a disc 25 QUICK Button Use this to view the status of the disc that is being played 26 PLAY LIST TOP MENU Button Use this to return to the TOP MENU or to view the recorded files list 27 CLEAR Button 28 SUBTITLE Button Press this to switch the DVD s subtitle ...

Страница 17: ... the RF Cable Step 3 Connecting the Scart Cable Step 4 Connecting the Video Cable Step 5 Connecting the Audio Cable Step 6 Connecting External Devices Step 7 Preparing the Remote Control Quick Overview 17 Unpacking 18 Connecting DVD Recorder VCR to the TV using the RF Cable 18 Connecting the Scart Cable 19 Connecting the Video Cable 20 Connecting the Audio Cable 21 Connecting External Devices 23 P...

Страница 18: ...V DIGITAL AUDIO OUT OPTICAL COAXIAL R R L VIDEO L RF cable Aerial AUDIO OUT Make sure that both the television and the DVD Recorder VCR are switched off before connecting the cables Remove the aerial or network input cable from the television 1 Connect this cable to the 75Ω coaxial socket marked on the rear of your DVD Recorder VCR 2 Plug the RF cable supplied into the socket on your DVD Recorder ...

Страница 19: ...AL AUDIO OUT OPTICAL COAXIAL R R L VIDEO L SCART Cable RF cable Aerial 1 2 AUDIO OUT Method 2 Connecting DVD Recorder VCR to a Satellite Receiver or Other Equipment You can connect your DVD Recorder VCR to a Satellite receiver or other DVD Recorder VCR using the SCART cable if the appropriate outputs are avail able on the equipment chosen The following illustra tions give a few examples of the con...

Страница 20: ...L VIDEO L 1 2 AUDIO OUT There are several ways to connect your DVD Recorder VCR Select one of the following video connecting meth ods that best suits you below Method 1 Connecting to a Video input jack Method 2 Connecting to an S video input jack S Video Modes S Video is available only if your TV supports S Video input If S Video output does not work check the TV connections and the TV input selec...

Страница 21: ...ack and white Y and color C signals to present clearer images than regular video input mode There are several ways to connect your DVD Recorder VCR Select the audio connection that best suits you below Method 1 Connecting to your TV Method 2 Connecting to a stereo amplifier analog audio out digital audio out Method 3 Connecting to an AV amplifier with a digital input jack Step 5 Connecting the Aud...

Страница 22: ...age 38 Subwoofer Center Rear L Rear R Front L Front R OPTICAL COAXIAL DIGITALAUDIO IN or DIGITAL AUDIO OUT OPTICAL COAXIAL DIGITAL AUDIO OUT OPTICAL COAXIAL R R L VIDEO L AUDIO OUT Method 2 Connecting to a stereo amplifier with analog input jacks If your stereo amplifier only has audio input jacks L and R use the analog audio out jacks R1 L1 ANALOG AUDIO IN Front L speaker Front R speaker white re...

Страница 23: ...rder to the DV IN jack If your camcorder has a DV output jack connect it to the DV input jack of your DVD Recorder VCR If your camcorder has a DV output jack see page 79 for more information DUBBING TO DVD TO VCR ON STANDBY INPUT SELECT I AUX Manufactured under license from Dolby Laboratories Dolby and the double D symbol are trademarks of Dolby Laboratories DTS and DTS Digital Out are trademarks ...

Страница 24: ...polarity of the batteries Dry Cell Check if the batteries are drained Check if remote sensor is blocked by obstacles Check if there is any fluorescent lighting nearby Step 7 Preparing the Remote Control Do not expose the remote sensor of the recorder to a strong light source such as direct sunlight or other illu mination If you do so you may not be able to operate the recorder via the remote contr...

Страница 25: ...1 JVC 0311 0431 0521 0571 LOEWE OPTA 0471 0501 0571 0651 LUXOR 0241 0261 0271 0281 0351 MAGNAVOX 0501 0071 0191 0221 0461 0471 0591 0611 0651 MARANTZ 0201 0501 MATSUI 0001 0171 0191 0231 0411 0441 0451 0501 0551 0571 METZ 0041 0331 0361 0461 0471 0651 MITSUBISHI 0201 0321 0331 0451 0501 0511 0571 0651 0771 NATIONAL 0371 0501 0511 0531 0761 0841 0911 1061 NOKIA 0231 0241 0261 0271 0401 0611 NORDMEN...

Страница 26: ...con firm any new settings 3 RETURN Button Press this button on the remote control to return to the last MENU screen displayed or to exit the on screen MENU all together 4 DVD RAM VR Install Programme On Screen Menu Navigation 26 Plug Auto Setup 27 Setting the Date and Time 28 Presetting the Stations Automatically 29 Presetting the Stations Manually 30 Clearing a Preset Station 31 Changing the Pres...

Страница 27: ...icated on page 19 Connecting Your DVD Recorder VCR to the TV using the RF Cable 1 Start the auto setup 3 Start the auto scanning 4 Plug the DVD Recorder VCR into the mains Auto in the front panel display flickers 2 Wait current time and date are displayed automatically 5 Check the date and time if it is Correct Press OK button then the data and time will be saved if it is Incorrect Refer to Seting...

Страница 28: ...rogramme Programme Programme Press to select the hour minutes day month and year The option selected highlight 4 On completion press RETURN to exit the menu 7 Press OK button then the date and time will be saved If you don t press OK button it will not be saved 6 Press the button to increase or decrease the value The day of the week is displayed automatically You can hold the buttons down to scrol...

Страница 29: ...nd so on When the automatic scanning procedure has finished the DVD Recorder VCR switches automatically to programm 1 The number of stations automatically stored by the DVD Recorder VCR depends on the num ber of stations that it has found 6 Programme You do not need to preset the stations if you have already set them automatically see Plug Auto Set Up on page 27 Your DVD Recorder VCR contains a bu...

Страница 30: ...to Install then press or OK button to select 3 Select Manual Setup Move the selection bar to Manual Setup using the buttons then press or OK button to select 4 Ch 60 Programme Press the buttons to select a PR number as required then press or OK button to select 5 Press the button to select Edit Then press or OK button to be displayed Manual Setup menu 6 Press the buttons to start scanning the chan...

Страница 31: ...tion Do not wish to store Press the buttons until the station displayed the CH is selected Press the buttons to go on scanning the frequen cy band and display the next station Go back to the beginning of step 11 Clearing a Preset Station If you have stored a TV station That you do not require At the wrong programme positiom you can cancel it Open MENU With the DVD in Stop mode press the MENU butto...

Страница 32: ...hen press or OK button to select 3 Select Manual Setup Move the selection bar to Manual Setup using the buttons then press or OK button to select 4 Ch 60 Programme Programme Press the button to select Delete Then press OK button to delete 6 Press the buttons to select Yes and then press the OK button 7 Press the buttons to select a PR number as required then press or OK button to select 5 Edit Del...

Страница 33: ...ting the VCR Output Channel Open MENU With the DVD in Stop press the MENU button 1 Select Setup Using the buttons move the selection bar to Setup then press OK to select 2 Select Install Using the buttons move the selection bar to Install then press OK to select 3 Select VCR Output CH Move the selection bar to VCR Output CH using the buttons then press OK to select 4 Programme Auto Setup Install M...

Страница 34: ...the remote control 1 Select Setup using buttons then press the or OK button Select Language using buttons then press the or OK button Language setup menu will be displayed 3 Programme 2 Audio Programme Use buttons to select the Audio and press the or OK button 4 Select the desired Language using buttons then press the or OK button Press the RETURN or button to return to the previous menu Press the...

Страница 35: ...tton 4 Use the buttons to select Subtitle Some discs may not contain the language you select as your initial language in that case the disc will use its original language setting 5 Audio Subtitle Disc Menu On Screen Menu English Français Deutsch Español Italiano Nederlands Korean Automatic Language Programme With the DVD in Stop mode press the MENU button on the remote control 1 Select Setup using...

Страница 36: ...Select Language using buttons then press the or OK button Language setup menu will be displayed 3 Programme 2 Disc Menu Programme Use buttons to select the Disc Menu and press the or OK button 4 Use the buttons to select Disc Menu Language 5 Press the or OK button Disc Menu language is selected and the screen returns to Language Setup menu 6 Programme ...

Страница 37: ...ill be displayed 3 Programme 2 On Screen Menu Programme Use buttons to select the On Screen Menu and press the or OK button 4 Press the or OK button On Screen Menu is selected and the screen returns to Language Setup menu 6 Use the buttons to select On Screen Menu Language 5 Audio Subtitle Automatic Original Disc Menu On Screen Menu English Français Deutsch Español Italiano Nederlands Language Pro...

Страница 38: ...S Bitstream via digital out put only Select DTS when connecting to a DTS Decoder Dynamic Compression 1 On To select dynamic compression 2 Off To select the standard range 5 Press the RETURN or button to return to the previous menu Press the MENU button to exit the menu When DTS soundtrack is played sound does output from Analog Audio Output With the DVD in Stop mode press the MENU button on the re...

Страница 39: ...t the desired item Then press the or OK button 5 Press the RETURN or button to return to the previous menu Press the MENU button to exit the menu Note Display Video Options TV Aspect Depending on the type of television you have you may want to adjust the screen setting aspect ratio 4 3 Letter Box Select when you want to see the total 16 9 ratio screen DVD sup plies even though you have a TV with a...

Страница 40: ...ol function works in conjunction with DVDs that have been assigned a rating which helps you control the types of DVDs that your family watches There are up to 8 rating levels on a disc Select Setup using buttons then press the or OK button 2 Select Parental control using buttons then press the or OK button 3 Programme Enter the 4 digit password using the 0 to 9 but tons on the remote control The C...

Страница 41: ... the or OK button The Enter the password message will be displayed 1 Enter the 4 digit password using the 0 to 9 but tons on the remote control The Confirm the password message will be displayed 2 Enter your password again using the 0 to 9 but tons on the remote control 3 About the Change Password Press the RETURN or button to return to the previous menu Press the MENU button to exit the menu Note...

Страница 42: ...ns move the selection bar to VCR then press or OK to select 4 NICAM AV 1 Output RGB On Programme Programme Select Auto Repeat Move the selection bar to Auto Repeat It sets the VCR to play a tape repeatedly unless a tape control is activated Stop Fast Forward or Rewind 7 Programme Select Auto Play Move the selection bar to Auto Play then press button to select from the following options On The VCR ...

Страница 43: ...is adjusted automatically 5 Off Off On Programme Select VCR Move the selection bar to VCR then press or OK button 4 VCR Front Display Automatic On RGB NICAM AV1 Output Programme Intelligent Picture Control IPC The intelligent Picture Control Feature allows you to adjust the sharpness of the image automatically accord ing to your own preferences Open MENU With the VCR in play mode Press the MENU bu...

Страница 44: ...ut Programme Selection the Colour Mode Before recording or playing back a tape you can select the required system standard Otherwise the system automatically selects the reception standard when you select Automatic When playing back a tape the standard is automatical ly selected by the DVD Recorder VCR Open MENU With the VCR in play mode Press the MENU button 1 Select Setup Using the buttons move ...

Страница 45: ...button to select 2 Select System Using the buttons move the selection bar to System then press or OK button to select 3 Programme Set Front Display Move the selection bar to Front Display then press or OK button to select from the follow ing options Automatic Front Panel Display will dim auto matically during power off Bright Front Panel Display will be bright all the time Dim Front Panel Display ...

Страница 46: ... this position to record the standard mono sound during a NICAM broad cast if the stereo sound is dis torted due to inferior reception conditions NICAM mode On is displayed On Normally set at this position Select Setup Using the buttons move the selection bar to Setup then press or OK button to select 2 Open MENU With the VCR in play mode Press the MENU button 1 On completion press RETURN three ti...

Страница 47: ...r this DVD Recorder VCR is described on the rear panel of the DVD Recorder VCR Disc Types Disc Logo Recorded content Disc Shape Max Playing Time DVD VIDEO AUDIO VIDEO Single sided 5 Double sided 5 Single sided 3 5 Double sided 3 5 Singlesided 5 Singlesided 3 5 Singlesided 5 Singlesided 3 5 Single sided 5 4 7GB Double sided 5 9 4GB 5 4 7GB 5 4 7GB Single sided 5 Single sided 3 5 AUDIO JPEG Images M...

Страница 48: ...ypes of discs or when specific opera tions such as angle change and aspect ratio adjustment are being performed Information about the discs is written in detail on the box Please refer to this if necessary Do not allow the disc to become dirty or scratched Finger prints dirt dust scratches or deposits of cigarette smoke on the recording surface may make it impossible to use the disc for recording ...

Страница 49: ...t off unless the disc is removed or the recorder is unplugged or if you press the STOP button twice This function is only applicable to DVD Video DVD RAM DVD RW DVD R or Audio CDs CDDA Note Do not move your DVD Recorder VCR while playing as this may cause damage to the disc Make sure to press the OPEN CLOSE button to open or close the disc tray Do not push the disc tray while it is being opened or...

Страница 50: ...ck Using the Search Skip Functions During play press the SEARCH or button on the remote control The playback speed will change as follows You can scan the program in reverse order To return to normal speed playback press the II button DVD VIDEO DVD RAM DVD RW DVD R AUDIO CD CDDA Skipping Chapters or Tracks During play press the l or l button on the remote control If you press the l button If you p...

Страница 51: ...AM DVD RW Title Time Subtitle Audio Repeat Zoom DVD R 1 10 CHANGE What s a track A track is usually a song on a Audio CD CDDA or MP3 disc What s a chapter A title on a DVD disc is usually divided into chapters What s a title A title means usually a film contained on a DVD disc This may not work for some discs When an audio CD CDDA or a MP3 disc is inserted depending on the type the infor mation di...

Страница 52: ... Press OK button Repeat play allows you to repeat title chapter or A B To make the screen disappear press the QUICK or RETURN button 3 Using Repeat Play For Audio CD MP3 Press the QUICK button during playback Repeat is highlighted 1 Press OK button 2 Press the buttons to select the Track or Disc you want to playback repeatedly For MP3 discs you can select Track Folder or Disc 3 Press OK button Rep...

Страница 53: ... the QUICK function For DVD VIDEO DVD RAM DVD RW DVD R To return to normal playback Using the A B Repeat Function Press the QUICK button during playback 1 Use to select Repeat and use button to select A B 2 Press OK button 3 Select Off on the Repeat item or press the CLEAR button on the remote control Press the OK button at the point where you want the repeat play to start A and then press the OK ...

Страница 54: ...ages and subtitle languages may not work depending on disc type It is available during playback only Use to select Subtitle and use but tons to select the desired subtitle language If a disc contains subtitles you can select a desired subtitle language by pressing the buttons Subtitle display may be different depending on disc type DVD subtitles may overlap with your TVs subti tles If this occurs ...

Страница 55: ...Angle This function is disc dependent and may not work with all DVDs This function does not work when a DVD has not been recorded with a multi camera angle system Note Selecting the Audio language Press the QUICK button during playback 1 Use to select Audio and use buttons to select the desired audio language Audio languages may be different because they are disc specific Some discs allow you to s...

Страница 56: ...scene 2 Press the OK button to start playing from the selected scene 3 Press the OK button again when the desired scene appears The number 2 is displayed and the scene is memorized Repeat above to bookmark other positions You can bookmark up to 10 scenes 4 Press button to move to the next position 3 The screen will display Marker in place of Bookmark if you are playing a DVD RAM DVD RW VR Up to 99...

Страница 57: ... press the OK button again after the screen was enlarged to twice the normal size the screen size will be enlarged to four times the normal size 4 DVD VIDEO normal size Æ2X Æ4X Æ2X DVD RAM DVD RW Ænormal size DVD R Clearing a Bookmark Press the MARKER button 1 1 2 CLEAR Press buttons to select a marked scene you want to delete 2 Press CLEAR button to delete the selected bookmark 3 To return to the...

Страница 58: ...e top menu functionality 2 Some type of discs contains a dedicated menu system that allows you to select special functions for title chap ter audio track subtitle film preview information on characters etc Check Remaining Time SP 02 08 Thu 01 Jan 2004 Title List Title refers to a recorded video stream Title List shows list to help you select a title Since the title list consists of the information...

Страница 59: ...the track song to start playback from and then press the OK button You can also select the track song by pressing the number buttons on the remote 2 Insert an audio CD CDDA into the disc tray The audio CD menu appears and the tracks songs are played back 1 Each disc has a variety of menu functions available CD Quick Music Repeat mode Repeat off Repeat Track Repeat Disc Current track song Displays ...

Страница 60: ...enerated and played Ramdom Play continues until the play option is changed Select a desired play option using the but tons and press the OK button 3 Play Option Normal The same can be used with a Mp3 disc Note Press QUICK during Play to highlight Repeat Mode Press OK when Repeat Mode is highlight ed 1 Repeat Off Select Repeat Mode using the buttons and Press the OK button A screen allowing you to ...

Страница 61: ...screen will appear Select Playlist using the buttons and press the OK button The playlist screen will appear Play Option Playlist 4 Select tracks in the order in which you want them to play using the buttons Press the OK button 5 If you playlisted a wrong track select the wrong track using the buttons and press the CLEAR button The wrong track will be removed Press the II PLAY PAUSE button to play...

Страница 62: ...t Photo using buttons then press the OK button 3 OK 4 Photo CD Playback Insert a photo CD JPEG into the disc tray 1 The screen shown below will appear automati cally Press II PLAY PAUSE button to switch to slide show mode To see the next 6 pictures press the lbutton To see the previous 6 pictures press the l but ton 2 OK Photo When using a combination MP3 JPEG disc If you want to listen to MP3 fil...

Страница 63: ...cks the selected track song or displays the files in the selected folder 3 Playback the selected track song 2 l button Playbacks the next track 5 l button Returns to the beginning of the cur rent track when it is pressed during playback If it is pressed again your DVD Recorder VCR plays back the previous track 6 RETURN button Moves to the parent of the folder to which the current song belongs 4 Wh...

Страница 64: ...IP function allows you to view a sub screen together with the main screen in DVD mode You can watch both DVD and TV together Using PIP PIP does not work in VCR mode Note Switching between the PIP and main screens Press the PIP button again The main and PIP screen will be switched 1 Deactivating PIP Press the PIP button again PIP will be deactivated 1 ...

Страница 65: ...ssing the Record Safety Tab and Auto Play is turned on See pages 41 42 2 Stop Playback Press the STOP button on the remote control or on the front panel of the unit 3 To play a standard VHS Video tape videotape just insert it into the VCR deck and press the PLAY button You can turn on the Auto Play to enable the VCR deck to play automatically when you insert a videotape that is missing the Record ...

Страница 66: ...ode press F ADV SKIP to cue ahead exactly 30 seconds Press F ADV SKIP repeated ly up to 4 times to cue ahead 2 minutes 4 Slow motion In pause mode press button for slow motion Press the press button repeatedly to vary slow motion speed from 1 5 to 1 30 of nor mal playback Press the II PLAY PAUSE but ton twice to resume normal viewing 5 Cue Review In Play mode press Forward or Rewind to Cue review ...

Страница 67: ...0 00 00 1 Select Go To Zero and then press the OK button 3 While a cassette is stopped press the QUICK button 2 Select End Search and perss the OK button 2 While a cassette is stopped press the QUICK button 1 Note The VCR will rewind or fast forward search ing for the 0 00 00 counter position and then automatically stop at that position Note The VCR will fast forward searching for a blank position...

Страница 68: ...rding of DVD and other software and the manufacture of soft ware discs including blank discs Moreover because of variations in the quality of discs this recorder may not be able to record on all discs that bear a DVD RAM DVD R or DVD RW logo but you should not encounter difficulty if you use only high quality recordable DVD discs If you happen to encounter difficulties playing or record ing a DVD ...

Страница 69: ...and Copy Never If you want to record a copy once type program use DVD RW with CPRM in VR Mode and DVD RAM This mode automatically creates chapters at speci fied intervals during finalization Simple editing erasing titles changing title name DVD RW Video mode DVD R This mode involves multiple editing functions such as deletion of a whole title partial deletion of a title etc Various editing options...

Страница 70: ...g speed quality XP High approx 1 hour ÆSP Standard approx 2 hours ÆLP Low approx 4 hours ÆEP Extended Play approx 6 hours 4 Press the z REC button 5 Press the STOP button to stop or finish a recording in progress The message Updating the information of disc Please wait for a moment 6 Press the REC PAUSE button to pause a recording in progress Press the REC PAUSE button again during pause to resume...

Страница 71: ...us A message is displayed to allow you to enter the Videoplus code If all twelve programmes have been set the message Timer is full is displayed Refer to page 76 if you wish to cancel a preset record ing 1 Using the Videoplus Feature Before presetting your DVD Recorder VCR Switch on both the television and your DVD Recorder VCR Check that the date and time are correct Insert the cassette or Record...

Страница 72: ...on to activate the timer 5 Refer to page 76 if you wish to Check that your DVD Recorder VCR has been programmed correctly Cancel a preset recording 6 Press the OK button The information concerning the programme is displayed When using the Videoplus function for the first time with stored stations the programme number flashes On the first occasion you must enter the station number manually by press...

Страница 73: ... the Day selection mode on the same day and at the same time Press the or buttons until the W Week value is displayed followed by the required day Example W SA Weekly Saturday Extend the recording time Press the or buttons until the End selection mode Press the or buttons to increase or decrease the stop time Select the recording speed Press the or buttons until the recording speed selection mode ...

Страница 74: ...ogramme Playlist OK DVD RAM VR Scheduled Record List Press the buttons to select Standard Timer and then press the or OK button 2 Press the button to select scheduled Record List and then press the or OK button 3 OK Scheduled Record List To PR Start End Speed V P No 01 To PR Day Start End Speed VPS PDC 01 Off SP DVD THU 01 18 01 16 01 Set timer recording option The Timer Recording screen is displa...

Страница 75: ...deo quality is are impor tant Approx 1 hour SP standard quality Select to record in standard quali ty Approx 2 hours LP low quality Select when a long recording time is required Approx 4 hours EP extended mode Select when a longer recording time is required Approx 6 hours about 1 2 Mbps VCR AUTO Select when you want to set video quality auto matically It depends on remaining time of VCR tape SP St...

Страница 76: ... you want to modify See the timer programming section for more information on timer programming Input sources 74 page 5 Press the OK button to confirm the edited set ting 6 DVD RAM DVD RW DVD R Press the MENU button 1 Press the buttons to select Programme and then press the or OK button 2 Press the buttons to Standard Timer and then press the or OK button 3 Deleting a Timer Programming Follow thes...

Страница 77: ... press or OK to select 2 Select Videoplus Extended Using the buttons move the selection bar to Videoplus Extended then press OK to select 3 Press the corresponding buttons until the Videoplus Extended time then the press or OK to select 4 Press the MENU button after finishing the opera tion 5 Videoplus Extended Disc Manager Programme DVD RAM VR Standard Timer VIdeoPlus VIdeoPlus Extended Off Progr...

Страница 78: ...ted 2 Press Record z REC button 3 Allow recording to continue for 10 seconds 4 Press TIME SLIP button APIP Picture in Picture appears to show recording is taking place 5 Press Play Pause button PIP pauses 6 When desired press Play Pause button once more to commence playback and view the recorded programme in PIP from the original Pause position 7 To transfer this PIP playback with sound to main TV...

Страница 79: ...ptions while recording is in progress see Special Recording Features 3 Basic VCR Recording Insert Tape Insert a blank Video tape into the VCR deck Make sure the tape is long enough to record the entire program To change the Recording Speed see page 80 1 Select a Programme to Record Use the 0 9 buttons or the PROG TRK buttons to select the desired Programme or press the INPUT SEL button to select A...

Страница 80: ...ffer ent Programme watch a different media or add record ing time in 30 minute increments When you watch or record on the VCR during DVD Recording some function buttons may not operate The message This function is not available will be displayed Note When DVD Recorder VCR is connected to TV using S Video cable the playback screen on the video tape will not display during DVD recording You cannot r...

Страница 81: ... to make a Copylist To make and select a New Copylist See pages 91 92 If you want to copy directly choose Direct Copy 2 DVD RAM DVD RW DVD R DVD RAM VR Copy VCR DVD DVD VCR Disc Manager Programme Playlist Select the Copylist you want to copy using the buttons and then press button To copy play list select Copy 3 Edit Copylist 01 JAN 2004 1 01 JAN 2004 12 00 1 Scene 01 JAN 2004 12 00 00 00 44 Play ...

Страница 82: ...laylist VCR DVD 00 00 21 02 00 01 04 PLAY 00 01 04 Copy All DVD RAM VR VCR Start End Edit Press OK button to choose the list you want to copy 4 VCR DVD 00 00 21 02 00 01 10 PLAY 00 01 04 Copy All DVD RAM VR VCR Start End Edit To copy Copylist select Copy 5 VCR DVD 00 00 21 02 00 00 43 PLAY Copy All Play Copy Delete DVD RAM VR VCR Start End Edit The VCR will fast forward searching for a start posit...

Страница 83: ...me Viewing the Menu Functions for a Disc 83 Viewing Title List 85 Playing a Title List Entry 86 Renaming a Title List Entry 87 Deleting a Title List Entry 88 Locking a Title List Entry 89 Deleting a Section from a Title List Entry 90 Creating a Playlist Entry 91 Editing a Playlist Entry 93 Editing Scene for a Playlist Entry 94 Copying a Playlist Entry to the VCR 98 Deleting a Playlist Entry from t...

Страница 84: ...ramme Title List Disc Manager Copy Programme Setup DVD R V DVD R V Disc Manager Programme Press the MENU button again to hide the menu screen You can configure the settings on the Setup screen using the arrow and OK buttons If recording or editing could have been finished properly because of any kinds of error such as sudden power failure The recording or editing might have not been done Please be...

Страница 85: ...0 00 18 00 06 32 00 08 16 00 09 36 01 JAN 2004 01 JAN 2004 02 JAN 2004 03 JAN 2004 04 JAN 2004 05 JAN 2004 06 JAN 2004 07 JAN 2004 01 JAN 2004 18 00 PR2 12 00 DVD RW VR Disc Manager Programme Playlist Title List Title refers to a recorded video stream Title List shows a list to help you select a title Since the title list consists of the information on data that is actually recorded if one title i...

Страница 86: ...ess the or OK button or press the TITLE LIST button on the remote control The View Title List screen is displayed 2 Press the buttons to select an entry you want to playback from Title List and then press the or OK button The Edit Title List menu is displayed 3 Follow these directions to playback an entry from the Title List Insert the recorded disc Press the MENU button 1 Disc Manager DVD RW VR P...

Страница 87: ... 03 JAN 2004 04 JAN 2004 05 JAN 2004 06 JAN 2004 07 JAN 2004 04 01 JAN 2004 02 JAN 2004 03 JAN 2004 04 JAN 2004 05 JAN 2004 06 JAN 2004 00 00 28 05 00 00 32 06 00 00 40 07 00 01 00 01 JAN 2004 12 00 Press the button to select Rename and then press the OK button The Rename screen is displayed 4 Enter the desired characters using the arrow buttons Back Space Moves the cursor to the previous characte...

Страница 88: ...JAN 2004 04 JAN 2004 05 JAN 2004 06 JAN 2004 07 JAN 2004 12 00 Deleting a Title List Entry DVD RAM DVD RW DVD R Press the buttons to select Delete and then press the OK button DVD RAM DVD RW VR mode Since Playlist is present the message Do you want to delete Related Playlist may be deleted is displayed DVD RW Video mode DVD R Since Playlist is not present the message Do you want to delete is displ...

Страница 89: ...s the or OK button The Edit Title List menu is displayed 3 05 JAN 2004 12 00 PR5 05 JAN 2004 01 JAN 2004 02 JAN 2004 03 JAN 2004 04 JAN 2004 05 JAN 2004 06 JAN 2004 07 JAN 2004 12 00 Locking a Title List Entry DVD RAM DVD RW DVD R Press the buttons to select Protection and then press the OK button You will be prompted with the confirmation message Title Protection 4 Press the buttons to select On ...

Страница 90: ...Program is dis played Playback bar Playtime Section deletion start point window and time Section deletion end point window and time 4 00 09 20 00 00 25 02 JAN 2004 12 00 PR2 02 JAN 2004 01 JAN 2004 02 JAN 2004 03 JAN 2004 04 JAN 2004 05 JAN 2004 06 JAN 2004 07 JAN 2004 12 00 Press the buttons to select Start and then press the OK button The image and time at the start point are displayed on the st...

Страница 91: ...d Note VR mode The image and time at the end point are displayed the end point window 8 54 End 00 02 08 02 JAN 2004 12 00 PR2 02 JAN 2004 12 00 Press the buttons to select Delete and then press the OK button Message Do you want to delete will be displayed If you want to cancel press RETURN button to return to the Title List screen 9 54 End 00 02 08 Press the buttons to select yes and than press th...

Страница 92: ...End item 5 Scene No 001 01 JAN 2004 12 00 Press the OK button to select END point The image and time at the end point are displayed on the End window The yellow colored selection bar moves to the Make item 7 Press the OK button to confirm A new make scene screen is displayed Scenes to be made will be added to the current playlist Repeat the above steps to make more than one scene 8 If you want to ...

Страница 93: ... the playback is finished 1 Press the STOP button to stop the playback in progress The screen returns to the Edit Playlist screen 2 Follow these directions to playback the playlist entries DVD RAM DVD RW Follow these directions to playback or edit rename edit scene copy and delete the newly creat ed playlist entries Insert the recorded disc Press the MENU button when the disc is stopped 1 Press th...

Страница 94: ...a playlist entry Follow these directions to edit scenes for a playlist entry Insert the recorded disc Press the MENU button when the disc is stopped 1 Press the buttons to select Playlist and then press the or OK button 2 Editing Scene for a Playlist Entry 9 Scene 04 01 JAN 2004 02 JAN 2004 03 JAN 2004 04 JAN 2004 00 00 17 00 00 06 03 JAN 2004 12 00 03 JAN 2004 12 00 Press the buttons to select Ed...

Страница 95: ...ed 2 Press the button to select Edit Scene and then press the OK button The Edit Scene screen is displayed 5 Select the start point of the section with which you want to modify the selected scene using the play back related buttons Playback related buttons II l l 3 A Playing a Desired Scene Press buttons to select the scene you want to playback and then press the OK button The playlist entry to pl...

Страница 96: ...ayed on the scene to move 2 Press buttons to select the position where you want to move the selected scene and then press the OK button The selected scene is moved to the new position 3 You cannot move the selected scene to the position of the next scene because the selected scene should be inserted before that position Note D Adding a Scene Press buttons to select the scene before which you want ...

Страница 97: ... select cancel and then press the OK button 7 E Deleting a Scene from the Playlist Press buttons to select the scene you want to delete and then press the OK button 1 Press the buttons to select delete and then press the OK button 2 01 JAN 2004 12 00 01 JAN 2004 12 00 Select the end point of the section you want to add as a new scene using the playback related buttons 5 Press the buttons to select...

Страница 98: ... Copy Delete 4 Press the buttons to select Copy and then press the OK button The title you choose is played and copied to VCR tape 5 01 JAN 2004 12 00 01 JAN 2004 02 JAN 2004 Insert the recorded disc Press the MENU button when the disc is stopped 1 Press the buttons to select Playlist and then press the or OK button 2 Press the buttons to select an entry title you want to delete from the Playlist ...

Страница 99: ... buttons to select Yes and then press the OK button The screen returns to the Edit Playlist screen automatically after the delete operation finished 6 01 JAN 2004 12 00 Editing Disc Name Insert the disc Press the MENU button when the disc is stopped 1 Press the buttons to select Disc Name and then press the or OK button The Edit Name screen is displayed 3 Press the buttons to select Disc Manager a...

Страница 100: ...utton when the disc is stopped 1 Press the buttons to select Disc Manager and then press the or OK button 2 Disc Manager Programme Disc Finalise Playlist Press the buttons to select Disc Protection and then press the or OK button 3 Disc Protection allows you to protect your discs from disc format and program deletion due to unintended operations Disc Manager Programme Disc Finalise Playlist Press ...

Страница 101: ...list Disc Manager Program All data will be deleted Do you want to continue DVD RAM VR Formatting a DVD RAM DVD RW Disc Insert a disc to be formatted Press the MENU button with the disc stopped 1 Press the buttons to select Disc Manager and then press the or OK button 2 Press the buttons to select Disc Format and then press the or OK button You will be prompted with the confirmation message Do you ...

Страница 102: ...o Do you want to delete all title lists DVD RAM DVD RW DVD R Cartridge Protect Info DVD RAM Press the MENU button with the disc stopped 1 Disc Protect allows you to protect discs from disc format ting and program deletion due to unintended operations The cartridge write protect tab should be set to the unprotect position to be able to make a recording to a DVD RAM disc Press the buttons to select ...

Страница 103: ...ger Program Disc will be finalised Press the buttons to select Disc Finalise and then press the or OK button You will be prompted with the message Do you want to finalise disc If you select Yes you will be prompted again with the message Disc will be finalised Do you want to continue 3 Once a disc is finalised you cannot delete entries from the record list After being finalised the DVD R operates ...

Страница 104: ...you select Yes you will be prompted again with the message Disc will be unfinalised Do you want to continue 3 Press the buttons to select Yes and then press the OK button The disc is unfinalised A DVD RW can be finalised or unfinalised in Video mode Finalise Unfinalise Mark DVD VIDEO RW DVD RW V Operation Same as Additional DVD Video recording protection and deletion are possible A DVD RW can be f...

Страница 105: ...nce Troubleshooting DVD VIDEO DVD RAM DVD RW DVD R Troubleshooting Problems and Solutions VCR Specifications Troubleshooting DVD VIDEO DVD RAM DVD RW DVD R 106 Troubleshooting 107 Problems and Solutions VCR 108 Specifications 109 ...

Страница 106: ... free space Recording is available on DVD RAM DVD RW DVD R discs only If a program is copy protected you cannot record it Press the and button of your DVD Recorder VCR at the same time when the power is on All settings including password will revert to factory settings Do not use it if not absolutely required Note that this function is available only when there is no disc inserted Check whether th...

Страница 107: ...ot be played back If the scene changes from dark to bright suddenly the screen may jitter temporarily but it is not a defect Sound languages and subtitle languages are disc specific Only the sound and subtitle languages contained on a DVD disc are available and displayed on the disc menu Point the remote control at the remote control sensor on your DVD recorder VCR Operate within distance 15ft Rem...

Страница 108: ...nnot see normal broadcasts Check the TUNER EXTERNAL setting It should be on TUNER Check the TV antenna connections Noise bars or streaks on playback Press the PROG TRK buttons to minimize this effect When the II button is pressed A still picture may have noise bars depending on the during playback the still picture condition of the tape Press the PROG TRK buttons has severe noise bar streaks durin...

Страница 109: ...CH60 Output Audio DVD VCR RCA jack Euro Scart socket Audio DVD Only DIgital audio out OPTICAL COAXIAL Video DVD VCR RCA jack Euro Scart socket Composite RGB S Video Out Tape format VHS type video tape Colour system PAL Tuning system I VCR Video S N Above 43dB standard recording Resolution Above 240 lines standard recording Audio S N Above 68dB Hi Fi 39dB Mono Audio frequency characteristics 20Hz 2...

Страница 110: ...Printed in Korea BY731672 Rev 04 ...

Отзывы: