background image

E-13 


Cut mode (Option): 

When a Cutter is fitted, the media can be automatically cut. 
When loading the media as described on the previous pages, insert 
the leading edge of the media through the Media Outlet of the Cutter 
Cover while pulling the media through the printer. 


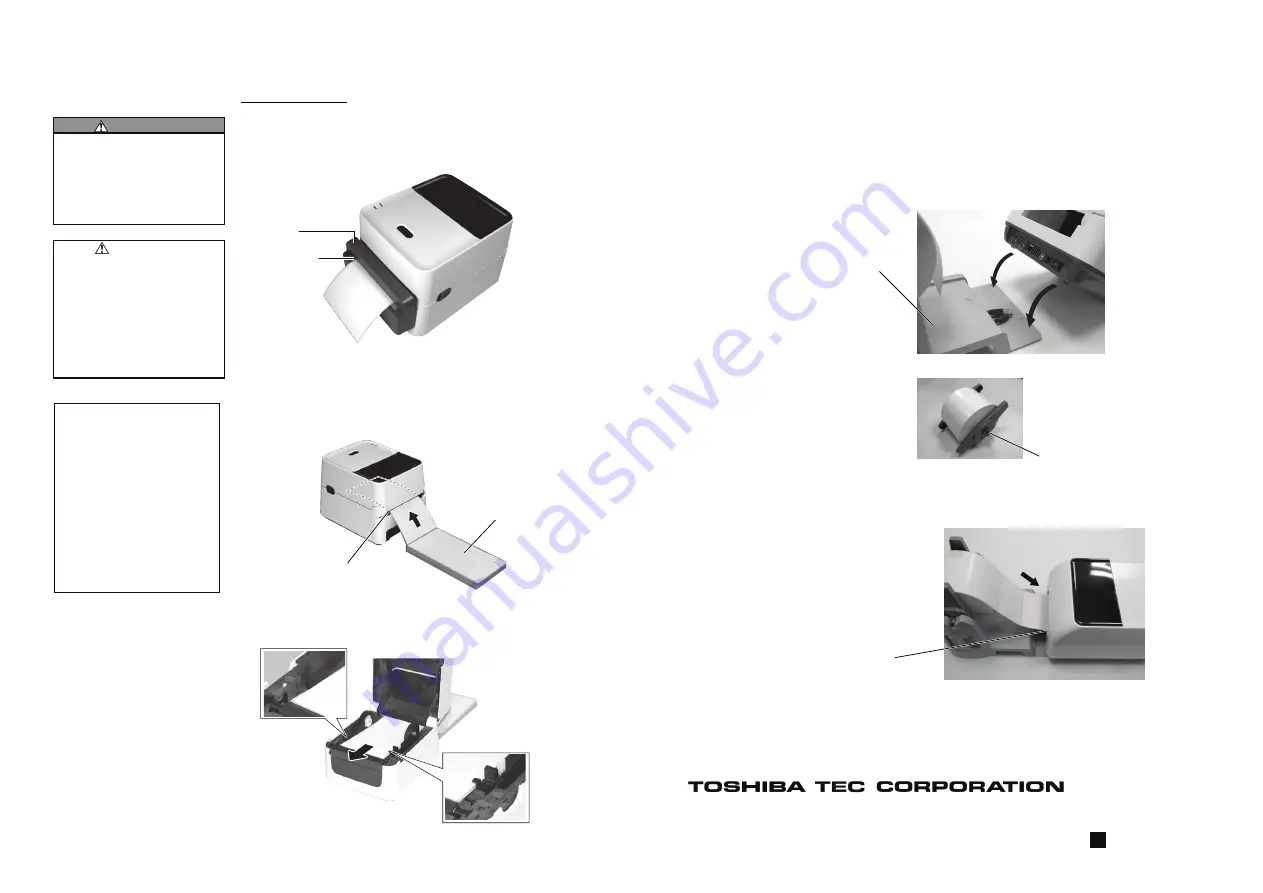
How to Load Fanfold Paper Stock 

1.


Place the fanfold paper stock at the rear of the printer, insert the 
leading edge of the paper into the Fanfold Paper Slot.


2.


Refer to the previous pages to feed the fanfold paper through the 
printer until it extends past the media outlet.


CAUTION! 

1.  Be sure to cut only the backing 

paper of the label. Cutting 

labels will cause glue to stick to 

the cutter blades which may 

affect the cutter quality and 

shorten the cutter life. 

2.  Use of tag paper which 

thickness exceeds the 

maximum specified value may 

affect the cutter life. 

HAZARDOUS MOVING PARTS
KEEP FINGERS AND OTHER 
BODY PARTS AWAY 
The cutter is sharp, so care must 
be taken not to injure yourself 
when handling the cutter. 

WARNING! 

NOTE

When placing fanfold paper 
stock at the rear of the printer, 
care should be taken of the 
following points. 
1.  Face the print surface up.  
2.  The fanfold paper stock is 

parallel to the fanfold paper 
slot. 

3.  The interface and power 

cables do not interfere with 
the feeding of the fanfold 
paper.


Media Outlet 

Cutter Cover 

Fanfold Paper Stock 

Fanfold Paper Slot 


E-14 


When the media roll has an outside diameter exceeding 127 mm (5”) 
or the inner core diameter is 76.2 mm (3”), the optional External 
Media Stand is needed. 
 

Remark:


Pictures below is the thermal transfer printing model of the B-FV4 series. 


1.


Fit the feet on the bottom of the printer as shown below.


2.


Insert the Media Shaft into the core of the media roll. 


3.


Place it into the slots on the External Media Stand.


4.


Pull the media forward and insert the leading edge into the Fanfold 
Paper Slot.  


5.


Refer to the previous pages to complete the media loading.  


External Media 
Stand (Option) 

Media Shaft (Option) 

Fanfold Paper Slot 

E

PRINTED IN TAIWAN 

EO1-33100 

R141020P4900-TTEC 

Ver00 F  2014-11 

© 2014 TOSHIBA TEC CORPORATION All Rights Reserved

1-11-1, Osaki, Shinagawa-ku, Tokyo 141-8562, JAPAN 

Содержание B-FV4D SERIES

Страница 1: ...ting dust and dirt could cause a fire due to the heat released by electric leakage NOTES 1 This manual may not be copied in whole or in part without prior written permission of TOSHIBA TEC CORPORATION 2 The contents of this manual may be changed without notification 3 Please refer to your local Authorized Service representative with regard to any queries you may have in this manual 4 Centronics is...

Страница 2: ...net Interface Serial Interface RS 232C Some models have no serial interface RS 232C Parallel Interface Centronics CAUTION The areas indicated by the ellipse have sharp edges To avoid injury be careful not to touch them when handling the printer E 4 2 1 3 Interior D B FV4D GS12 QM R x xx xxxxxxxxx Paper Slot CAUTION To avoid injury be careful not to trap your fingers in the Paper Slot while opening...

Страница 3: ...itch to turn the printer on off Plugging or unplugging the power cord to turn the printer on off may cause fire an electric shock or damage to the printer Power Switch NOTE If LED 1 is illuminated in colors other than green or unlit refer to Section 4 TROUBLESHOOTING of the Owner s Manual E 6 3 2 Turning OFF the Printer 1 Before turning off the printer power switch verify the following LED 1 is il...

Страница 4: ...ide or wound outside See the diagram below Both types of media roll should be loaded so that the print side faces up WARNING 1 Do not touch any moving parts To reduce the risk of fingers jewellery clothing etc being drawn into the mechanism be sure to load the media only once the printer has completely stopped moving 2 To avoid injury be careful not to trap your fingers while opening or closing th...

Страница 5: ...lack Mark Sensor align it with the centre of the black mark on the media Failure to do this will disable the detection of printed black marks resulting in an error NOTE Be careful not to squeeze the media with the Media Guides Doing so bends the media which can cause a paper jam or feed failure NOTES 1 The sensor type used in the last print job is selected by default To change the sensor type refe...

Страница 6: ...the Strip Block 2 When the media is correctly set the backing paper should be pinched between the Platen and the Strip Feed Roller as shown below Strip Feed Roller Strip mode Option When printing in strip mode labels are automatically removed from the backing paper as each label is printed How to set the media When issuing labels in the strip mode set the label in the following procedure 1 Load th...

Страница 7: ...handling the cutter WARNING NOTE When placing fanfold paper stock at the rear of the printer care should be taken of the following points 1 Face the print surface up 2 The fanfold paper stock is parallel to the fanfold paper slot 3 The interface and power cables do not interfere with the feeding of the fanfold paper Media Outlet Cutter Cover Fanfold Paper Stock Fanfold Paper Slot E 14 When the med...

Отзывы: