background image

2. PRINTER SETUP 

ENGLISH VERSION EO1-33099 

2.1 Precautions 


E2-

1


2.  PRINTER SETUP 


2.1  Precautions 


This section outlines the steps necessary to setup your printer prior to its 
operation.  The  section  includes  precautions,  connecting  cables, 
assembling accessories, loading media, and performing a test print. 
 
 
To insure the best operating environment, and to assure the safety of the 
operator and the equipment, please observe the following precautions. 


Operate  the  printer  on  a  stable,  level,  operating  surface  in  a  location 
free  from  excessive  humidity,  high  temperature,  dust,  vibration  or 
direct sunlight. 


Keep your work environment static free.  Static discharges can cause 
damage to delicate internal components. 


Make sure that the printer is connected to a clean source of AC Power 
and  that  no  other  high  voltage  devices  that  may  cause  line  noise 
interference are connected to the same mains.  


Ensure  that  the  printer  is  connected  only  to  AC  mains  that  has  a 
proper ground (earth) connection. 


Do  not  operate  the  printer  with  the  cover  open.    Be  careful  not  to 
allow  fingers  or  articles  of  clothing  to  get  caught  into  any  of  the 
moving parts of the printer. 


Make sure to turn off the printer power and to remove the power cord 
from  the  printer  whenever  working  on  the  inside  of  the  printer  or 
when cleaning the printer. 


For  best  results,  and  longer  printer  life,  use  only  TOSHIBA  TEC 
CORPORATION recommended media. (Refer to the Supply Manual.) 


Store the media in accordance with the specifications. 


This  printer  mechanism  contains  high  voltage  components;  therefore 
you should never remove any of the covers of the machine as you may 
receive  an  electrical  shock.    Additionally,  the  printer  contains  many 
delicate components that may be damaged if accessed by unauthorised 
personnel. 


Clean the outside of the printer with a clean dry cloth or a clean cloth 
slightly dampened with a mild detergent solution. 


Use  caution  when  cleaning  the  thermal  print  head  as  it  may  become 
very  hot  while  printing.    Wait  until  it  has  had  time  to  cool  before 
cleaning. 
Use  only  the  TOSHIBA  TEC  CORPORATION  recommended  print 
head cleaner to clean the print head. 


Do not turn off the printer power or remove the power plug while the 
printer is printing or while the Indicator Lamp is flashing. 


The  socket-outlet  needs  to  be  installed  near  the  equipment  and  must 
be easily accessible. 


Pull out the plug from the outlet more than once a year to clean around 
the  prongs.  Accumulating  dust  and  dirt  could  cause  a  fire  due  to  the 
heat released by electric leakage. 

CAUTION! 

Avoid using the printer in the 
locations where it is 
subjected to intense light 
(e.g. direct sunlight, desk 
light).  Such light may affect 
the sensors of the printer, 
causing malfunctions.  

Содержание B-FV4D-GL

Страница 1: ...TOSHIBA Barcode Printer B FV4D GL SERIES Owner s Manual ...

Страница 2: ...rsuant to Part 15 of the FCC Rules These limits are designed to provide reasonable protection against harmful interference when the equipment is operated in a commercial environment This equipment generates uses and can radiate radio frequency energy and if not installed and used in accordance with the instruction manual may cause harmful interference to radio communications Operations of this equ...

Страница 3: ... the AC voltage specified on the rating plate as this may cause fire or electric shock Do not plug in or unplug the power cord with wet hands as this may cause electric shock If the machine share the same electrical outlet with any other appliance that consumes a large amount of power the voltage will fluctuate widely each time these appliances operate Be sure to provide an exclusive outlet for th...

Страница 4: ... STORE the paper or ribbons where they might be exposed to direct sunlight high temperatures high humidity dust or gas Ensure the printer is operated on a level surface Any data stored in the memory of the printer could be lost during a printer fault Try to avoid using this equipment on the same power supply as high voltage equipment or equipment likely to cause mains interference Unplug the machi...

Страница 5: ...4 Connecting Cables to the Printer E2 4 2 5 Connecting the Power Cord E2 5 2 6 Opening Closing the Top Cover E2 6 2 7 Loading the Media E2 7 2 8 Self Print Test and Dump Mode Utilities E2 10 2 8 1 Self Print Test and Dump Mode E2 10 3 MAINTENANCE E3 1 3 1 Cleaning E3 1 3 1 1 Print Head E3 1 3 1 2 Sensor E3 2 3 1 3 Platen Roller E3 2 3 1 4 Media Housing E3 3 3 1 5 Cutter E3 3 3 2 Care Handling of t...

Страница 6: ... prior written permission of TOSHIBA TEC CORPORATION The contents of this manual may be changed without notification Please refer to your local Authorized Service representative with regard to any queries you may have in this manual Windows is a registered trademark of Microsoft Corporation ...

Страница 7: ...ual This printer has the following features Interfaces The printer comes fitted with the following interfaces USB interface Ethernet interface Serial RS232 interface Easy to use The printer mechanism is designed to allow easy operation and easy access for maintenance 1 Unpack the printer 2 Check for damage or scratches on the printer However please note that TOSHIBA TEC CORPORATION shall have no l...

Страница 8: ...EMKO Europe HAR France UTE Spain AEE China CCC Power Cord Instruction 1 For use with 100 125 Vac mains power supply please select a power cord rated Min 125V 10A 2 For use with 200 240 Vac mains power supply please select a power cord rated Min 250V 3 Please select a power cord with the length of 2m or less 4 The power cord plug connected to the AC power inlet must be able to be inserted into an I...

Страница 9: ...1 Dimensions 1 5 2 Front View The parts and units shown and named in this section are used for descriptions in the following chapters W 184 0 7 2 x D 271 2 10 7 x H 198 8 7 8 Dimensions in mm inches Media Outlet Media Outlet LED 1 LED 2 Media View Window Strip Block Option FEED Button ...

Страница 10: ...e print head or touch around it directly after printing By doing so you may get burnt Do not touch the print head or around it just after printing You may get burned as the print head becomes very hot during printing CAUTION To avoid injury be careful not to trap your fingers in the Paper Slot while opening or closing the Top Cover Paper Slot Media Roll Holders Media Roll Holder Lever Cutter Unit ...

Страница 11: ...nlit Unlit The power is off The Top Cover is open if the printer power is on Green Unlit Stand by Green S Unlit Printing is temporarily stopped paused Green F Unlit Communicating with a host Green Green Writing data to the flash or USB memory Green Green M The Flash ROM on the CPU board or USB memory is being initialized Orange Green A paper jam occurred Orange Red The media has ended Orange Red F...

Страница 12: ...he inside of the printer or when cleaning the printer For best results and longer printer life use only TOSHIBA TEC CORPORATION recommended media Refer to the Supply Manual Store the media in accordance with the specifications This printer mechanism contains high voltage components therefore you should never remove any of the covers of the machine as you may receive an electrical shock Additionall...

Страница 13: ... a host computer it is good practice to turn the printer ON before turning on the host computer and to turn OFF the host computer before turning off the printer 1 To turn ON the printer power press the power switch as shown in the diagram below Note that is the power ON side of the switch 2 As the printer powers on LED 1 and 2 will lite first in orange then off and finally LED 1 should stay illumi...

Страница 14: ... To turn OFF the printer power press the power switch as shown in the diagram below Note that is the power OFF side of the switch CAUTION 1 Do not turn off the printer power while the printer is printing as this may cause a paper jam or damage to the printer 2 Do not turn off the printer power while LED 1 is flashing as this may lead to loss or corruption of the data being downloaded Power Switch ...

Страница 15: ...ce port and one of your host computer s USB ports NOTE When disconnecting the USB cable from the host computer follow the Safely remove hardware procedure on the host computer Use a USB cable conforming to V2 0 or greater and with a Type B plug on one end A serial cable connection between the printer s RS 232C serial port and one of your host computer s COM ports The diagrams below show all the po...

Страница 16: ... 1 Make sure that the printer power switch is in the OFF O position 2 Insert the Power Cord into the AC power inlet NOTE If a power cord is not provided with this printer please purchase the correct one referring to page 1 2 Power Cord AC Power Inlet DC Cable Connector DC Cable Connector DC Cable Connector ...

Страница 17: ...ARNING WARNING WARNING WARNING To avoid injury be careful not to trap your fingers while opening or closing the cover CAUTION 1 Be careful not to touch the Print Head Element when opening the Top Cover Failure to do this may cause missing dots by static electricity or other print quality problems 2 Do not cover the Cover Open Sensor with your finger hand etc Doing so may cause the sensor to wrongl...

Страница 18: ...d it so that the print side faces up Outside wound 1 Open the Top Cover while pulling the Lock Release Portions as indicated by the arrows WARNING WARNING WARNING WARNING 1 Do not touch any moving parts To reduce the risk of fingers jewellery clothing etc being drawn into the mechanism be sure to load the media only once the printer has completely stopped moving 2 To avoid injury be careful not to...

Страница 19: ...ia Roll Holder Lever to clamp the media roll securely 3 Pass the media through the Media Guides Pull the media until it reaches the front of the printer Media Roll Holder Lever NOTES 1 Media path 2 Make sure that the print side faces up 3 Cut the leading edge of the media straight with scissors Platen NOTE Be careful not to squeeze the media with the Media Guides Doing so bends the media which can...

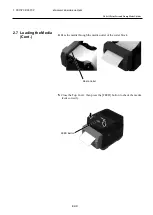
Страница 20: ... 8 Self Print Test and Dump Mode Utilities E2 9 2 7 Loading the Media Cont 4 Pass the media through the media outlet of the cutter block 5 Close the Top Cover then press the FEED button to check the media feeds correctly FEED Button Media Outlet ...

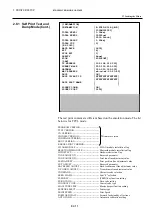
Страница 21: ...o Online operation turn the printer off then on again Print test label sample NOTE The following commands will have no effect the test print D AX XS Z2 1 Z2 2 only the AY command will B FV4D G PRINTER INFO PROGRAM VERSION 28OCT2015B FV4 V1 6C TPCL VERSION 15SEP2015 V1 4 CG VERSION 27FEB2014 V1 0 CHINESE VERSION 27FEB2014 V1 0 CODEPAGE VERSION 27FEB2014 V1 0 BOOT VERSION V1 4 KERNEL FONT VERSION 1 ...

Страница 22: ... feed amount fine adjustment value X COORD ADJUST X coordinate fine adjustment value CODEPAGE Character code selection ZERO SLASH Font 0 selection FEED KEY FEED key function setting EURO CODE Euro code setting CONTROL CODE Control code type MAXI CODE SPEC Maxicode specification setting SENSOR SELECT Sensor type PRINT SPEED Print Speed FORWARD WAIT Forward feed standby after issue AUTO CALIB Automa...

Страница 23: ...r Reserved item2 FLASH ROM Flash ROM Capacity SDRAM SDRAM Capacity USB SERIAL NUM USB serial number INFORMATION Printer model name and serial number TOTAL FEED1 Total feed distance condition1 TOTAL FEED2 Total feed distance condition2 TOTAL PRINT Total Print distance TOTAL CUT Reserved parameter RS 232C RS 232C setting value BAUD RATE BIT STOP BIT PARITY FLOW LAN Network setting values IP ADDRESS ...

Страница 24: ...nt Head Element 1 time per day with a Cleaner Pen cotton swab or soft cloth slightly moistened with ethyl alcohol WARNING 1 Be sure to turn OFF the power before performing any maintenance Failure to do this may cause an electric shock 2 To avoid injury be careful not to trap your fingers while opening or closing the cover 3 Be careful when handling the print head as it becomes very hot during prin...

Страница 25: ...e the Transmissive Sensor with a soft cloth or a cotton swab lightly moistened with absolute pure ethyl alcohol 2 To remove dust or paper particles wipe the Transmissive Sensor with a dry soft cloth Wipe the Platen Roller 1 time per day with a soft cloth moistened with absolute pure ethyl alcohol ...

Страница 26: ...lightly moistened with mild detergent solution 1 Turn the power off 2 Wipe Cutter Outlet and Cutter Tray with a dry soft cloth 3 Open the Top Cover 4 Detach the Cutter Tray from the Cutter Block then remove the Cutter Block from the printer by lifting it NOTE Clean the cutter every one label roll or at the end of day Cutter Outlet Cutter Tray Cutter Tray Cutter Block ...

Страница 27: ...ws and open the Paper Guide for cleaning 6 Open the Paper Guide for cleaning 7 Use the Scraper to remove adhesive residues from the cutter blade 8 Use the Cleaner Pen to clean the blade surface WARNING As the cutter blade is sharp care should be taken not to injure yourself while cleaning Paper Guide Scraper Cleaner Pen ...

Страница 28: ...wo upper hooks on both sides of the Cutter Block are inserted into the slits with reference to the Arrow Marks After fitting the Cutter Block attach the Cutter Tray to the Cutter Block Cutter Tray CAUTION When closing the Paper Guide be careful not to drop metal or other foreign objects such as a paper clip into the guide as this may cause a malfunction of the printer CAUTION Make sure the Cutter ...

Страница 29: ... high humidity dust or gas The thermal paper used for direct thermal printing must not have specifications which exceed Na 800 ppm K 250 ppm and Cl 500 ppm Some ink used on pre printed media may contain ingredients which shorten the print head s product life Do not use labels pre printed with ink which contain hard substances such as carbonic calcium CaCO3 and kaolin Al2O3 2SiO2 2H2O For further i...

Страница 30: ...ded is not direct thermal media though direct thermal mode is selected Load a thermal paper roll Section 2 7 The media is not correctly loaded Reload the media correctly Section 2 7 Print data is not sent from the host computer Send the print data Poor print TOSHIBA TEC CORPORATION approved media is not used Replace the media with an approved one The print head is dirty Clean the print head Sectio...

Страница 31: ...ntact the nearest TOSHIBA TEC CORPORATION representative Red Green F A paper jam occurred in the cutter unit Remove the jammed media then reload the media correctly and press the FEED Button Section 4 3 Orange Red The media has ended Load a new media roll then press the FEED Button Section 2 7 Orange Green A paper jam occurred Remove the jammed media then reload the media correctly and press the F...

Страница 32: ...ower off 2 Open the Top Cover and open the print head block 3 Remove the media roll 4 Remove the jammed media from the printer DO NOT USE any sharp implements or tools as these could damage the printer 5 Clean the Print Head and Platen then remove any further dust or foreign substances 6 Load the media again and close the Top Cover CAUTION Do not use any tool that may damage the print head ...

Страница 33: ... F 30 to 75 RH no condensation 10 to 90 RH no condensation 203 dpi 8 dots mm Direct thermal Cut 50 8 mm sec 2 sec 76 2 mm sec 3 sec 101 6 mm sec 4 sec 127 mm sec 5 sec 152 4 mm sec 6 sec 102 mm 4 0 1mm 1 5mm 99 mm 3 9 Average 15 184 0 mm x 271 2 mm x 198 8 mm 7 2 x 10 7 x 7 8 2 8 kg 6 2 lb Excluding media EAN8 13 EAN8 13 add on 2 5 UPC A UPC E UPC A add on 2 5 UPC E add on 2 5 CODE39 CODE93 CODE12...

Страница 34: ...ative A1 2 1 Media Type The table below shows the size and shape of the media that can be used on this printer Unit mm inch Issue mode Item Cut mode Label width 102mm 4 0 Cut length 25 4mm to 152 4mm 1 0 to 6 Thickness 0 06mm to 0 19mm 0 0024 to 0 0075 Max outer roll diameter Ø127mm 5 Roll direction Outside wound Inner core diameter 40mm 1 57 NOTES 1 To ensure print quality and print head life use...

Страница 35: ... media should be positioned at the centre of the print head 3 Print quality is not guaranteed within 3 mm from the print head stop position including 1 mm slow up 4 Average print black rate should be 15 or less For barcode print area the print rate should be 30 or less 5 Line weight should be 3 to 12 dots 102 0 mm Max label width 99 0 mm Effective Print Range Out of print range 1 5mm Print head el...

Страница 36: ...hould not be bundled tightly with power cords Should not be tied to power line conduits RS 232C Cable description The serial data cable used to connect the printer to a host computer should be one of the following two types 9 pin or 25 pin connector NOTE Use an RS 232C cable with a connector with inch type securing screws Connector to the Host Computer Function 9 pin 25 pin RXD 2 3 TXD 3 2 DTR 4 2...

Страница 37: ...nsity or resolution Font A complete set of alphanumeric characters in one style of type E g Helvetica Courier Times IPS Inch per second A unit used to express print speed Label A type of media with adhesive backing supplied on a backing paper Media Material on which images are printed by the printer Label tag paper fanfold paper perforated paper etc Printer driver A software program that will conv...

Страница 38: ...E EO1 33099B R151120R7802 TTEC Ver02F 2016 08 2015 2016 TOSHIBA TEC CORPORATION All Rights Reserved 1 11 1 Osaki Shinagawa ku Tokyo 141 8562 JAPAN ...

Отзывы: