


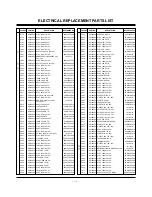
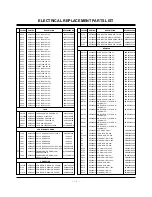
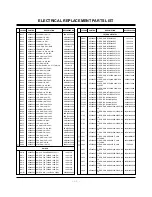


- 12 -
ADJUSTMENT INSTRUCTIONS
1. Application Object
This instruction is for the application to the DLP
Projection(Chassis: MB-042G).
2. Notes
(1) The power source insulation of this DLP Projection is not
charging type and you may not use the transformer for
insulation. But you’d better adjust the set after operating it
with insulation transformer between power supply cable
and input part of the set for protecting the adjusting
equipments.
(2) The adjustment must be performed under the correct
sequence.
(3) The adjustment must be performed in the circumstance of
25±5°C of temperature and 65±10% of relative humidity if
there is no specific designation.
(4) The input voltage of the receiver must keep AC 120V,
60Hz in adjusting.
(5) The set must be operated for 5 minutes preliminarily
before adjustment if there is no specific designation.
The preliminary operation must be performed after
receiving 100% white pattern,but reception of the moving
picture may also be possible in unavoidable case.
3. Composition of Adjustment Mode
(1) All adjustment mode are entered by pressing the ADJ key
on the remo
r
e control,after adjustment pess the ADJ key to
come out.
(2) Below picture is screen composition when press the first
ADJ key.
(3) As shown <Fig. 1>, using the (CH+ (
D
), CH- (
E
)) key,
select to item press the ENTER or (
G
) key to
enter the appropriate item and operate the adjustment.
(4) Change the value of adjustment with using the volume
+(
G
), volume -(
F
) key after select adjustment item one
more using the (CH+ (
D
), CH- (
E
)) key in ADJ Mode.
(5) Press the ADJ key to come out after adjustment.
(6) Preparation for Adjustment
1) Connect the power to TV Set and set the status of
“Power on”.
2) Heat-Run must operate over 5 min
it
ues before
adjustment.
4. Driver Board Bin Setting
See Bias Voltage Bin on the DMD as shown <Fig. 2> and
adjust the switch on the lower Driver Board as shown <Fig.
3>.
<Fig. 2> DMD Marking Locations
<Fig. 1> Adjustment Mode OSD
<Fig. 3> Driver Board Bin Setting


